

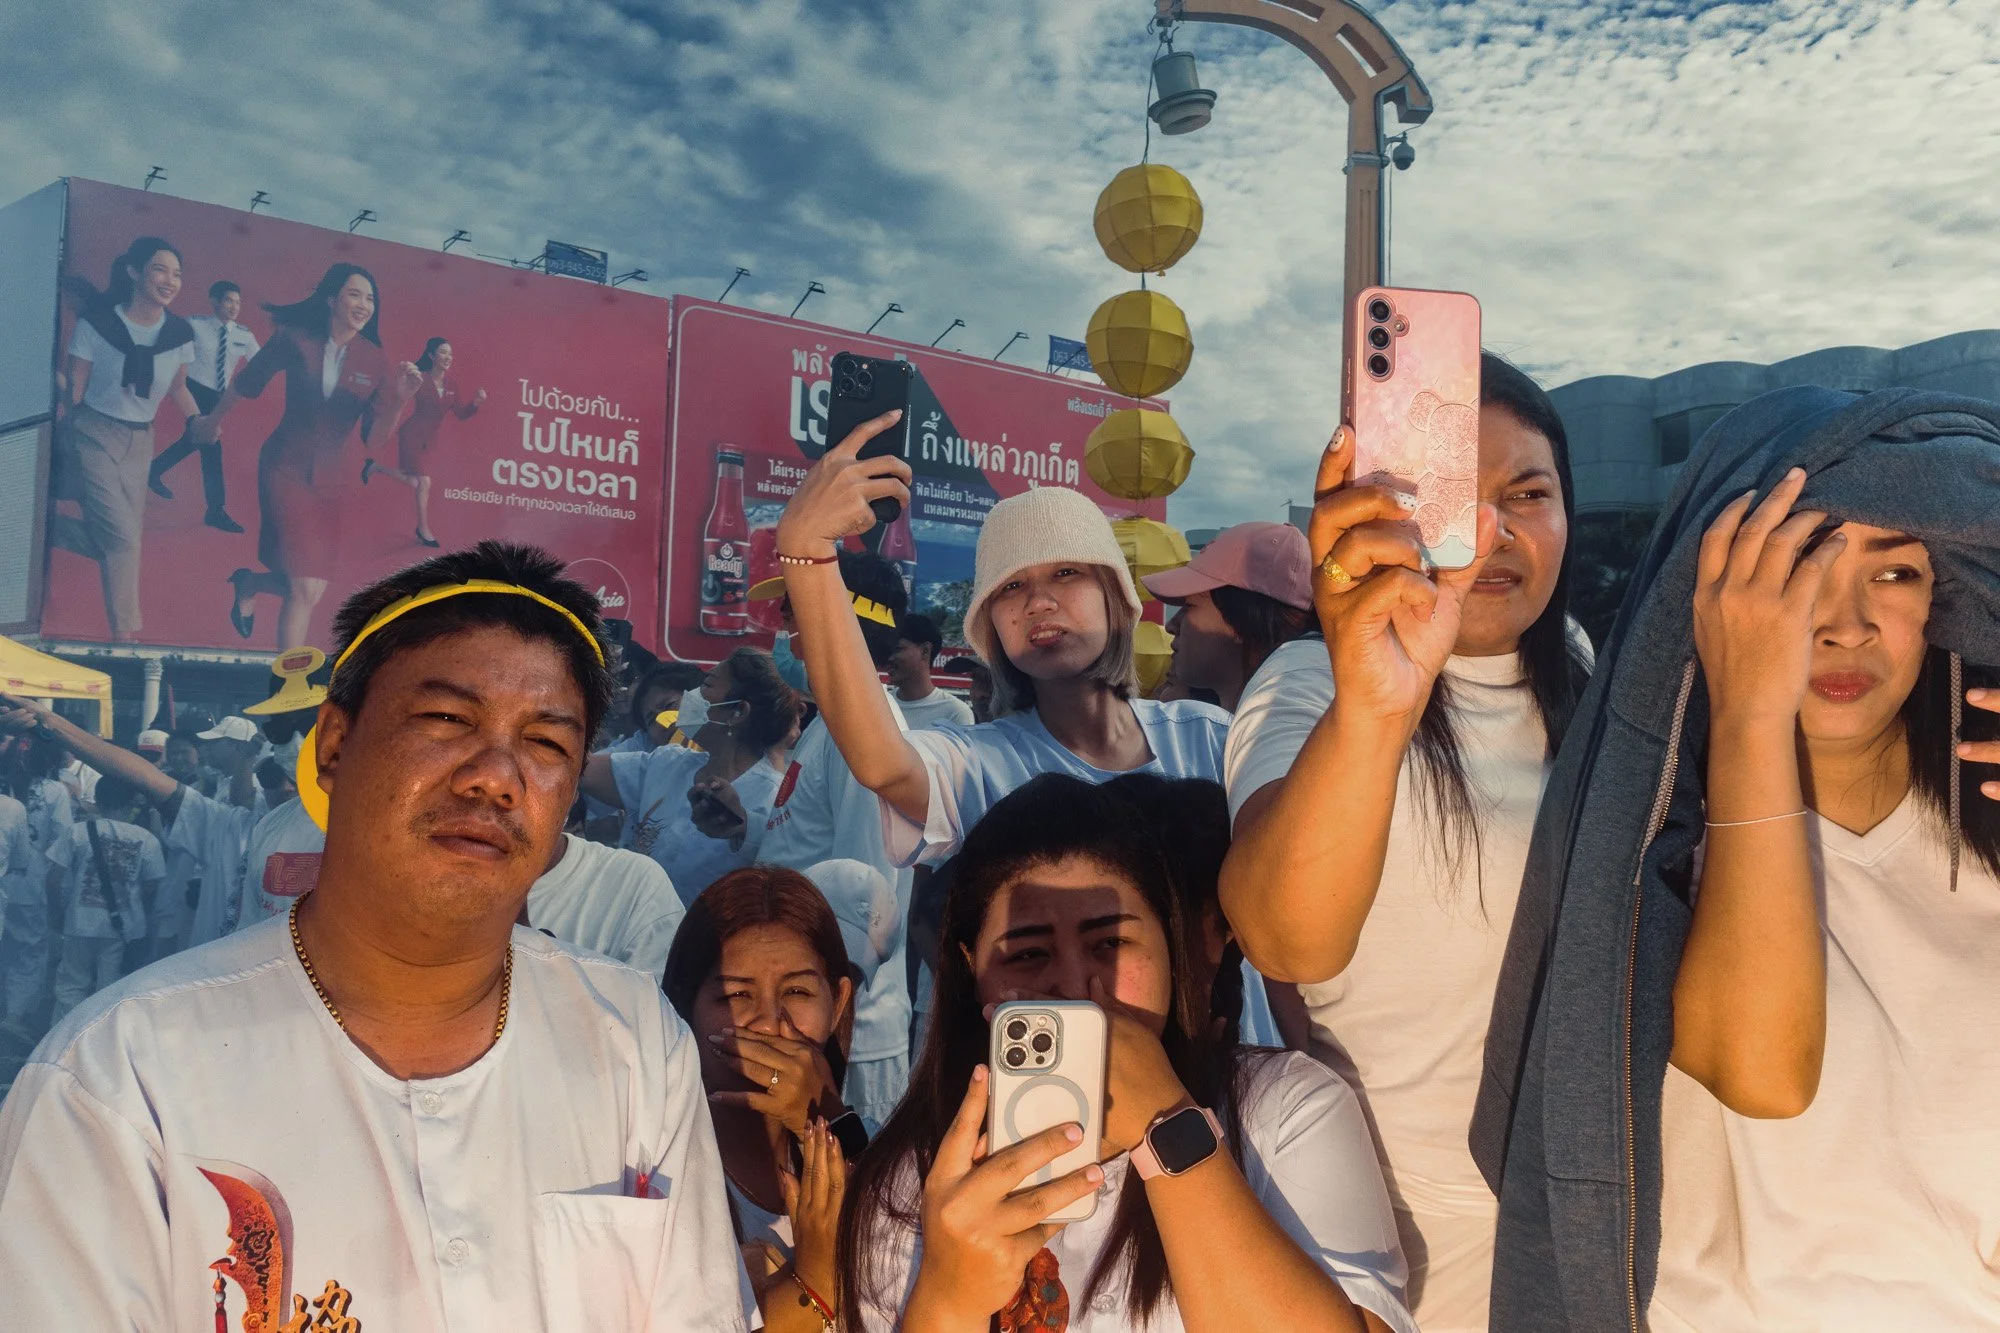
Street Photography in Phuket Part Four The Final Days and a Night of Absolute Madness
A multi day street photography journey through Phuket’s Nine Emperor Gods Festival also know as Vegetarian Festival. Shot with flash using the Ricoh GR IV and Leica Q3, capturing rituals, parades, and raw cultural moments.
The final two days of an intense and unforgettable nine day street photography journey. So let us not waste any time and get straight into it.
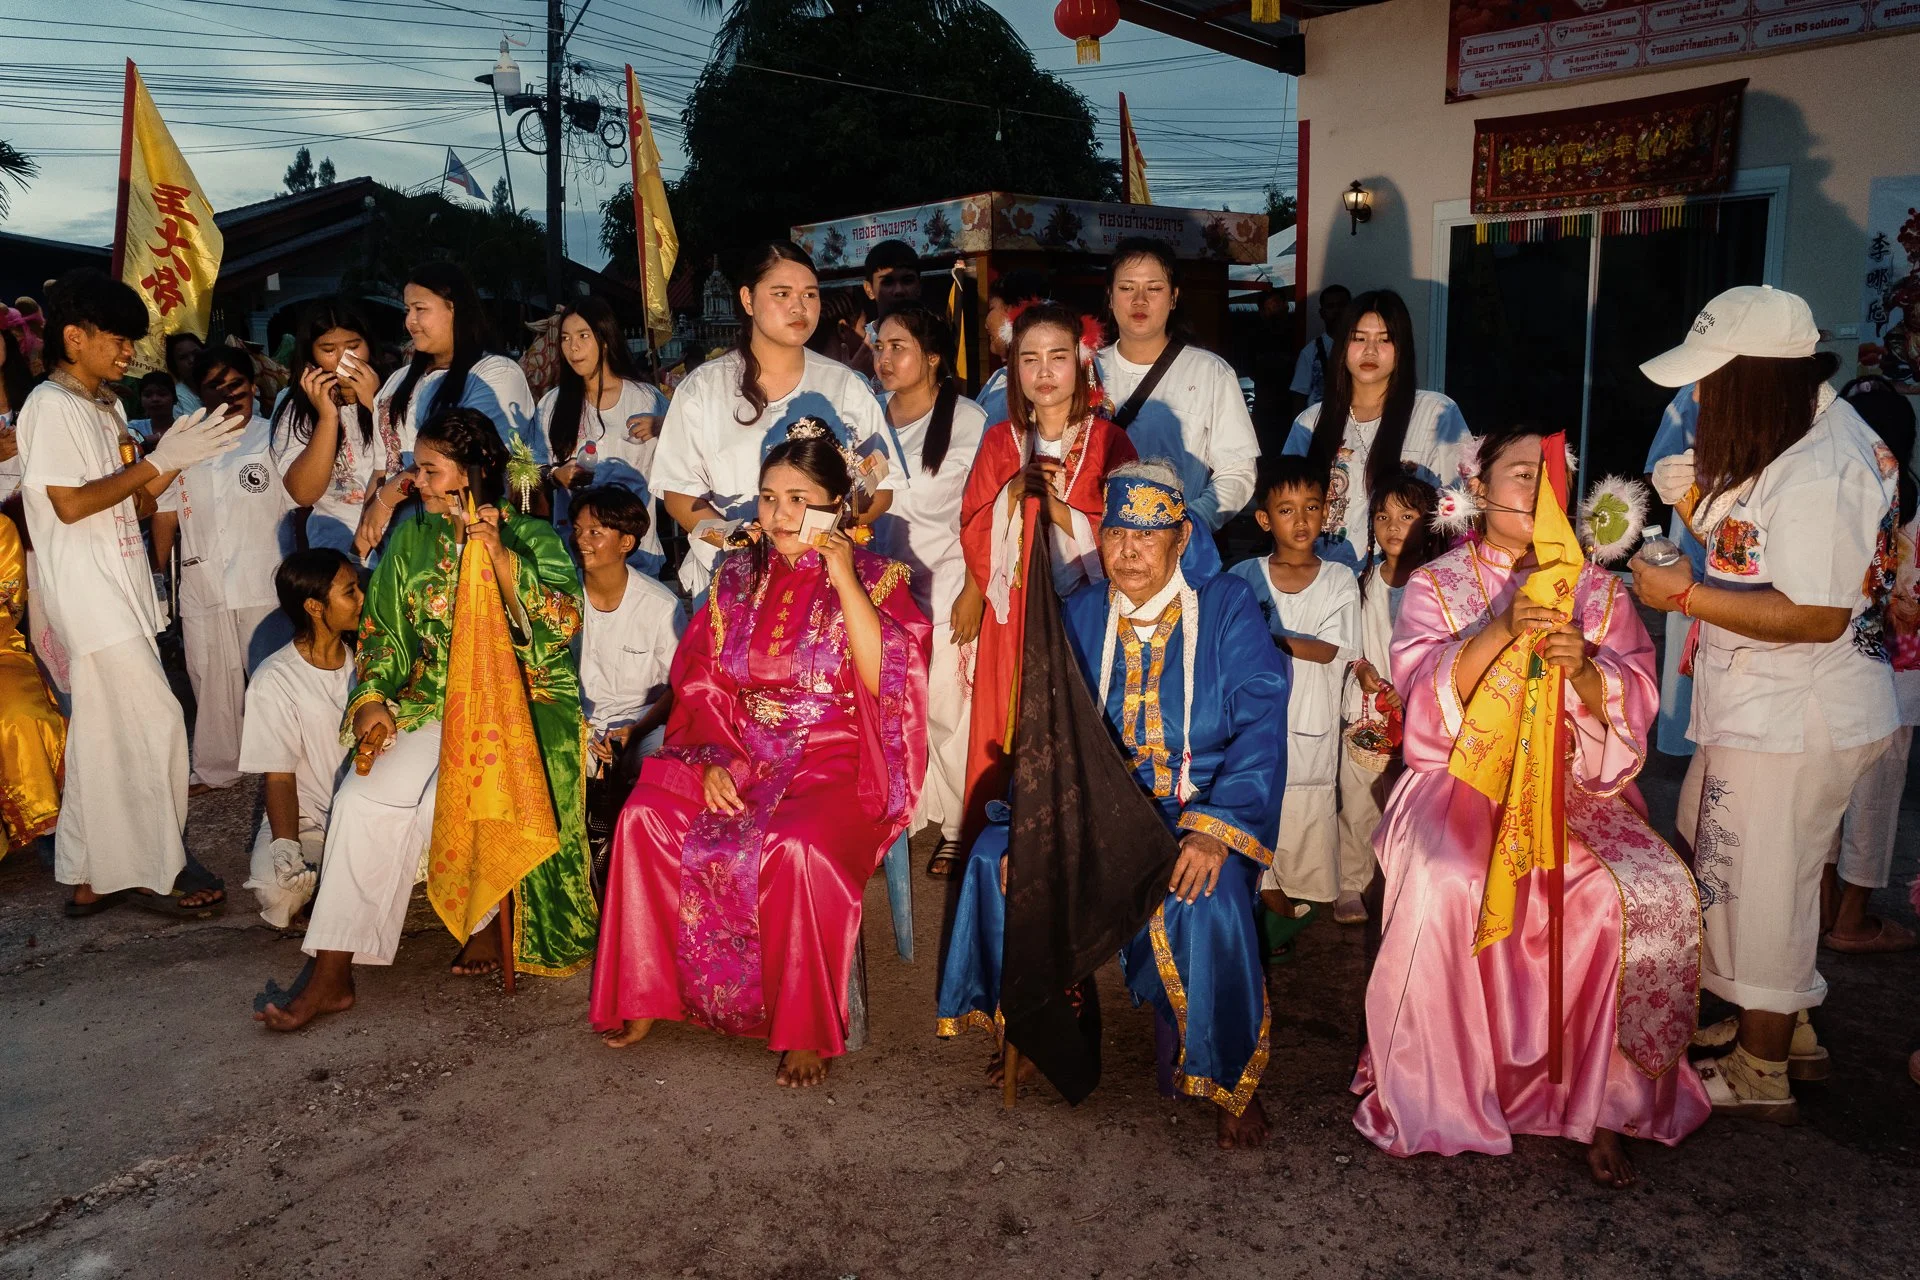
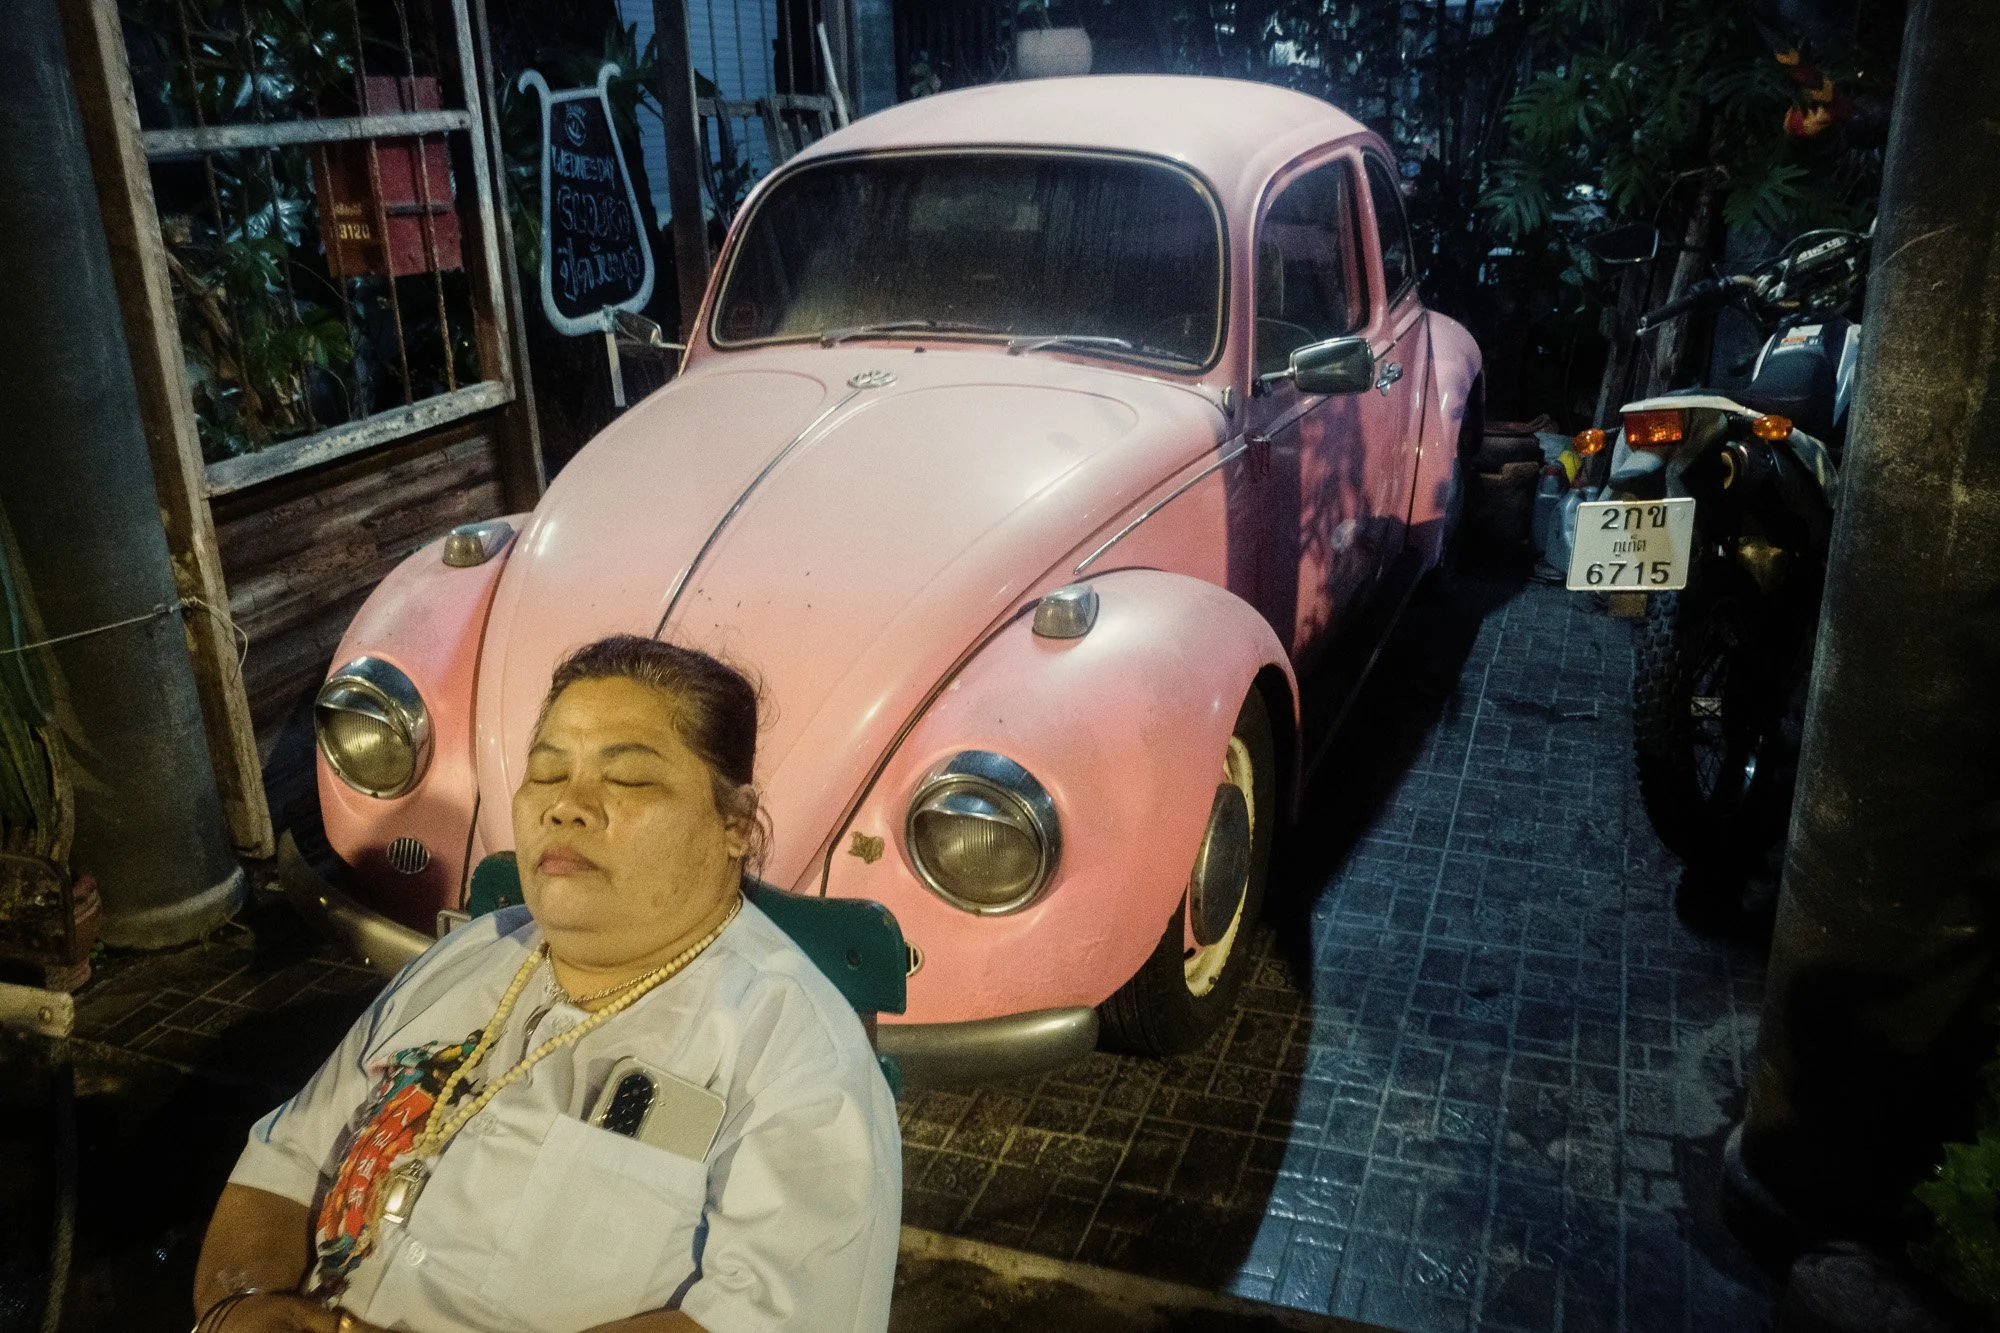
A Shrine Off the Grid
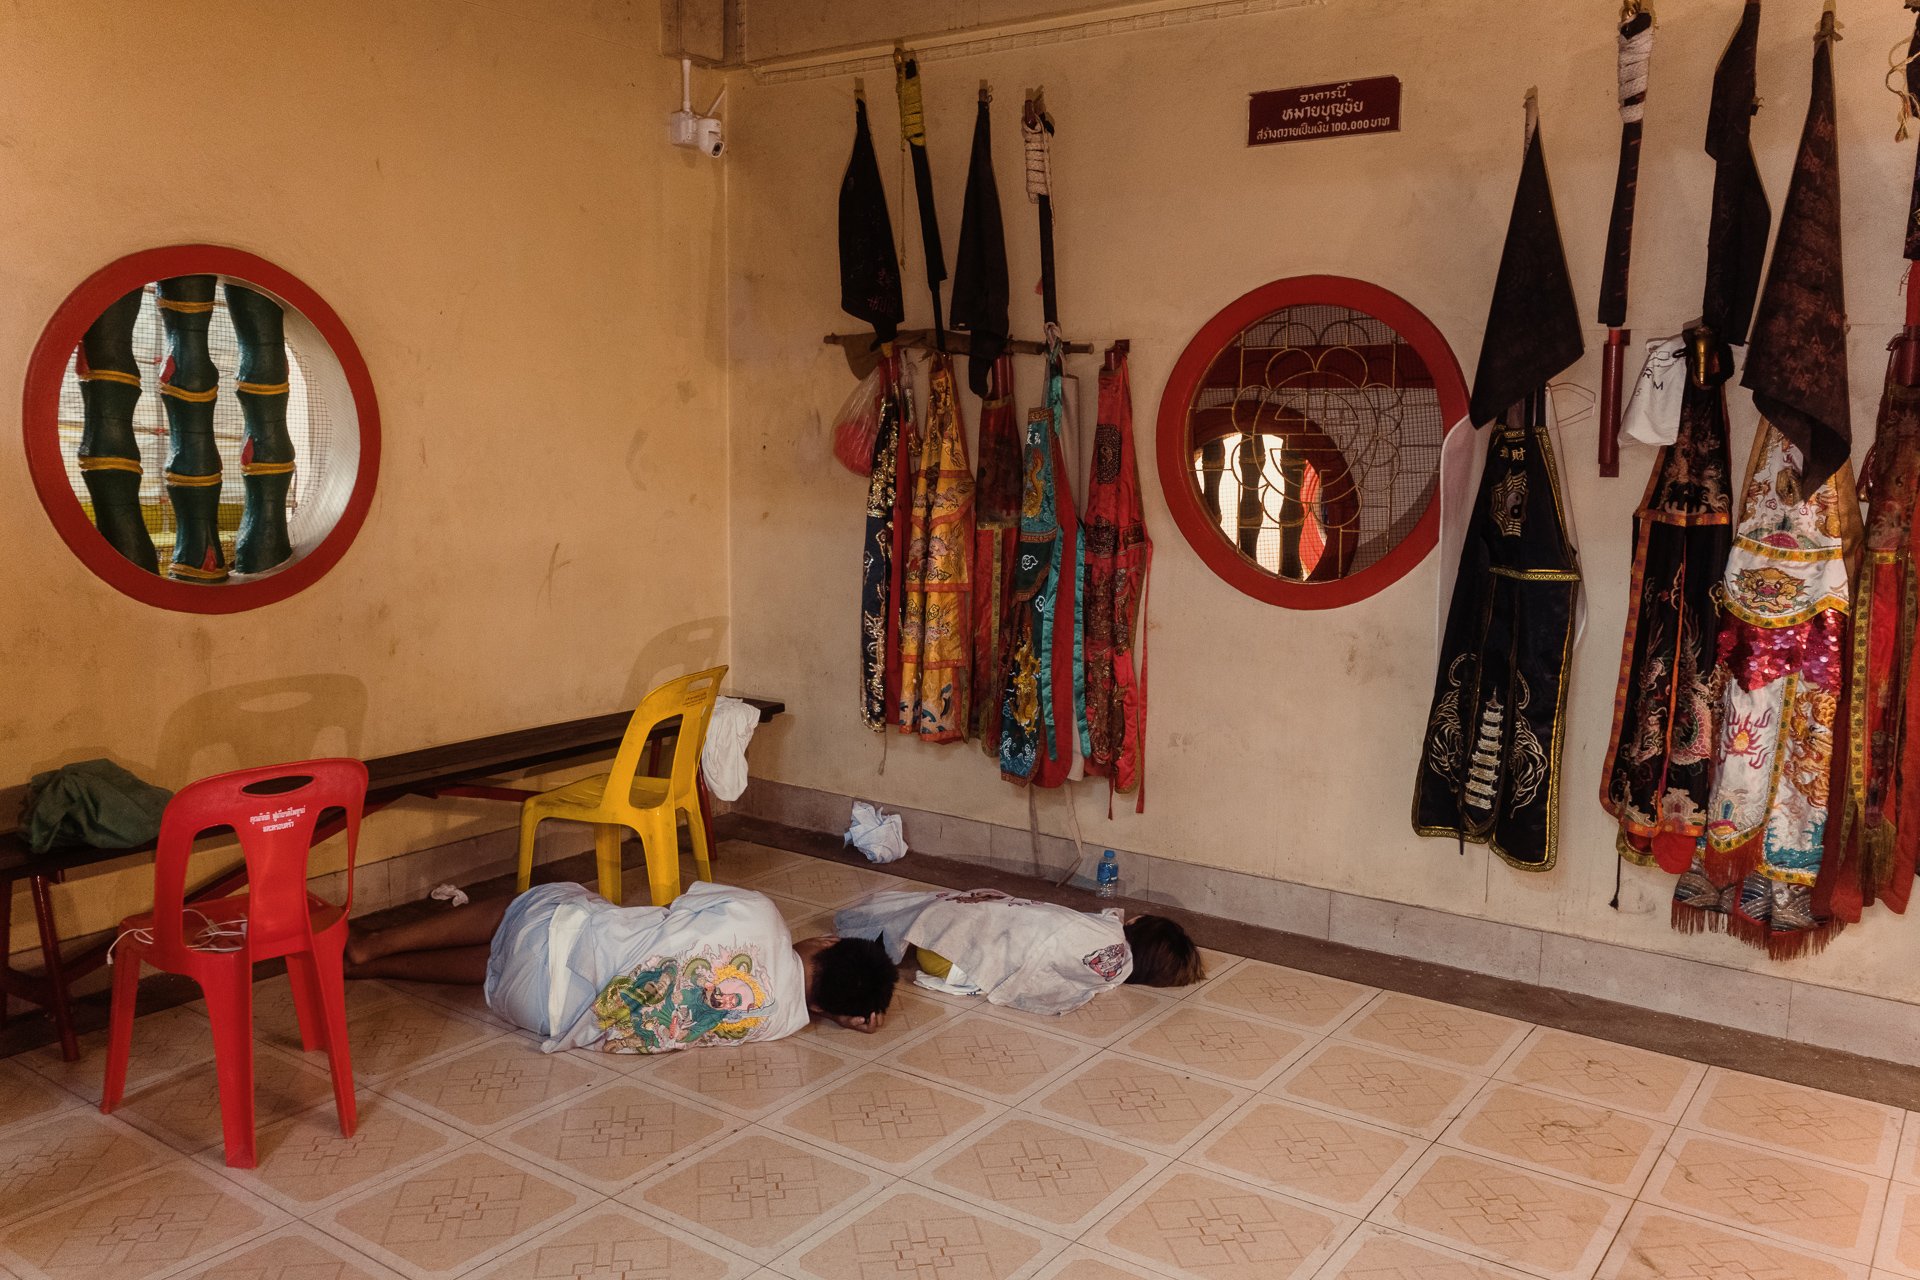
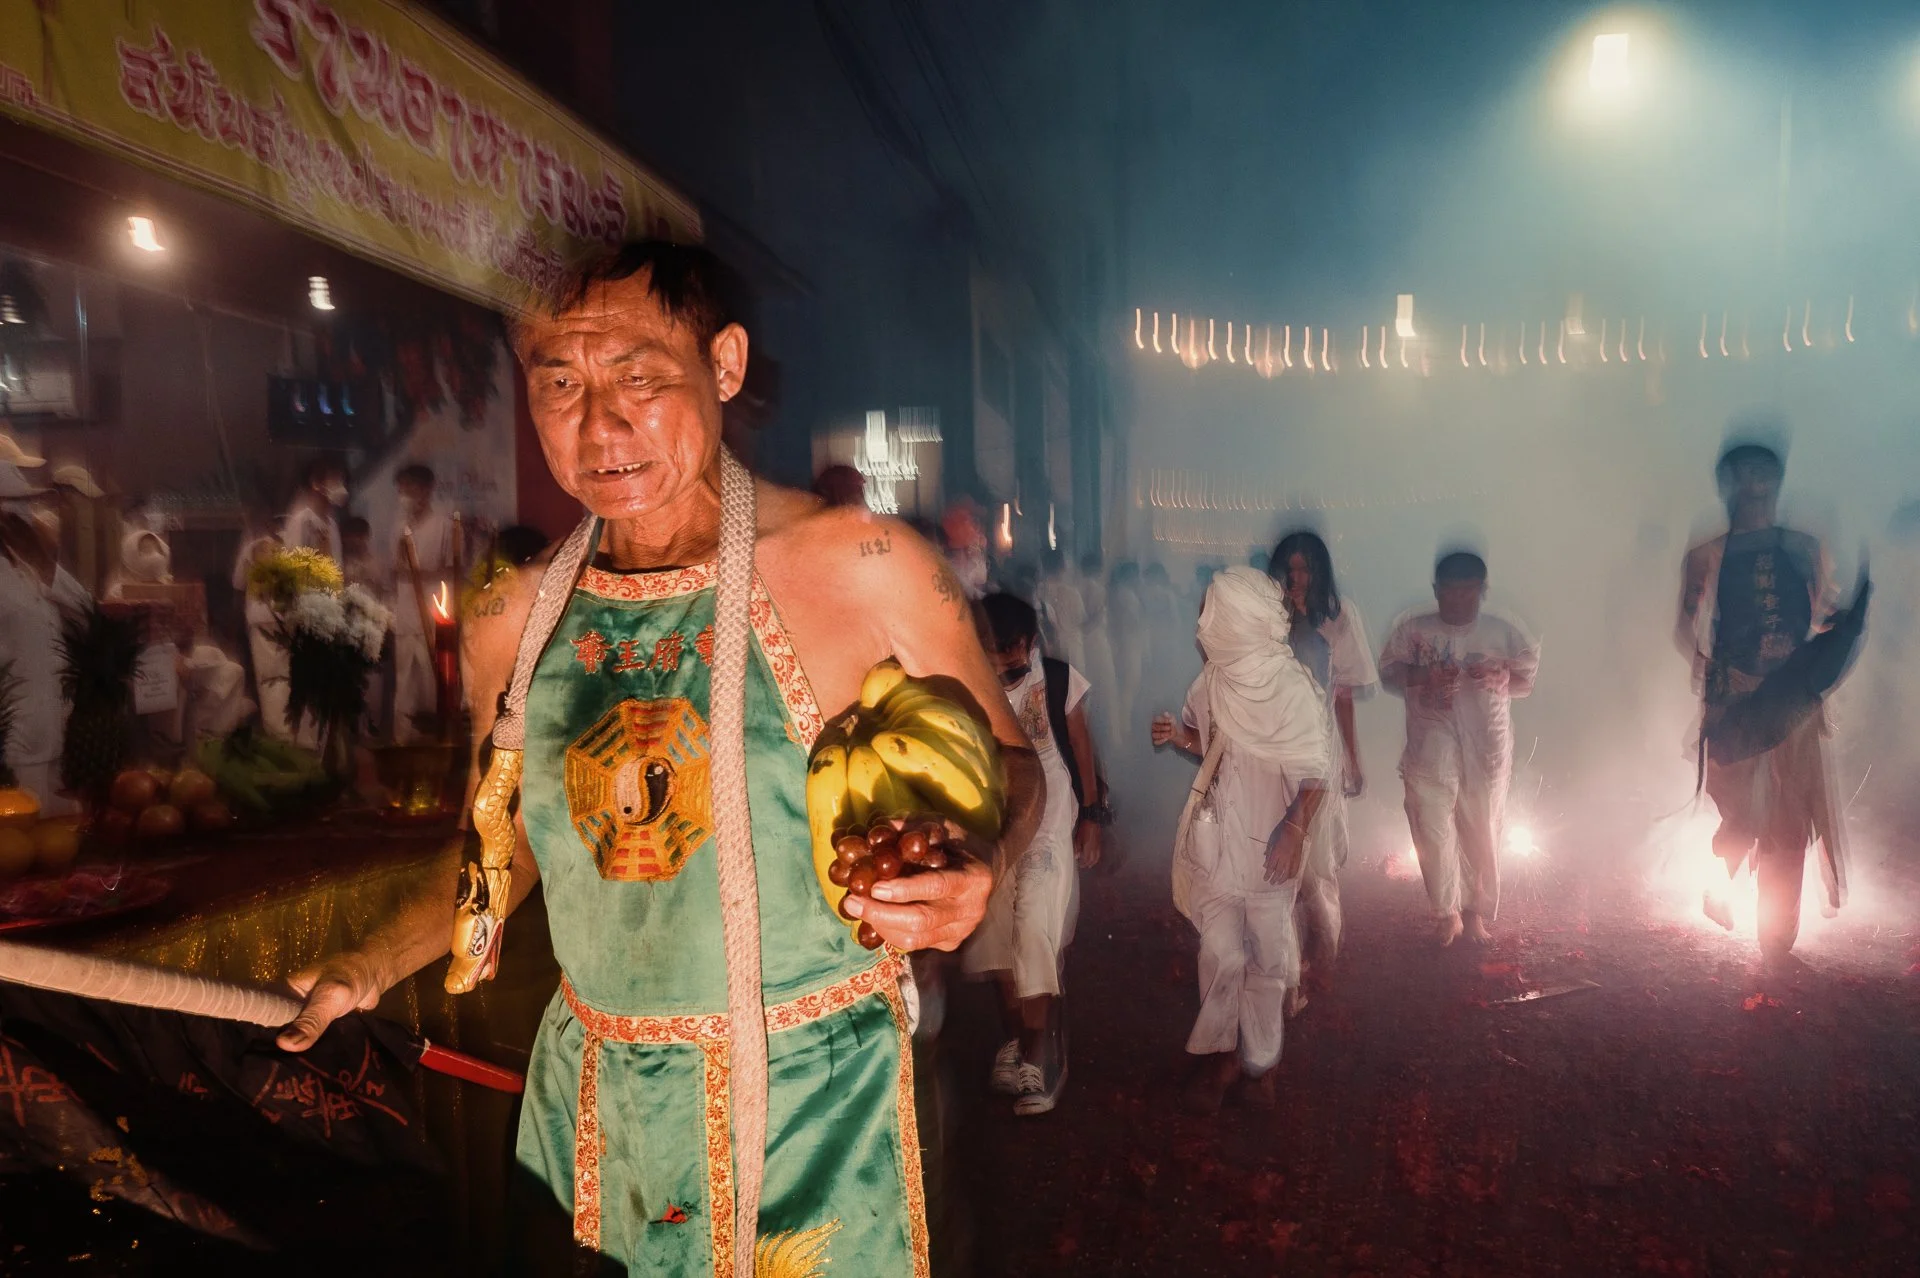
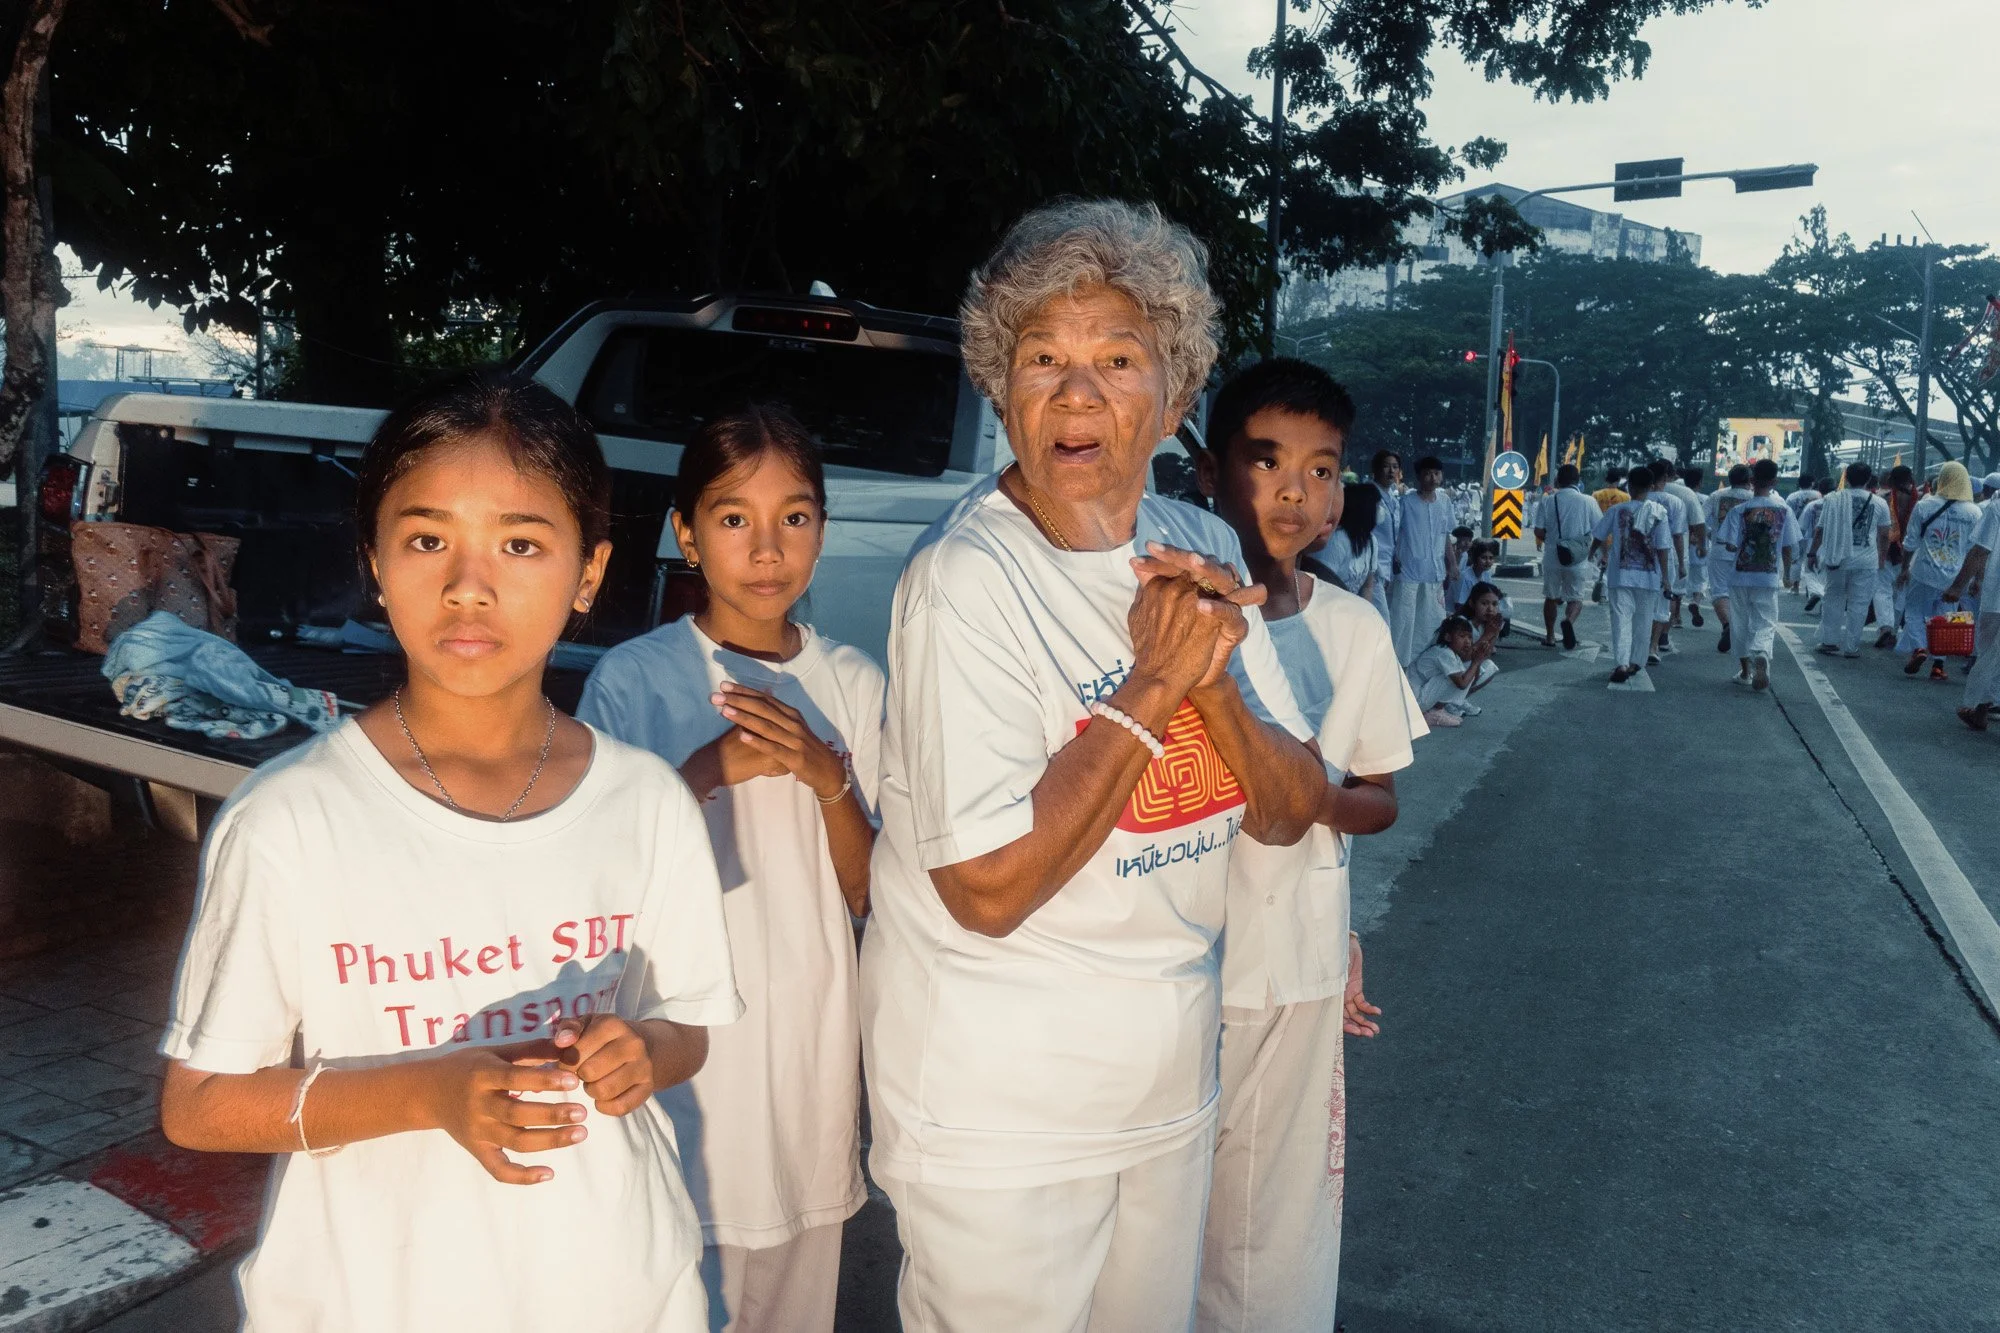
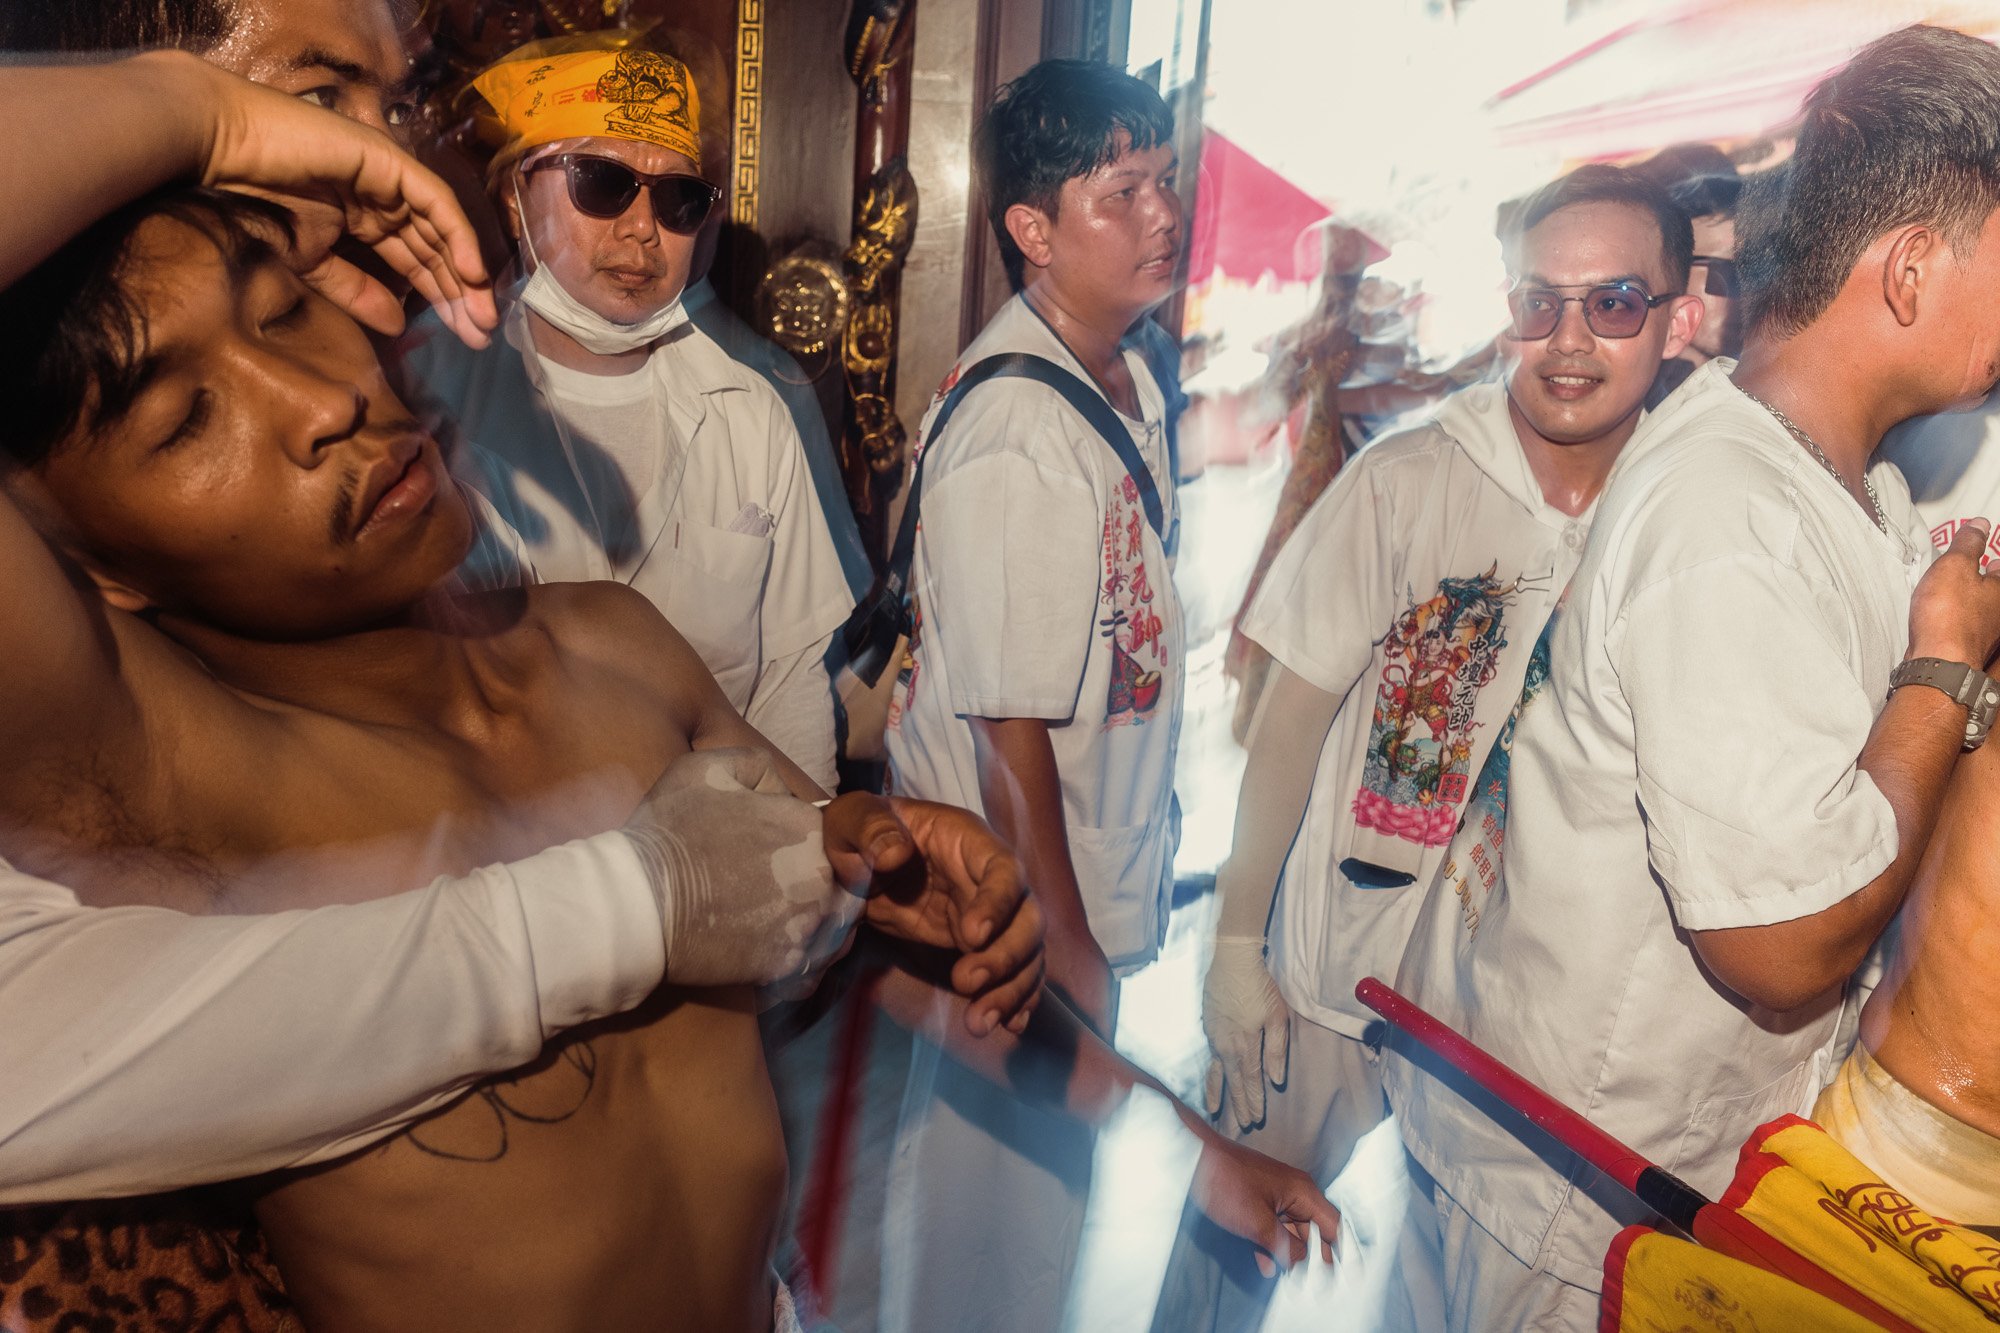
We started shooting very early that morning, around 5:30 a.m. Multiple events were happening at the same time, and instead of going to the obvious locations, we decided to visit a shrine slightly off the grid. That turned out to be a very good decision.
By the looks of it, some people had stayed overnight at the shrine. Apart from us, there were no other photographers and no tourists. The atmosphere felt incredibly intimate and special. The people welcomed us warmly, offered us food, and made us feel like we belonged there from the very beginning.
1. Ricoh GRIV - 0.3 sec - f/8.0 - ISO800
2. Ricoh GRIV - 1/60 - f/8.0 - ISO800
3. Ricoh GRIV - 11/320 - f/11 - ISO800
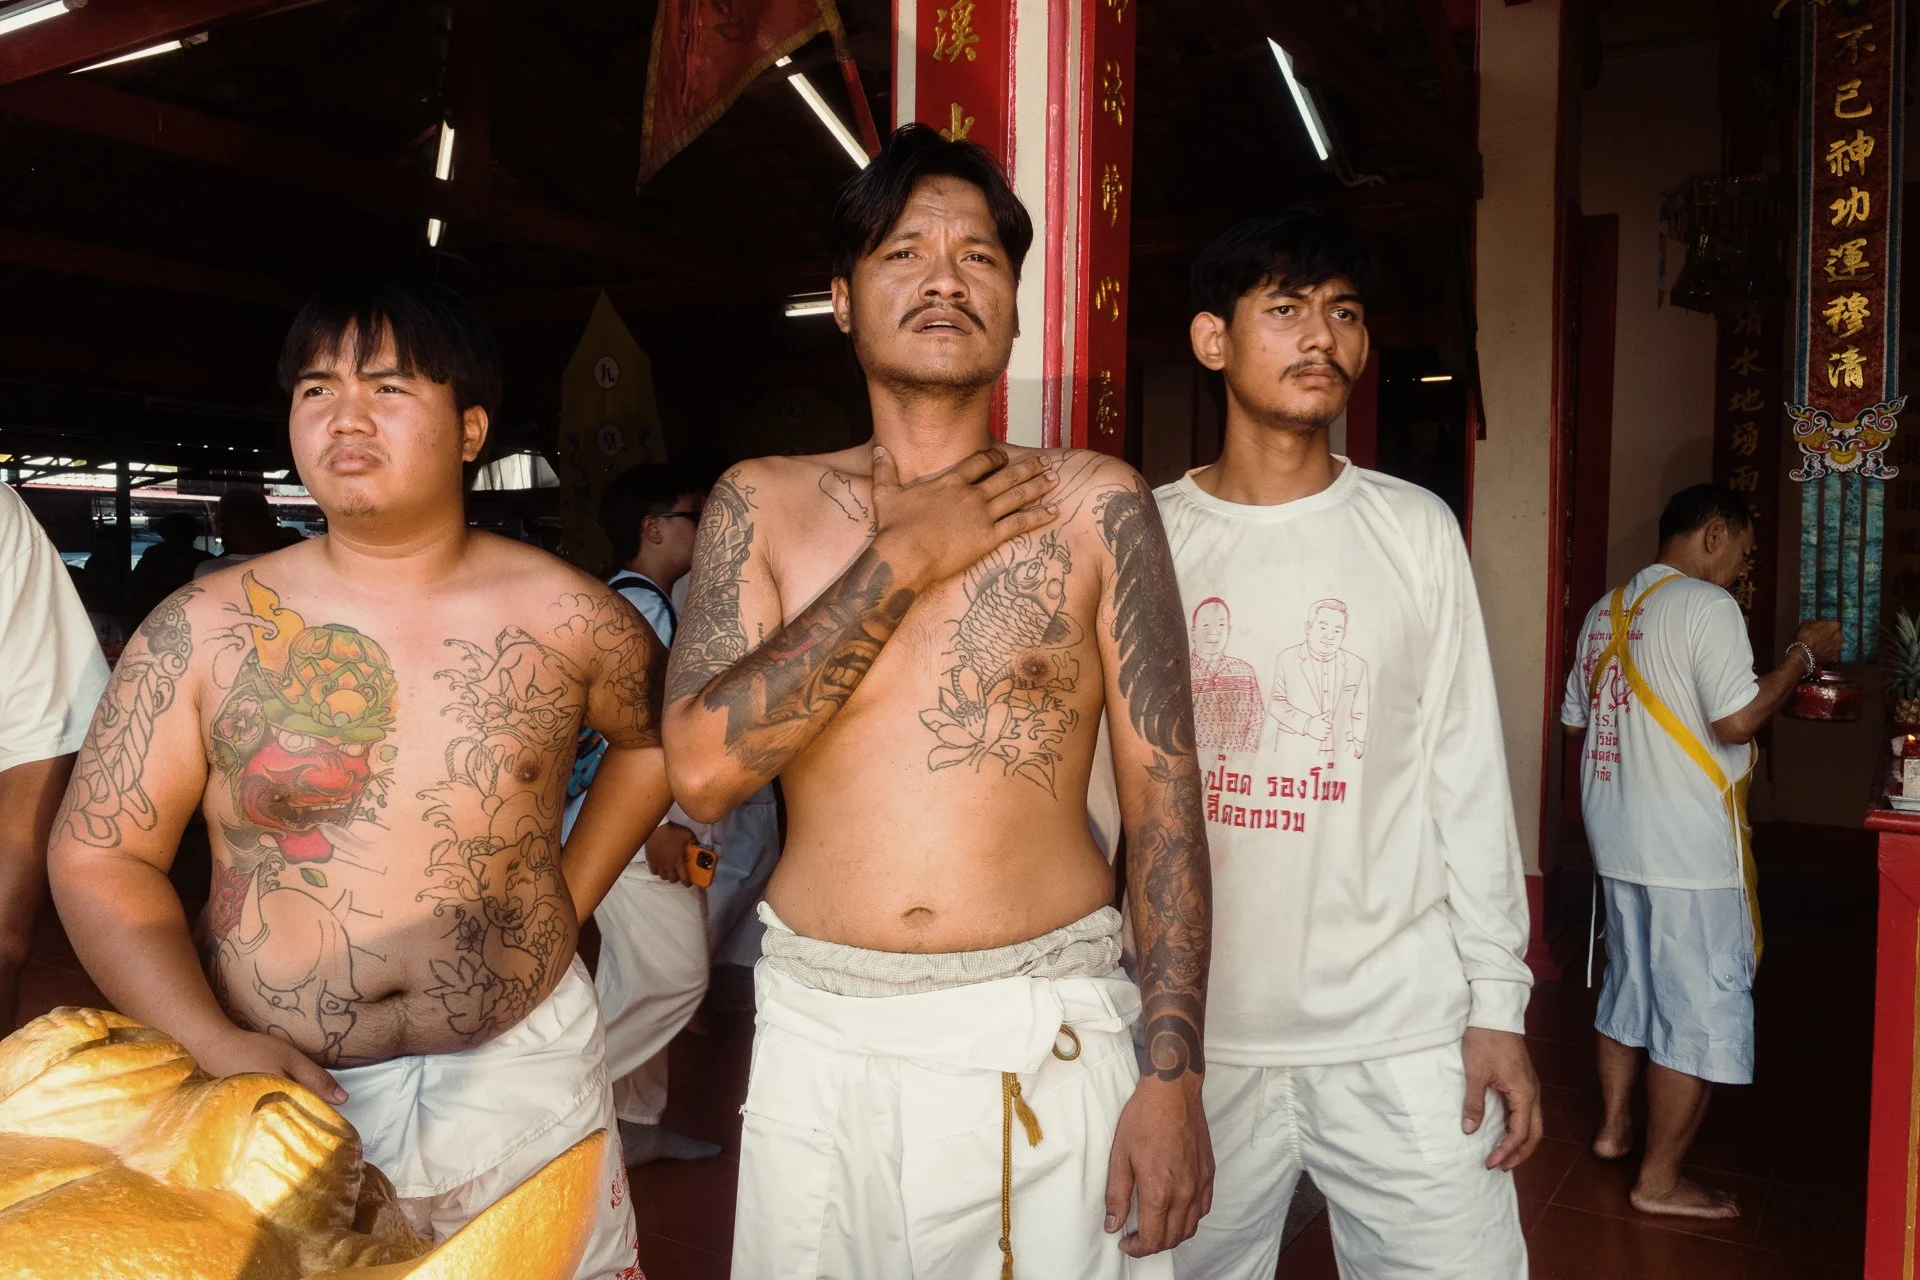
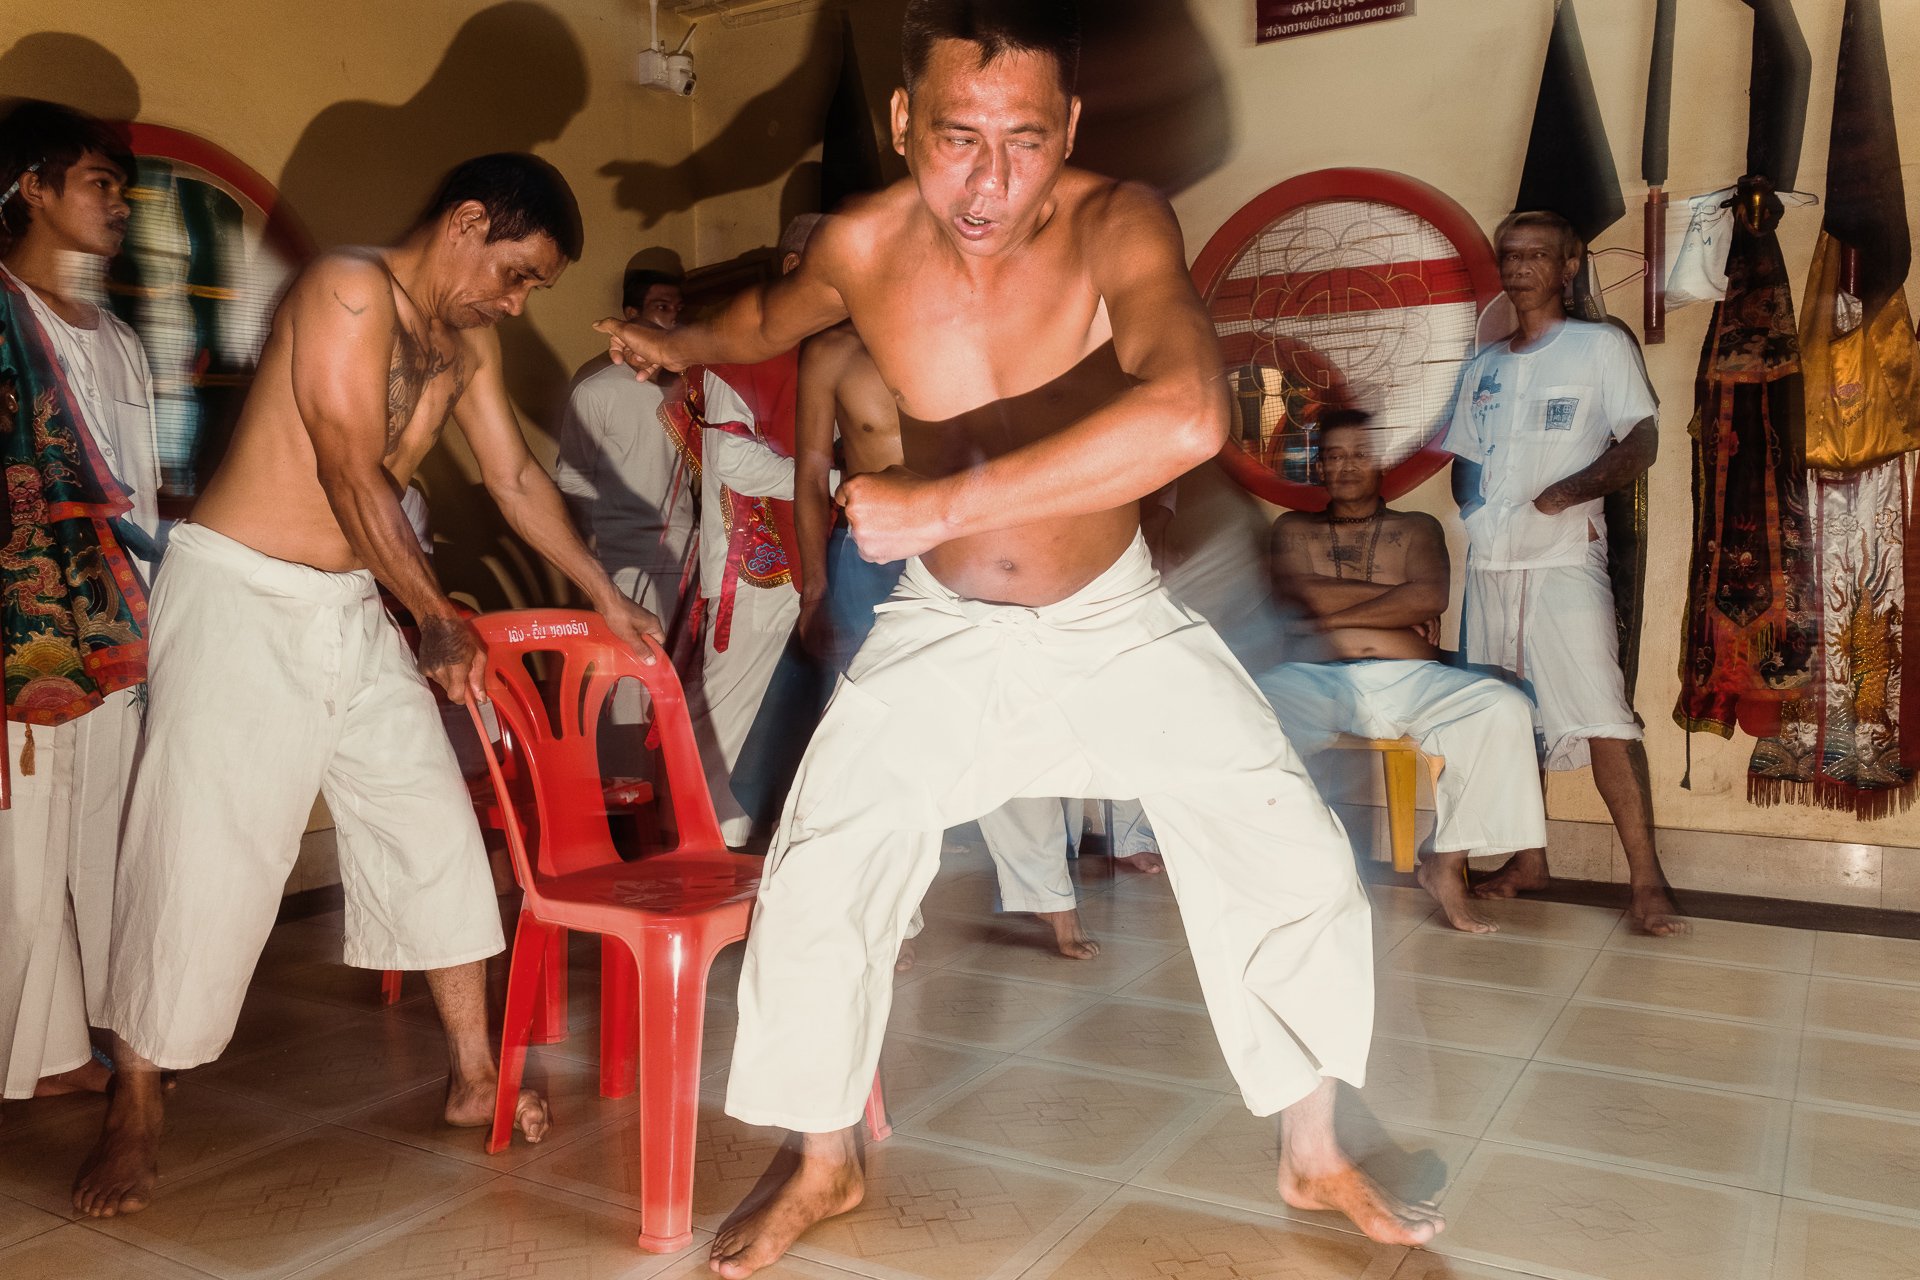
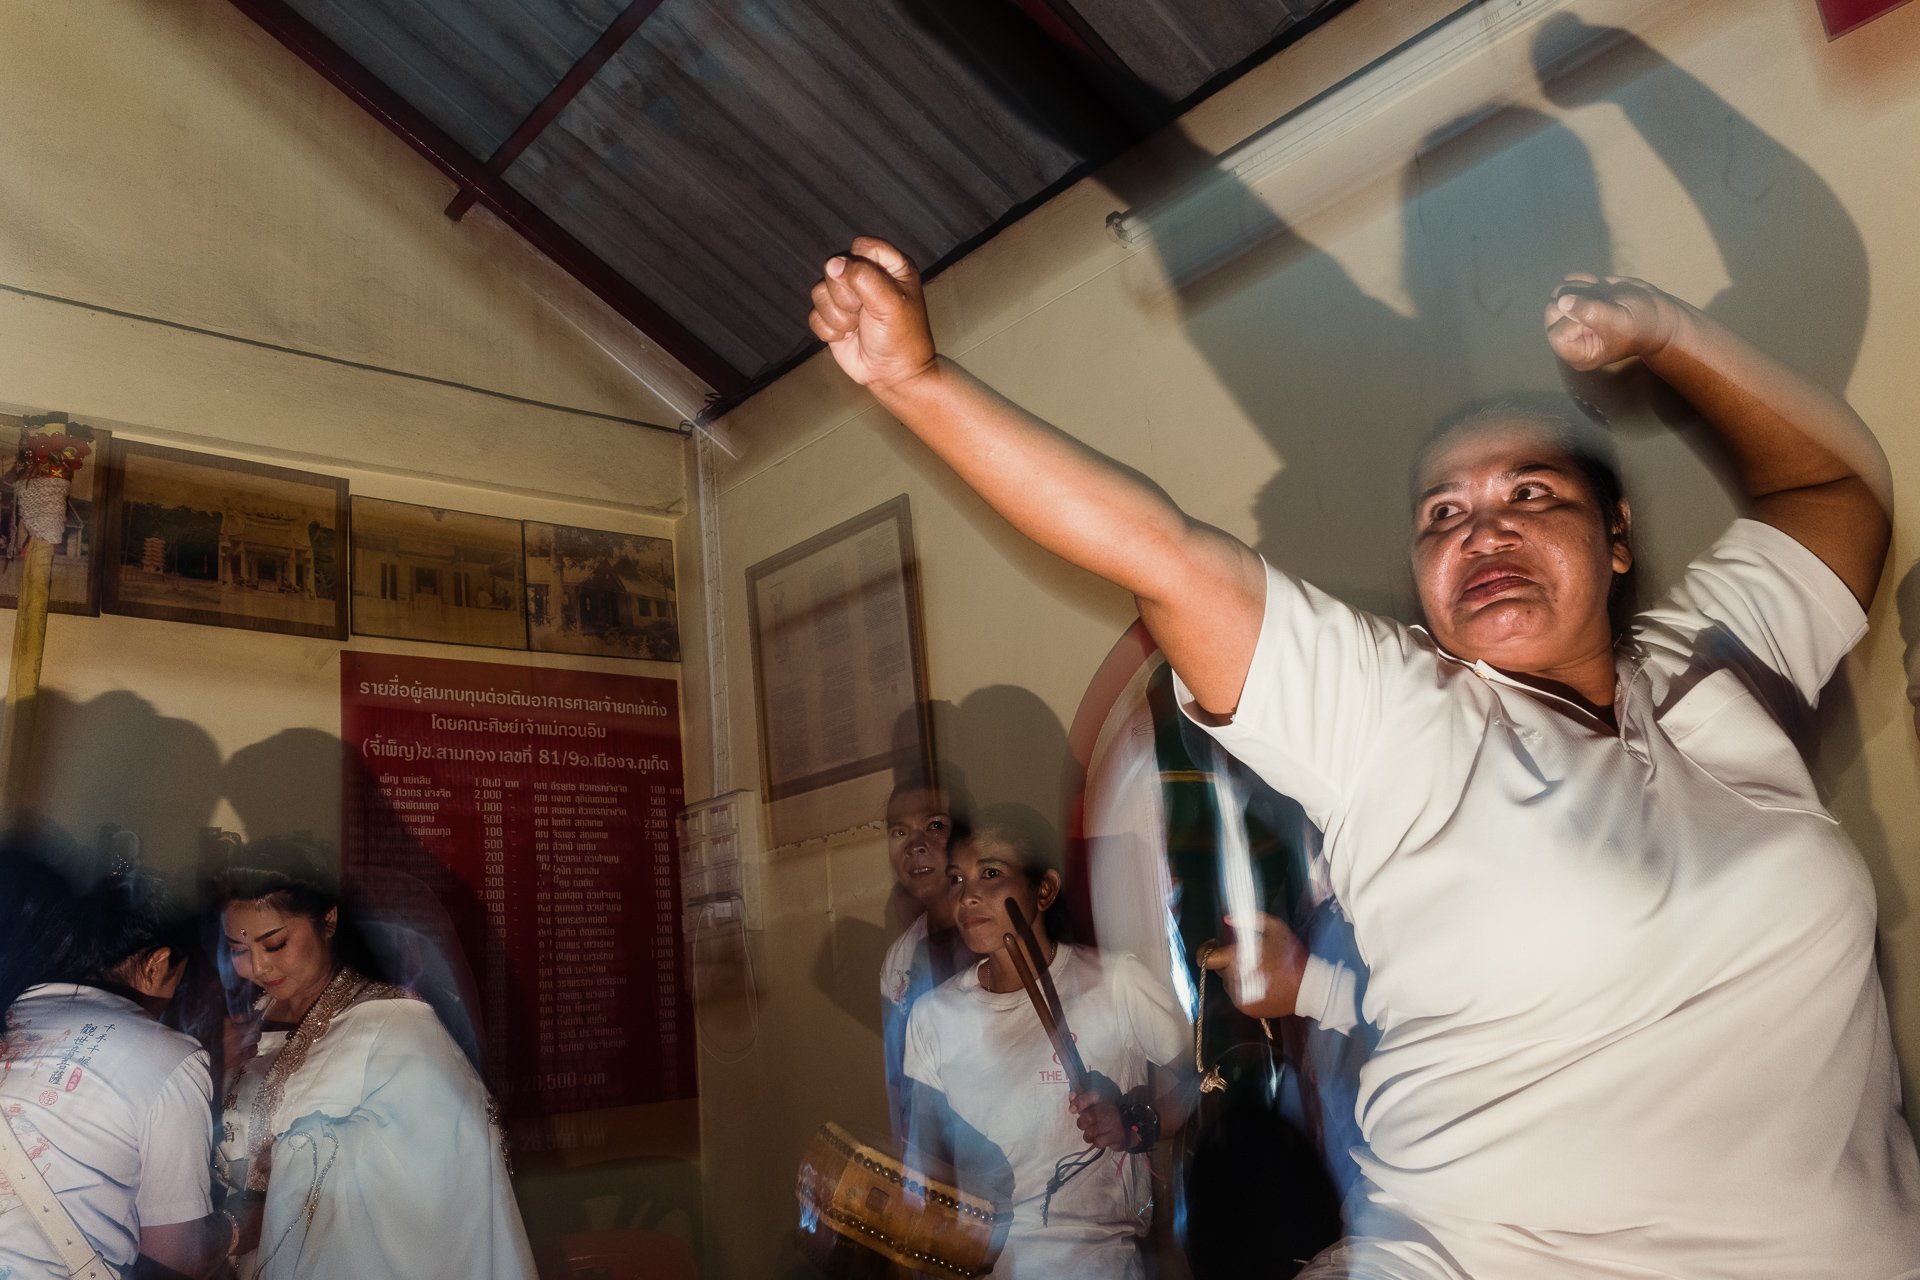
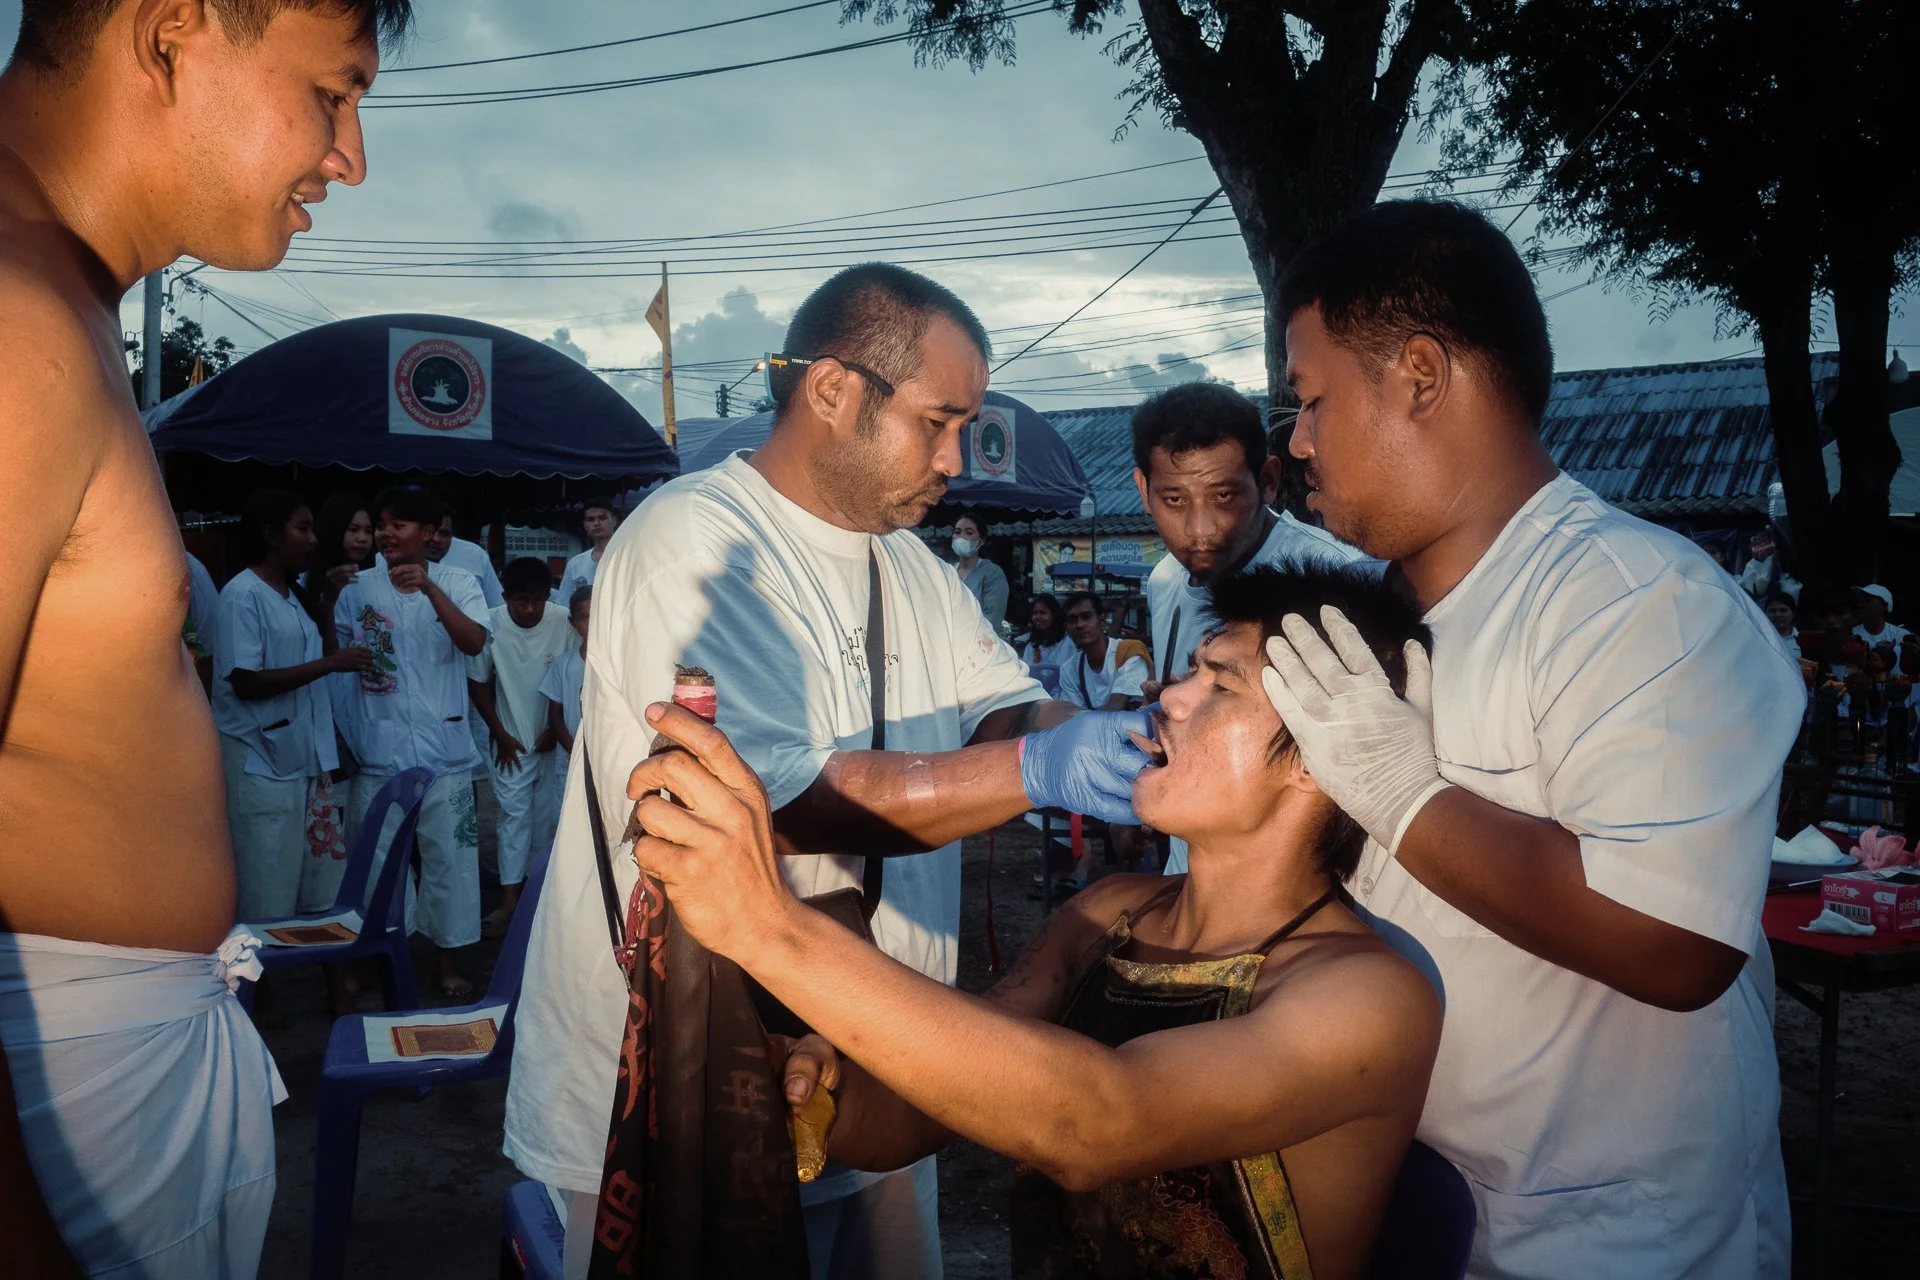
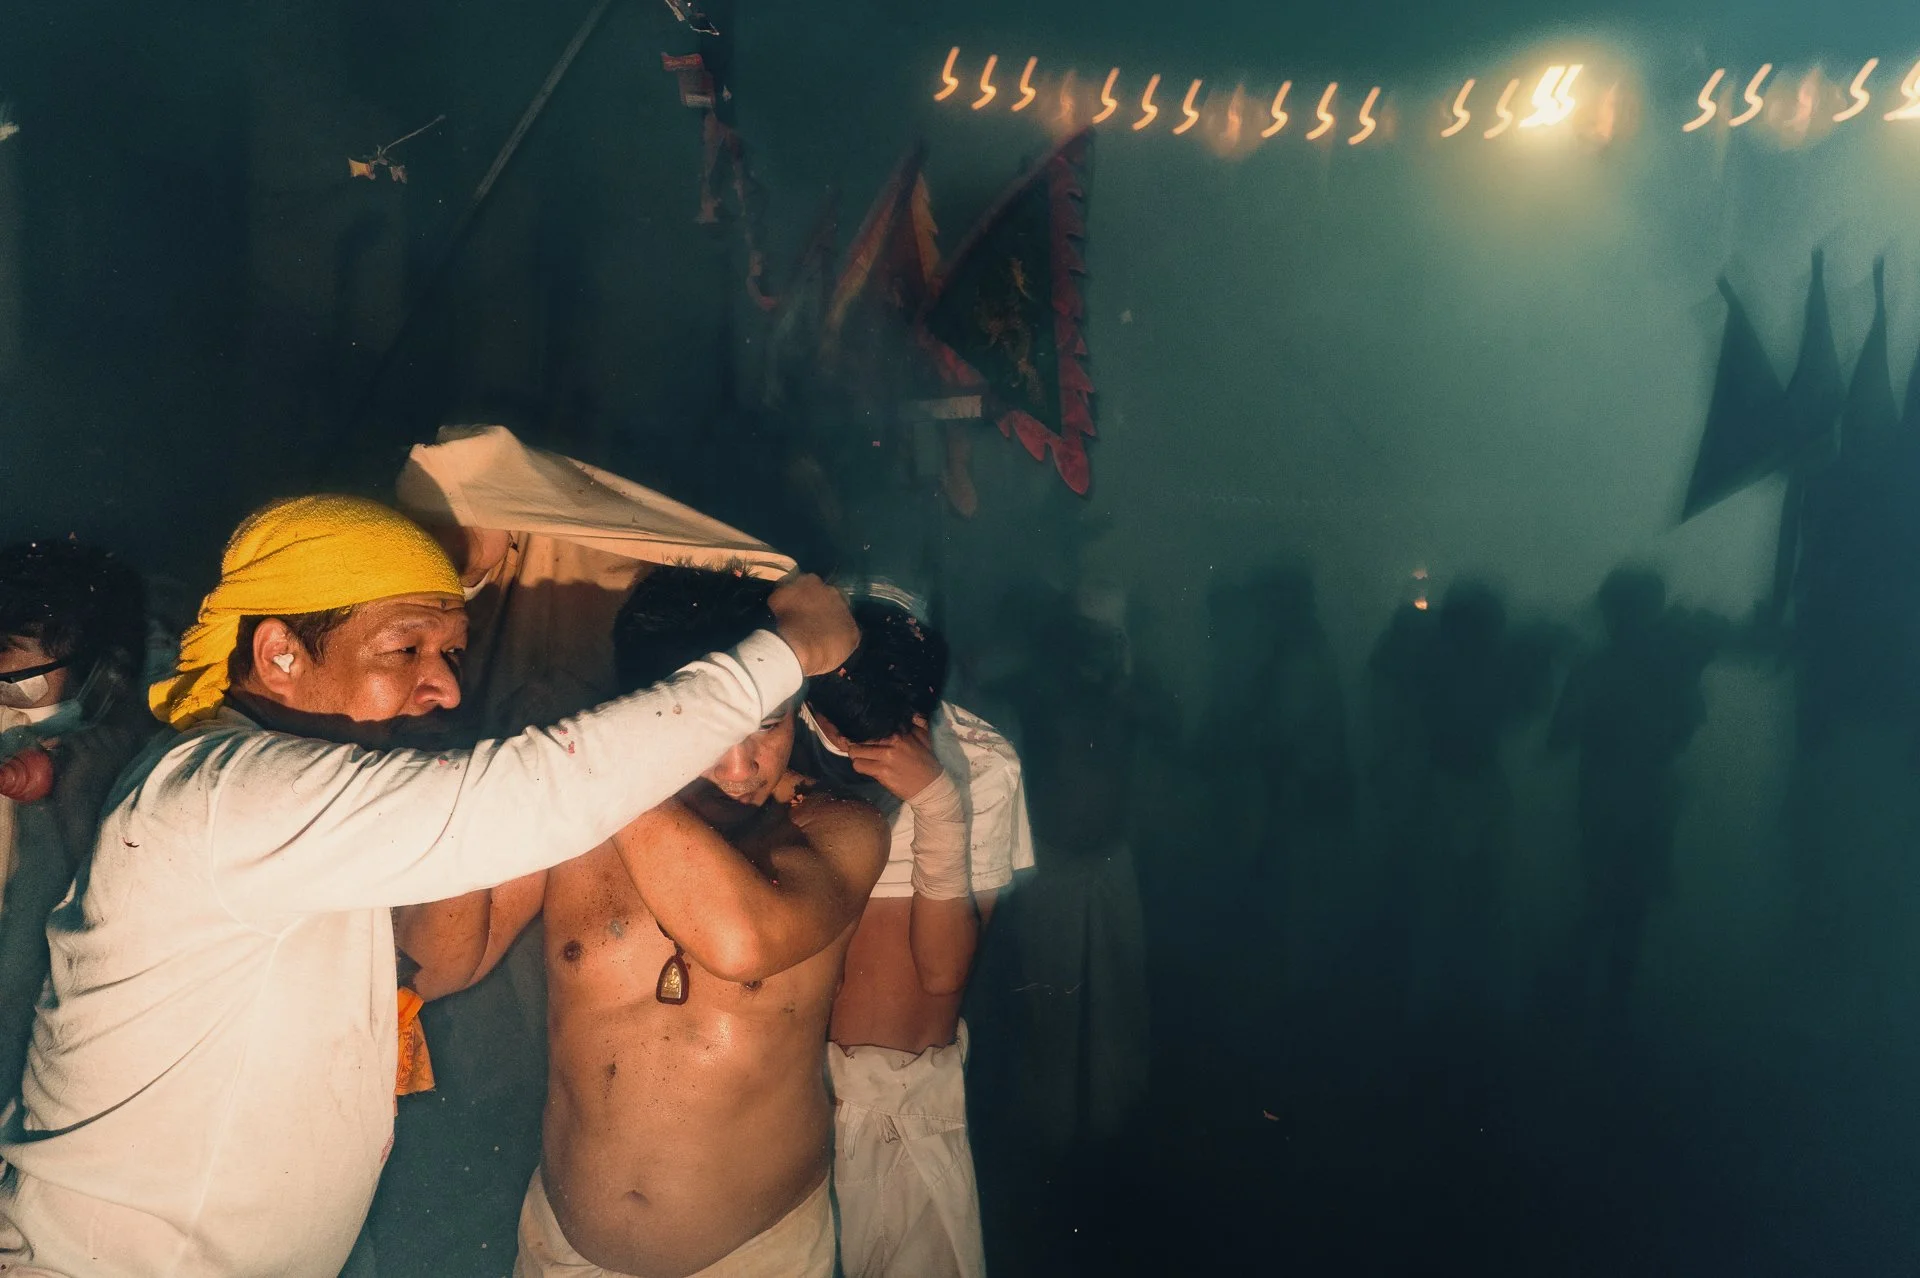
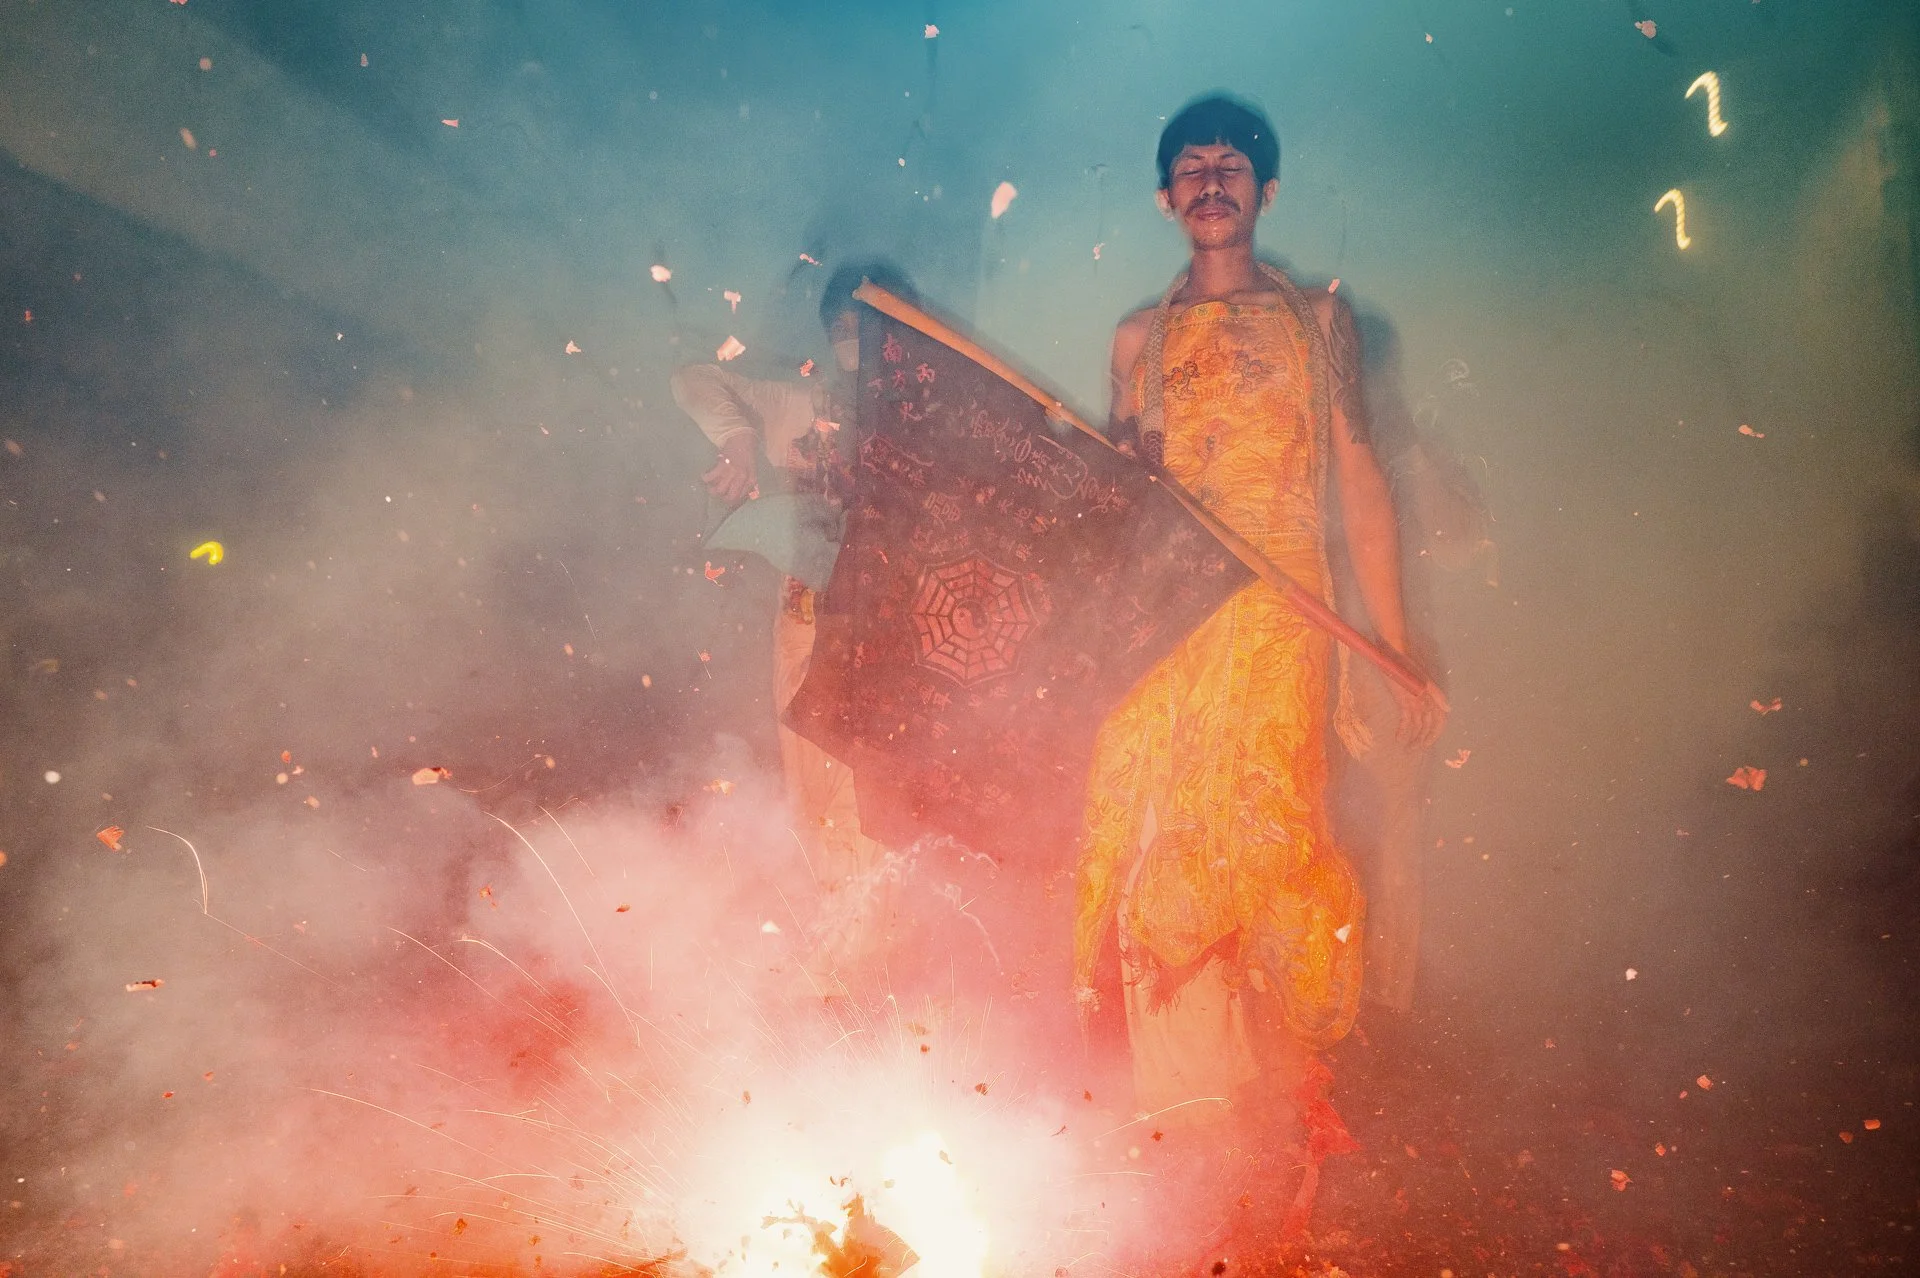
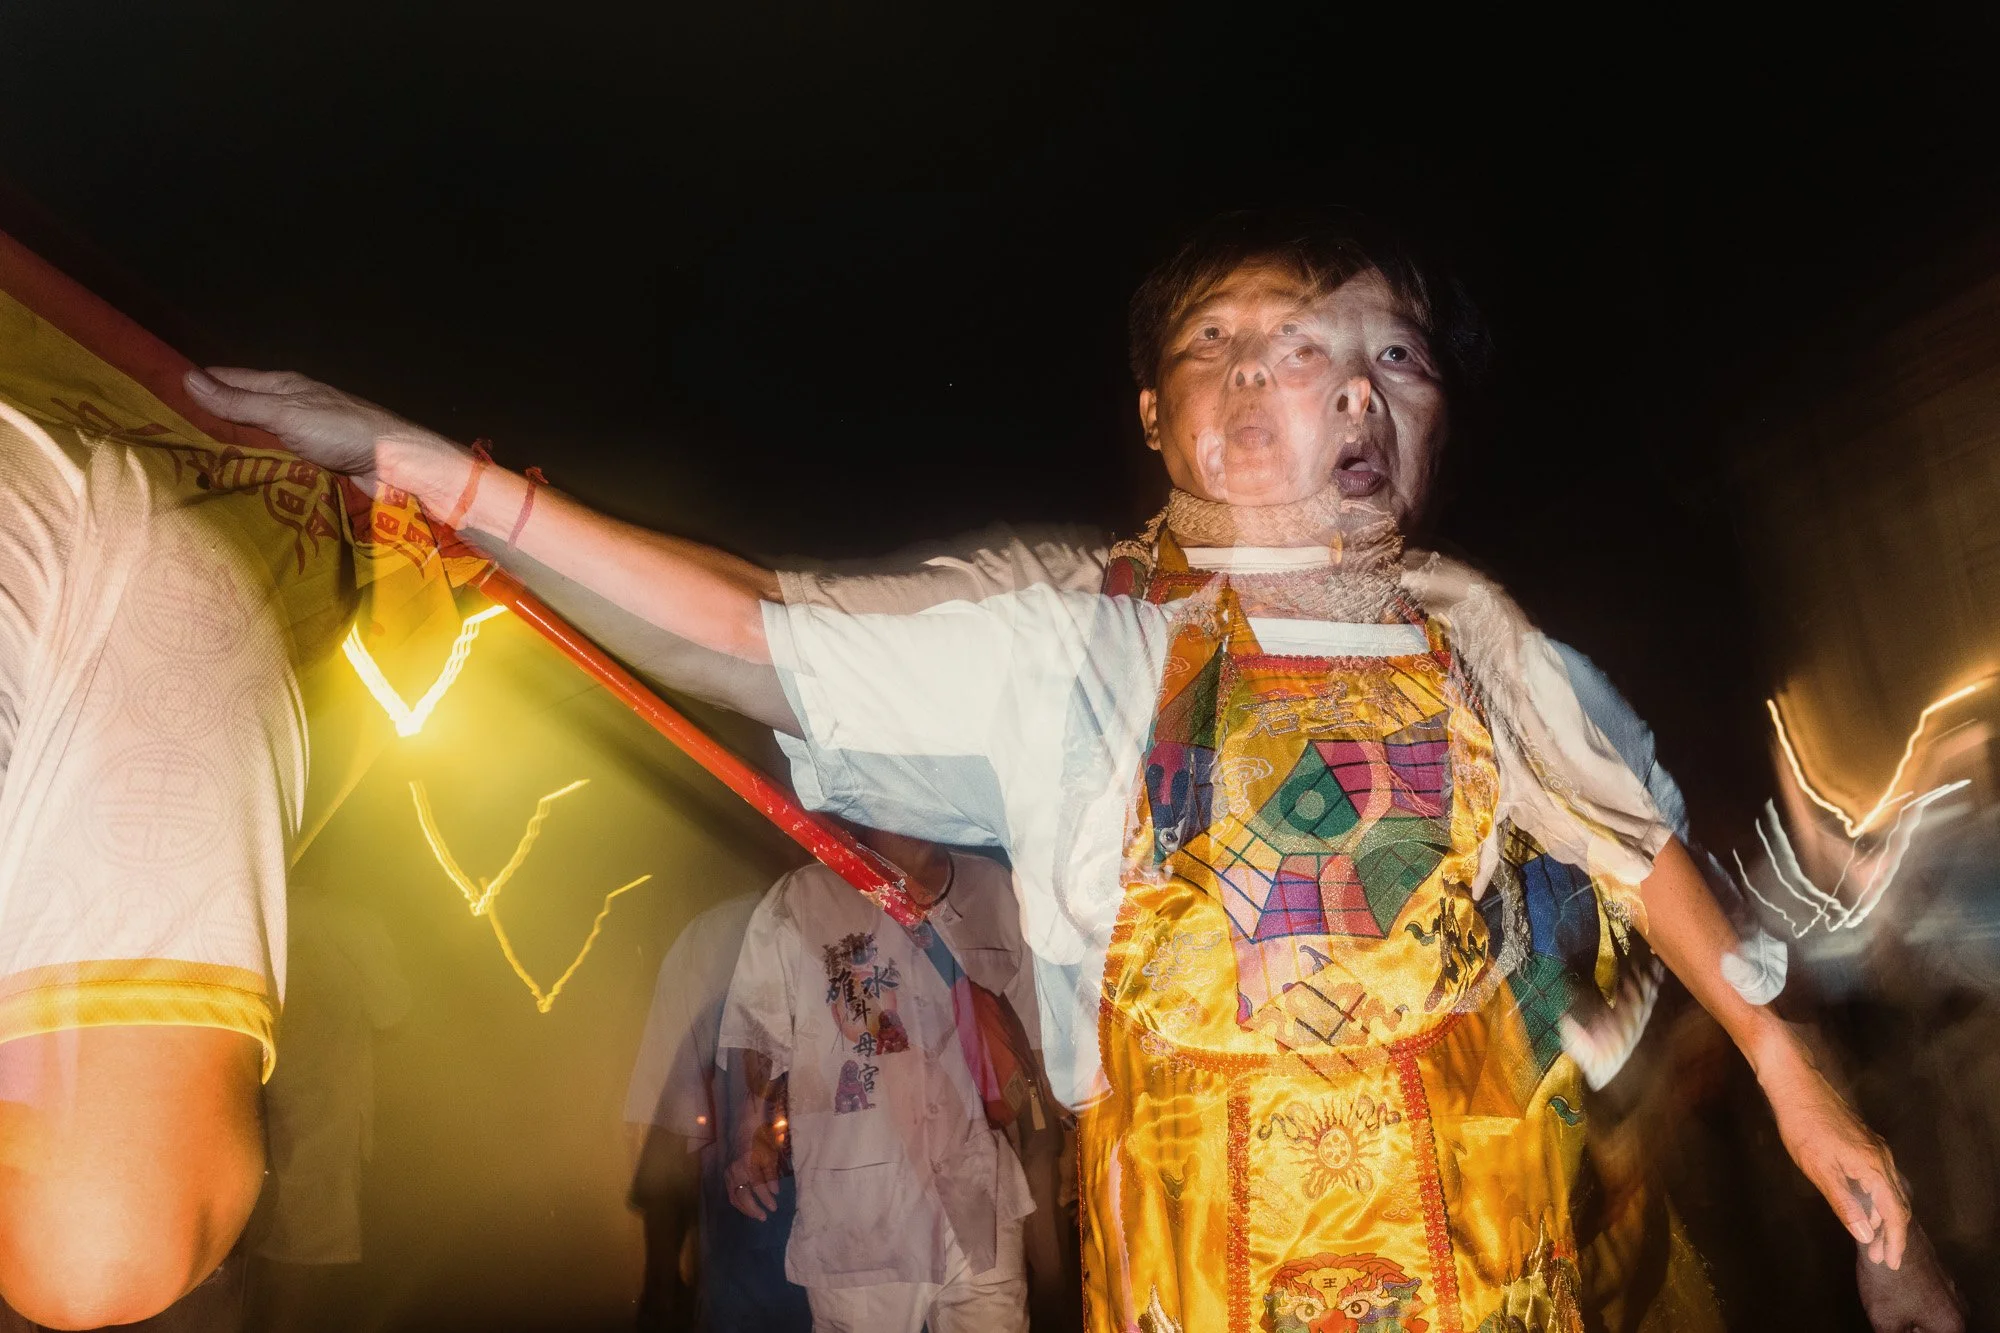
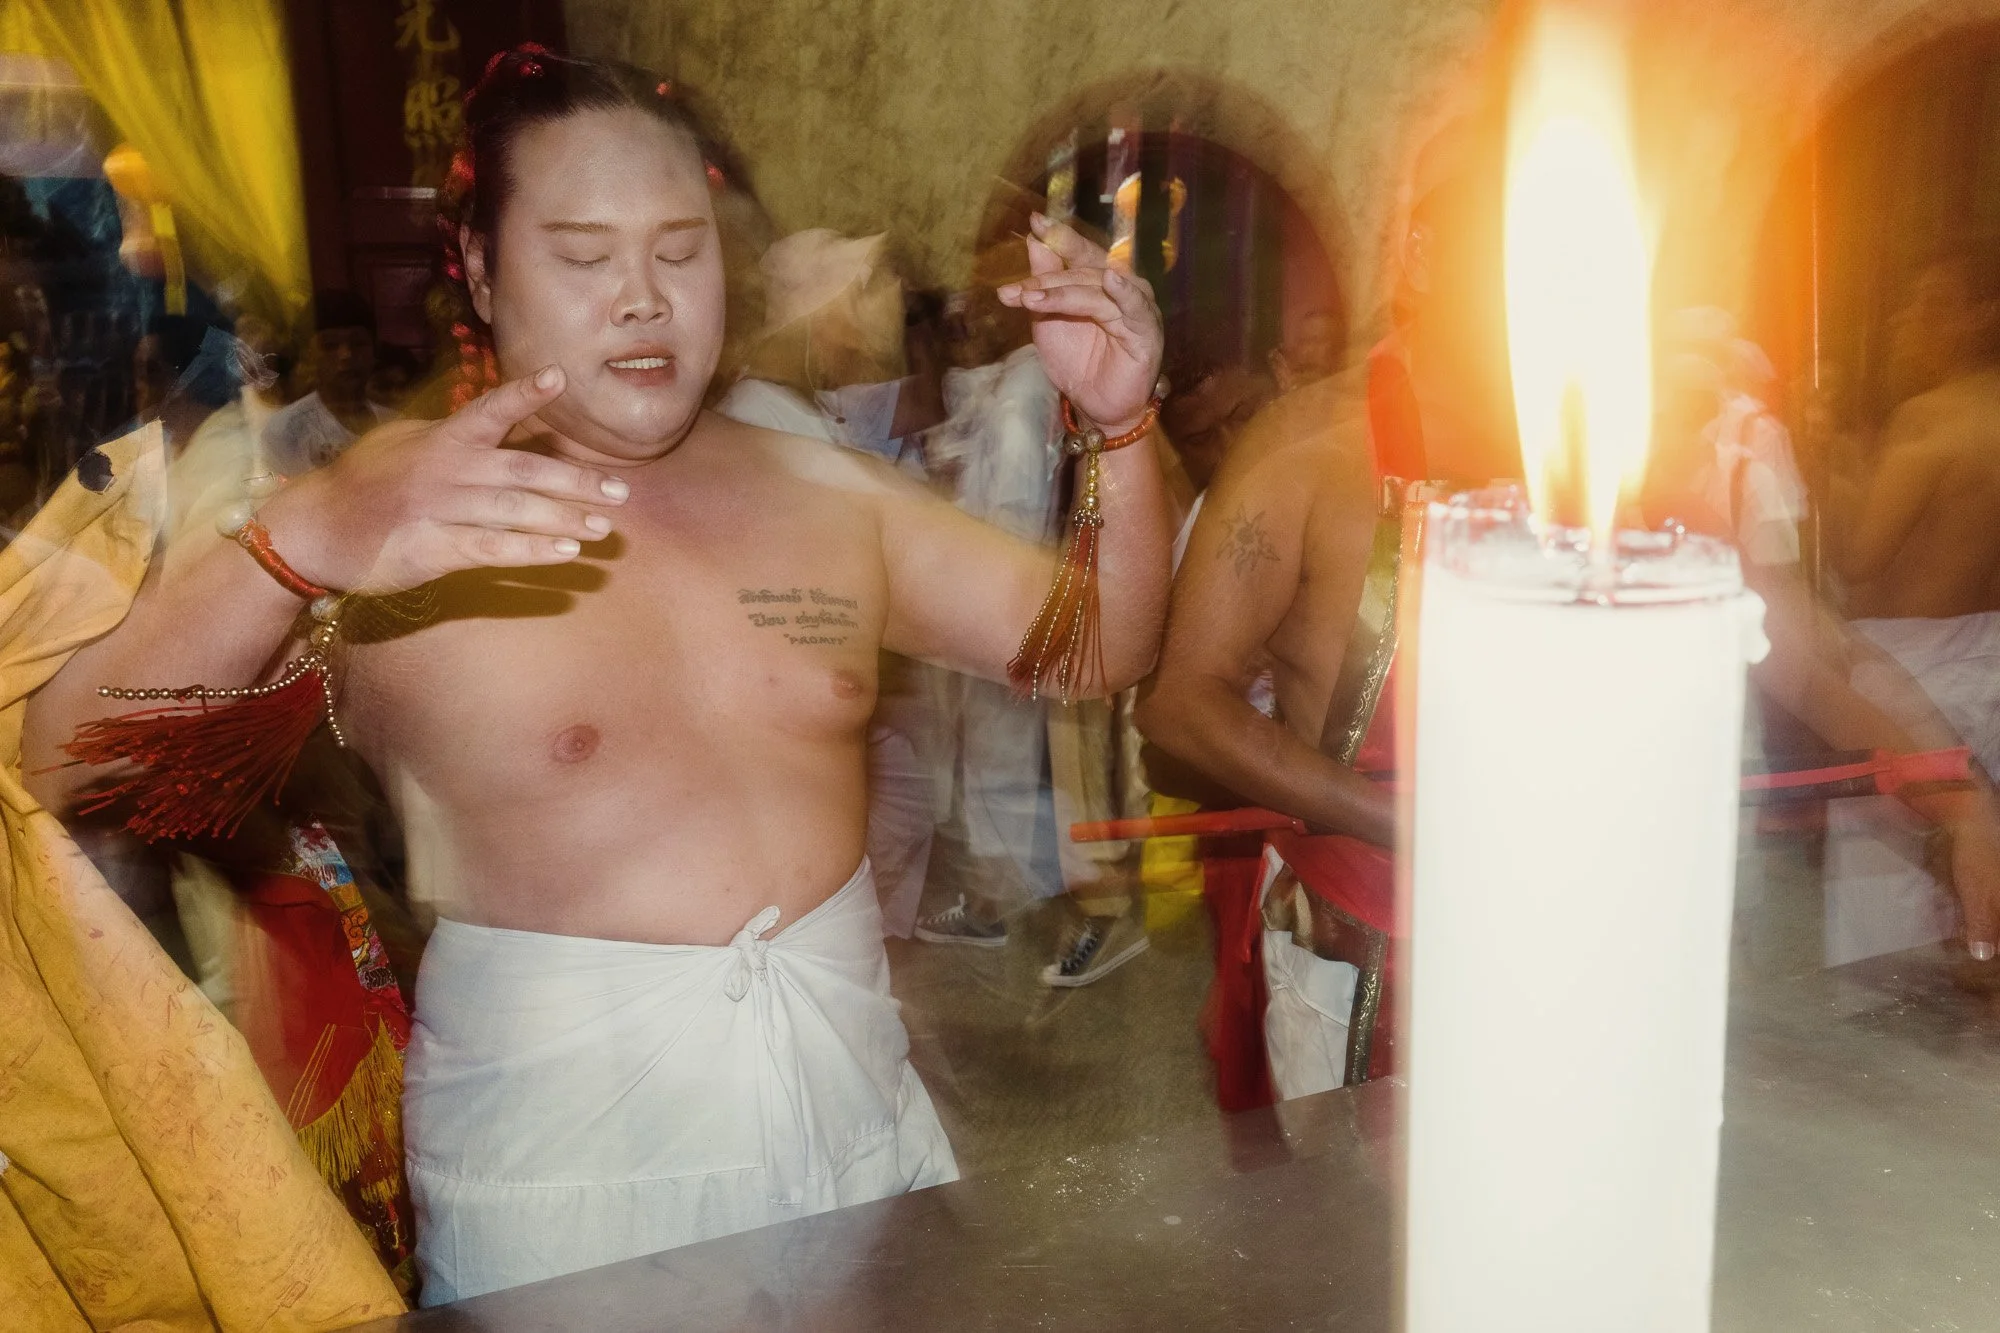
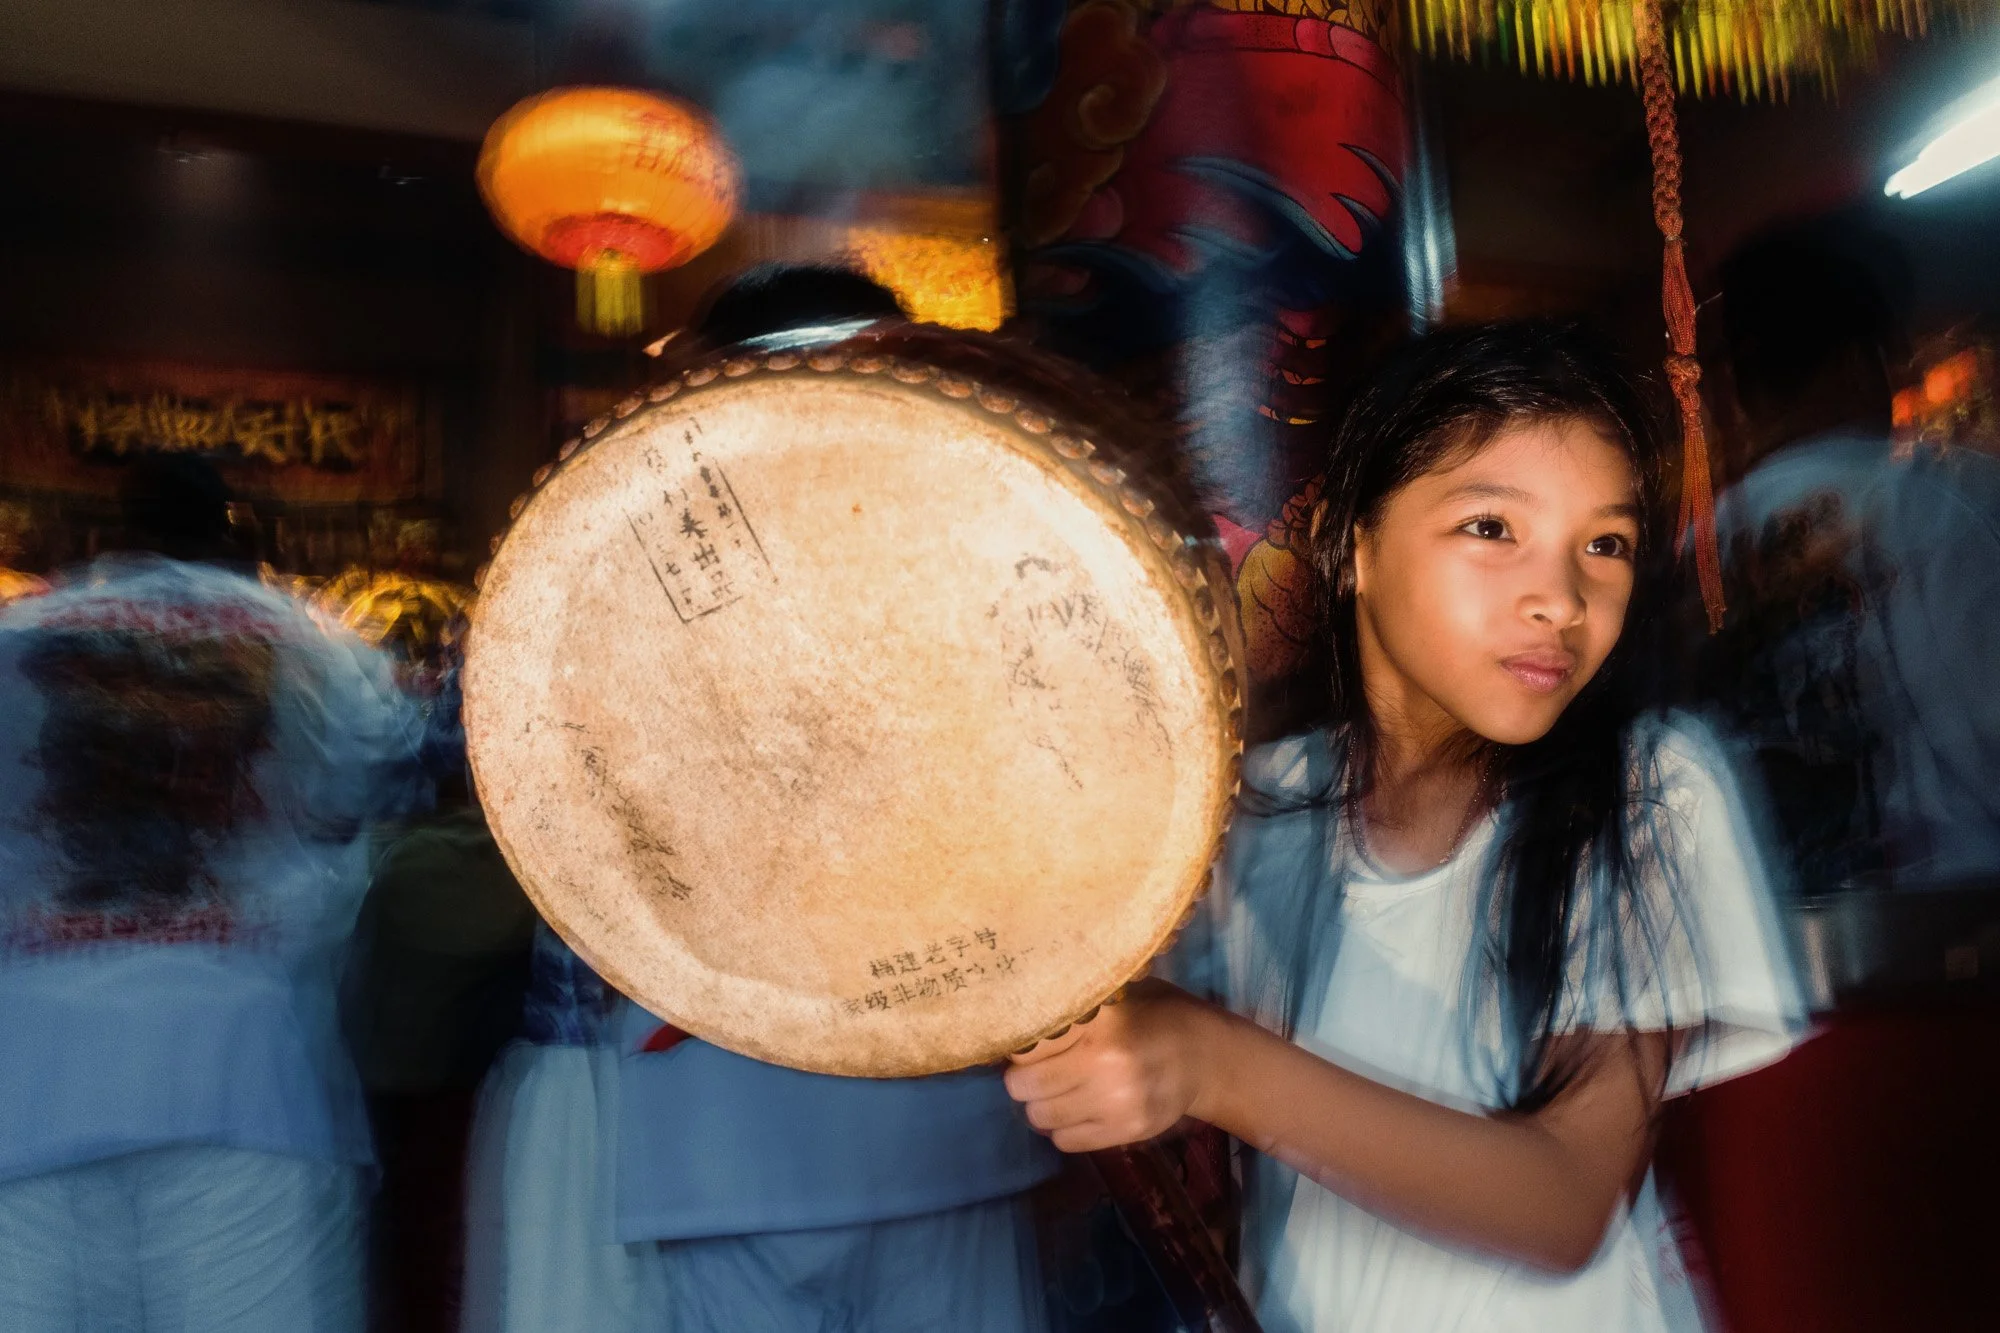
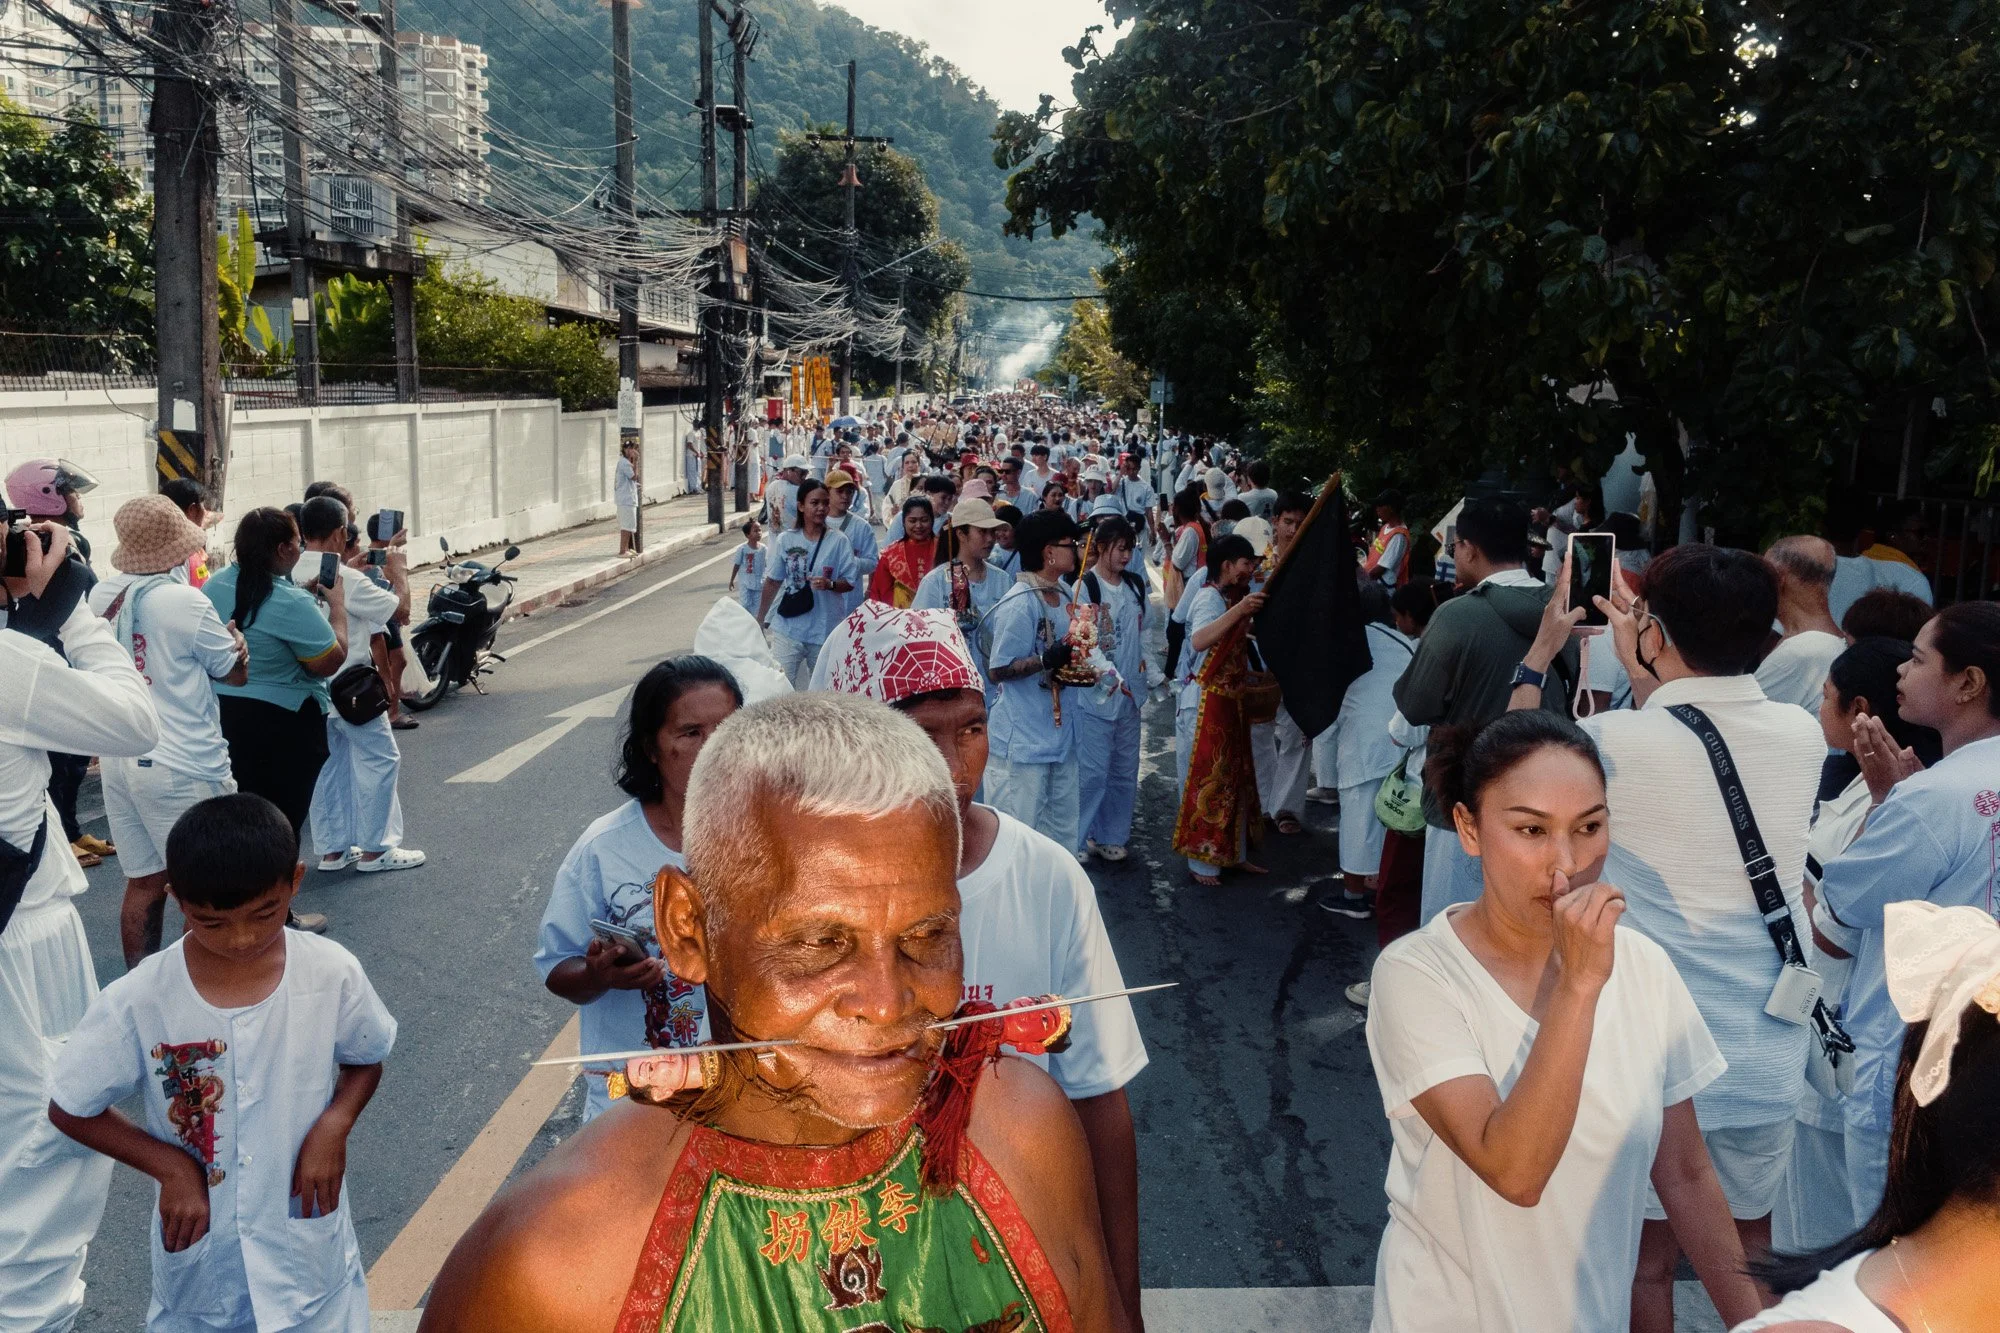
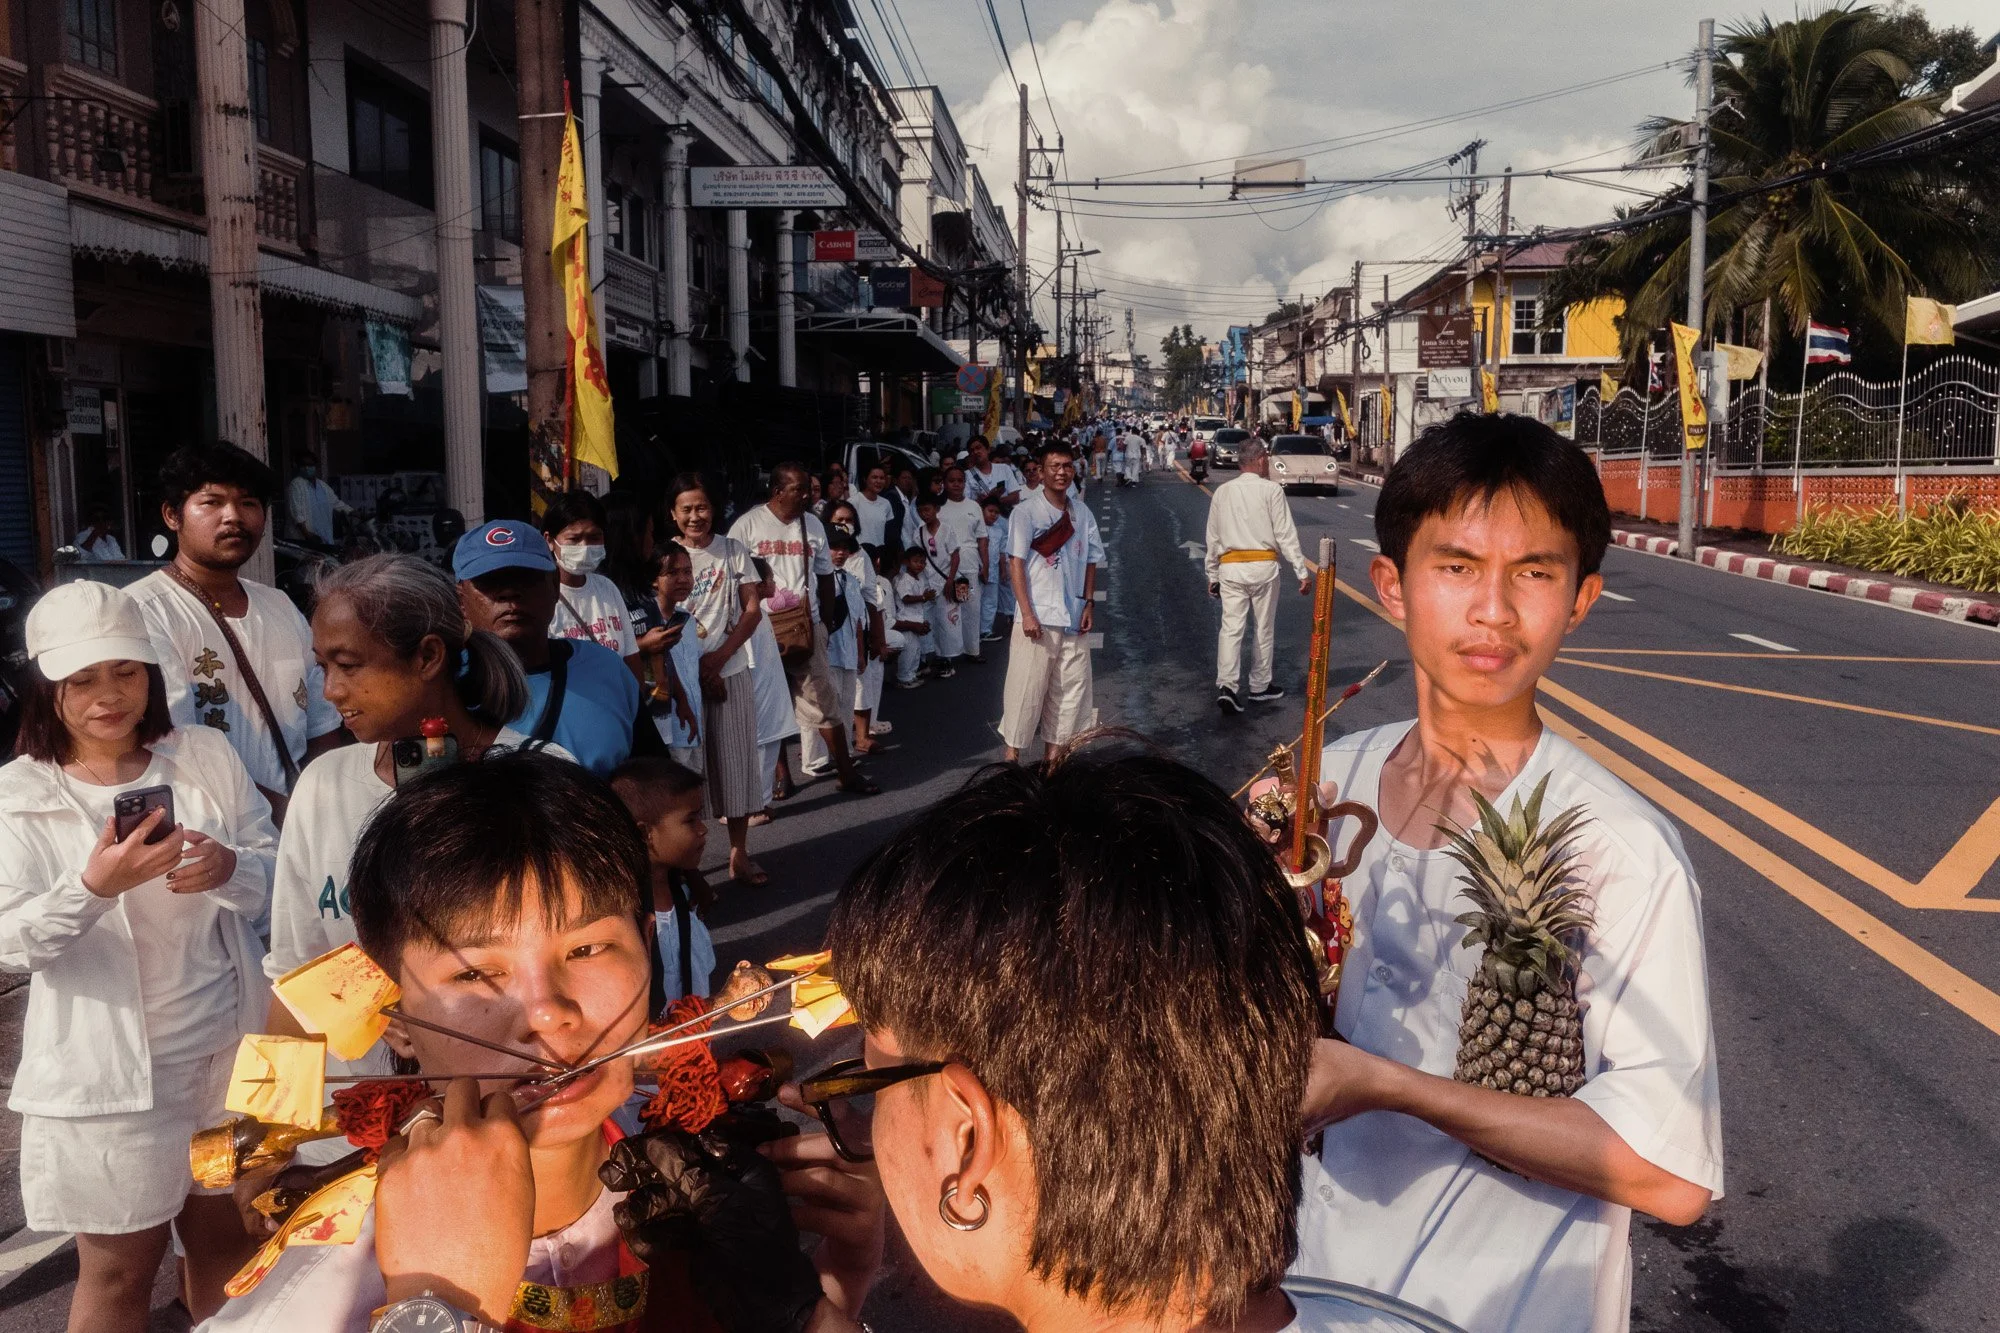
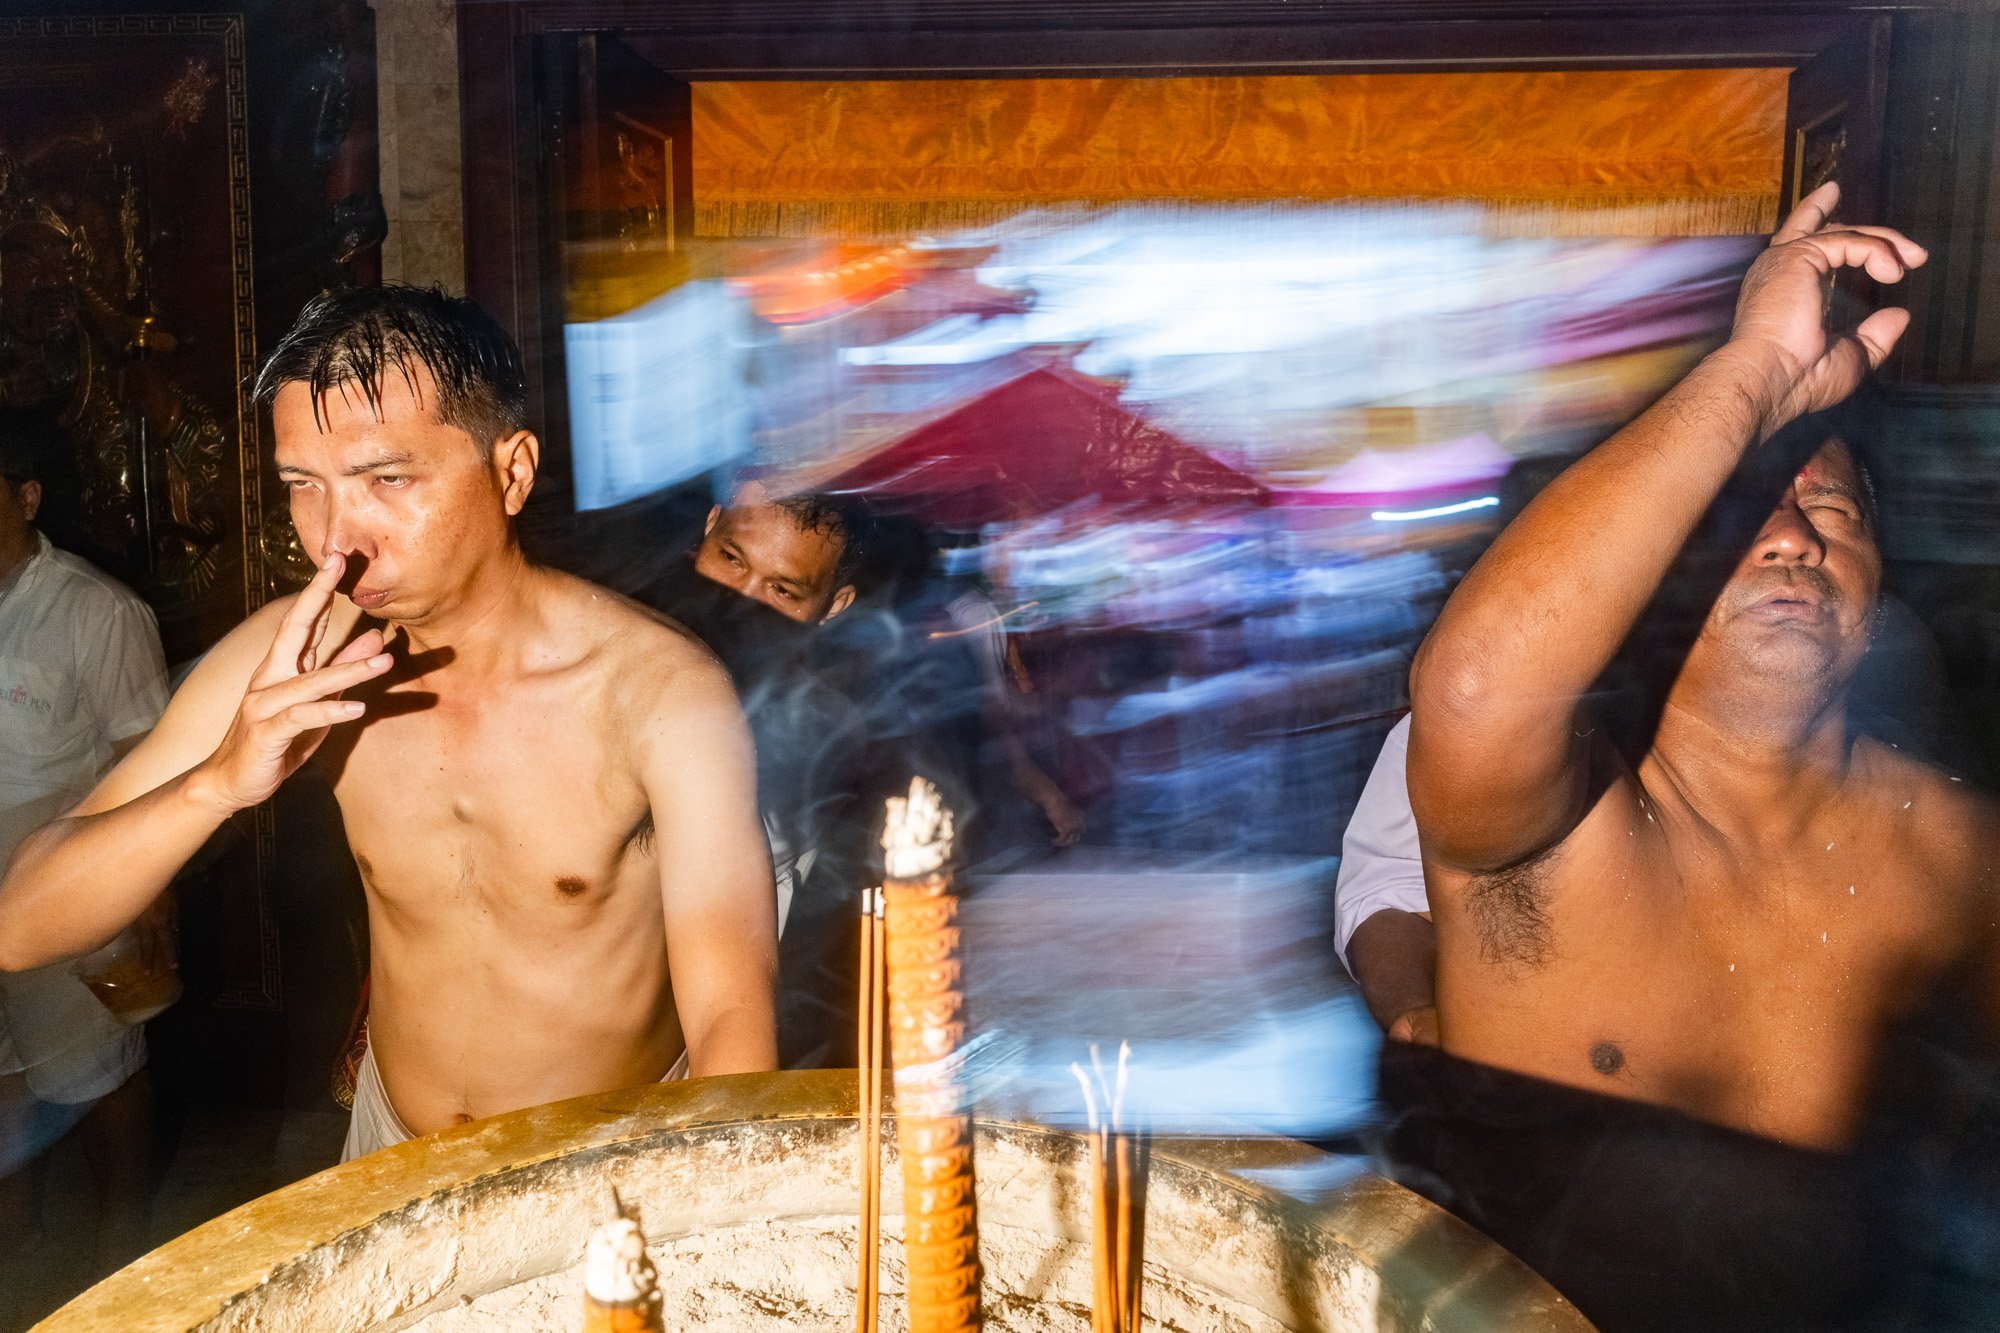
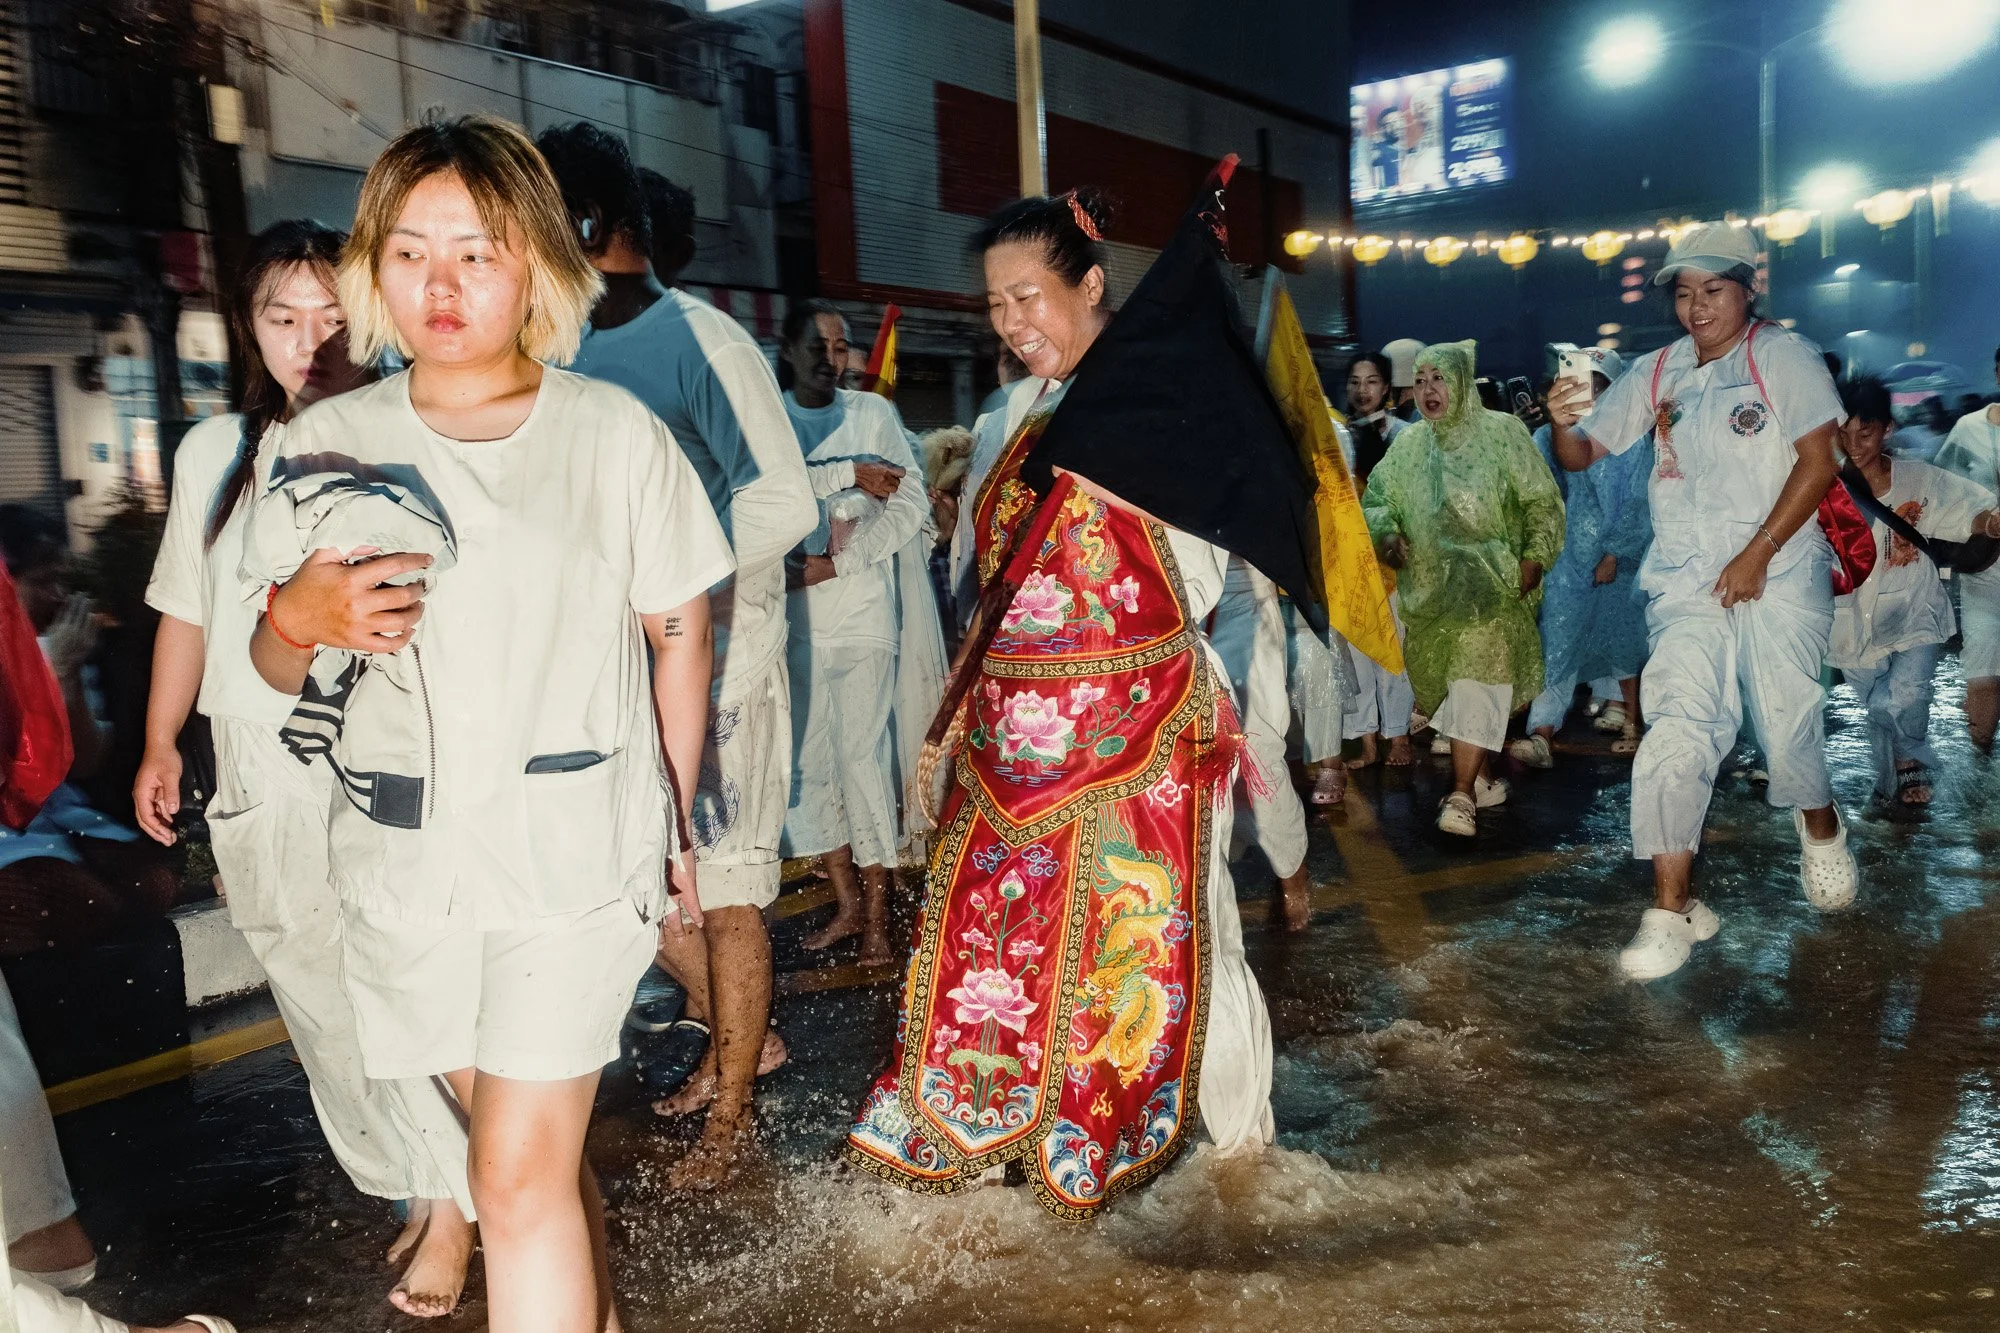
Kids were practicing their drumming while more and more people slowly arrived. If you have seen the earlier parts of this series, you already know what happens next. The Masongs began entering trance.
But this shrine was different.
What we witnessed there was hands down my favorite experience of the entire festival. The energy, the closeness, the authenticity. It was unbelievable.
4. Ricoh GRIV - 1/250 - f/11 - ISO400
5. Ricoh GRIV - 1/200 - f/11 - ISO400
6. Ricoh GRIV - 1/250 - f/11 - ISO400
7. Ricoh GRIV - 1/6 - f/11 - ISO400
8. Ricoh GRIV - 1/5 - f/9.0 - ISO400
9. Ricoh GRIV - 1/6 - f/9.0 - ISO400
10. Ricoh GRIV - 1/6 - f/9.0 - ISO400

11. Ricoh GRIV - 1/320 - f/11 - ISO400
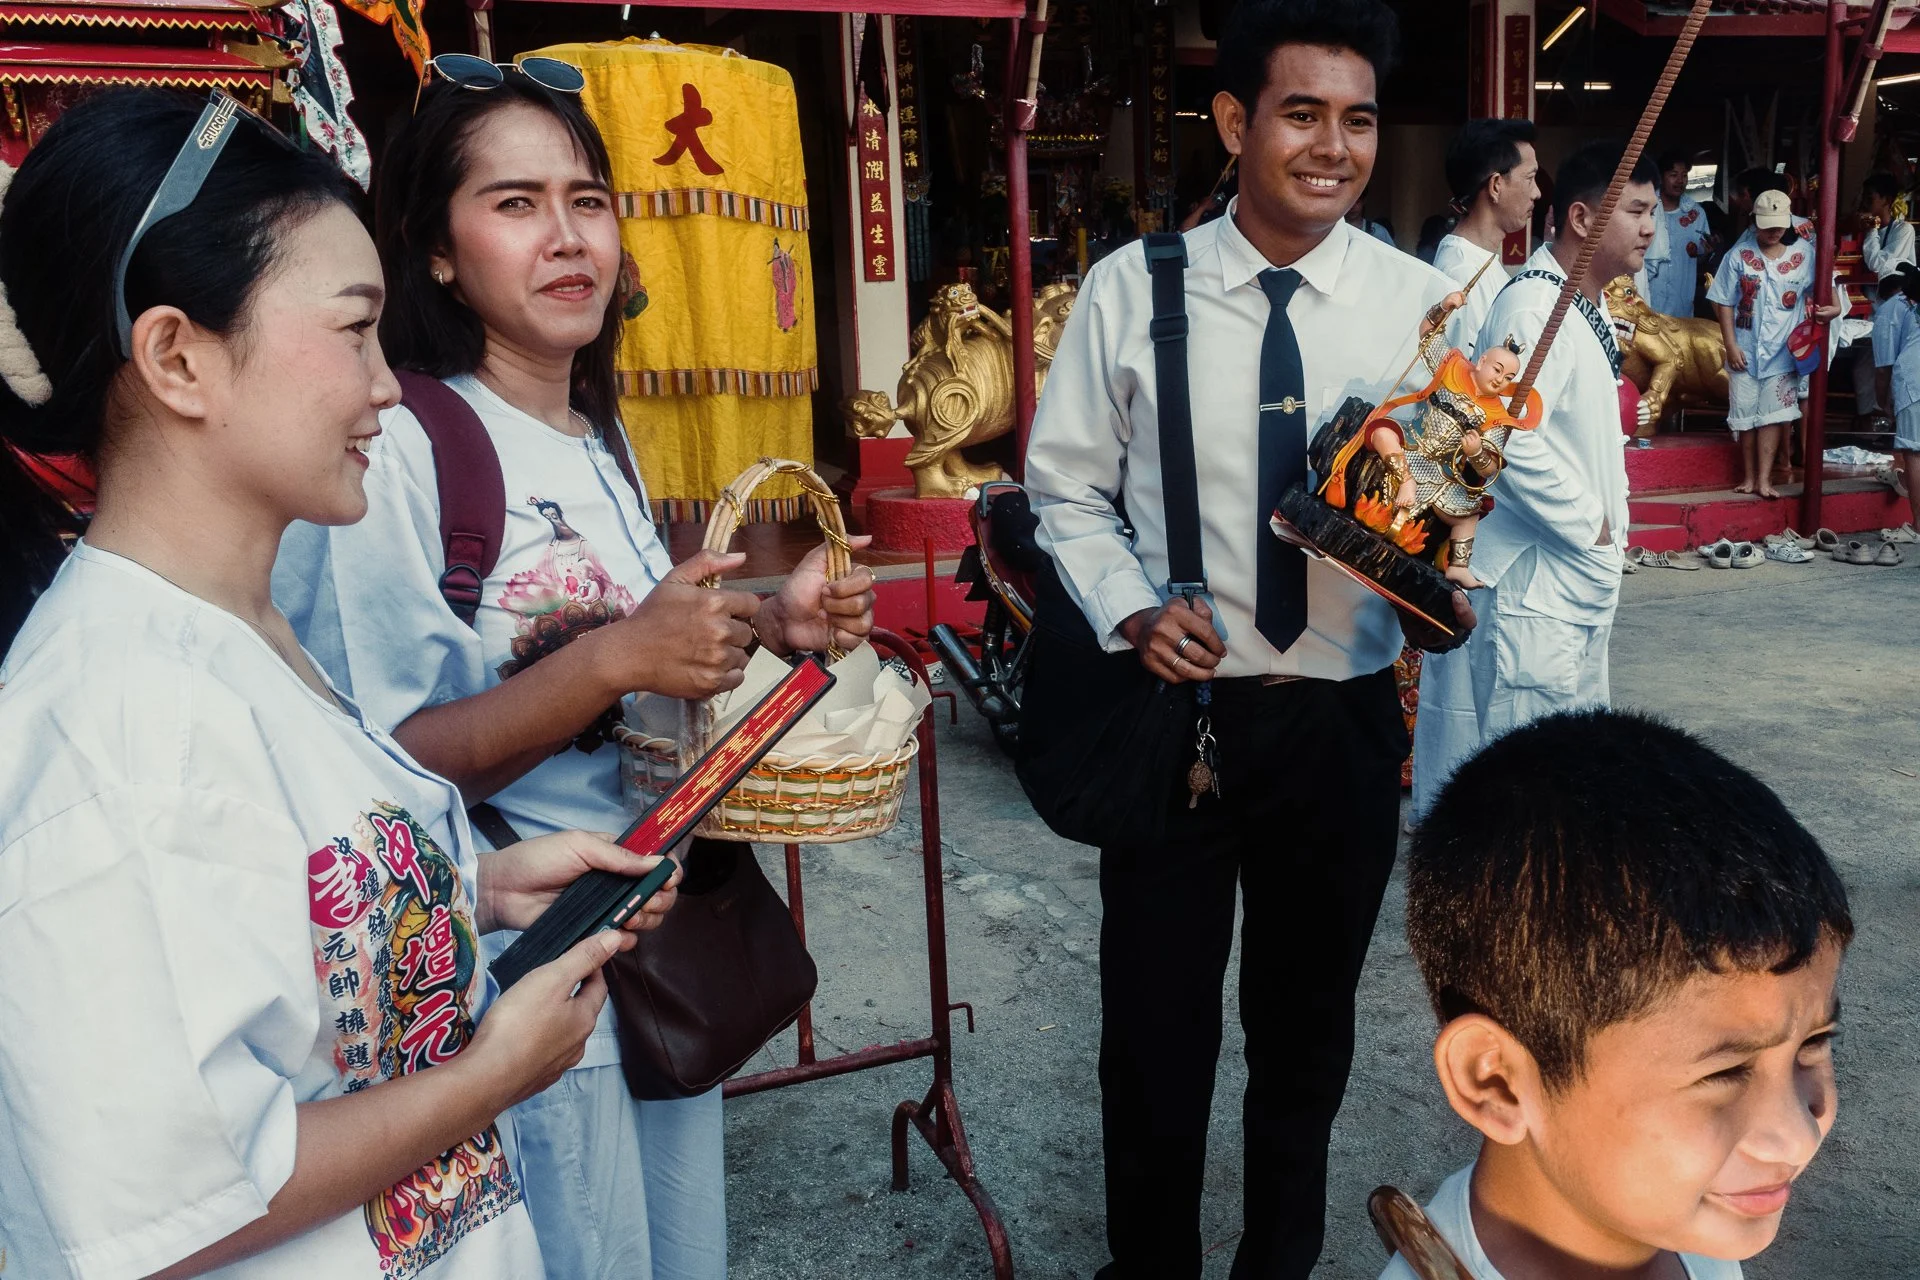
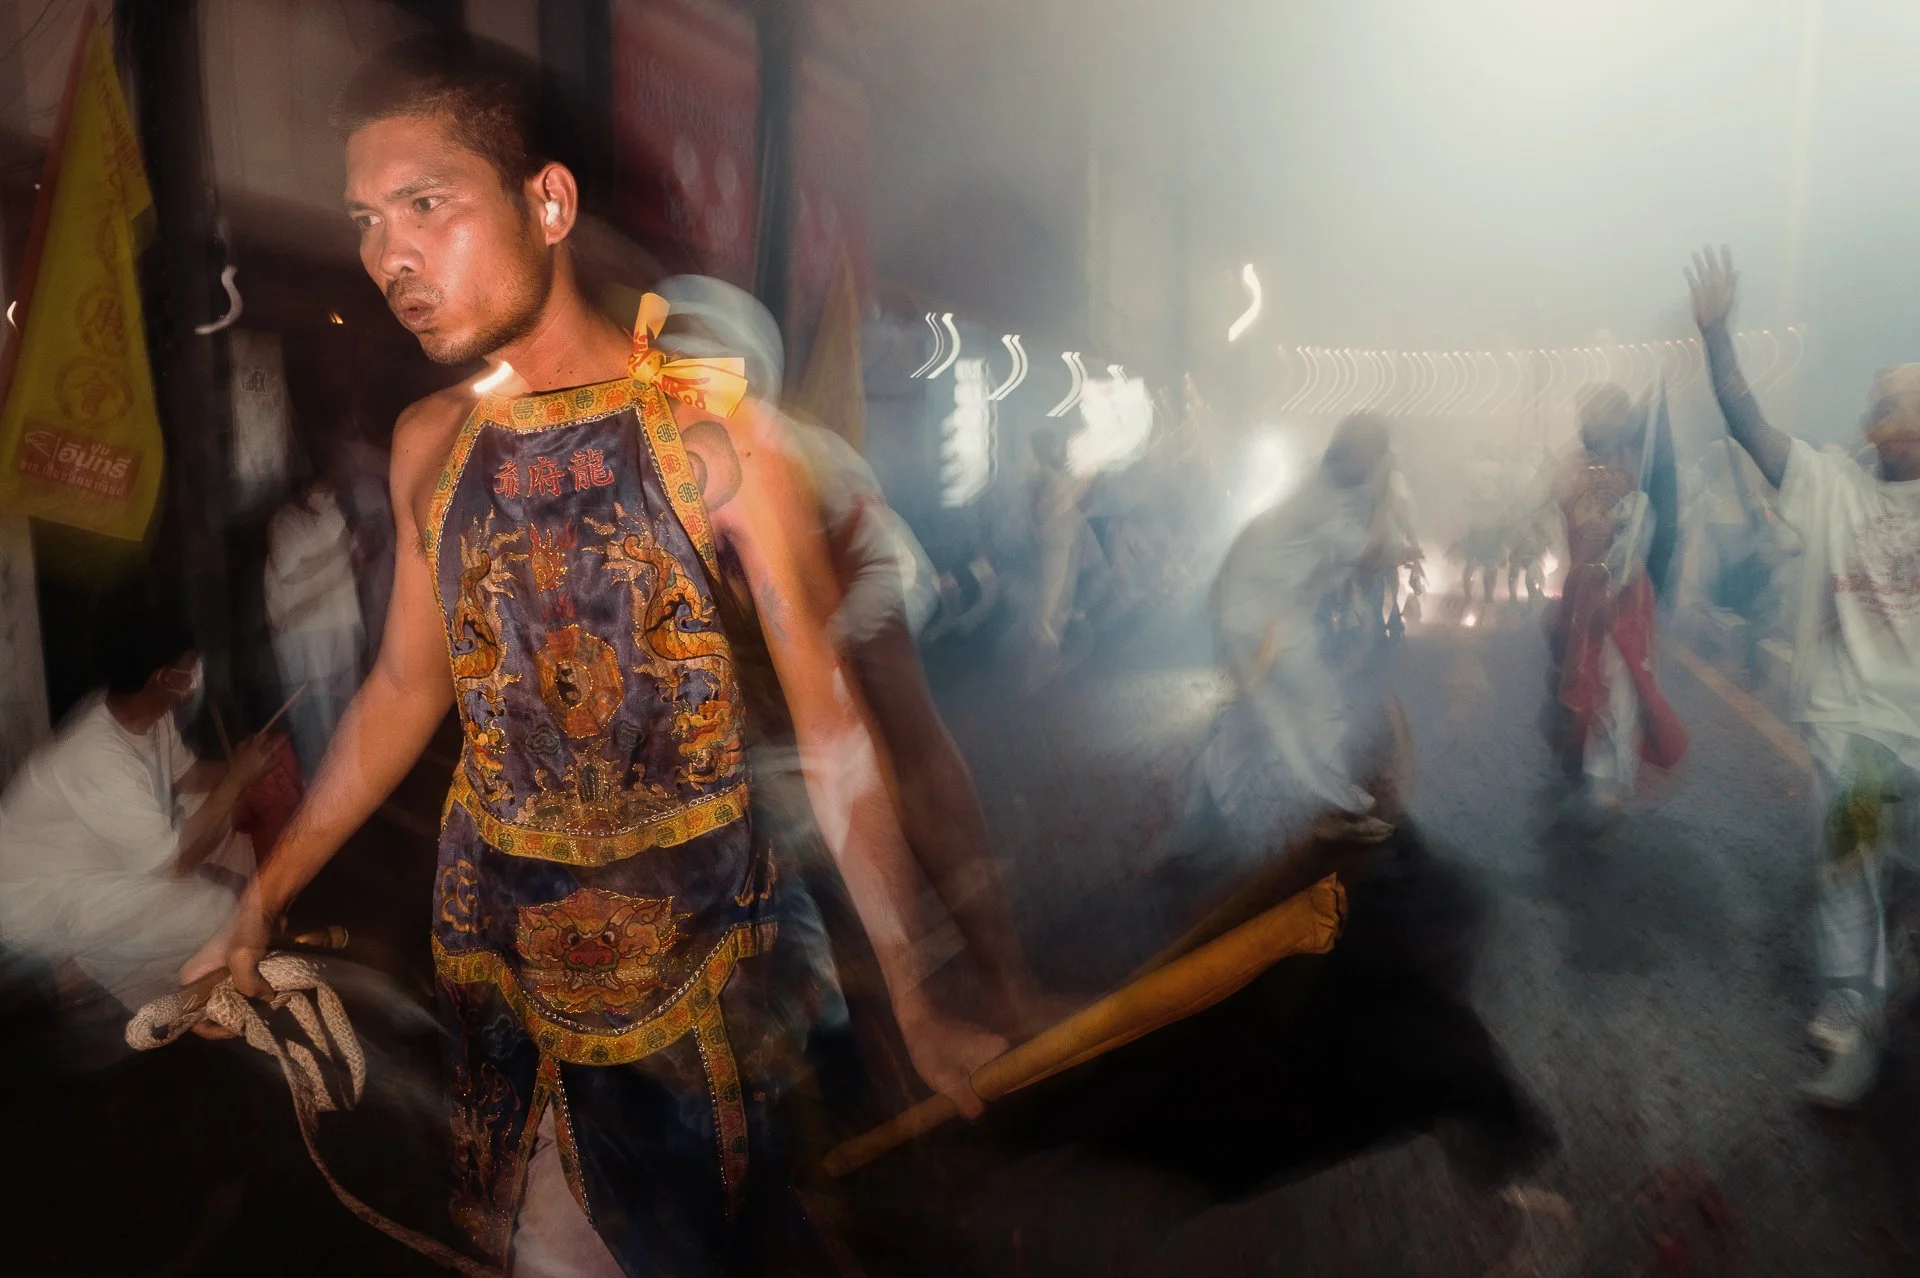
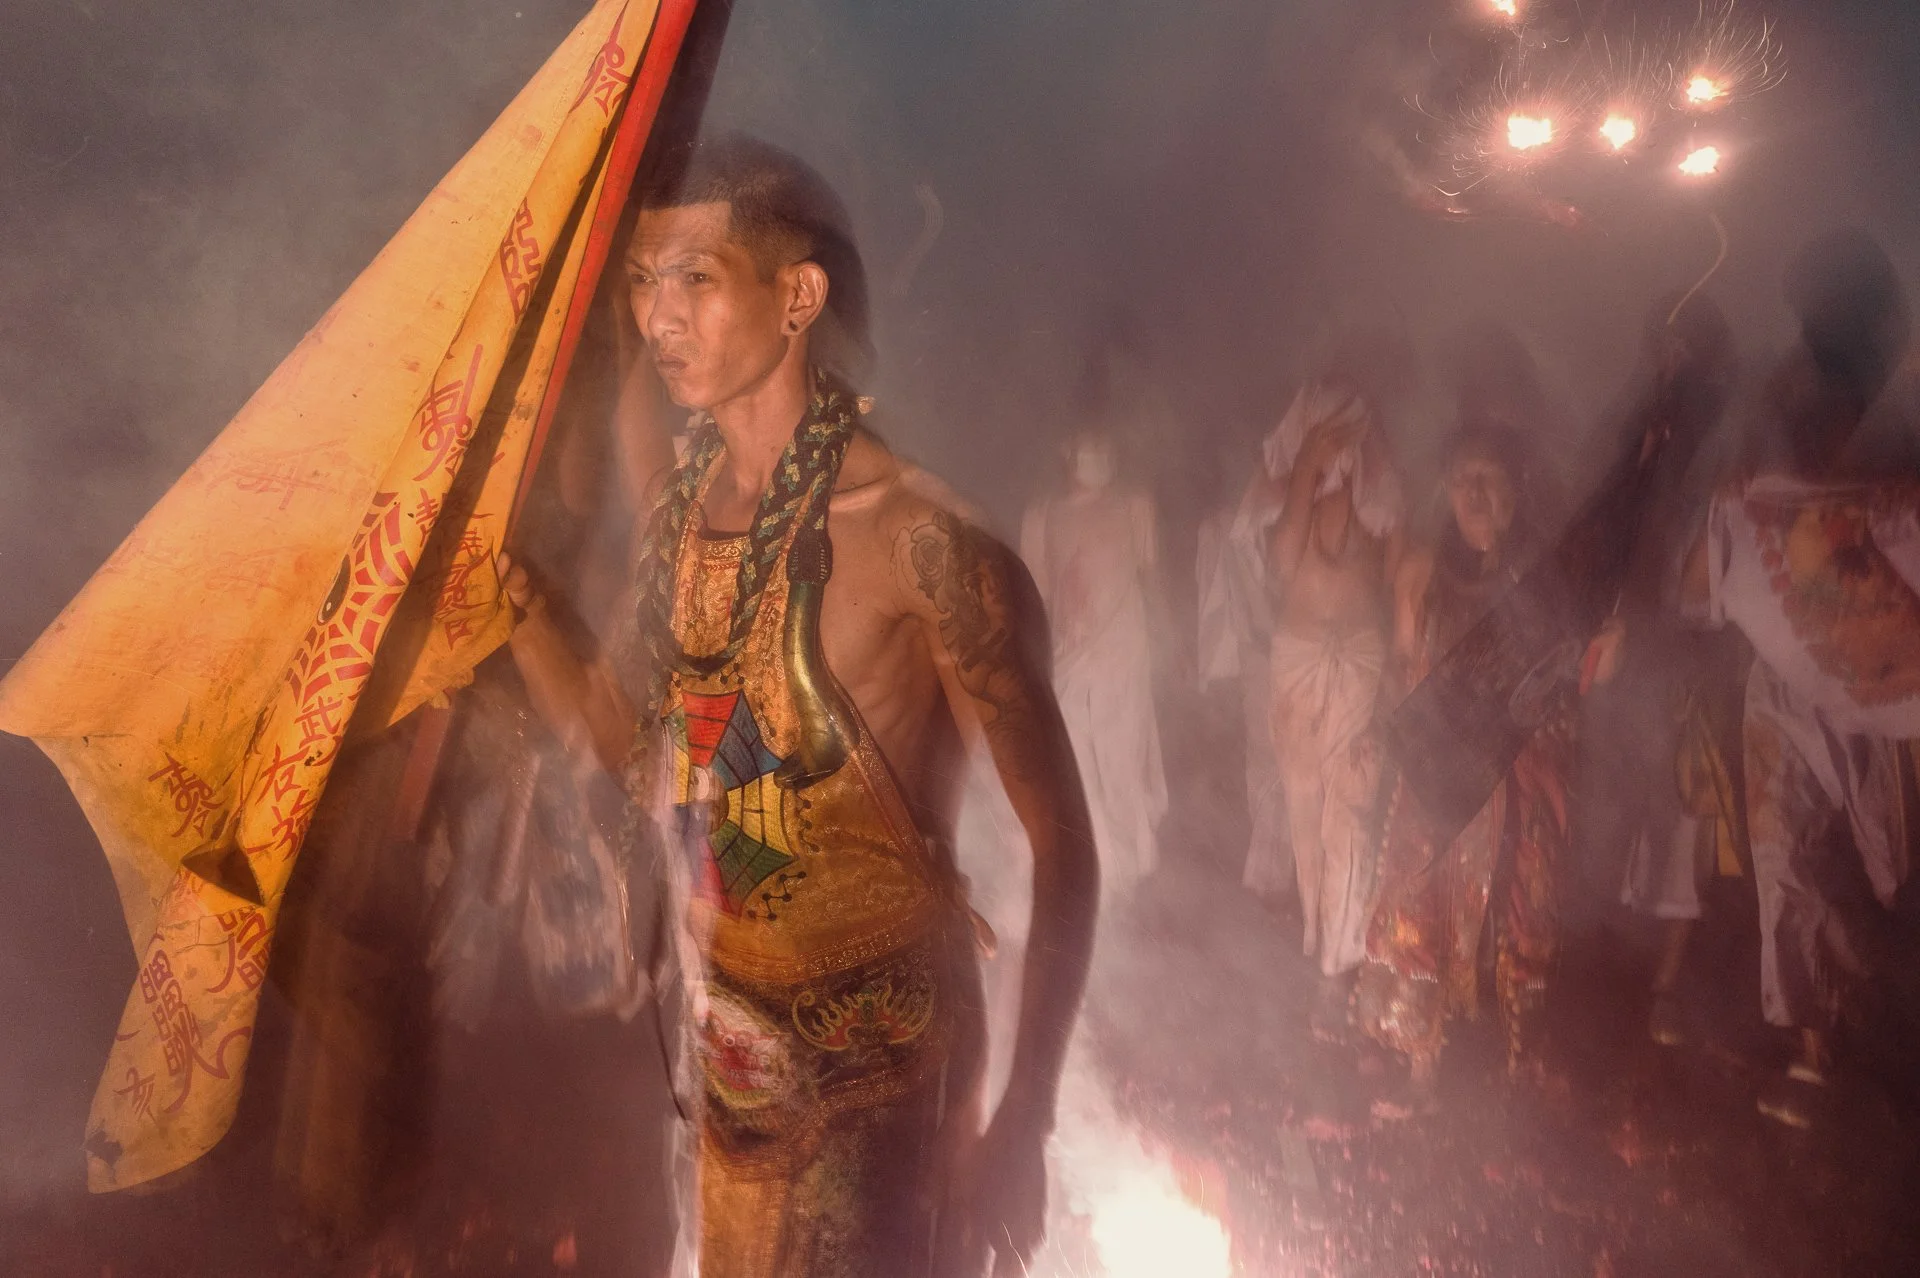
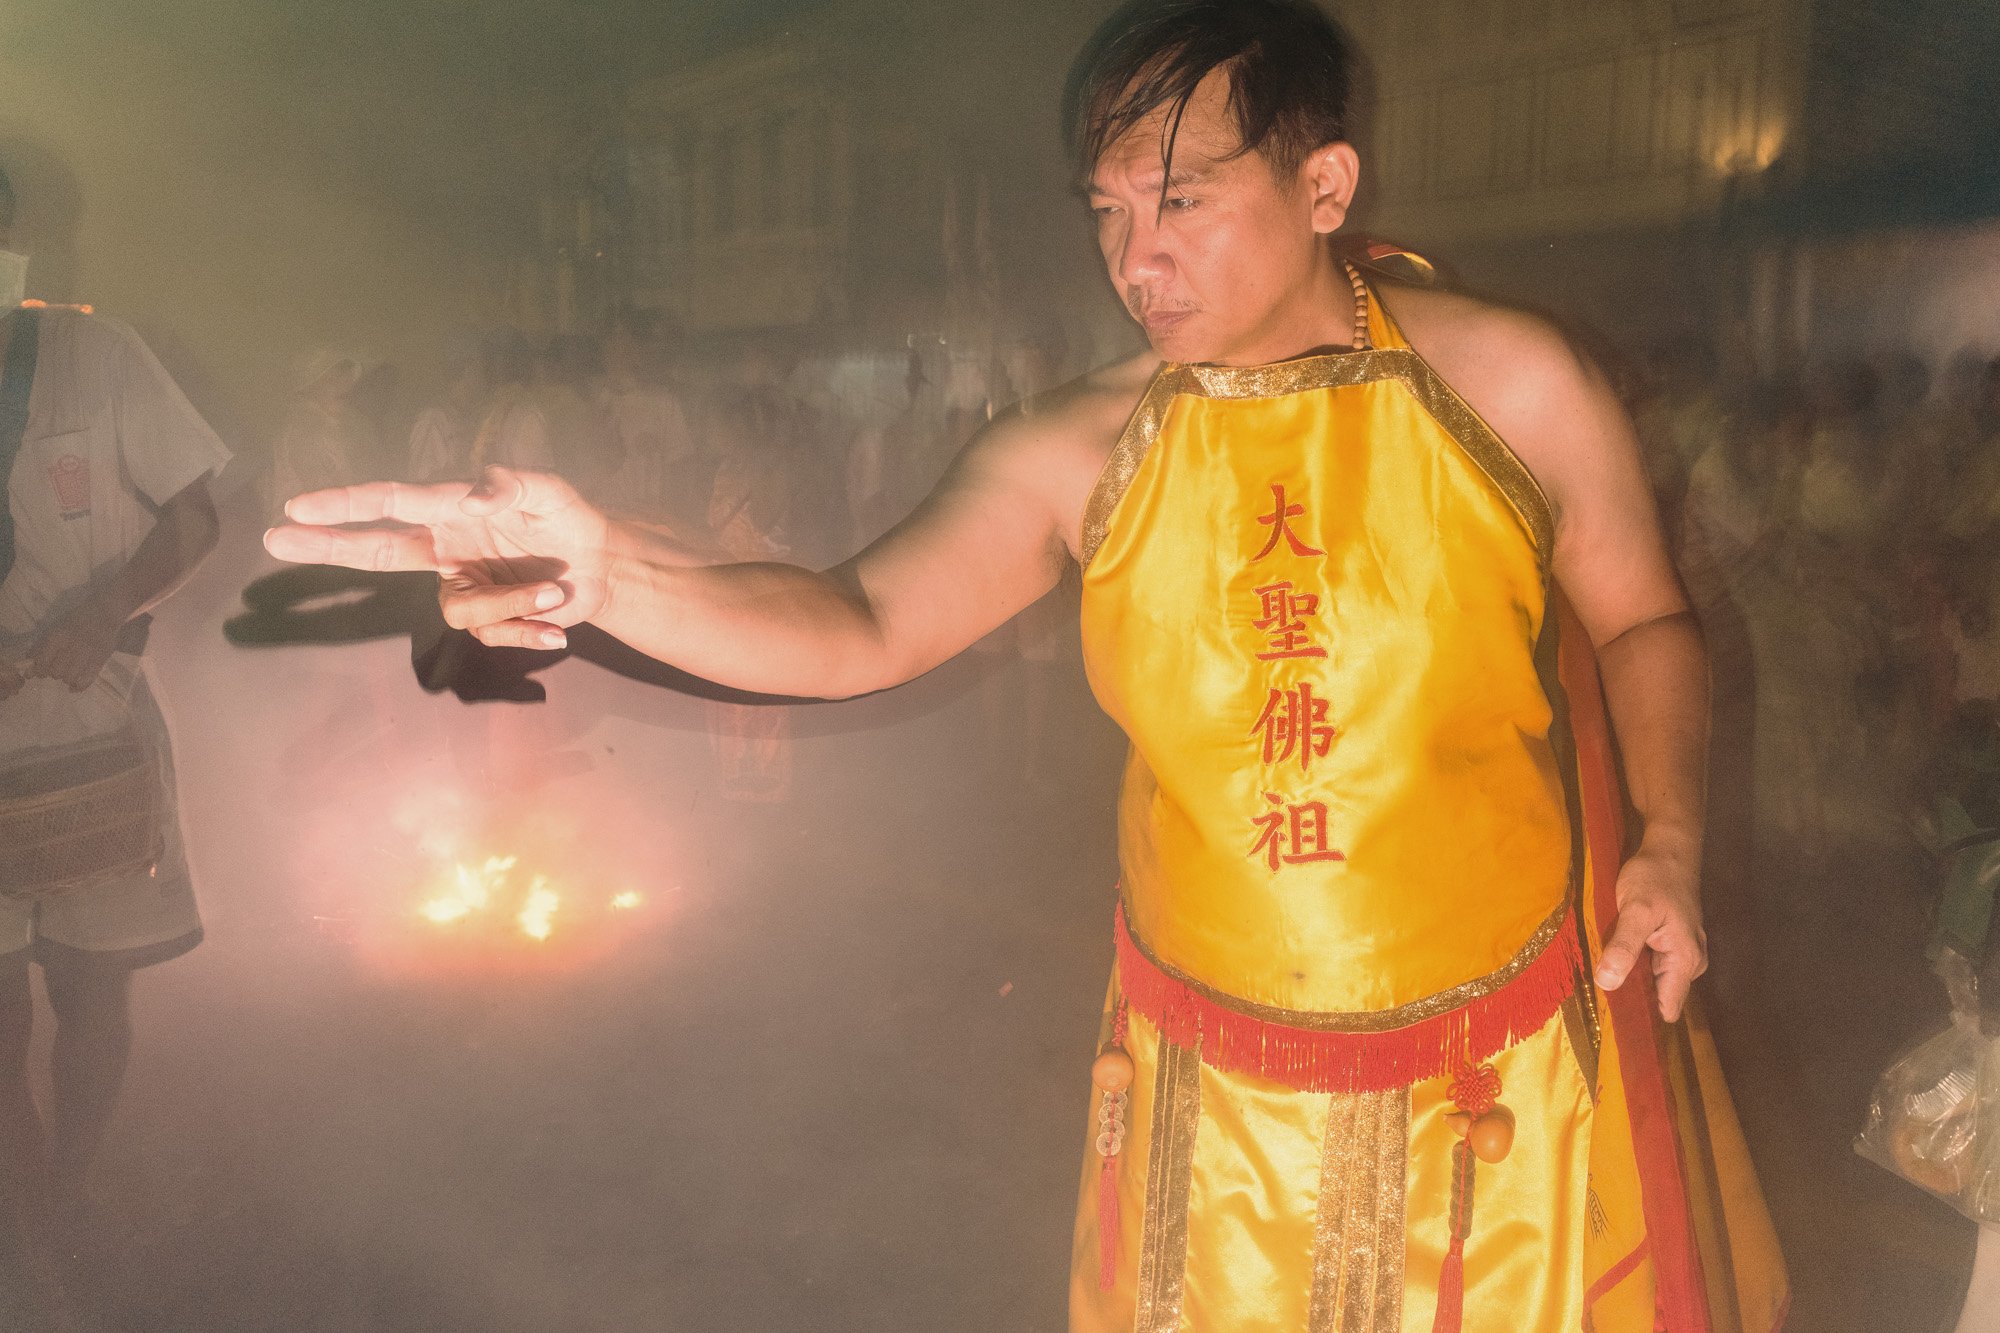
When the parade started, it felt completely different from what we had seen before. Because of the remote location, everything felt more rural and grounded. Calm, respectful, and deeply personal.
12. Ricoh GRIV - 1/200 - f/11 - ISO200
13. Ricoh GRIV - 1/200 - f/11 - ISO400
14. Ricoh GRIV - 1/500 - f/11 - ISO400
15. Ricoh GRIV - 1/400 - f/11 - ISO200
16. Ricoh GRIV - 1/320 - f/11 - ISO400
17. Ricoh GRIV - 1/320 - f/11 - ISO400
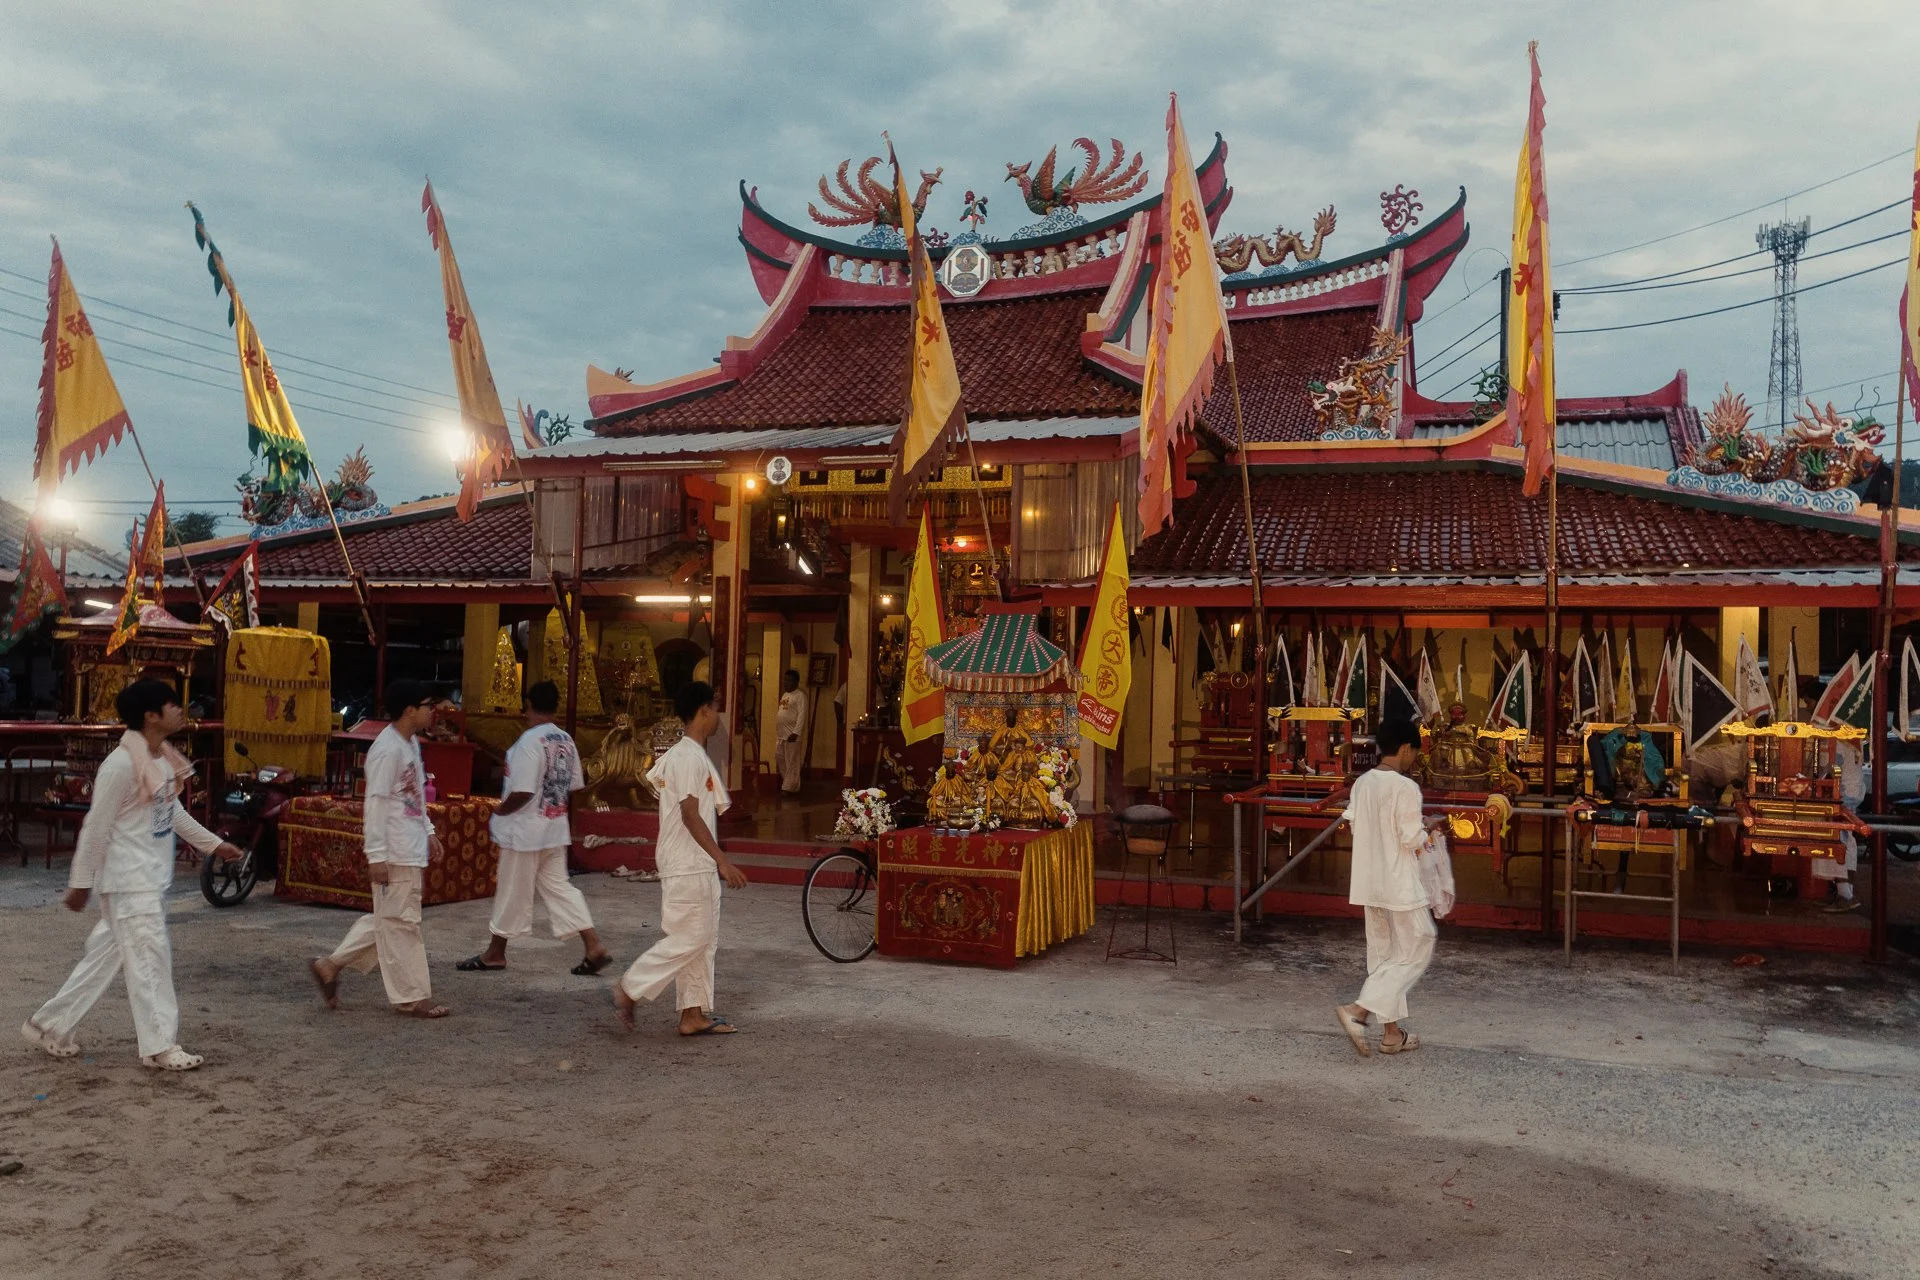
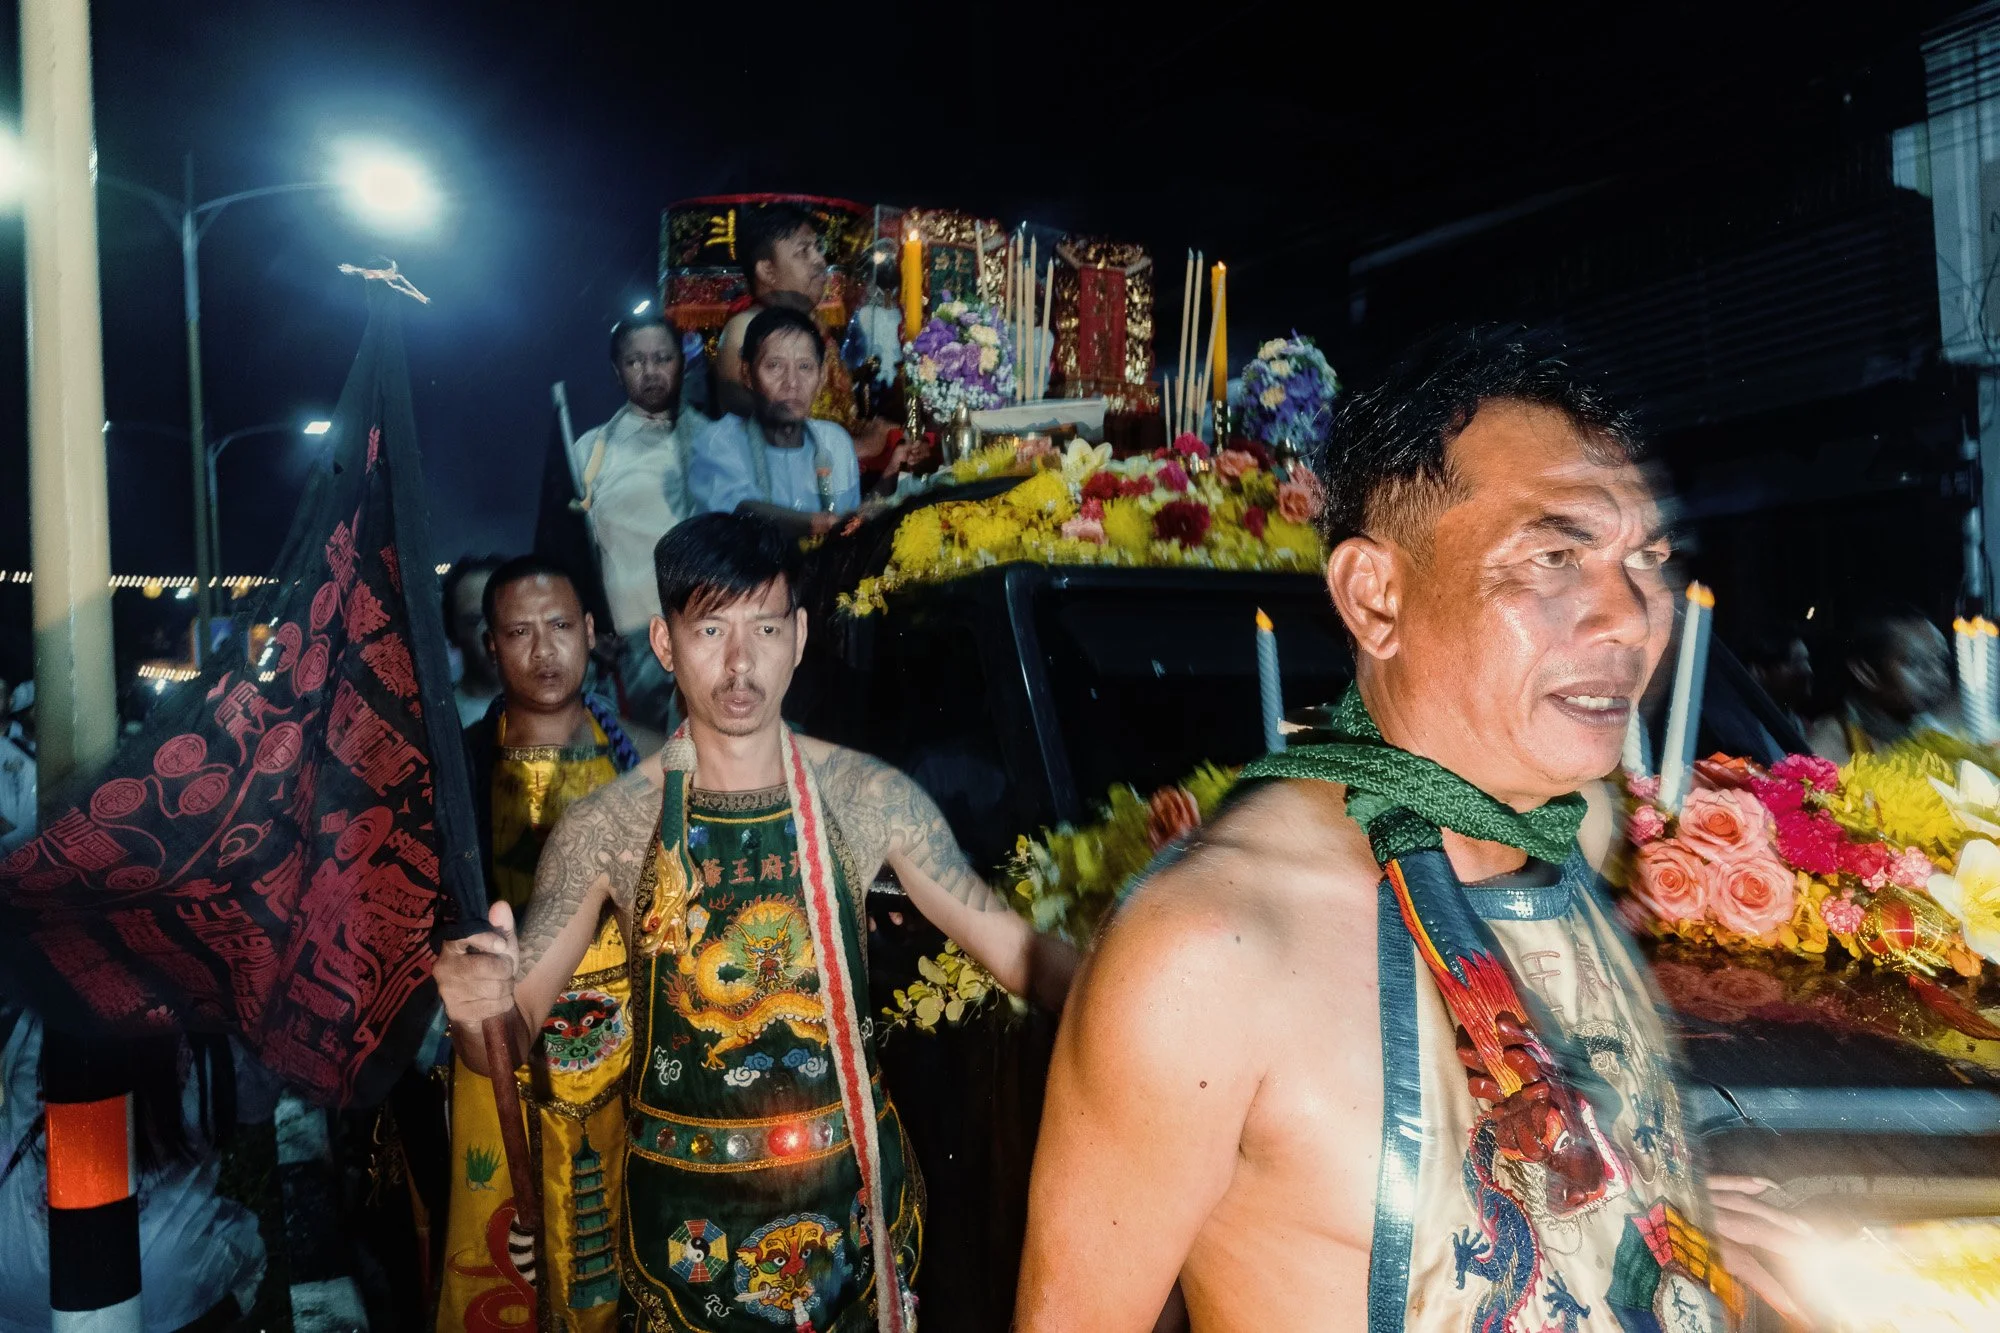
A Rural Parade
Later that afternoon, we drove for about an hour to reach a completely different location. A small village in the middle of nowhere. It was a risk because we had no idea what to expect. There could have been nothing at all.
But once again, we got lucky.
18. Ricoh GRIV - 1/200 - f/11 - ISO800
19. Ricoh GRIV - 1/80 - f/11 - ISO800
20. Ricoh GRIV - 1/125 - f/11 - ISO800
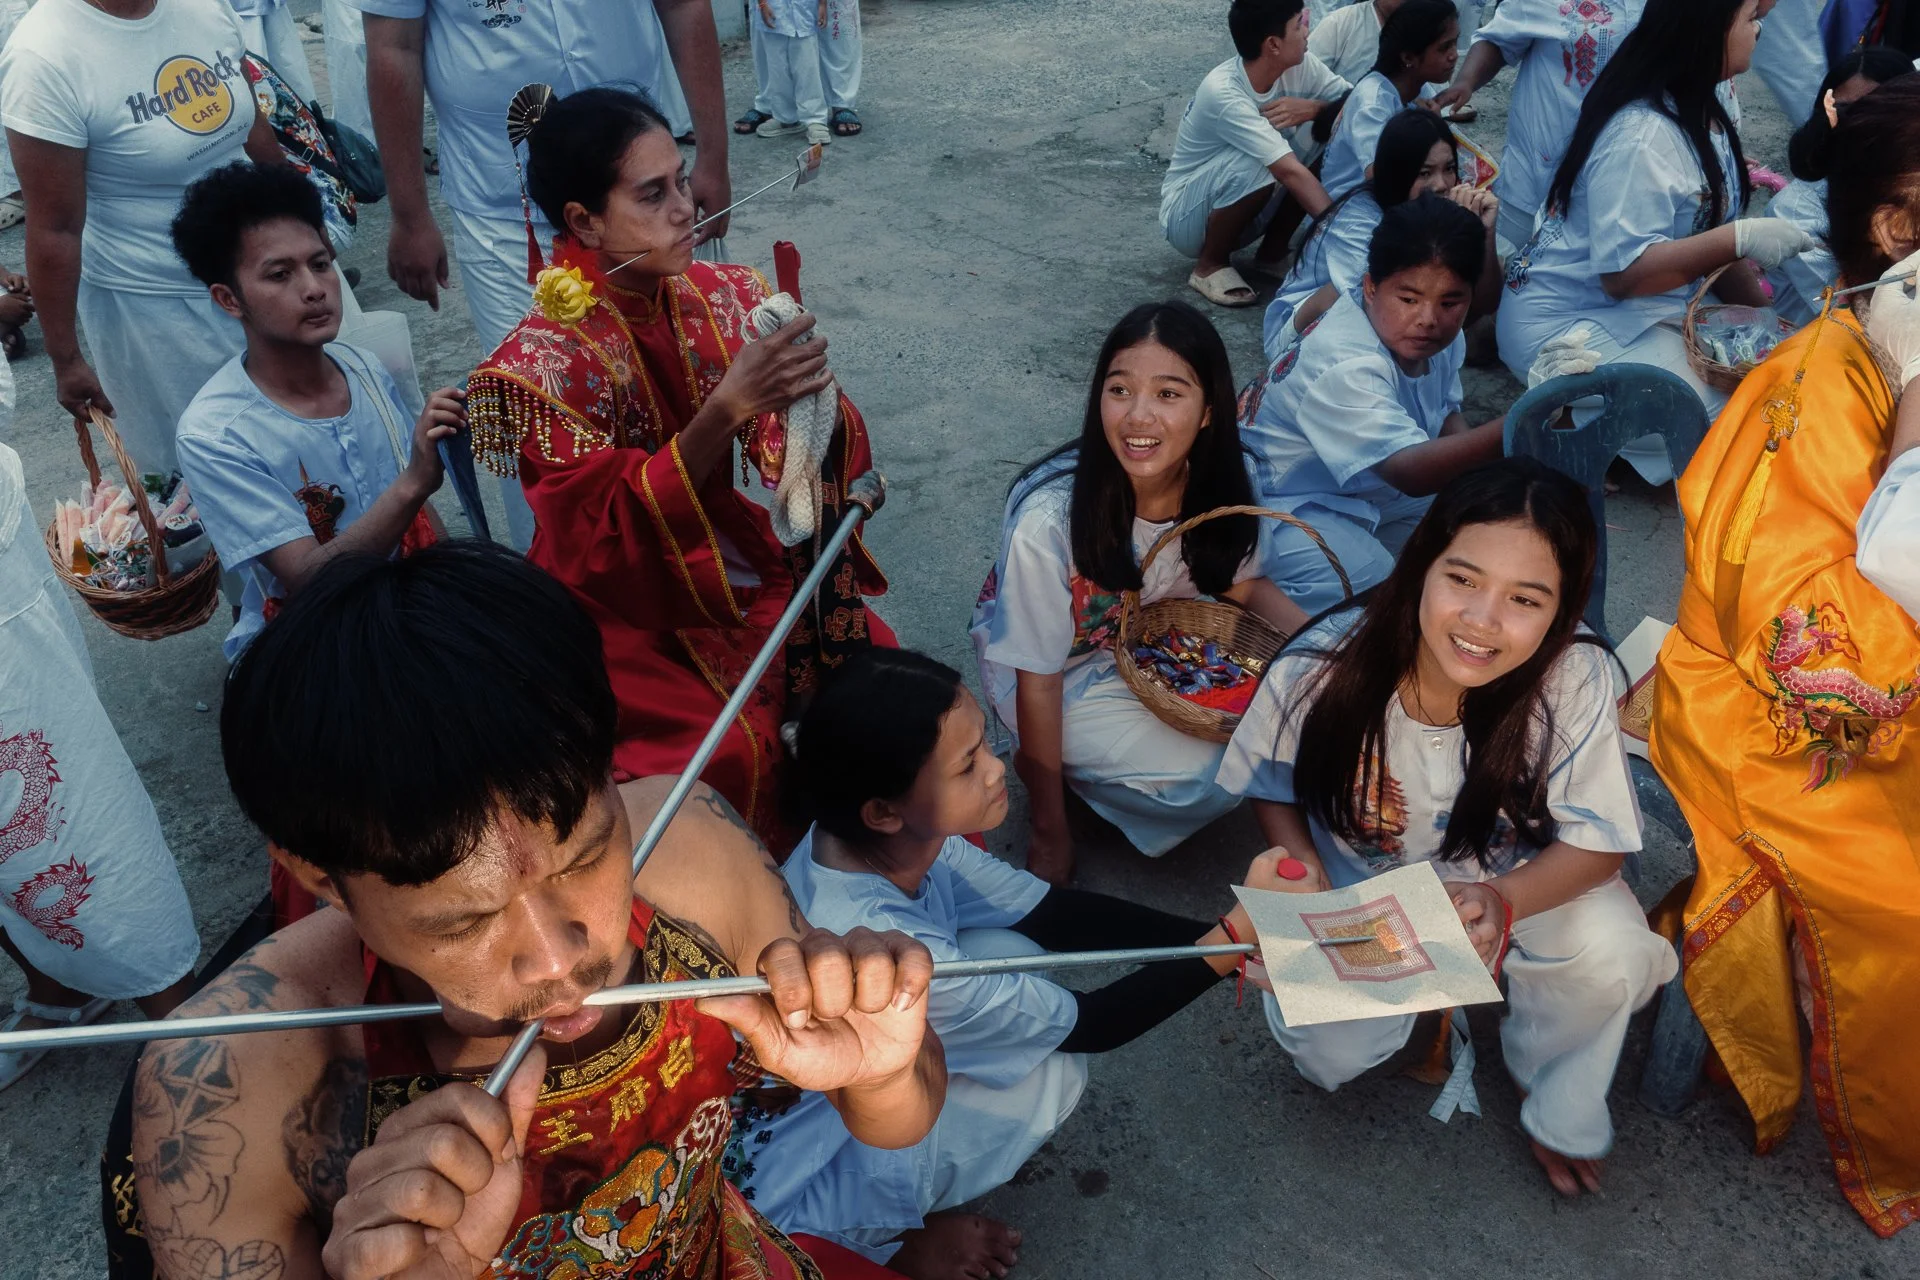
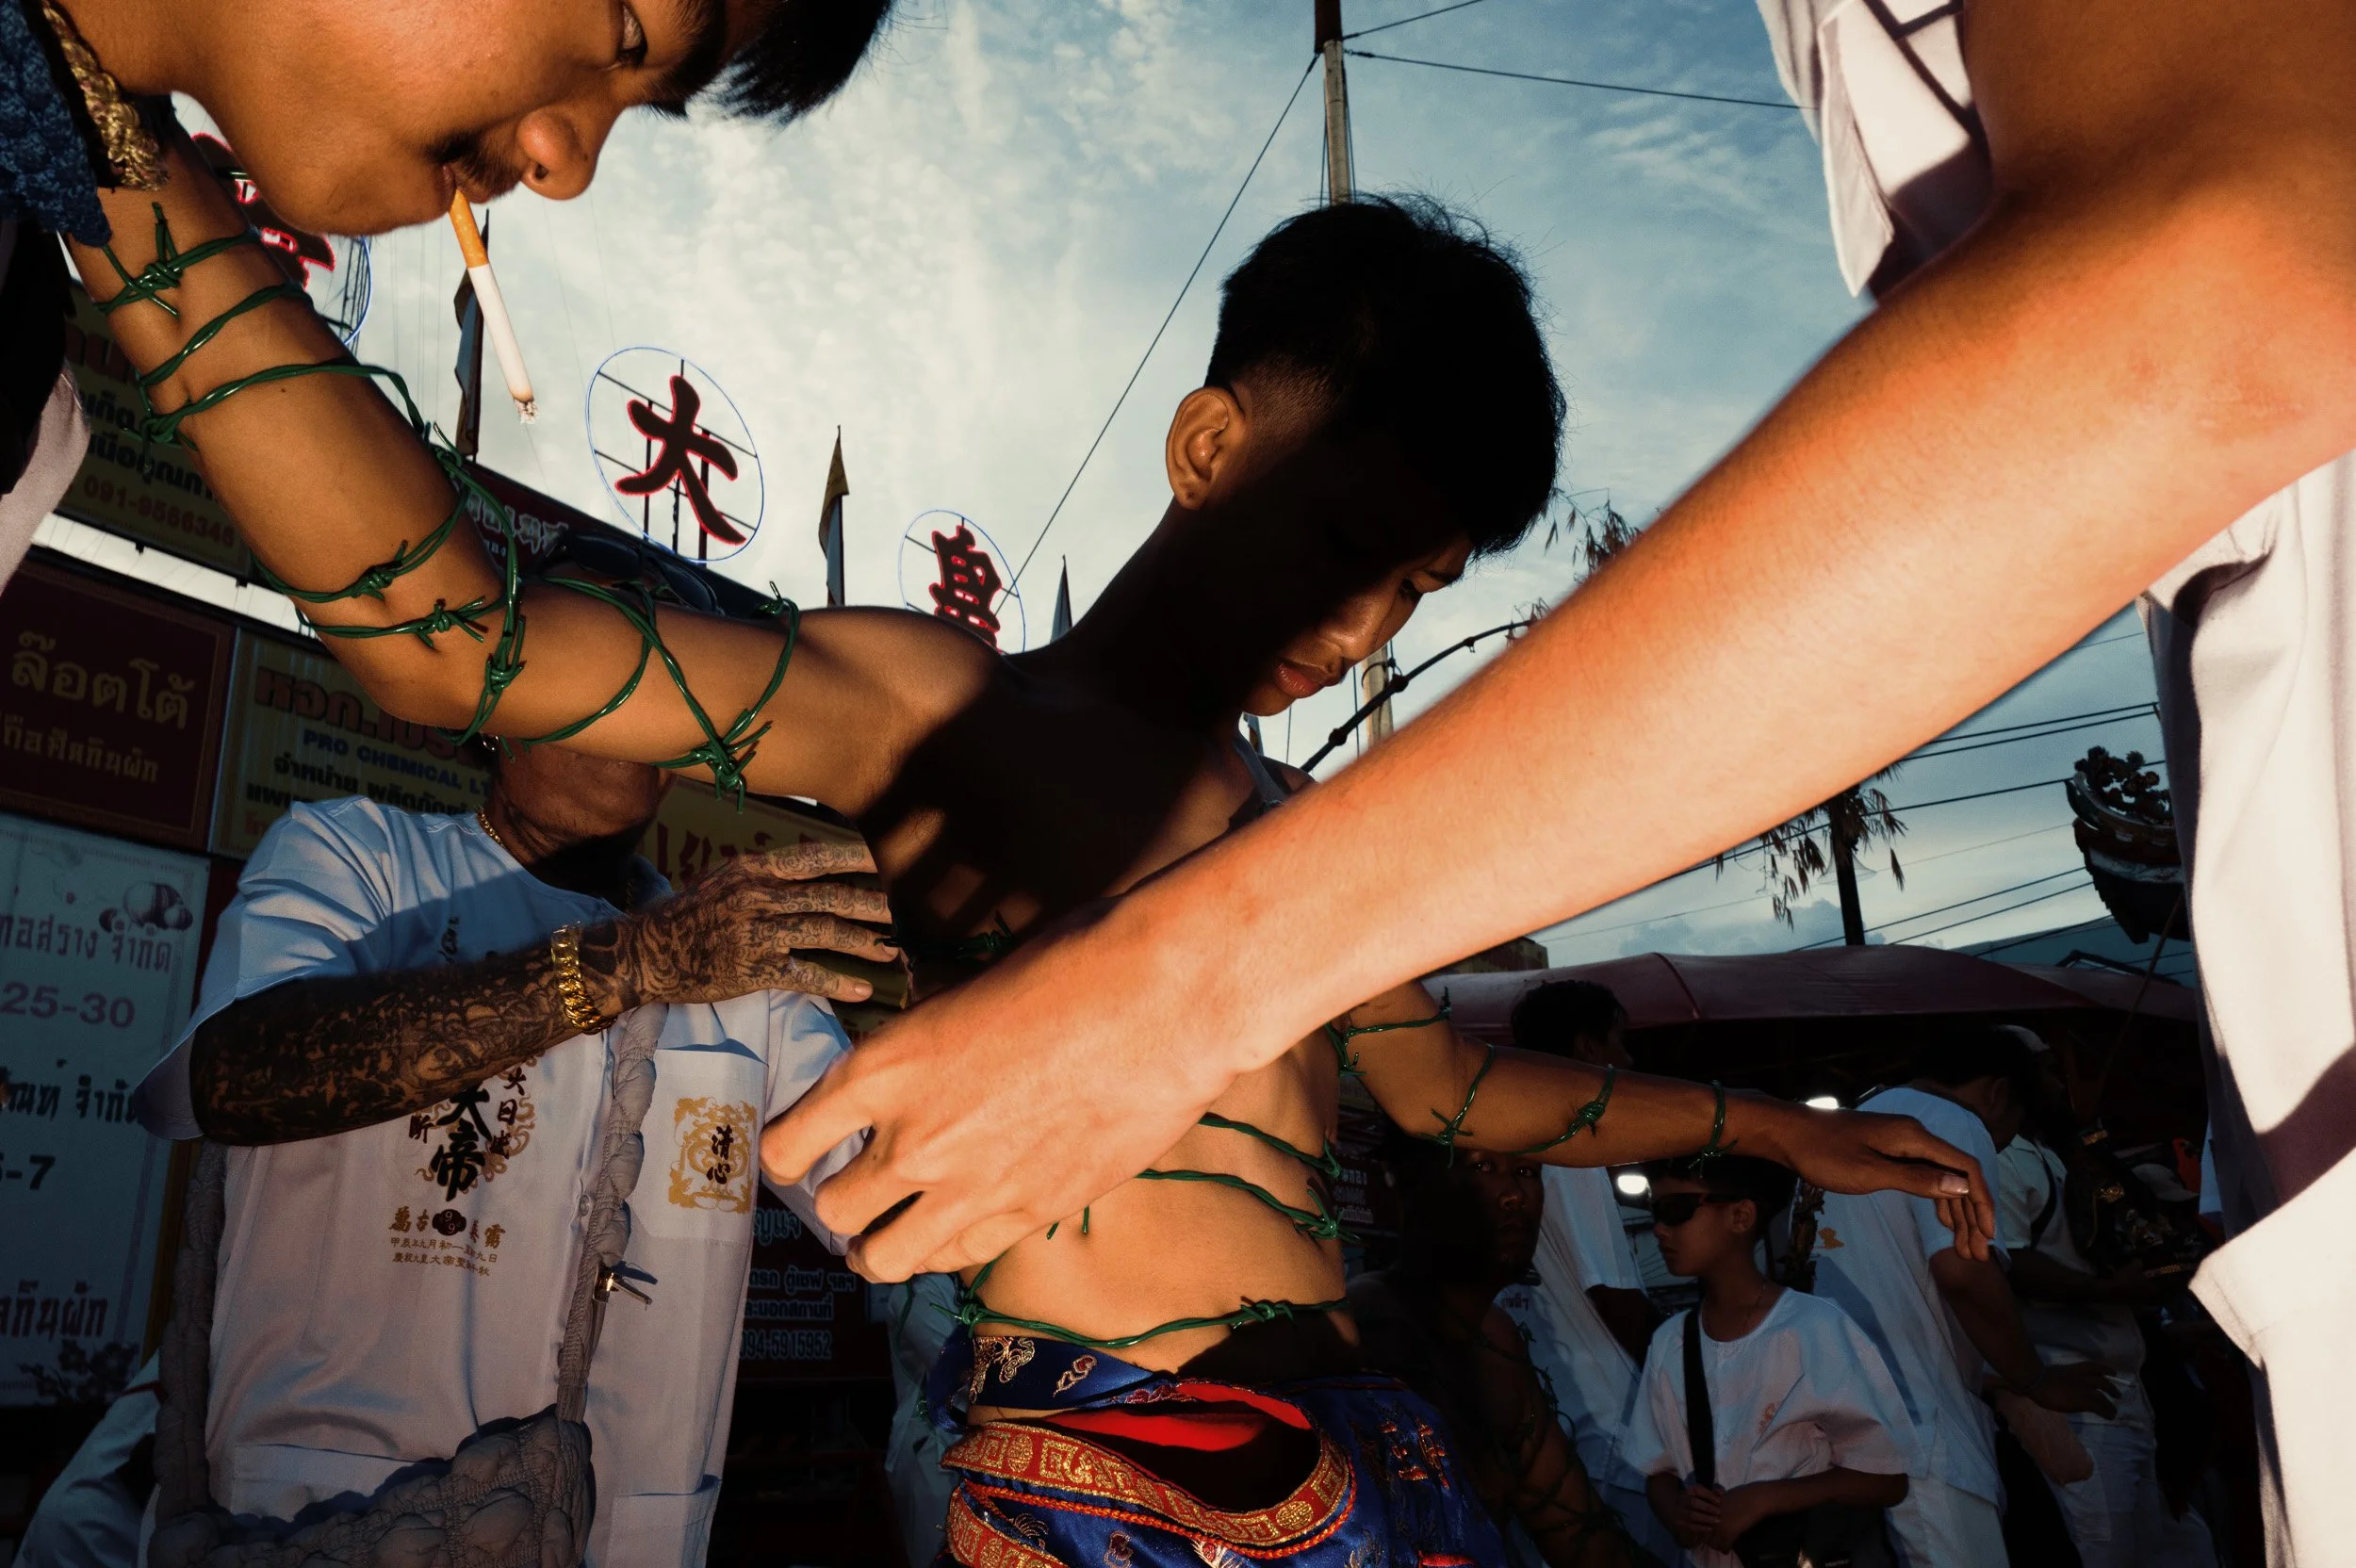
A Village That Time Forgot
While it was raining back in Phuket Old Town, this village stayed completely dry. The location was beautiful, and the locals told us that only one photographer had ever been there before. That was hard to believe.
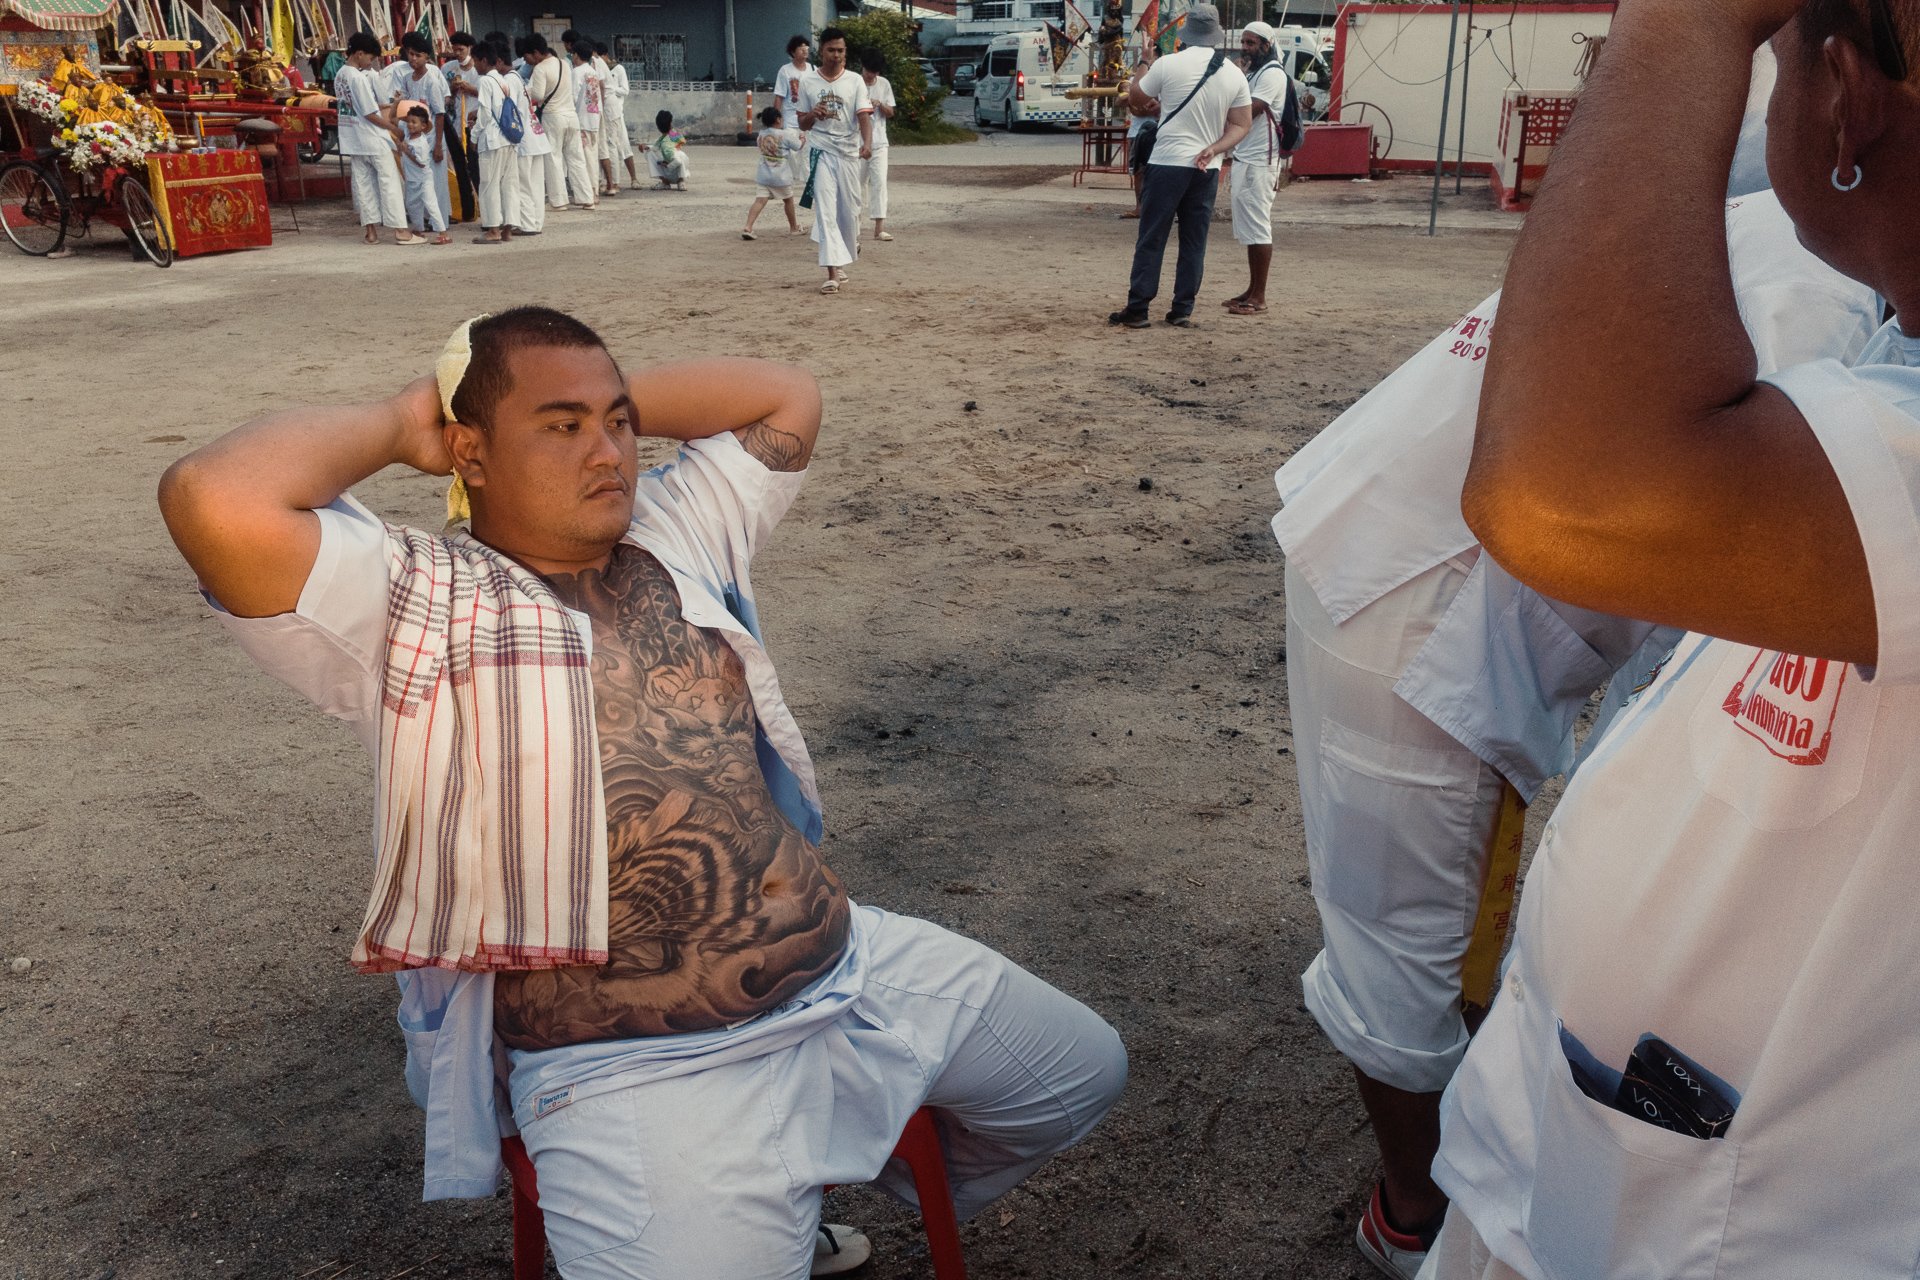
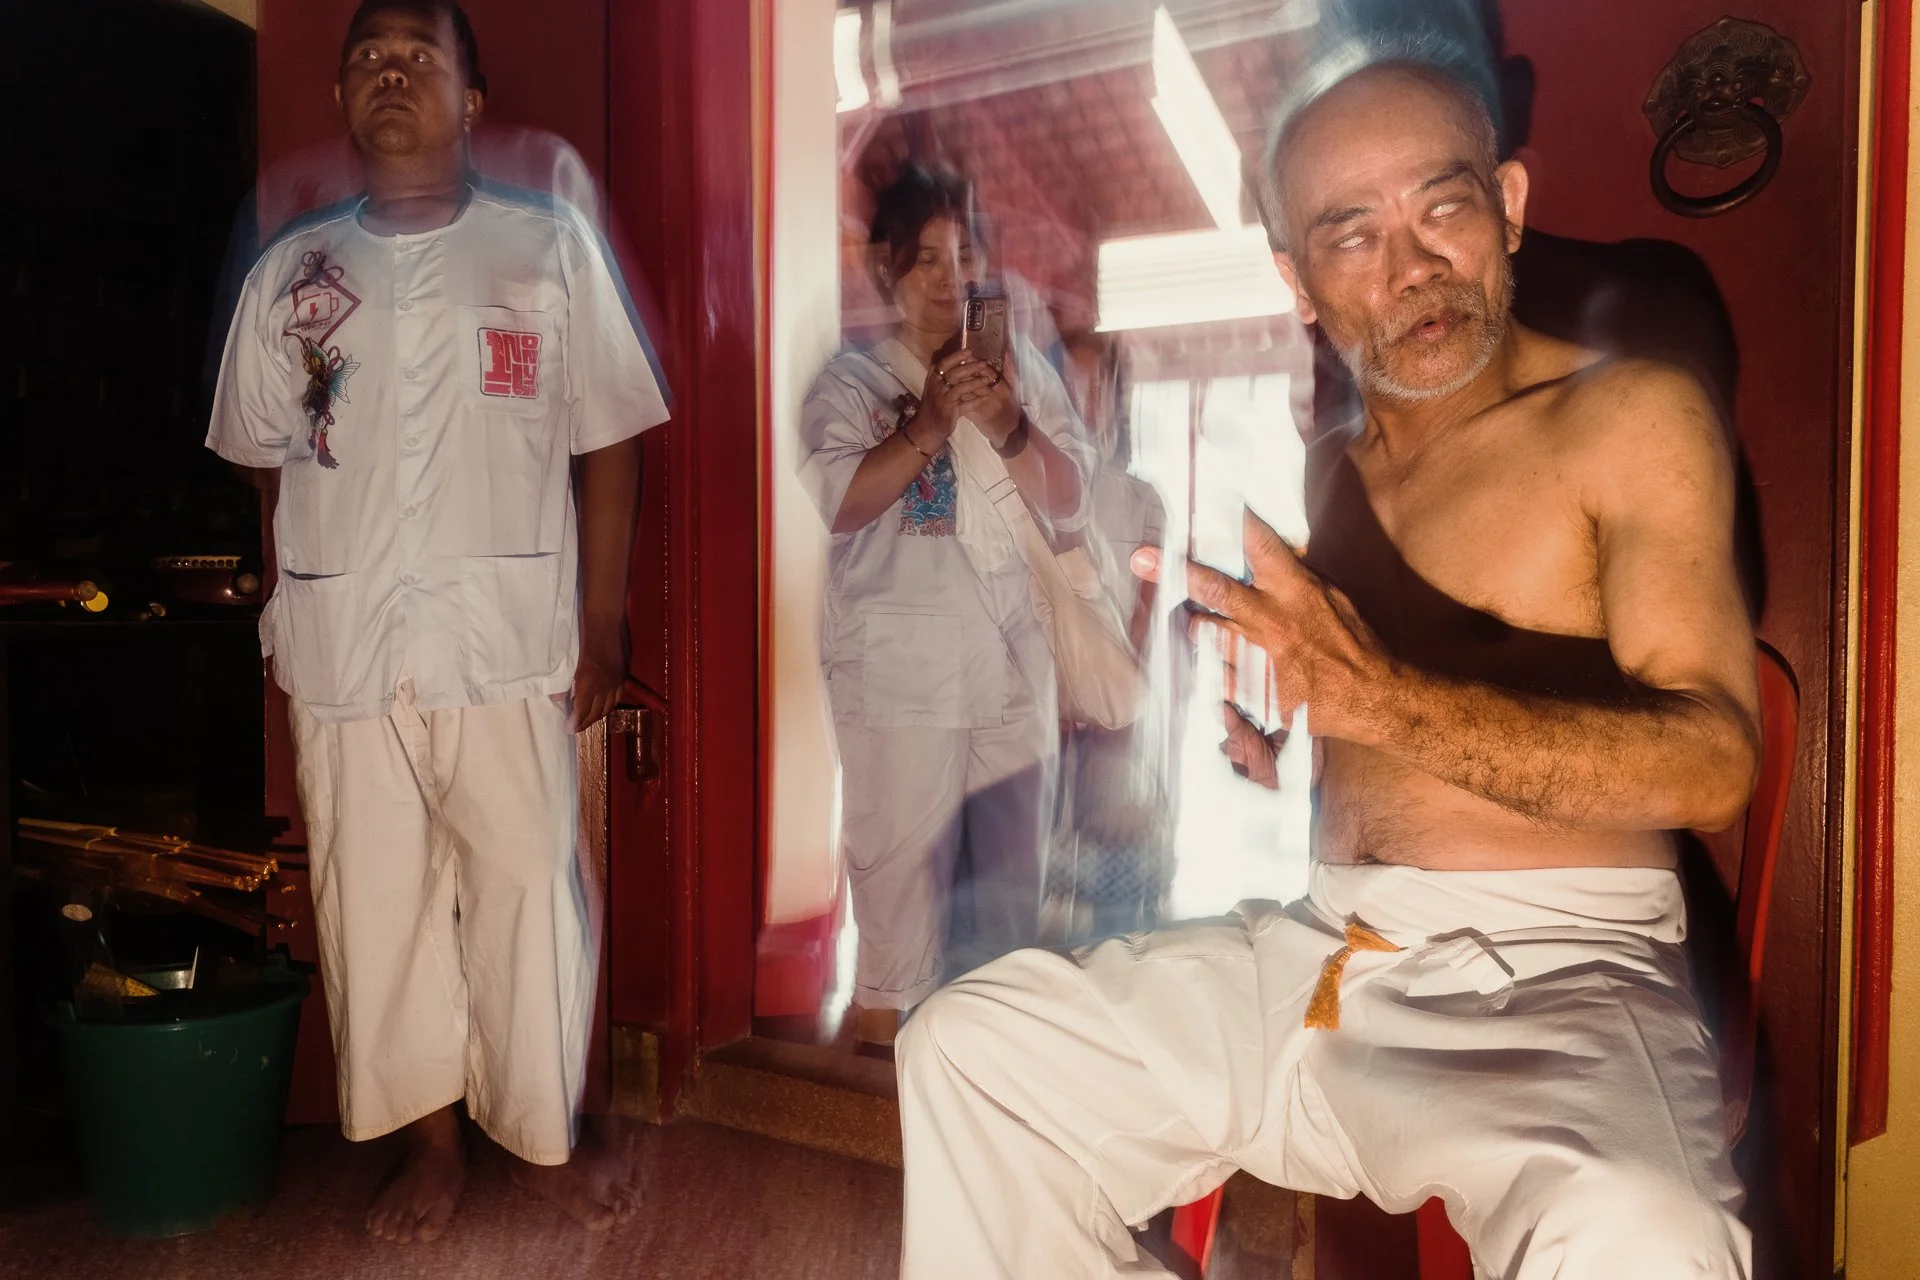
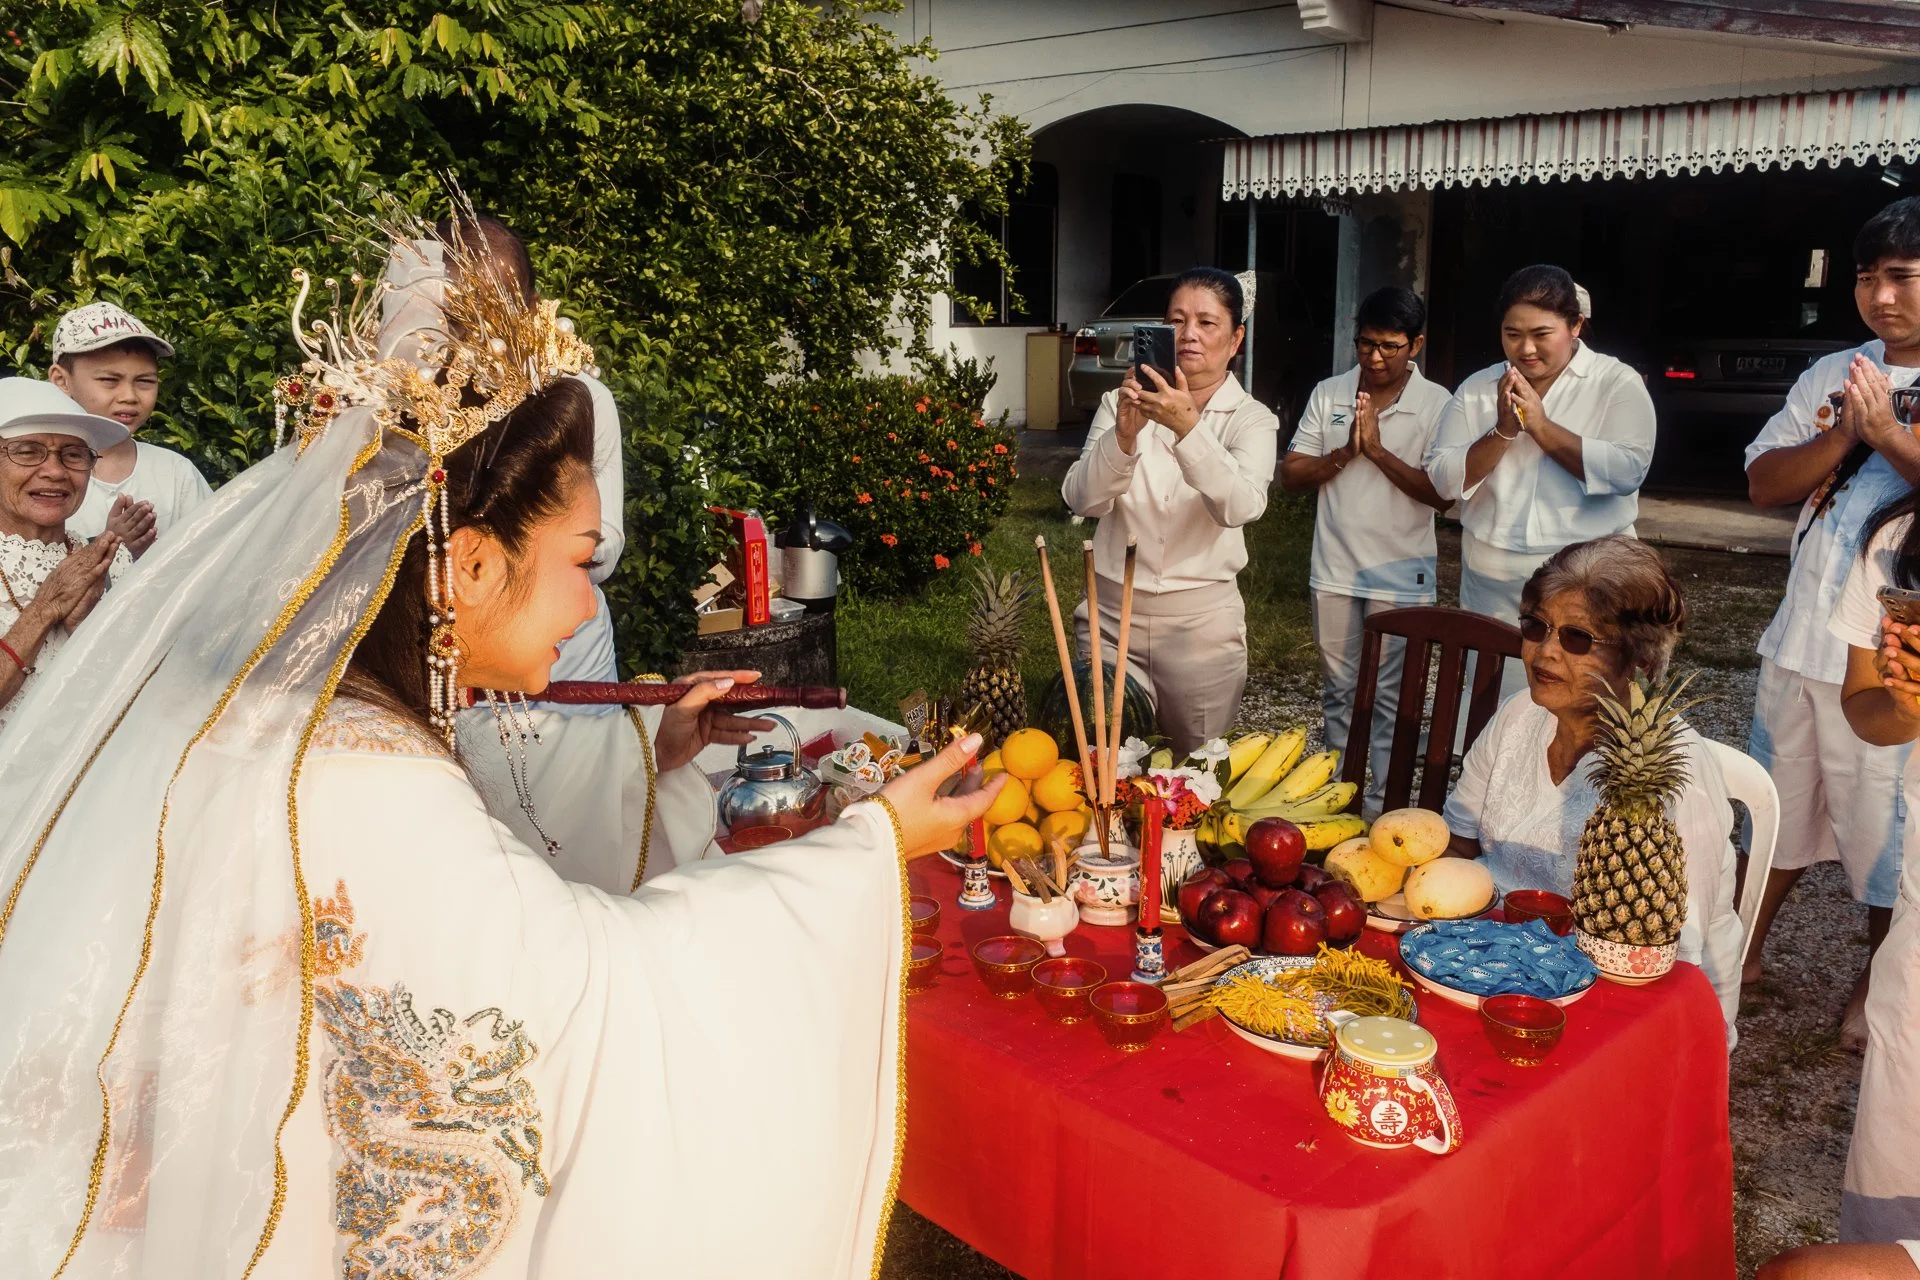
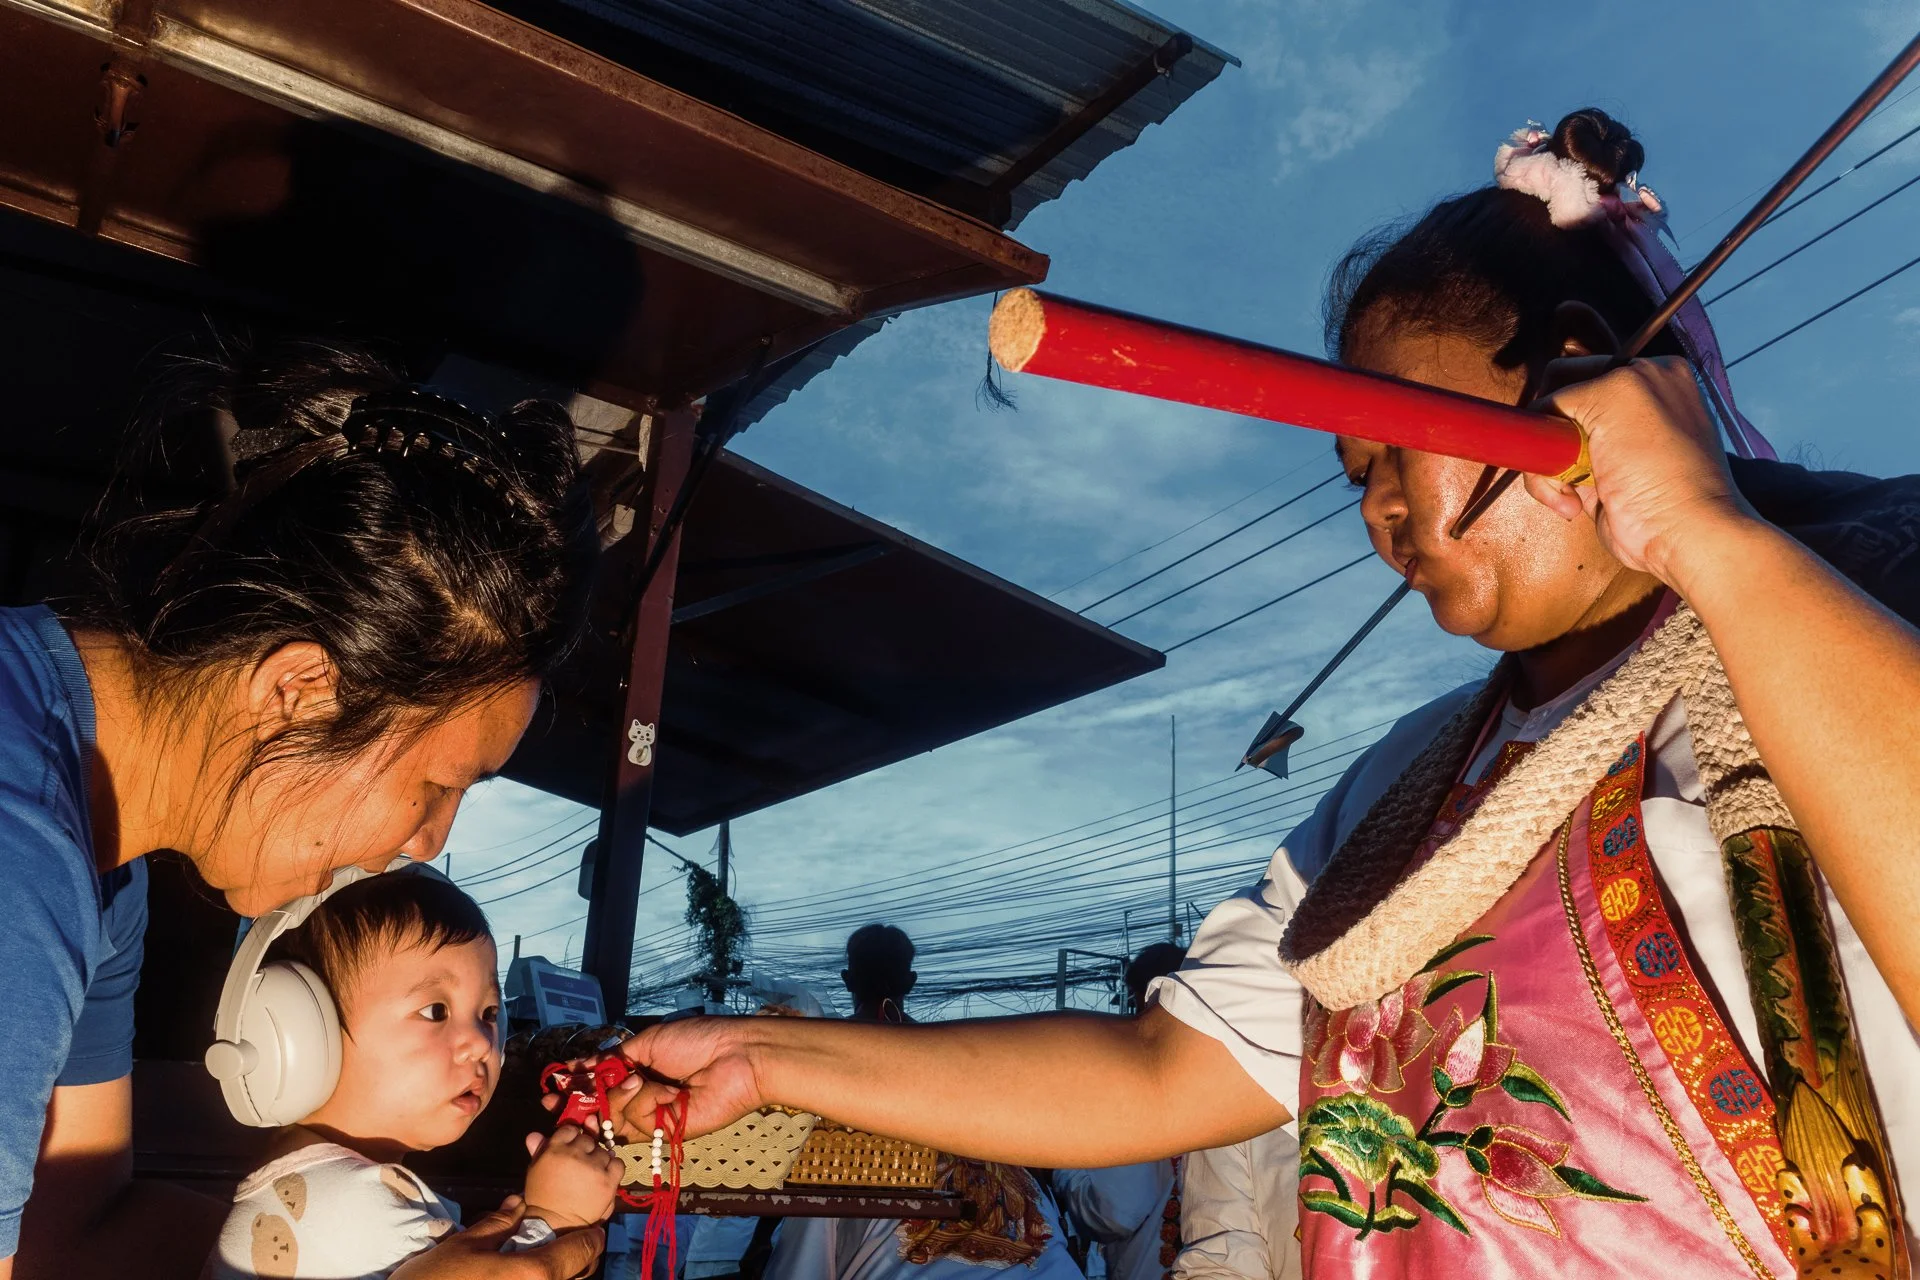
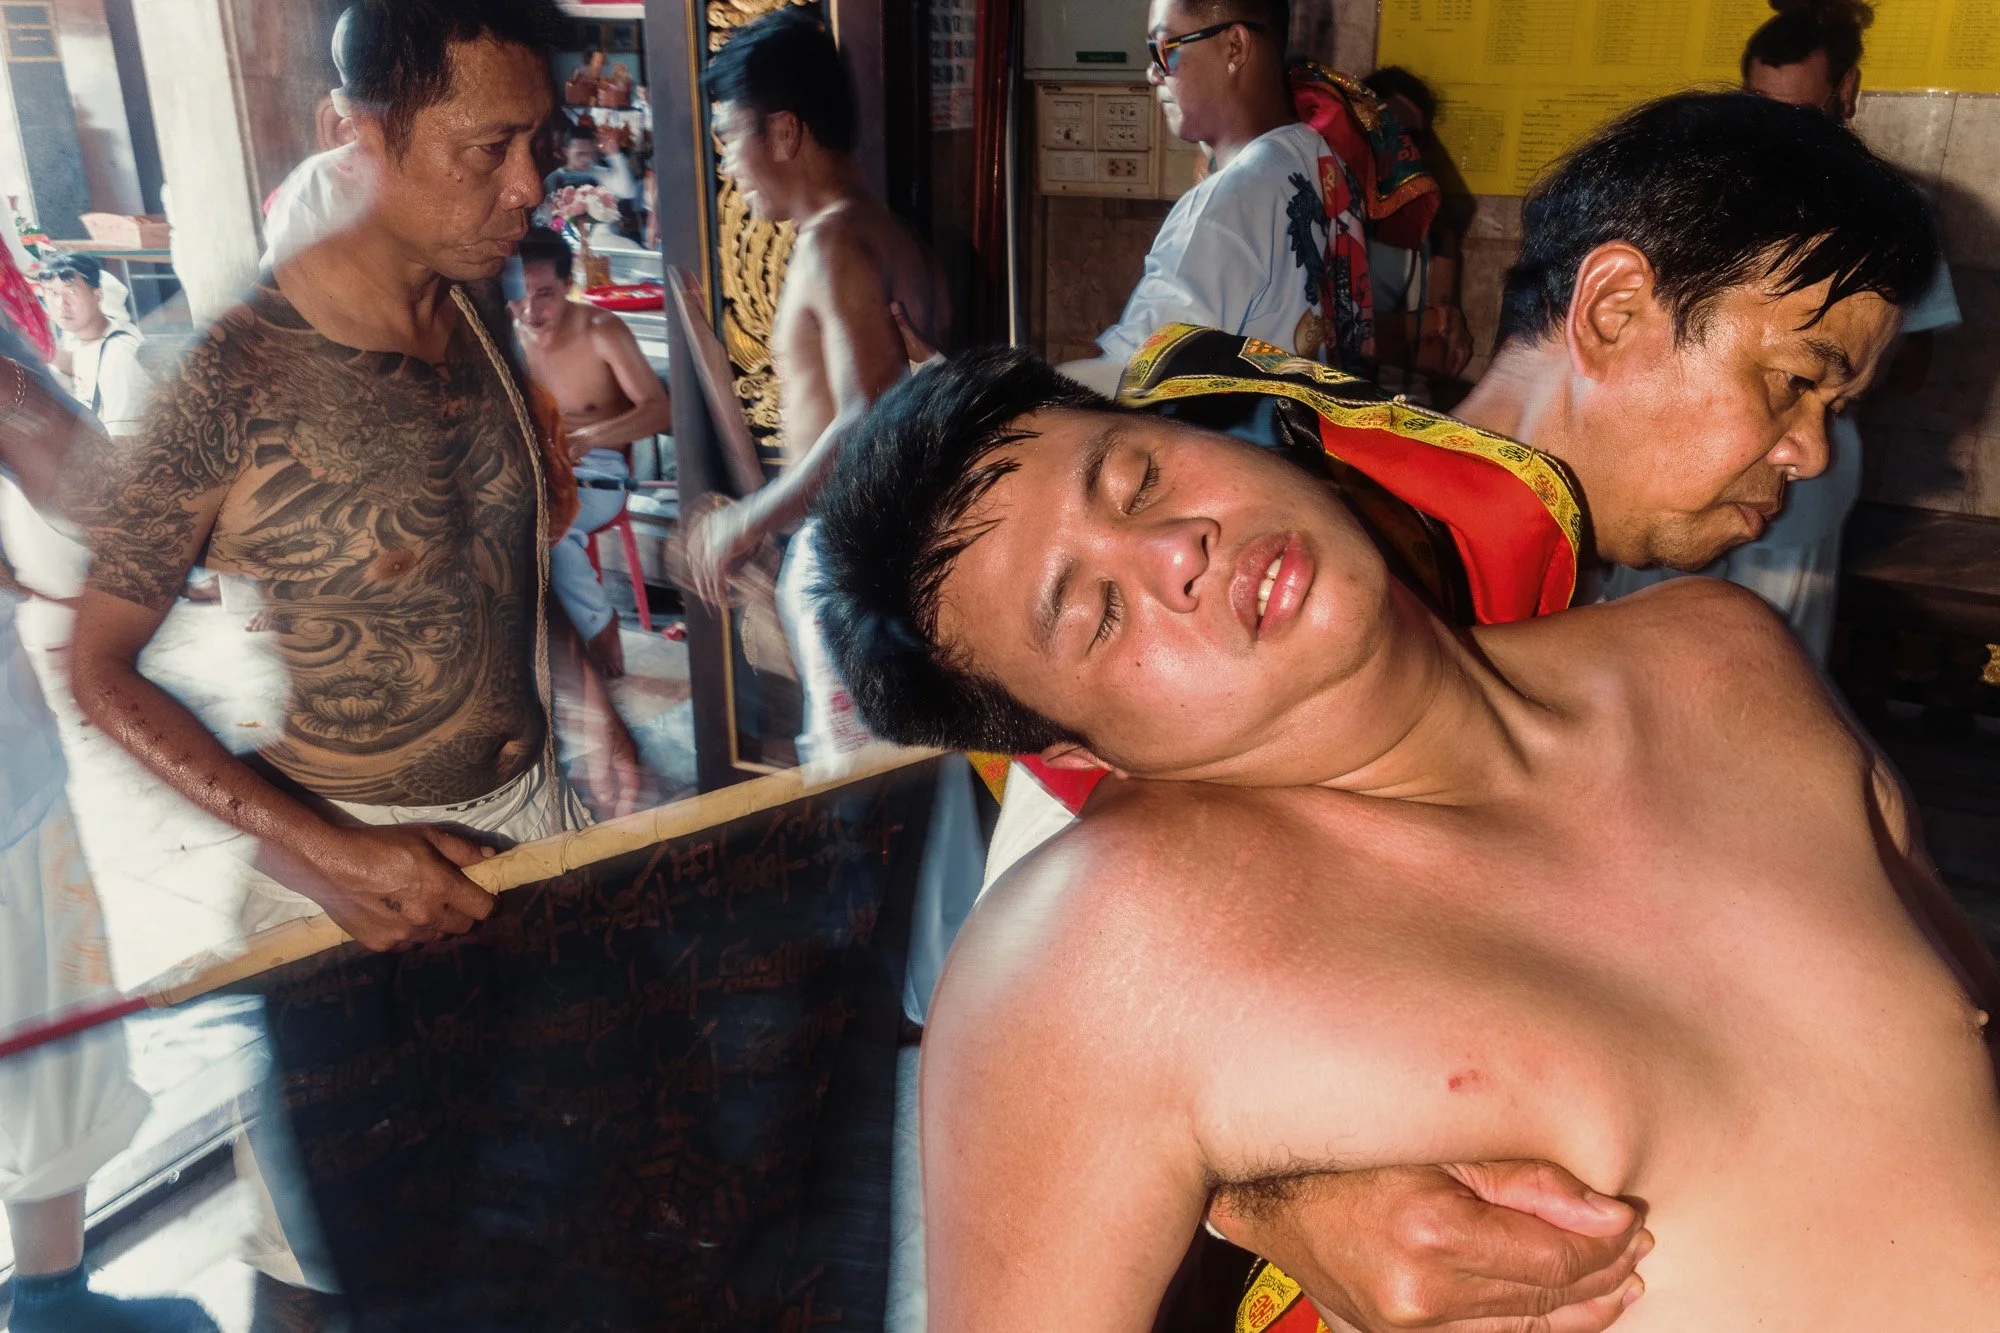
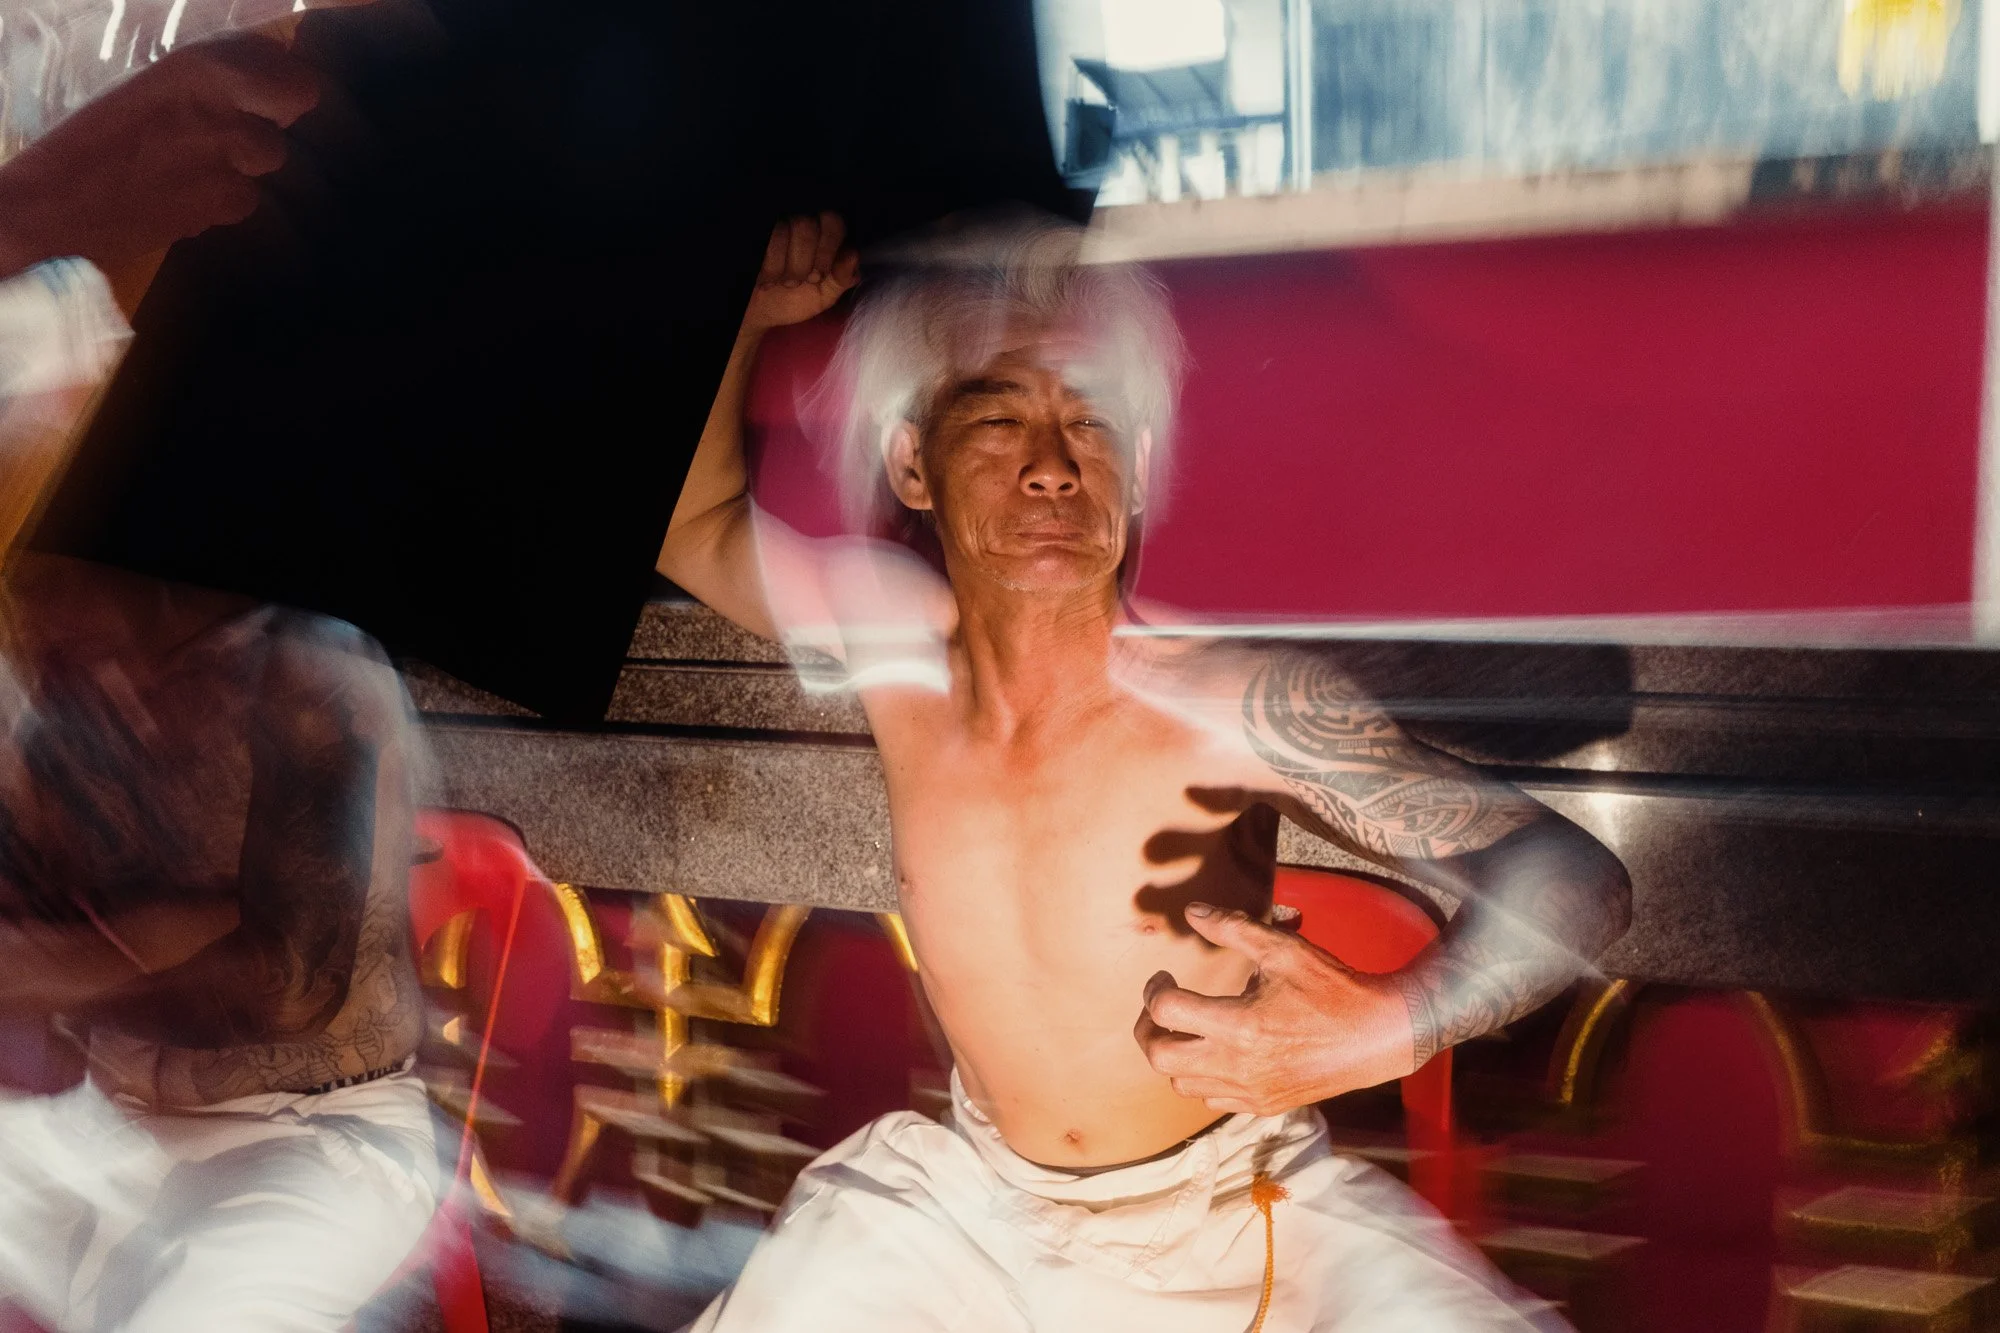
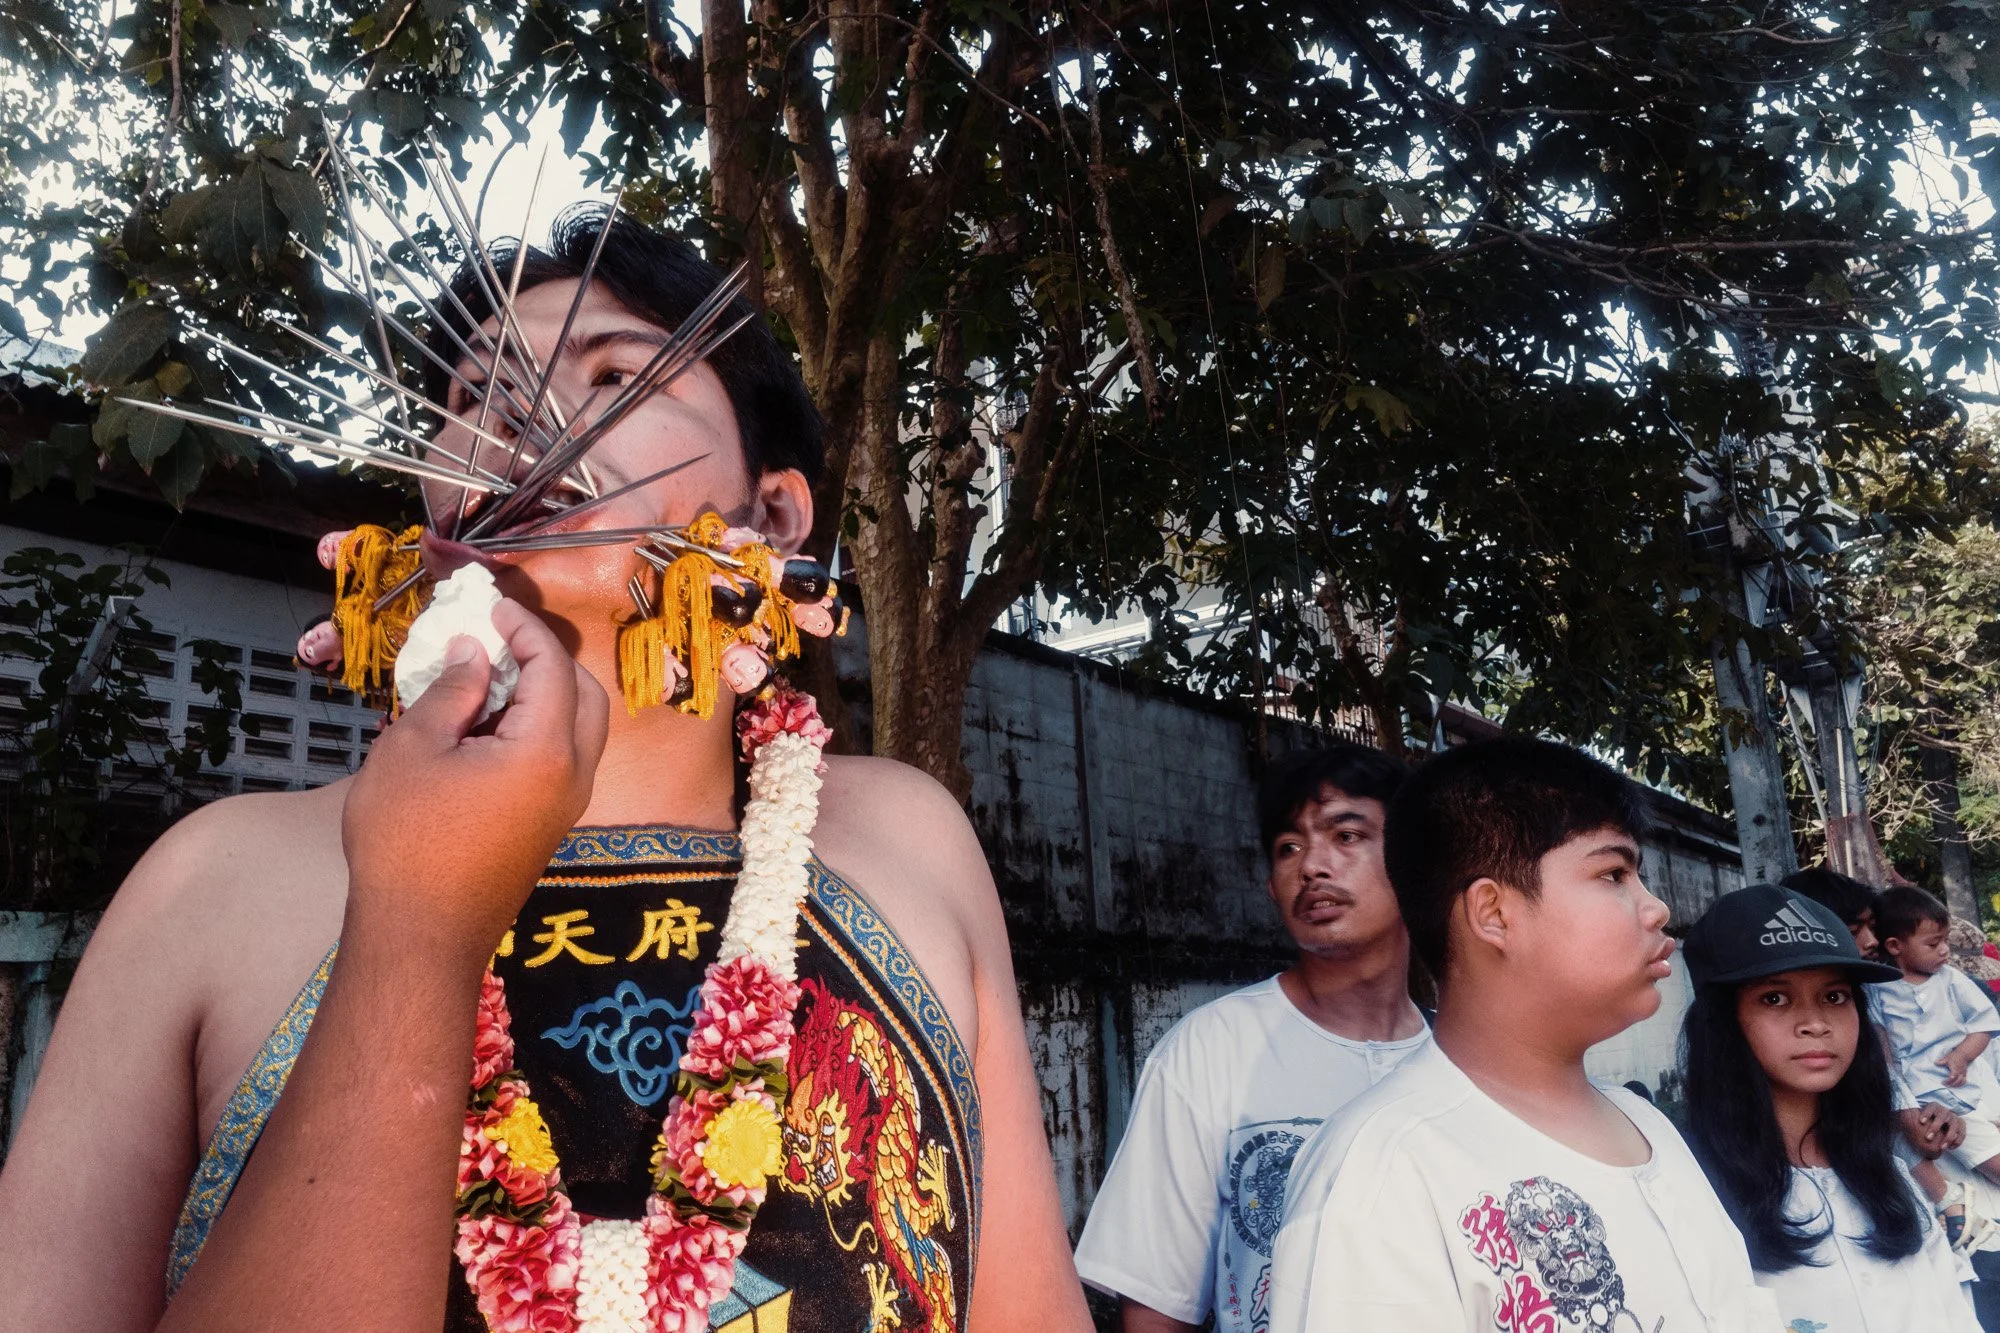
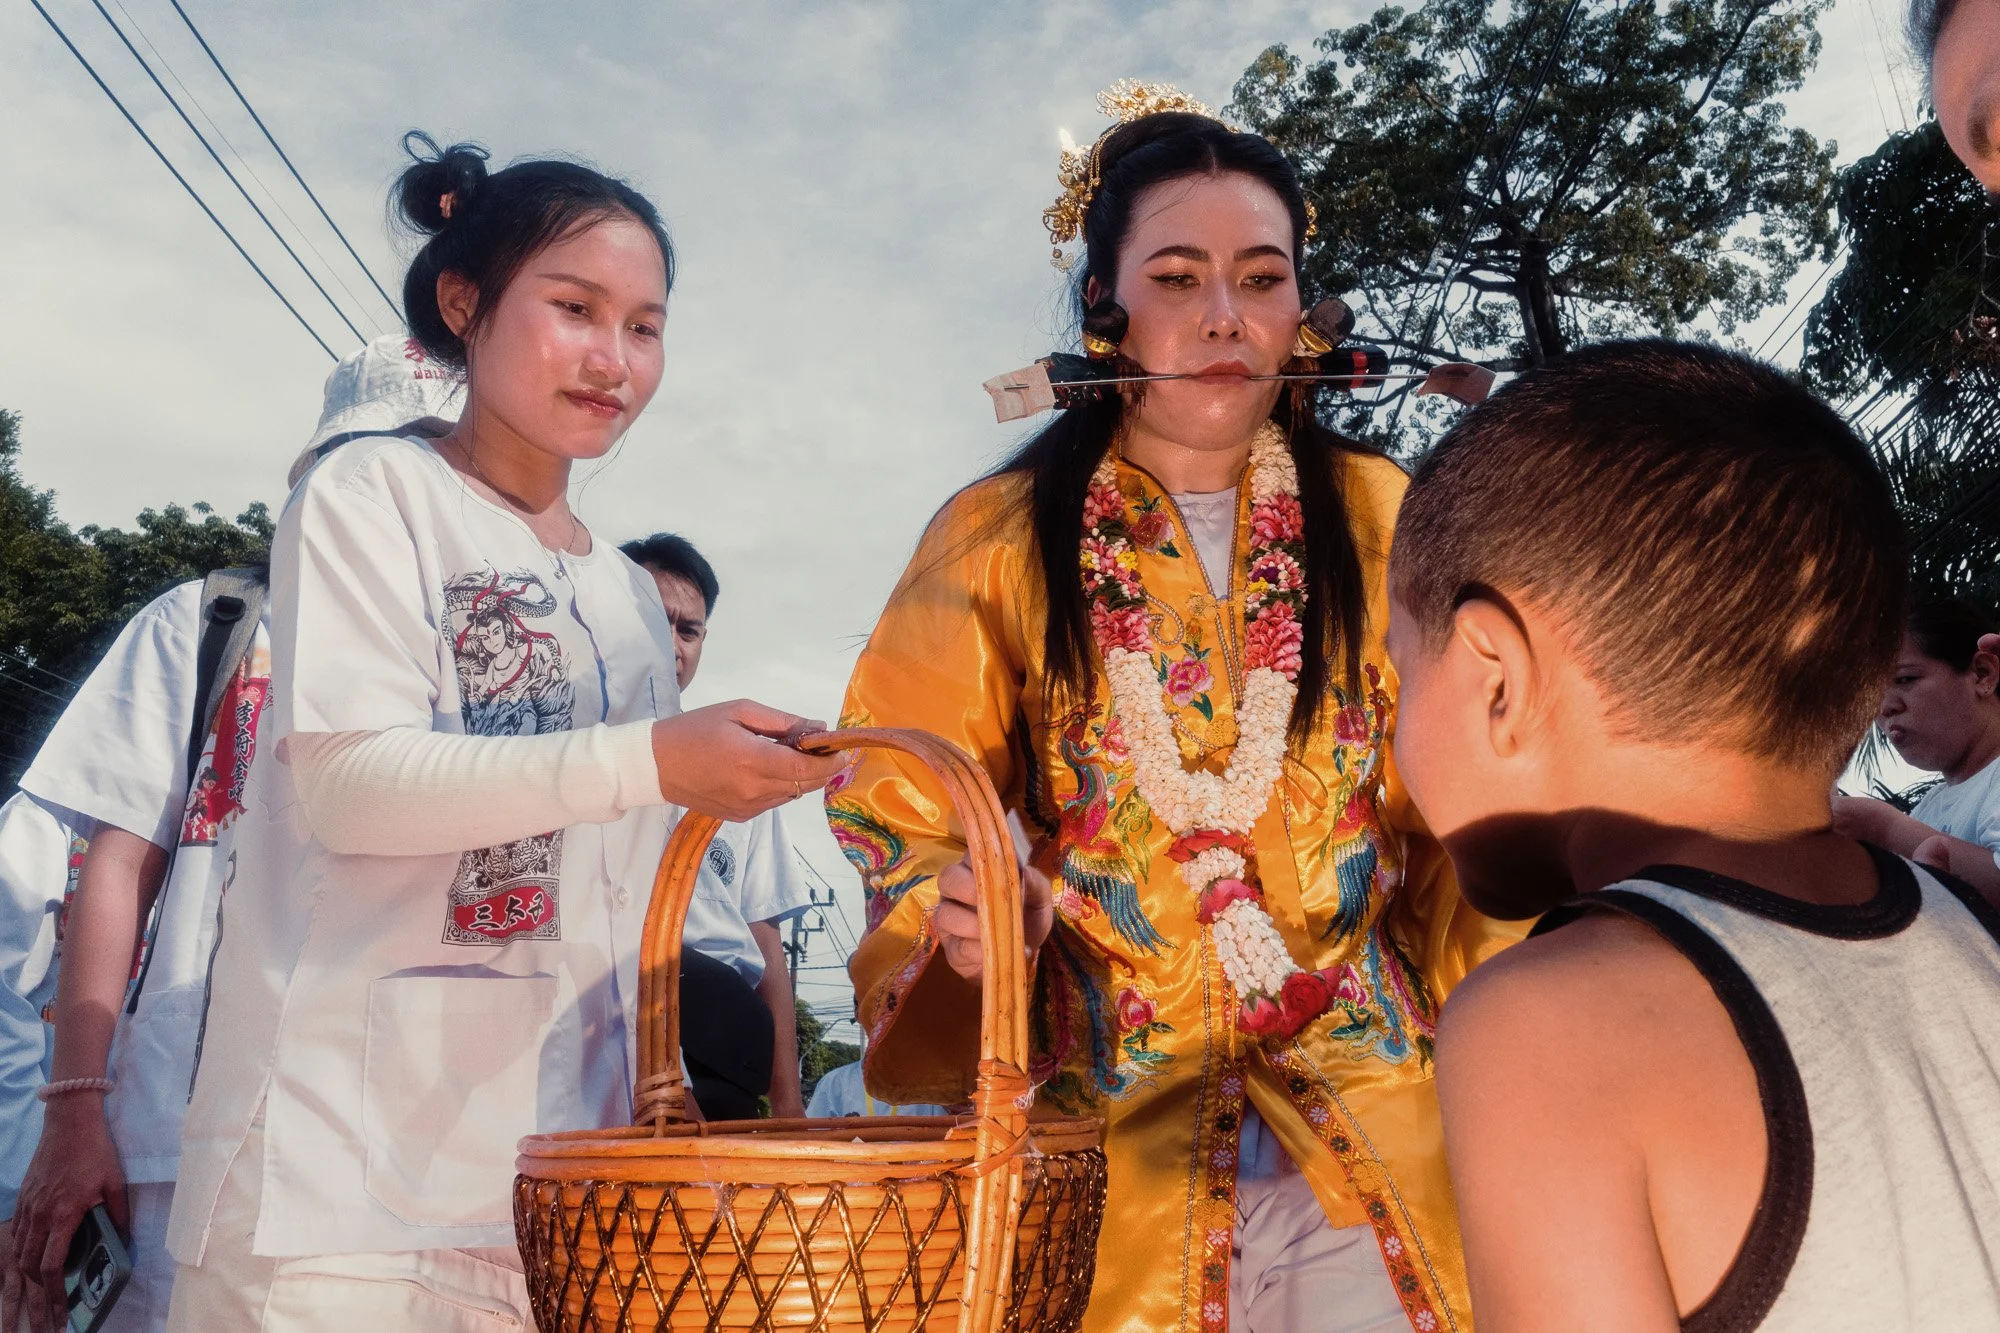
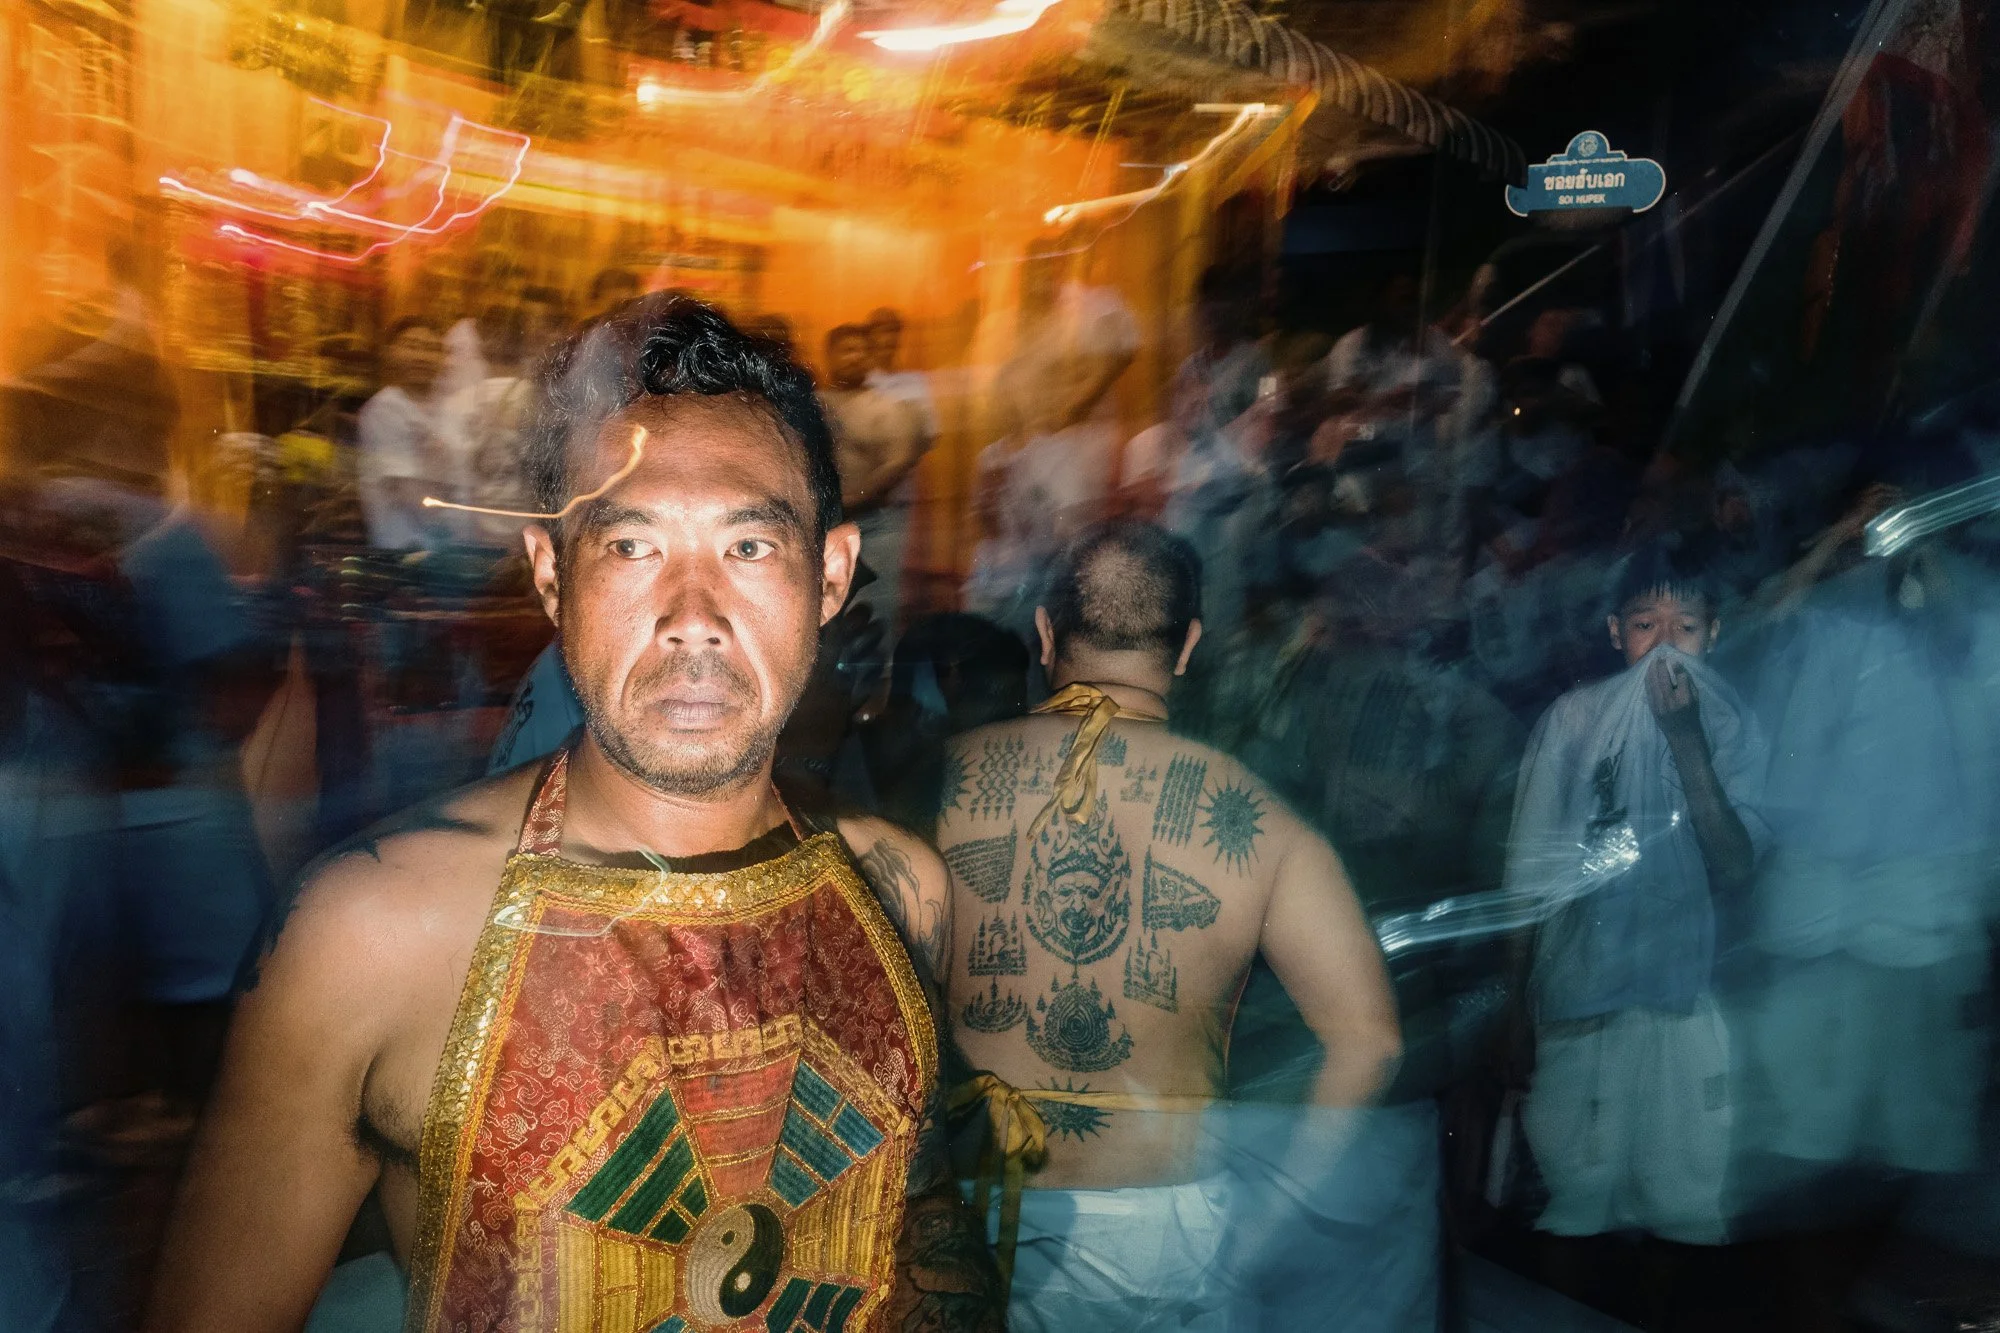
Just like in the morning, the people were incredibly kind and welcoming. Even in this small community, there were many Masongs. Much more than I expected.
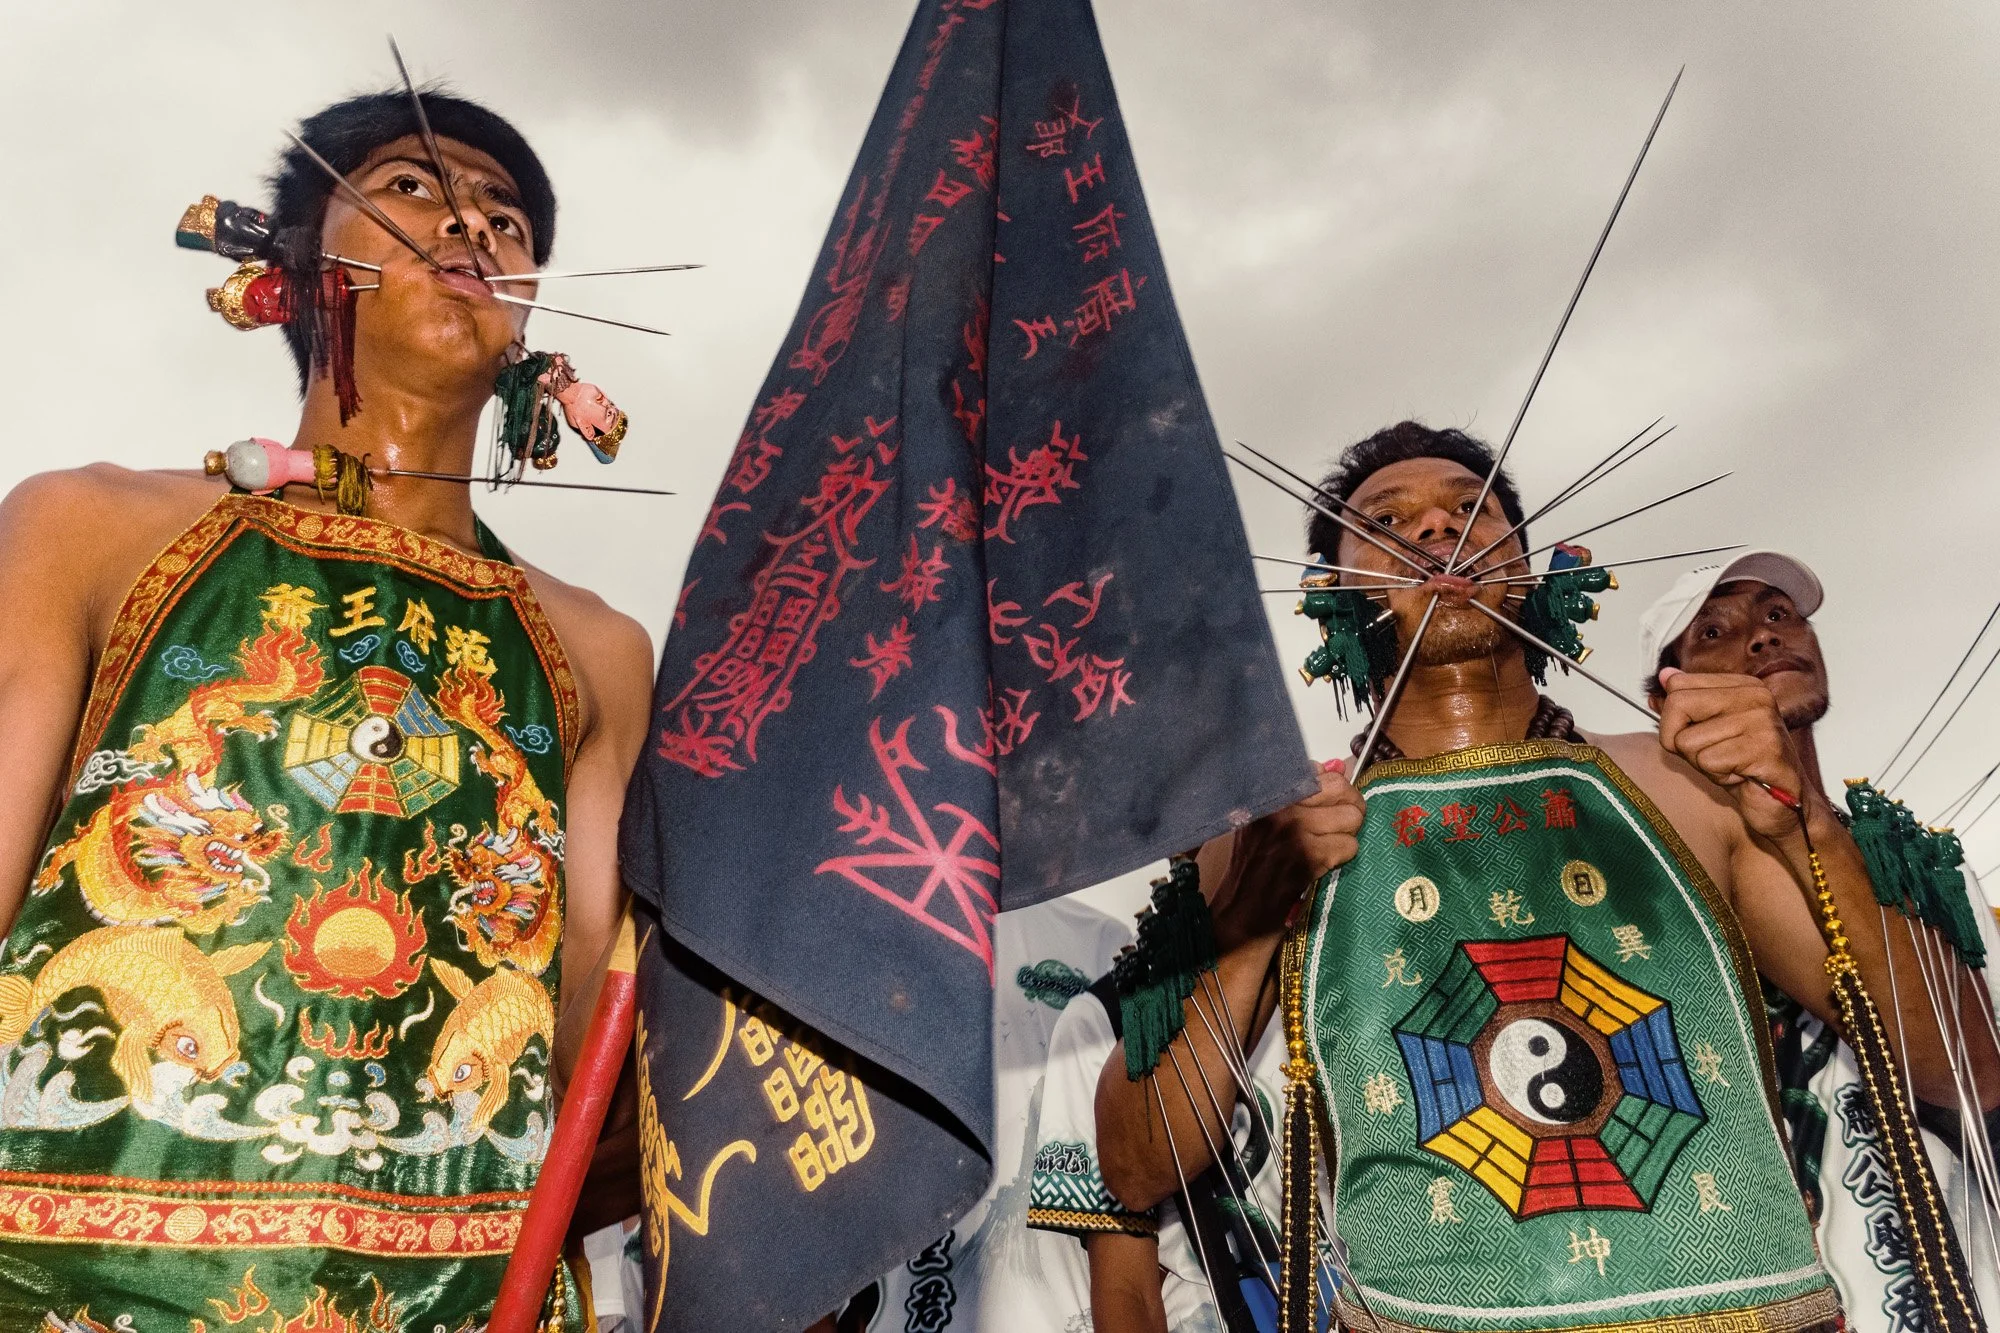
Photographing the Masongs getting pierced was easy because there was no crowd and no chaos. The piercings were not as extreme as what we had seen elsewhere.
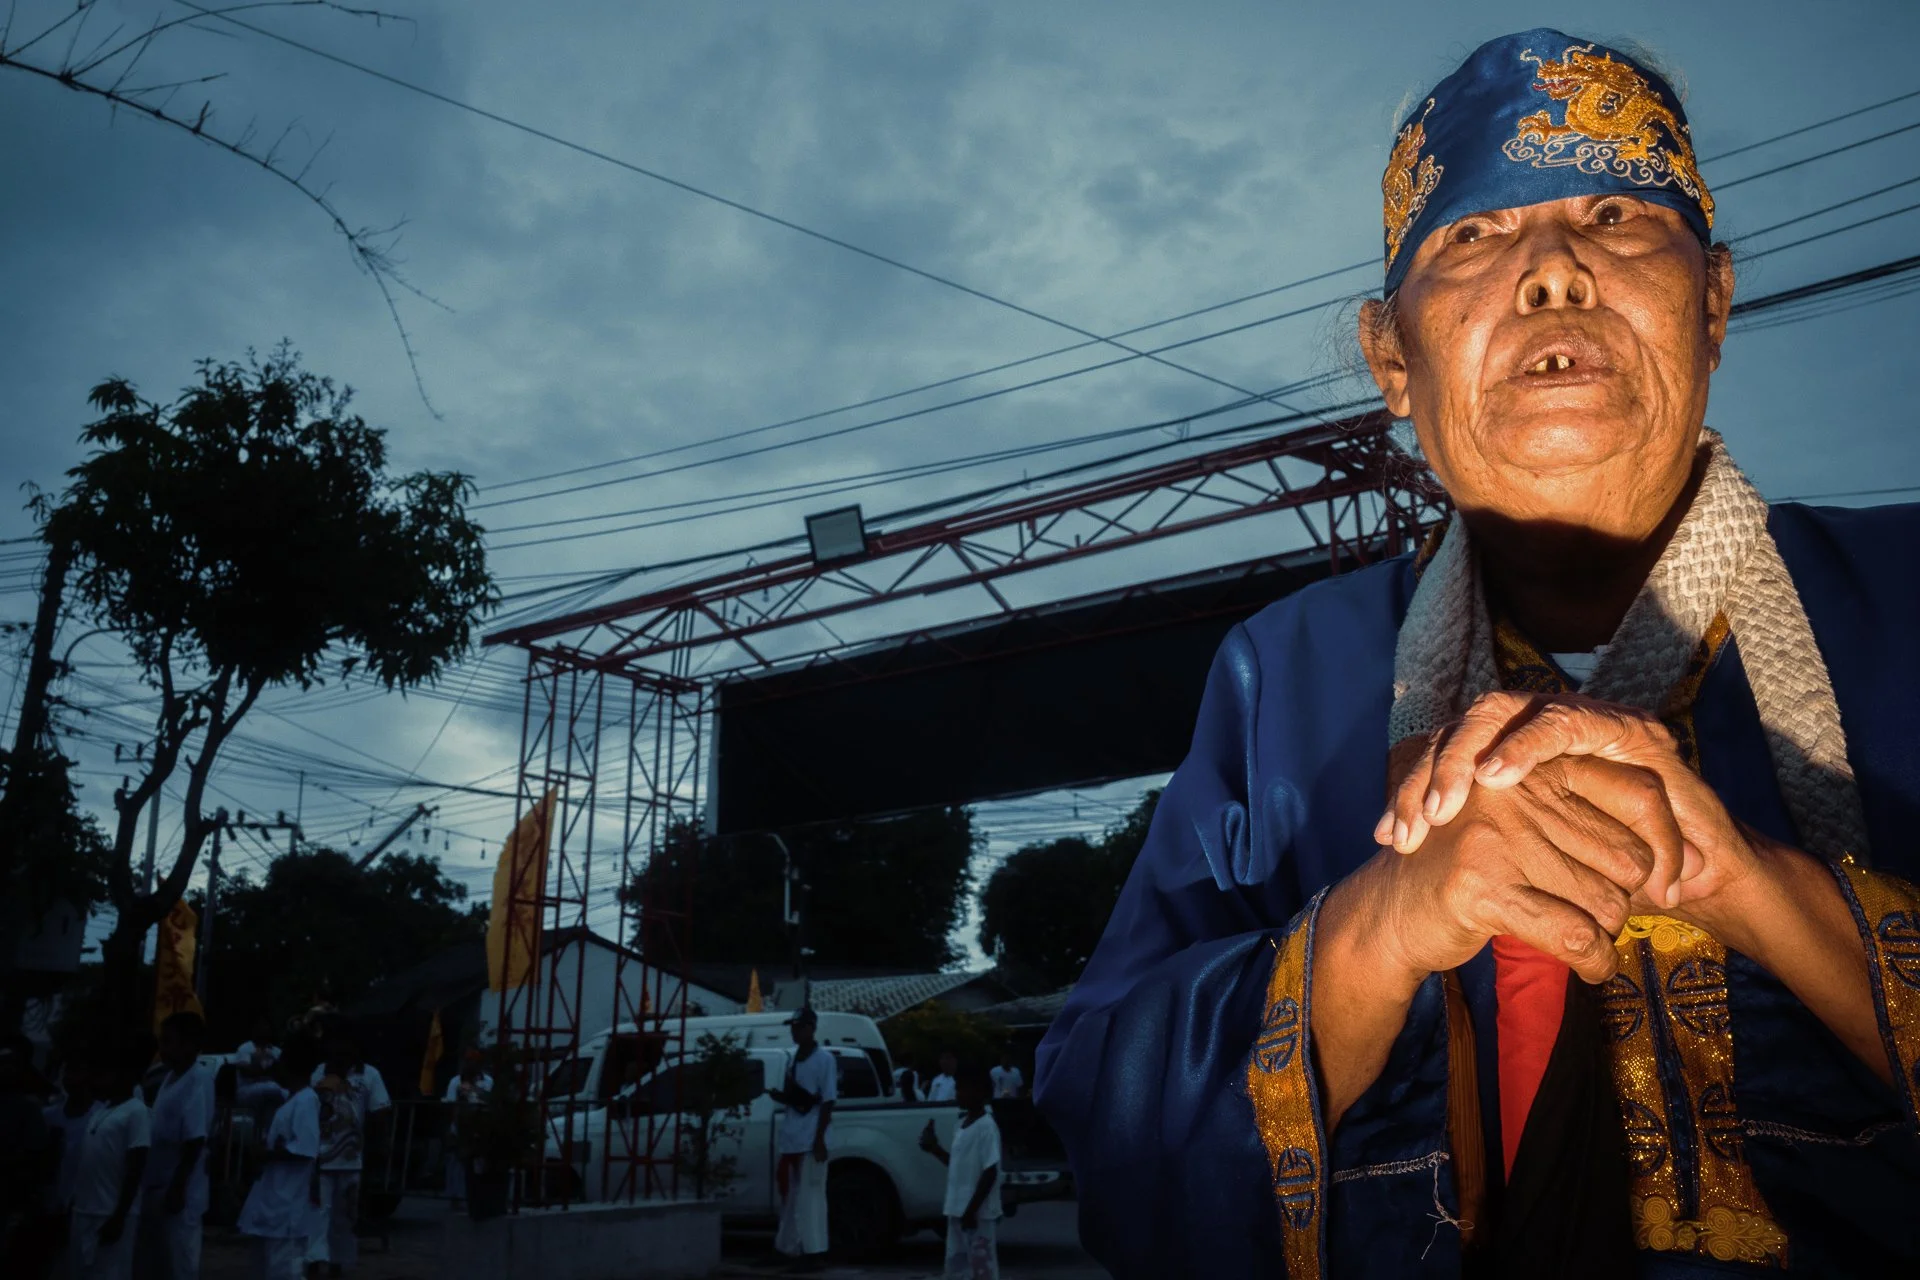
Female Masongs were sitting together, waiting for the parade to begin. One of the women, wearing a blue dress, must have been in her nineties. You could really feel how close knit this community was. Everyone knew each other.
20. Ricoh GRIV - 1/400 - f/11 - ISO800
21. Ricoh GRIV - 1/400 - f/11 - ISO800
22. Ricoh GRIV - 1/80 - f/11 - ISO800
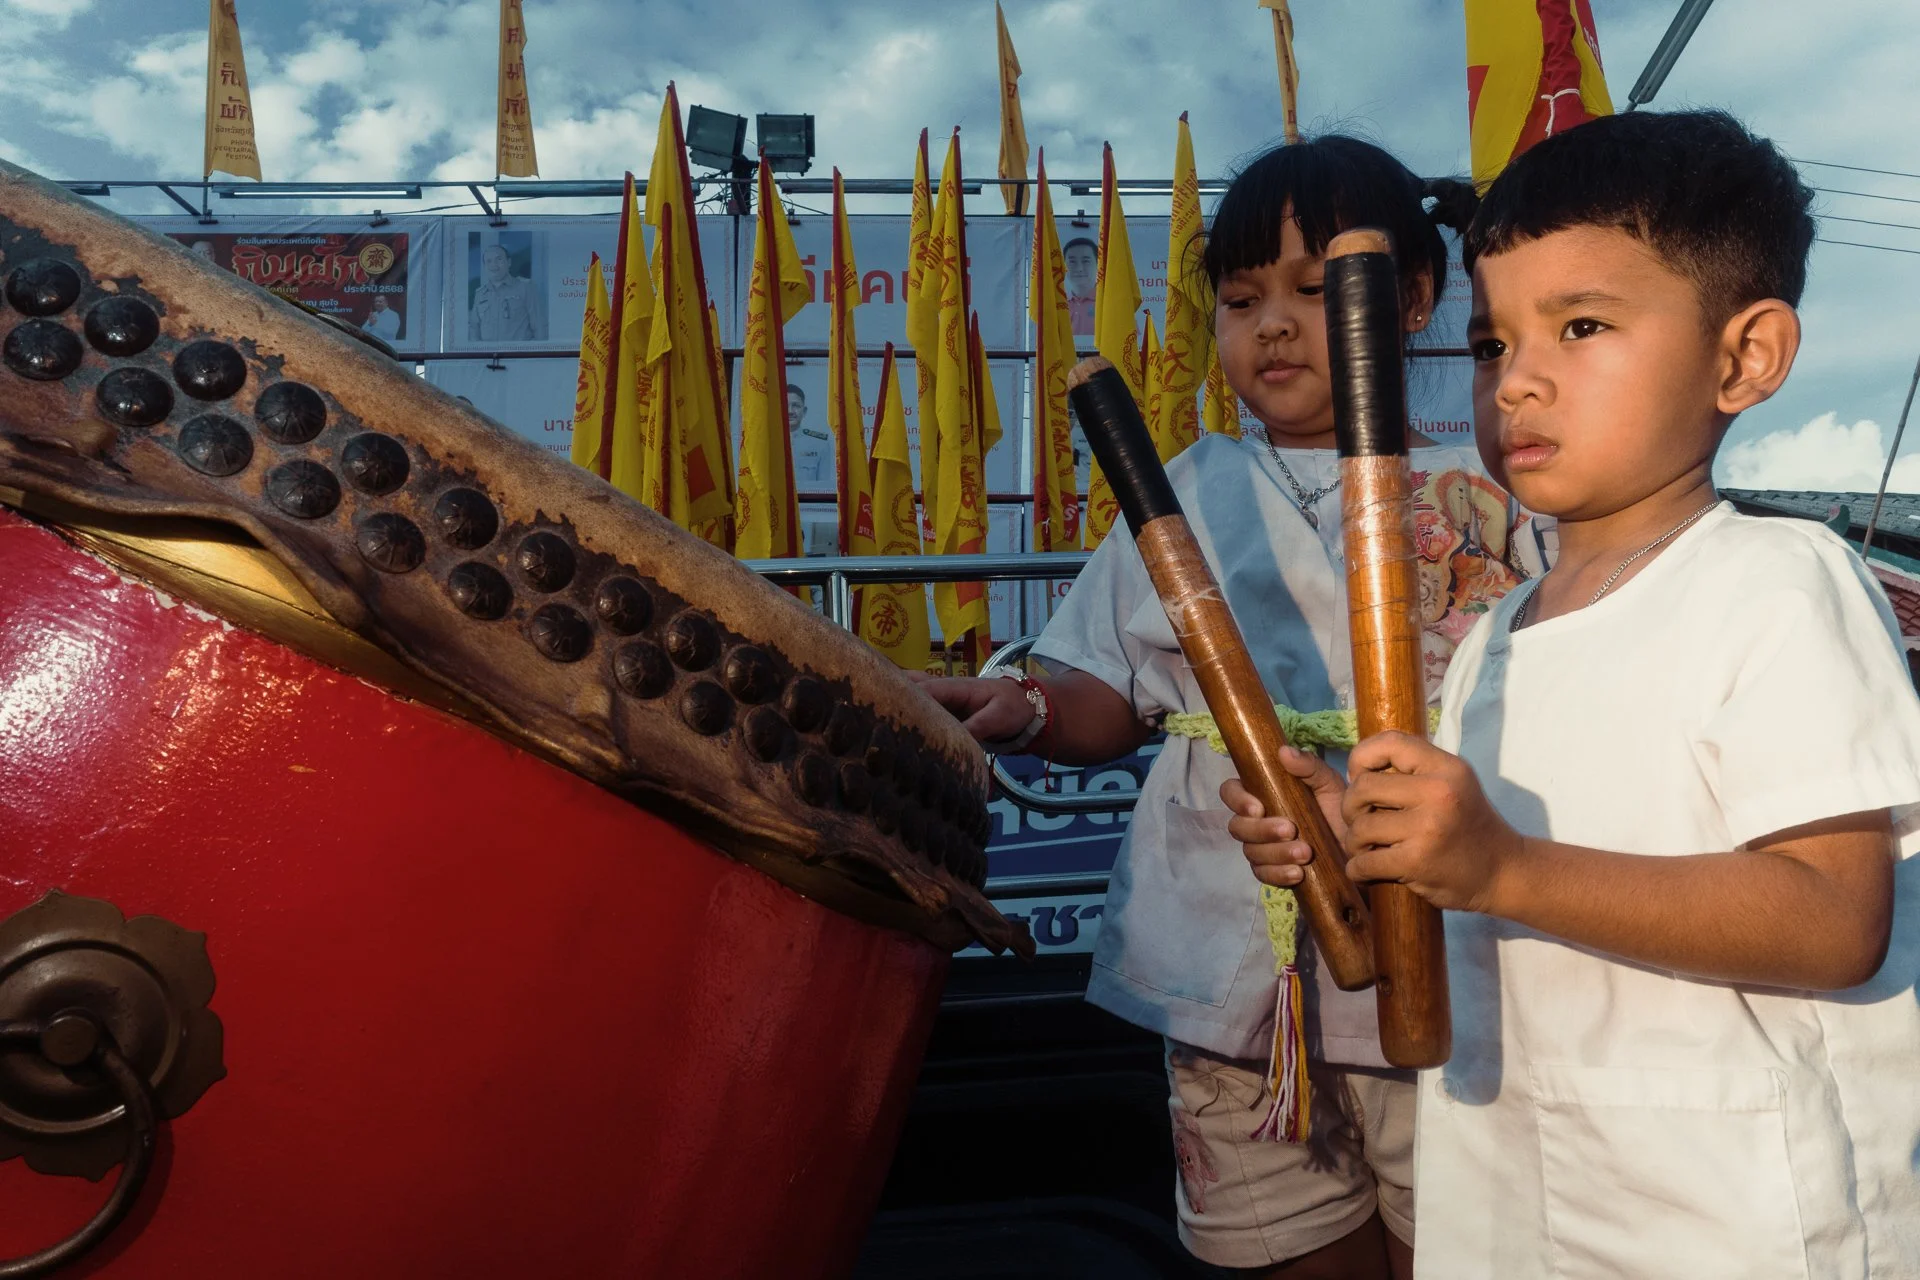
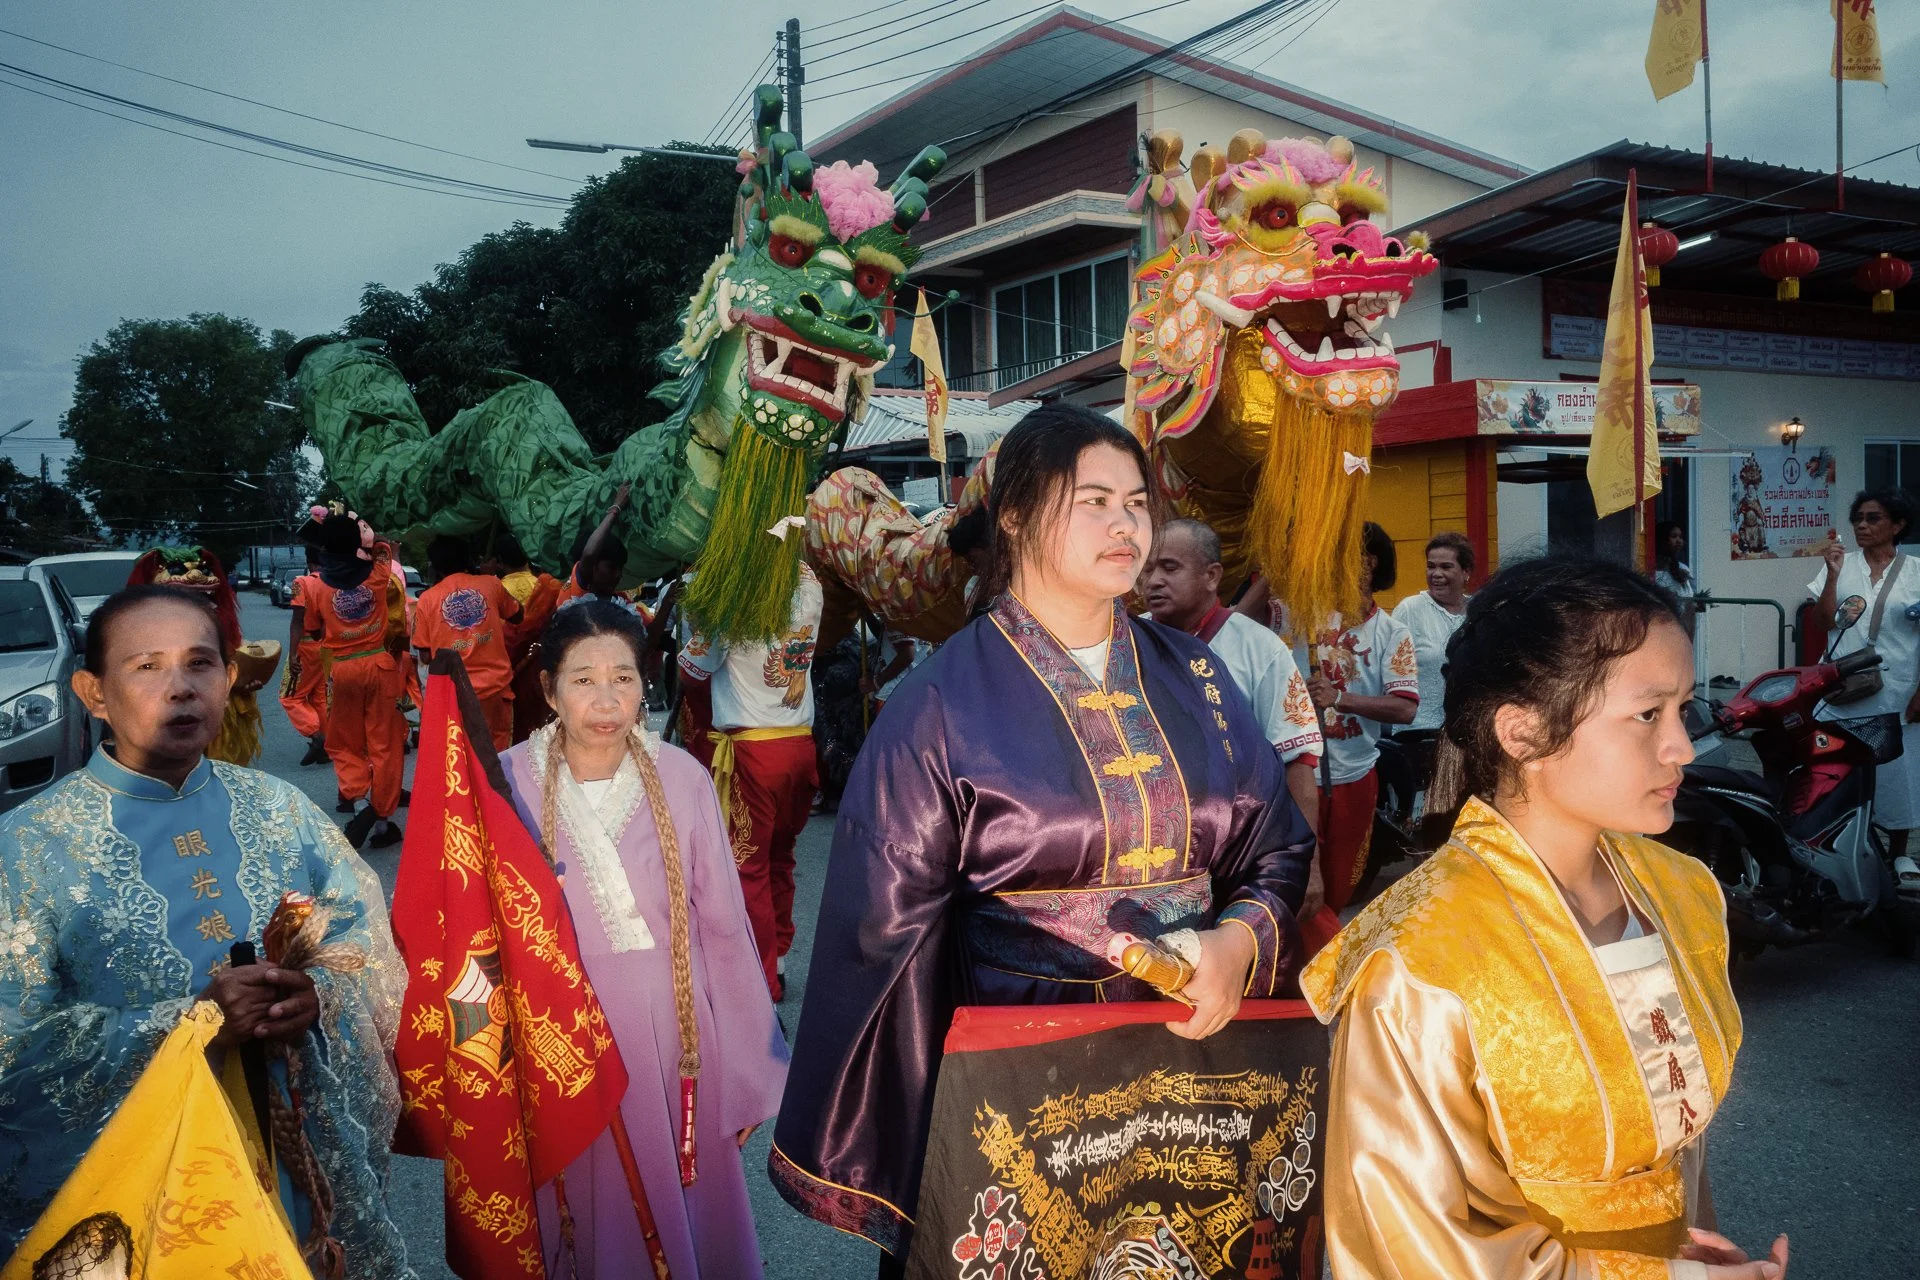
Every Street and Every Alley
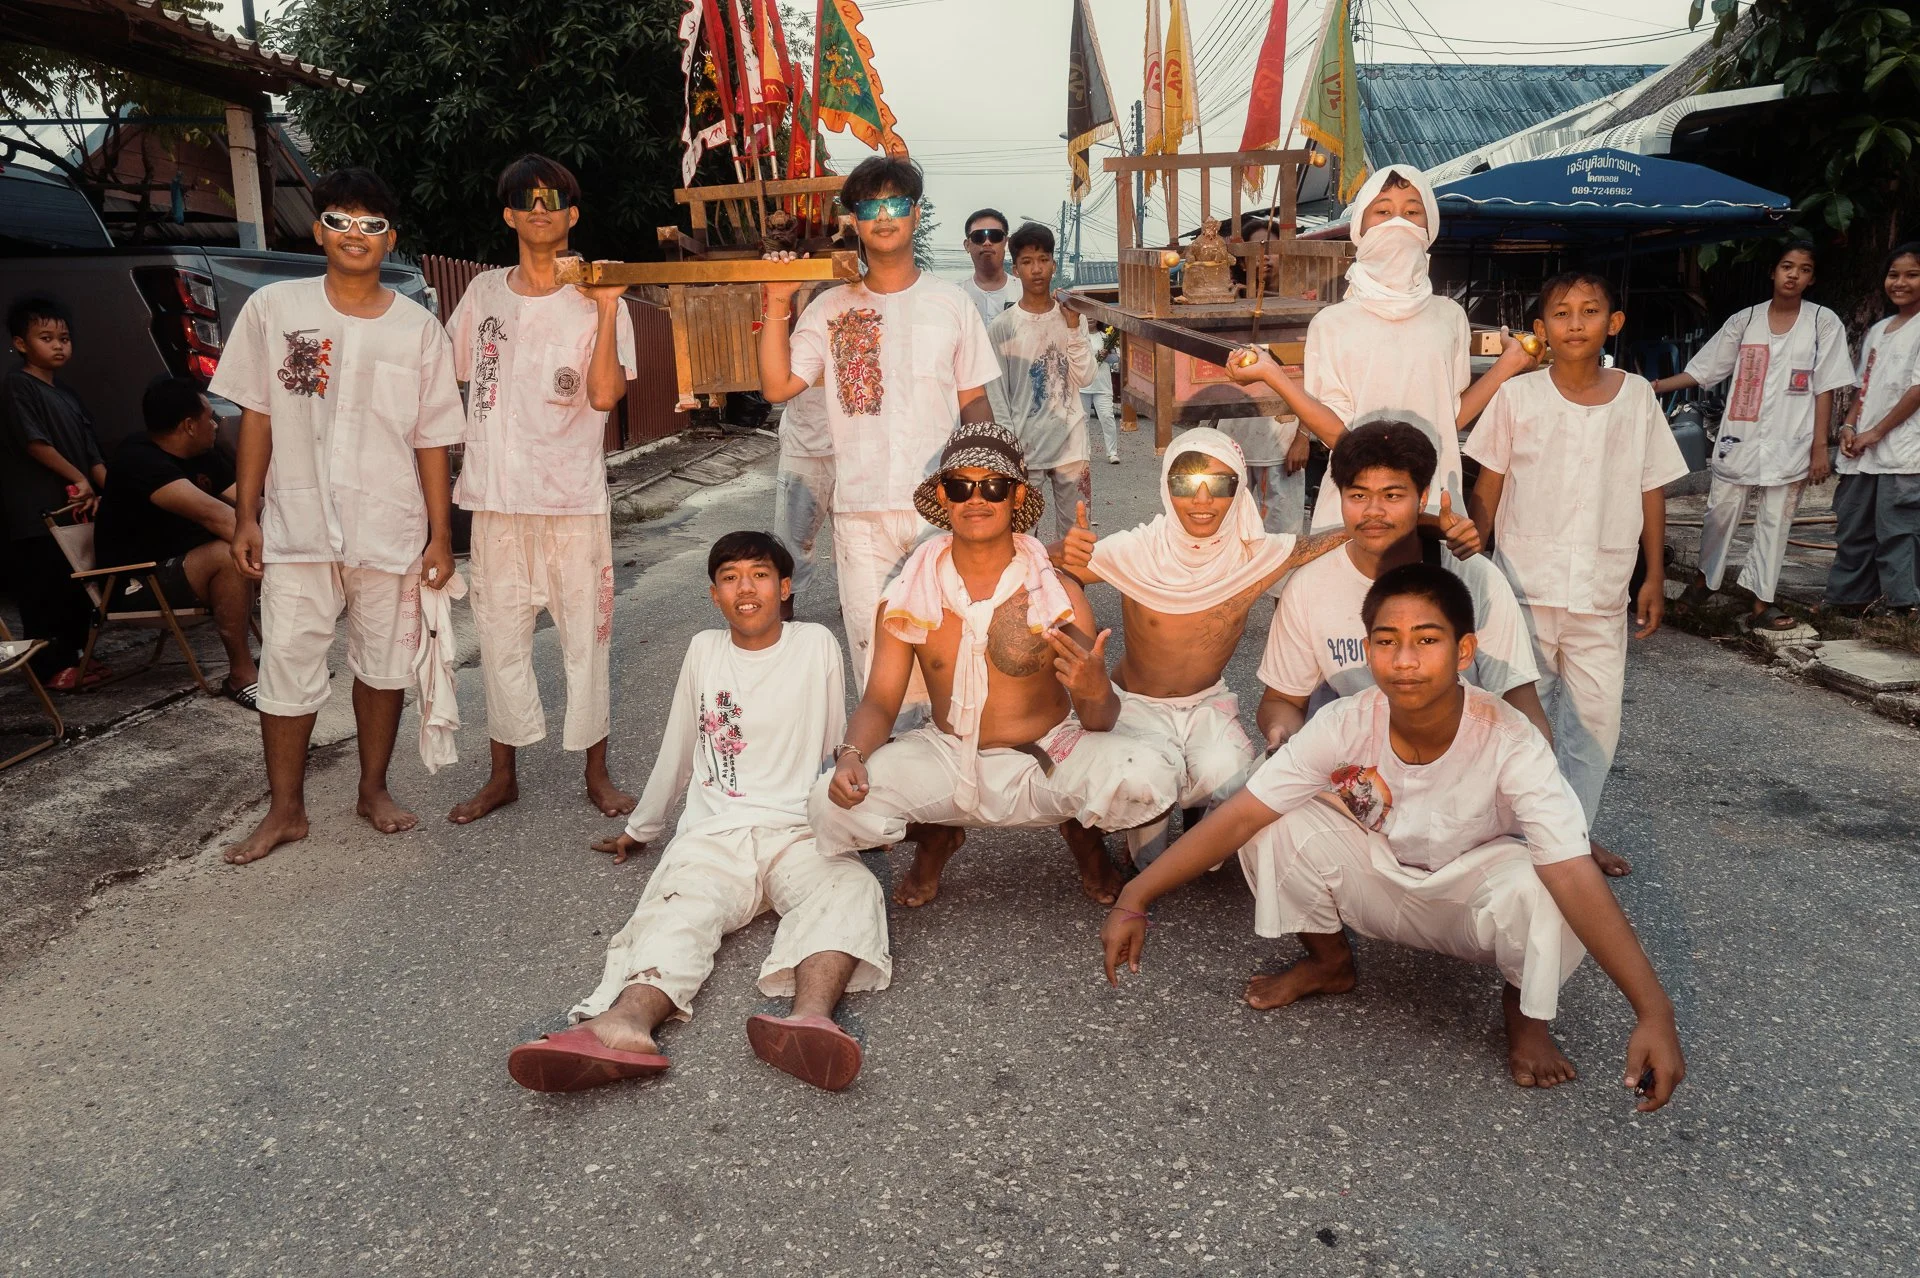
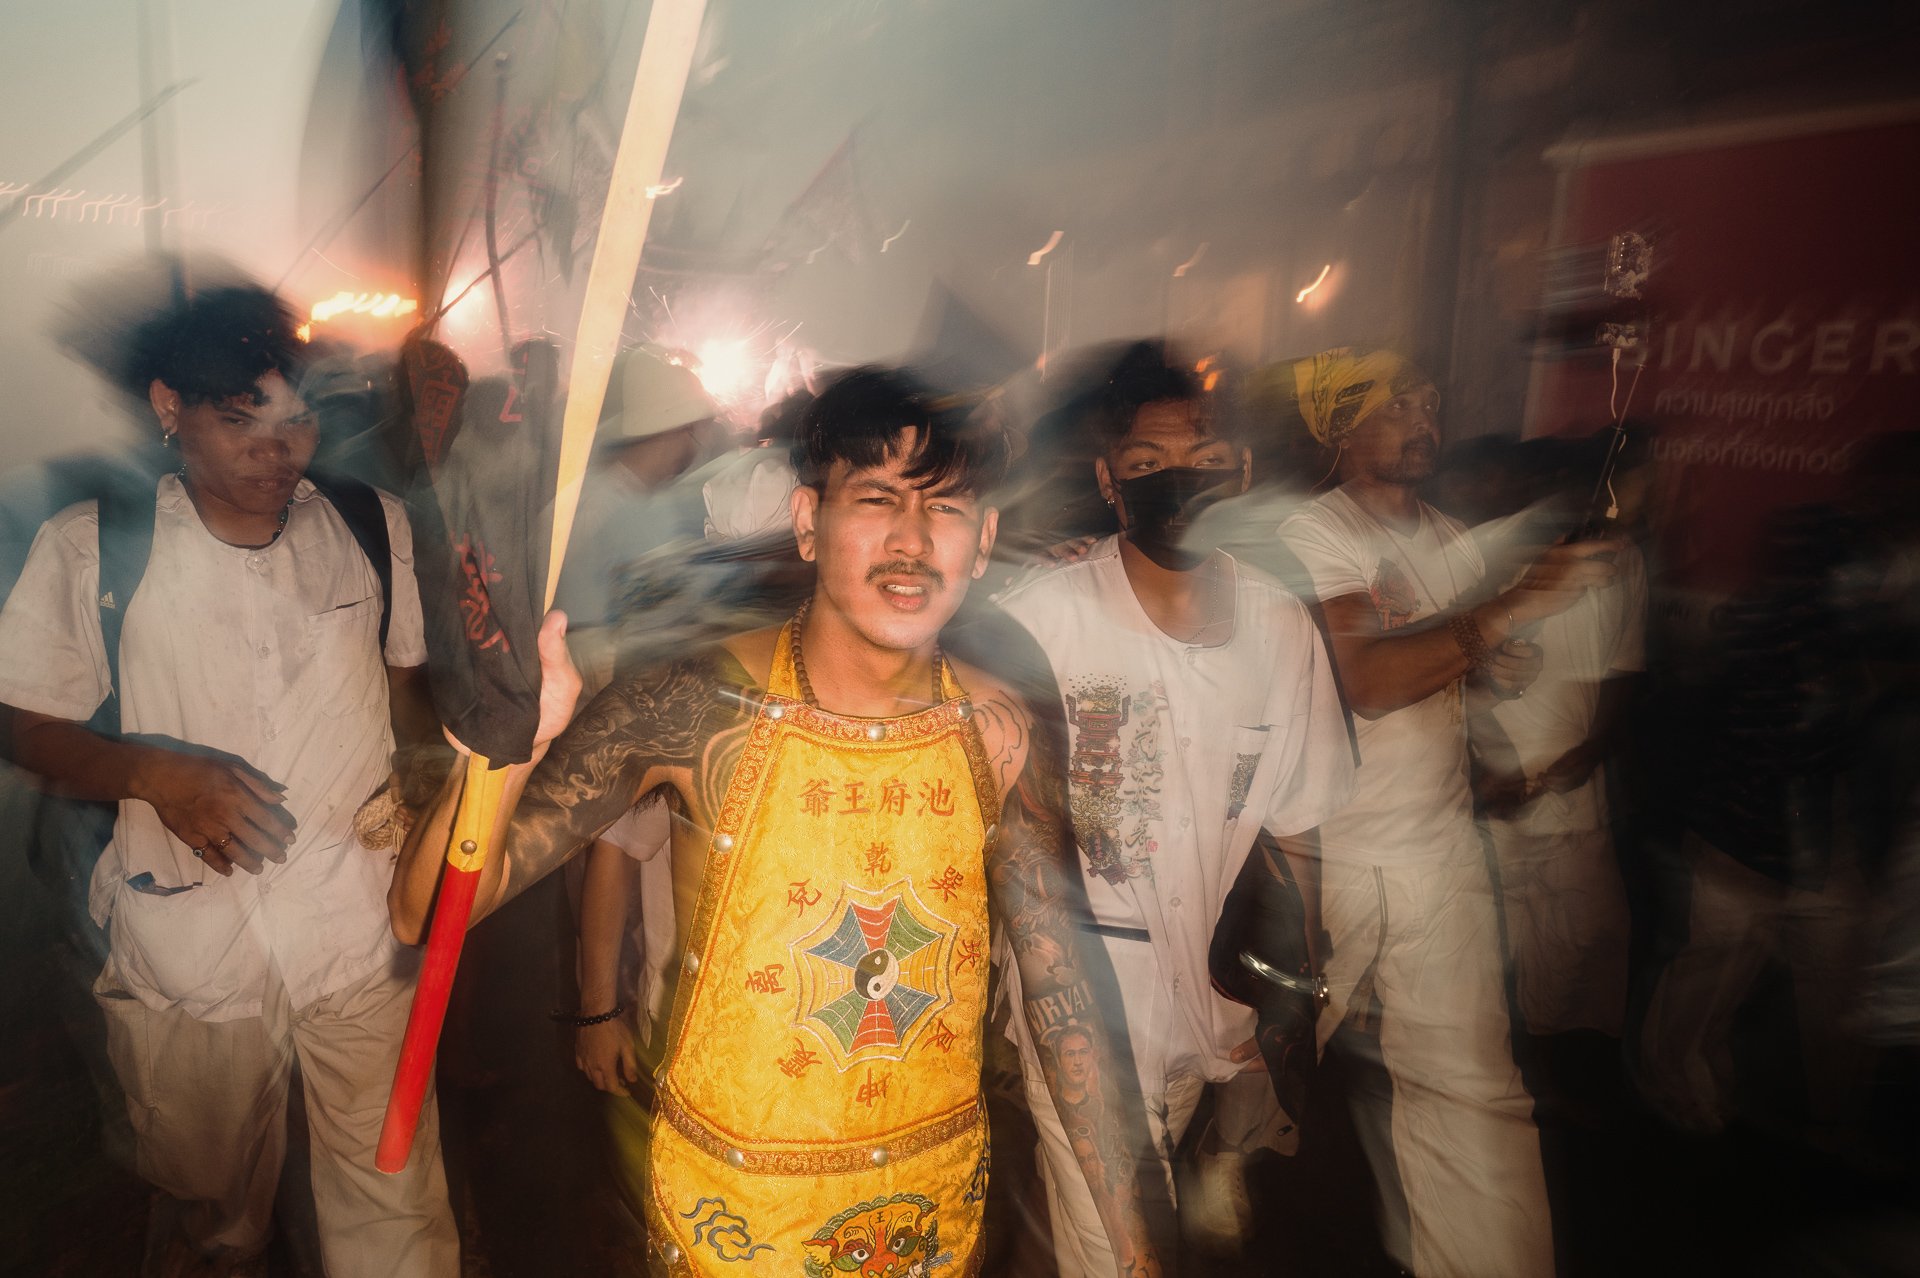
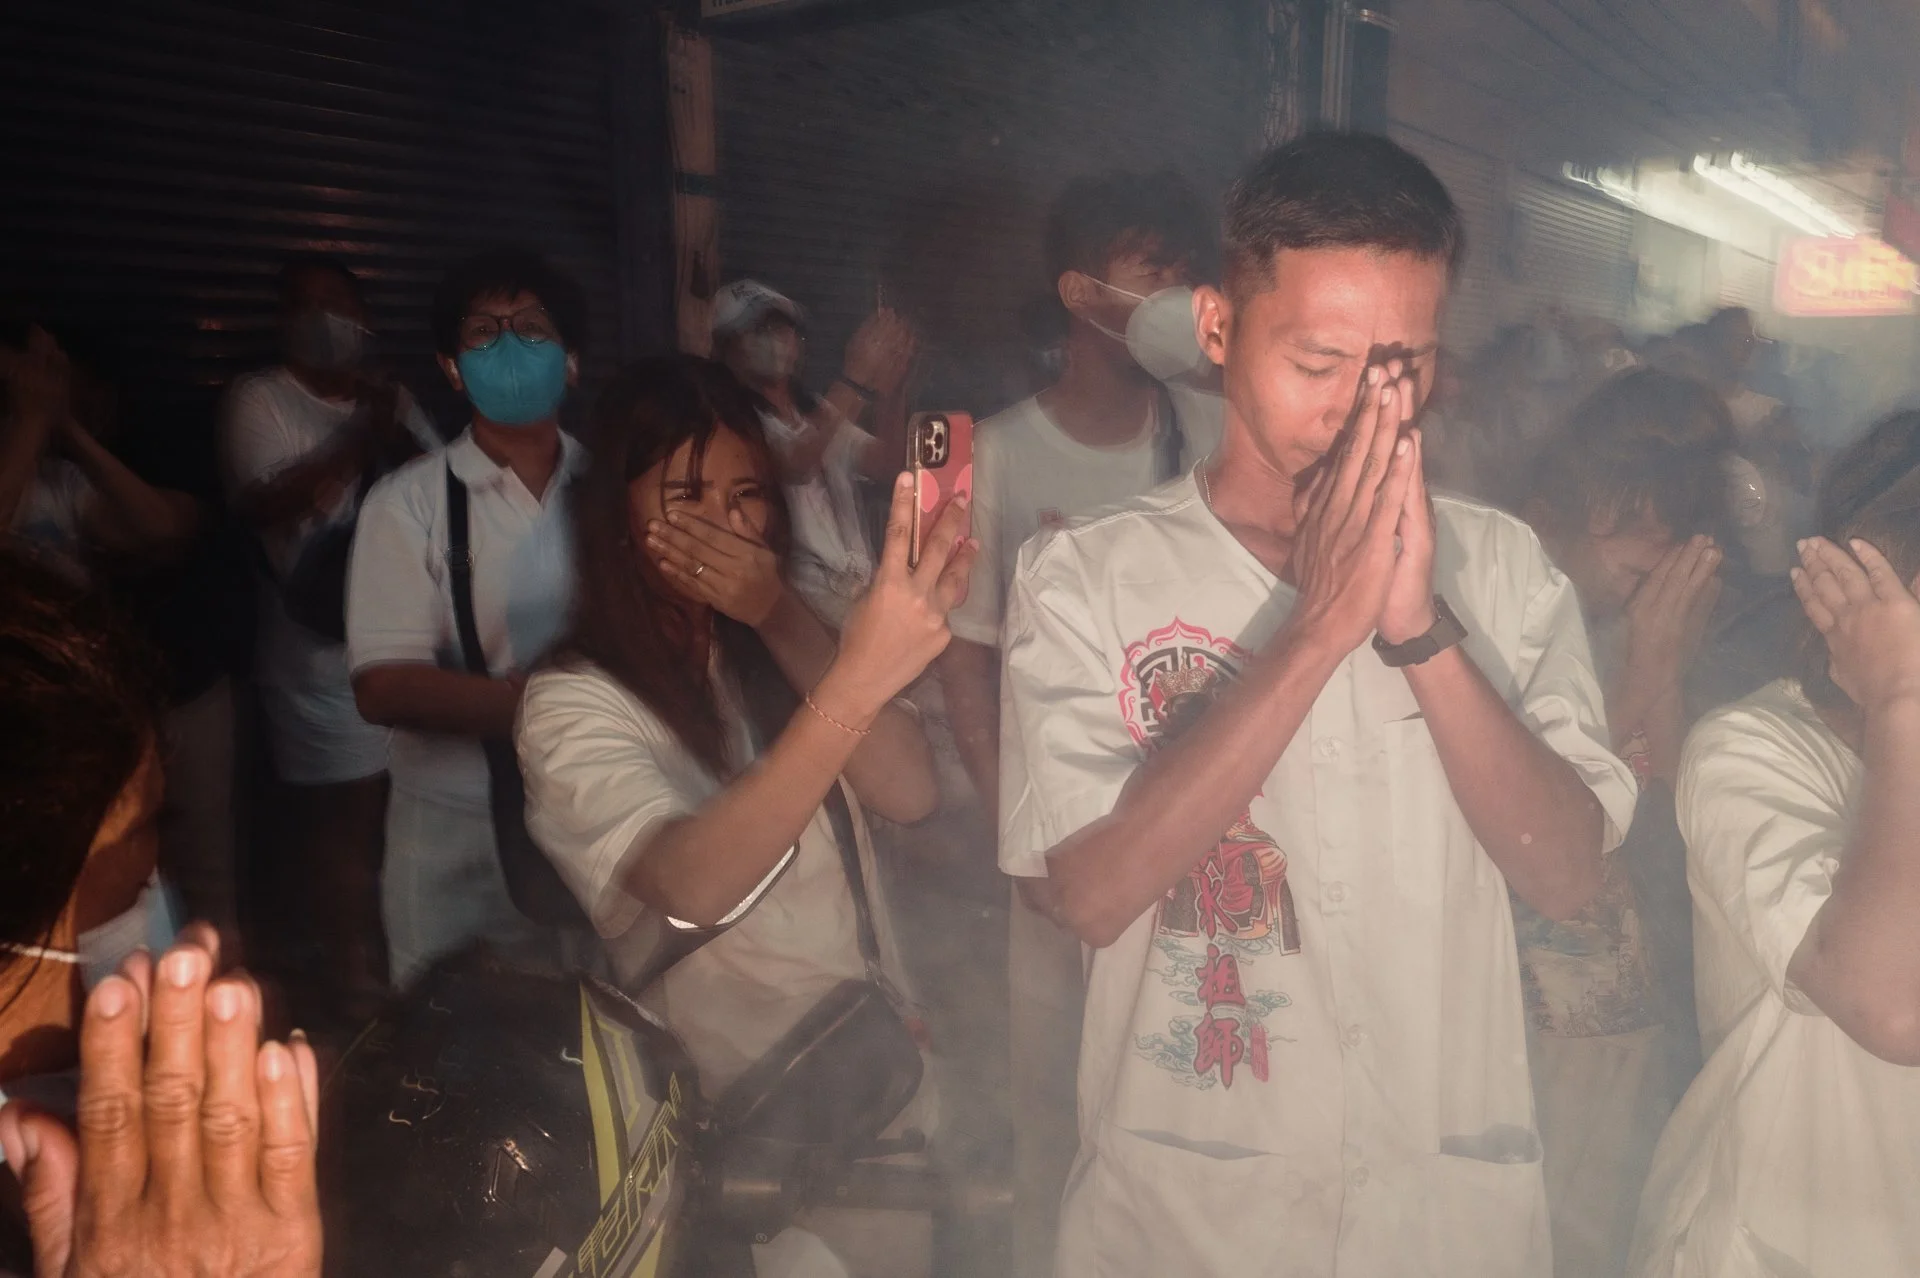
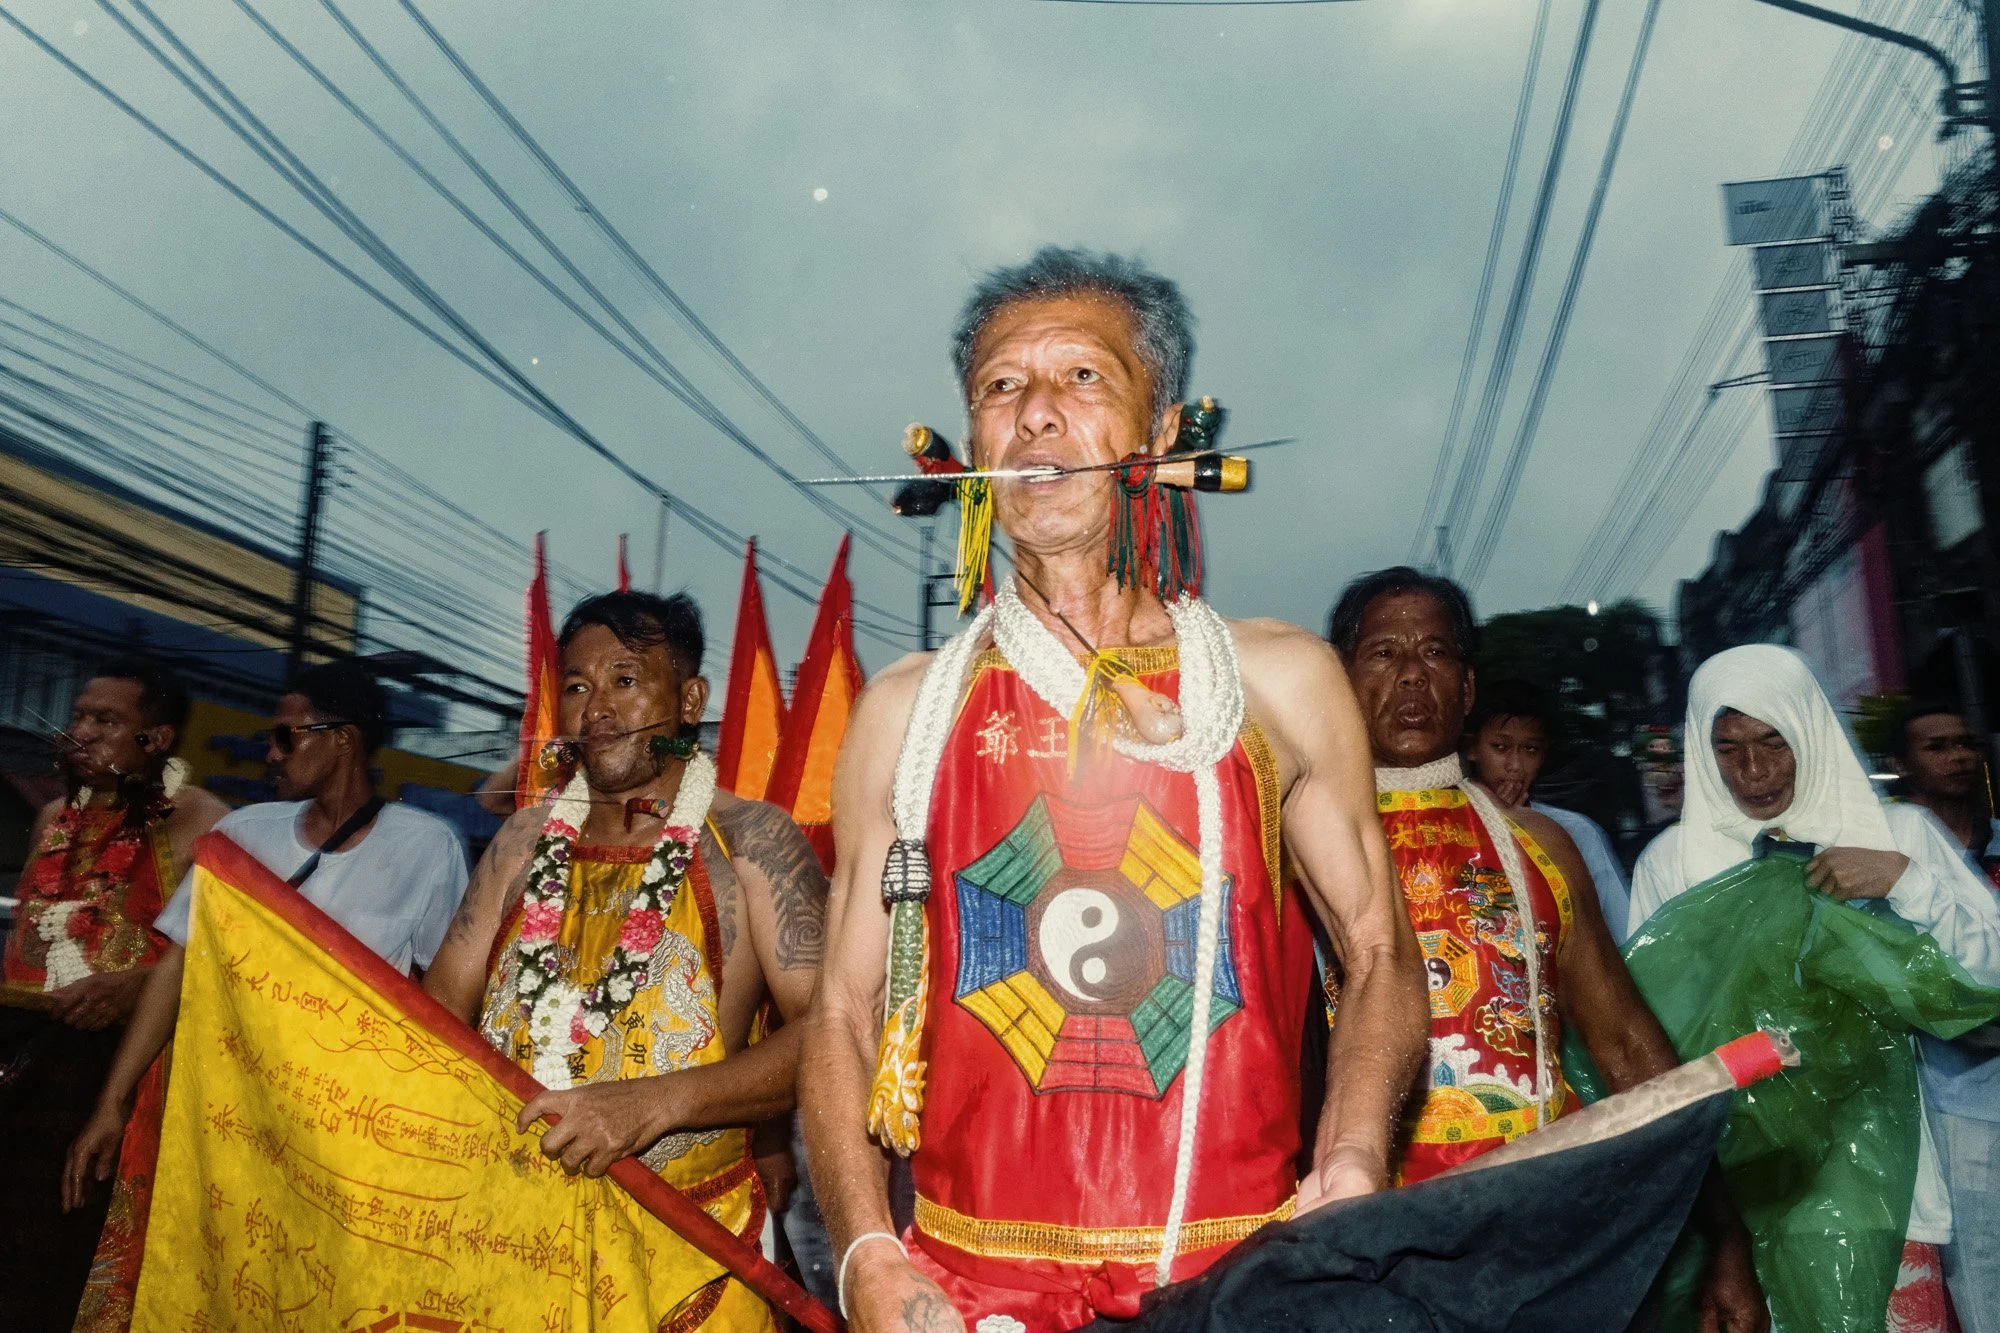
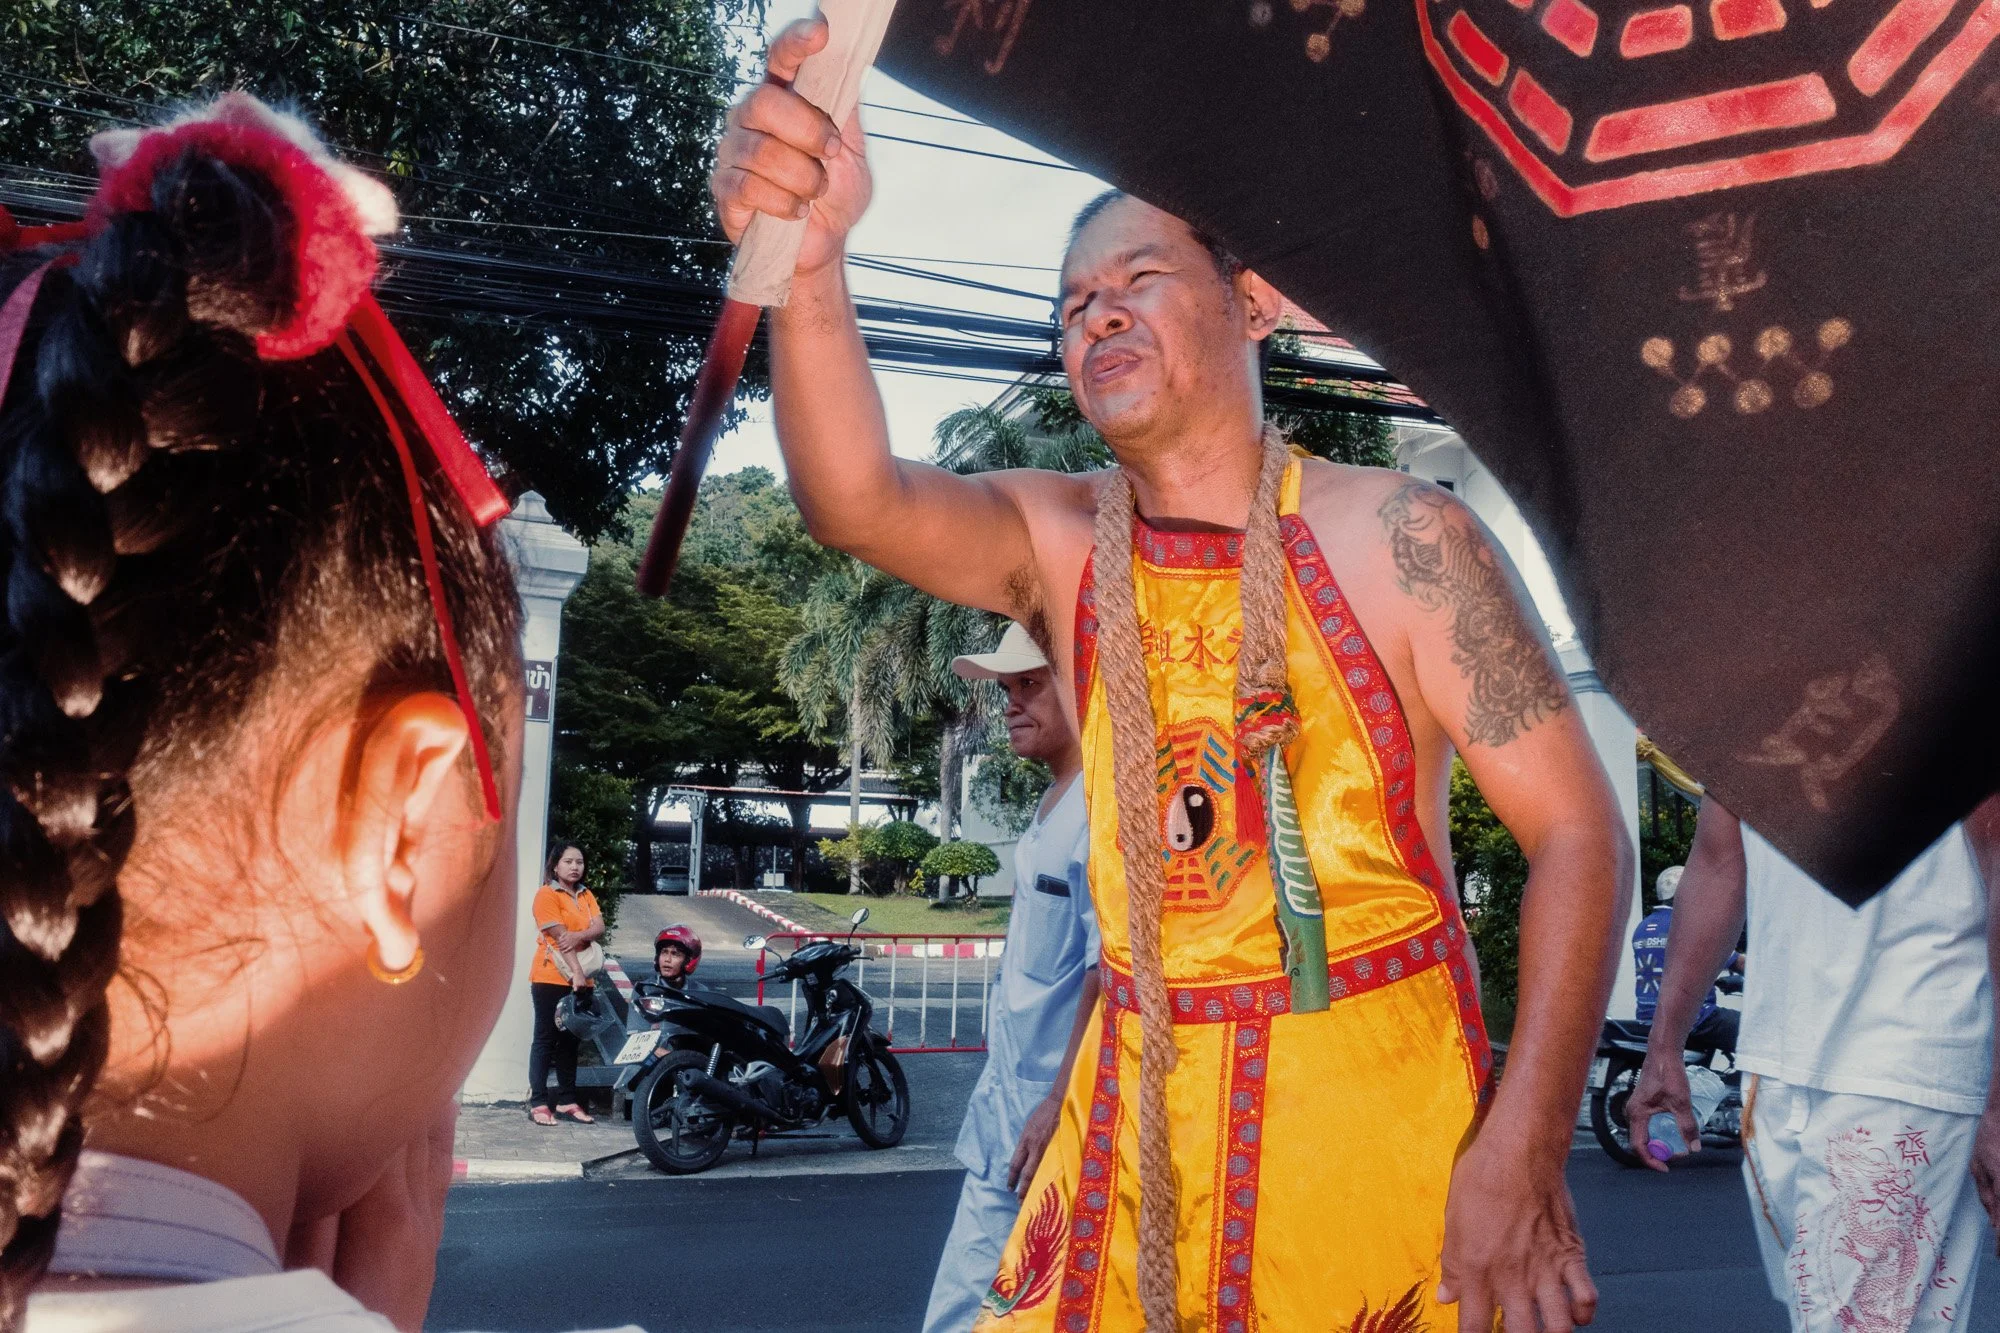
When the parade began, we walked through every street and every small alleyway in the village. At times it got a bit wild, as expected, but overall it was calm and deeply respectful.
It felt like the entire village was involved. People either walked along with the parade or stood in front of their homes to welcome the Masongs.
I truly feel blessed to have been part of this experience. Later, I shared a selection of my photos with the locals, which felt like the right thing to do.
23. Ricoh GRIV - 1/250 - f/11 - ISO800
24. Ricoh GRIV - 1/125 - f/11 - ISO800
25. Ricoh GRIV - 1/160 - f/11 - ISO800
26. Ricoh GRIV - 1/160 - f/11 - ISO800
27. Ricoh GRIV - 1/125 - f/11 - ISO800
28. Ricoh GRIV - 1/80 - f/11 - ISO800
At this point, all my Ricoh batteries were dead, so I switched to the Leica Q3.
29. Leica Q3 - 1/100 - f/11 - ISO800
30. Leica Q3 - 1/80 - f/11 - ISO800

31. Leica Q3 - 1/80 - f/11 - ISO800
32. Leica Q3 - 1/50 - f/11 - ISO800
33. Leica Q3 - 1/50 - f/11 - ISO800
34. Leica Q3 - 1/40 - f/11 - ISO800
35. Leica Q3 - 1/25 - f/11 - ISO800
36. Leica Q3 - 1/8 - f9.0 - ISO800
37. Leica Q3 - 1/30 - f9.0 - ISO800
38. Leica Q3 - 1/8 - f9.0 - ISO800
39. Leica Q3 - 1/5 - f9.0 - ISO800
40. Leica Q3 - 1/5 - f9.0 - ISO800
41. Leica Q3 - 0.3 sec - f9.0 - ISO800
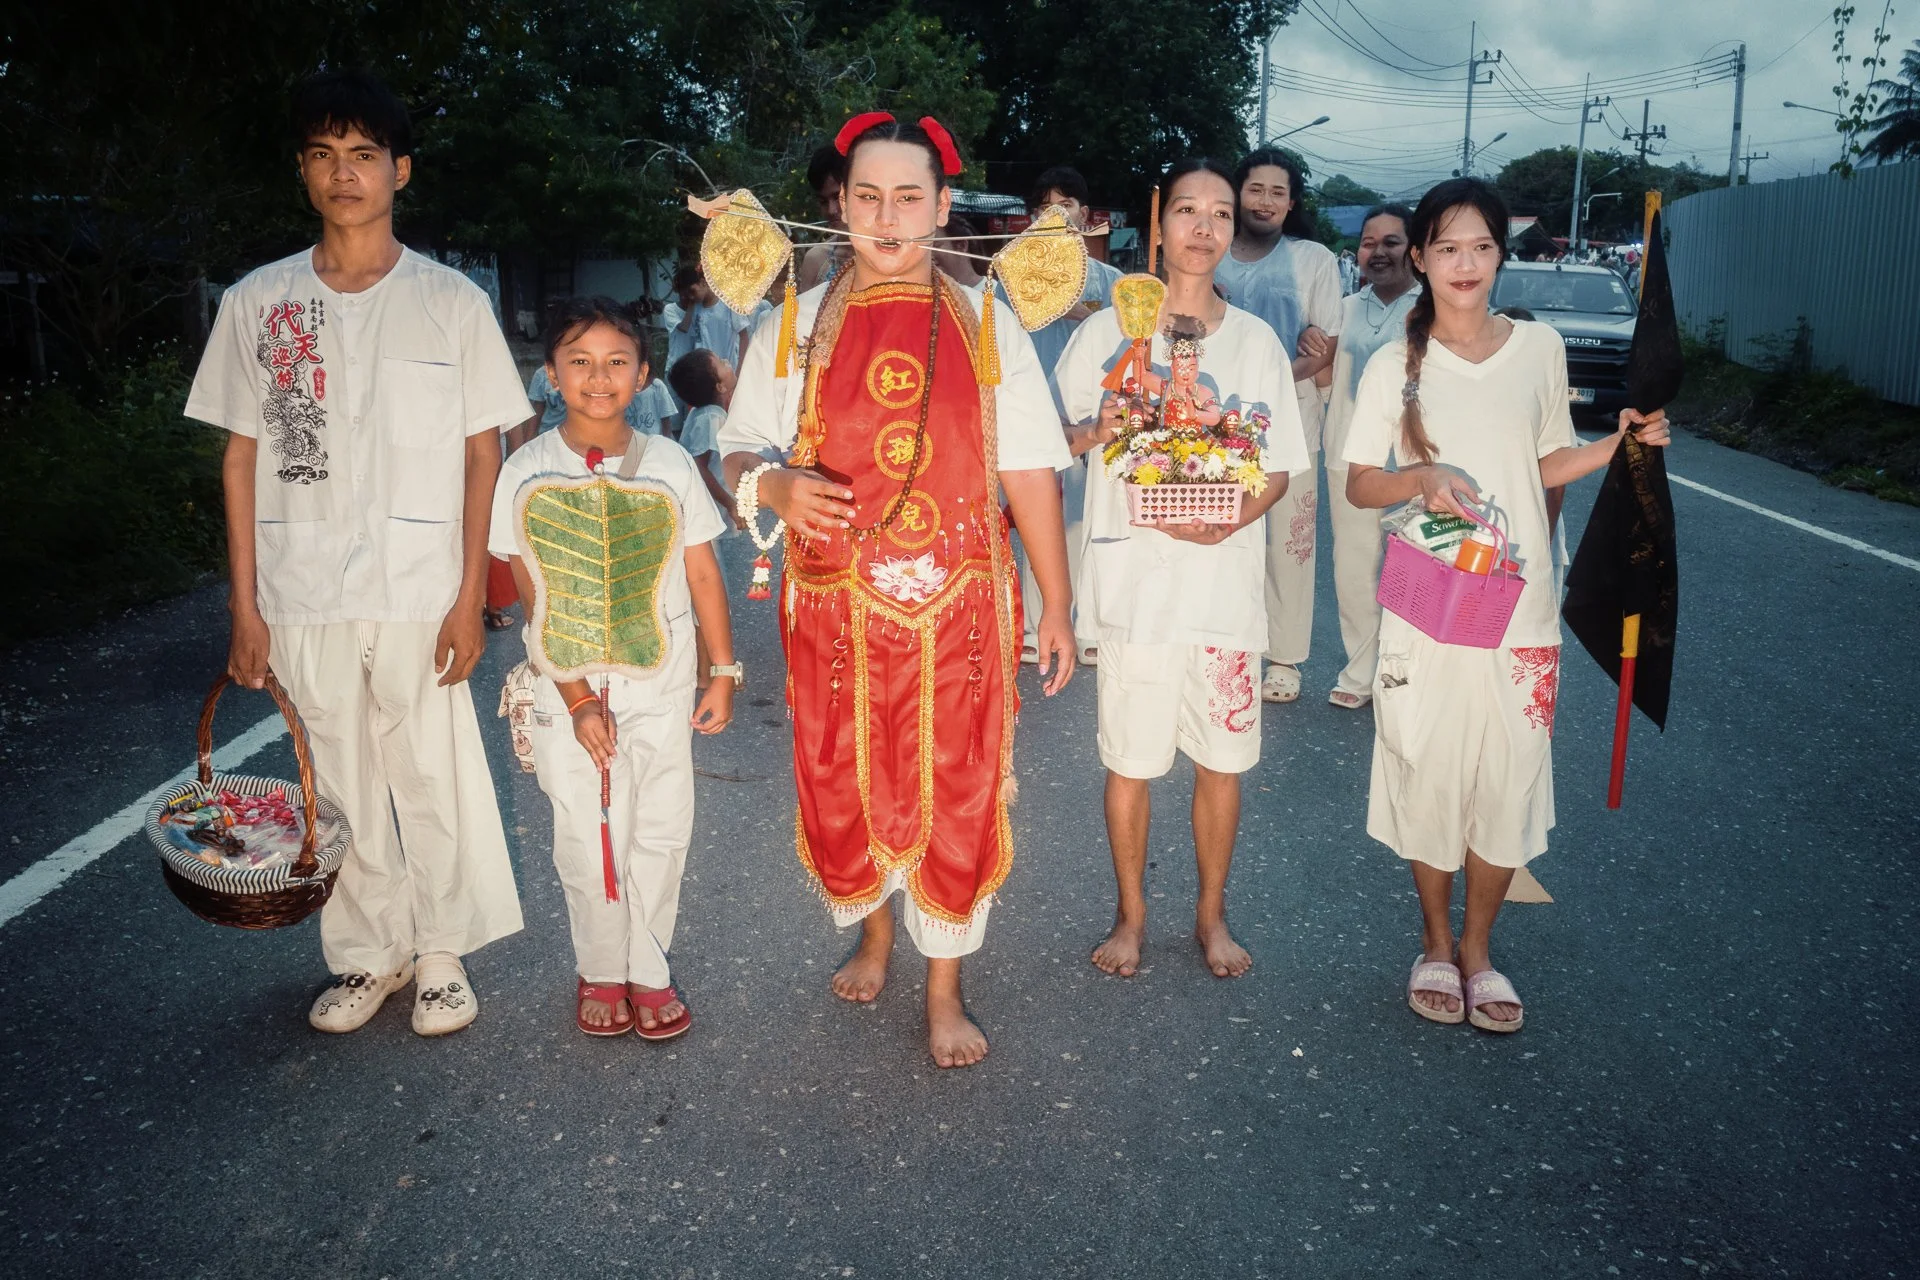
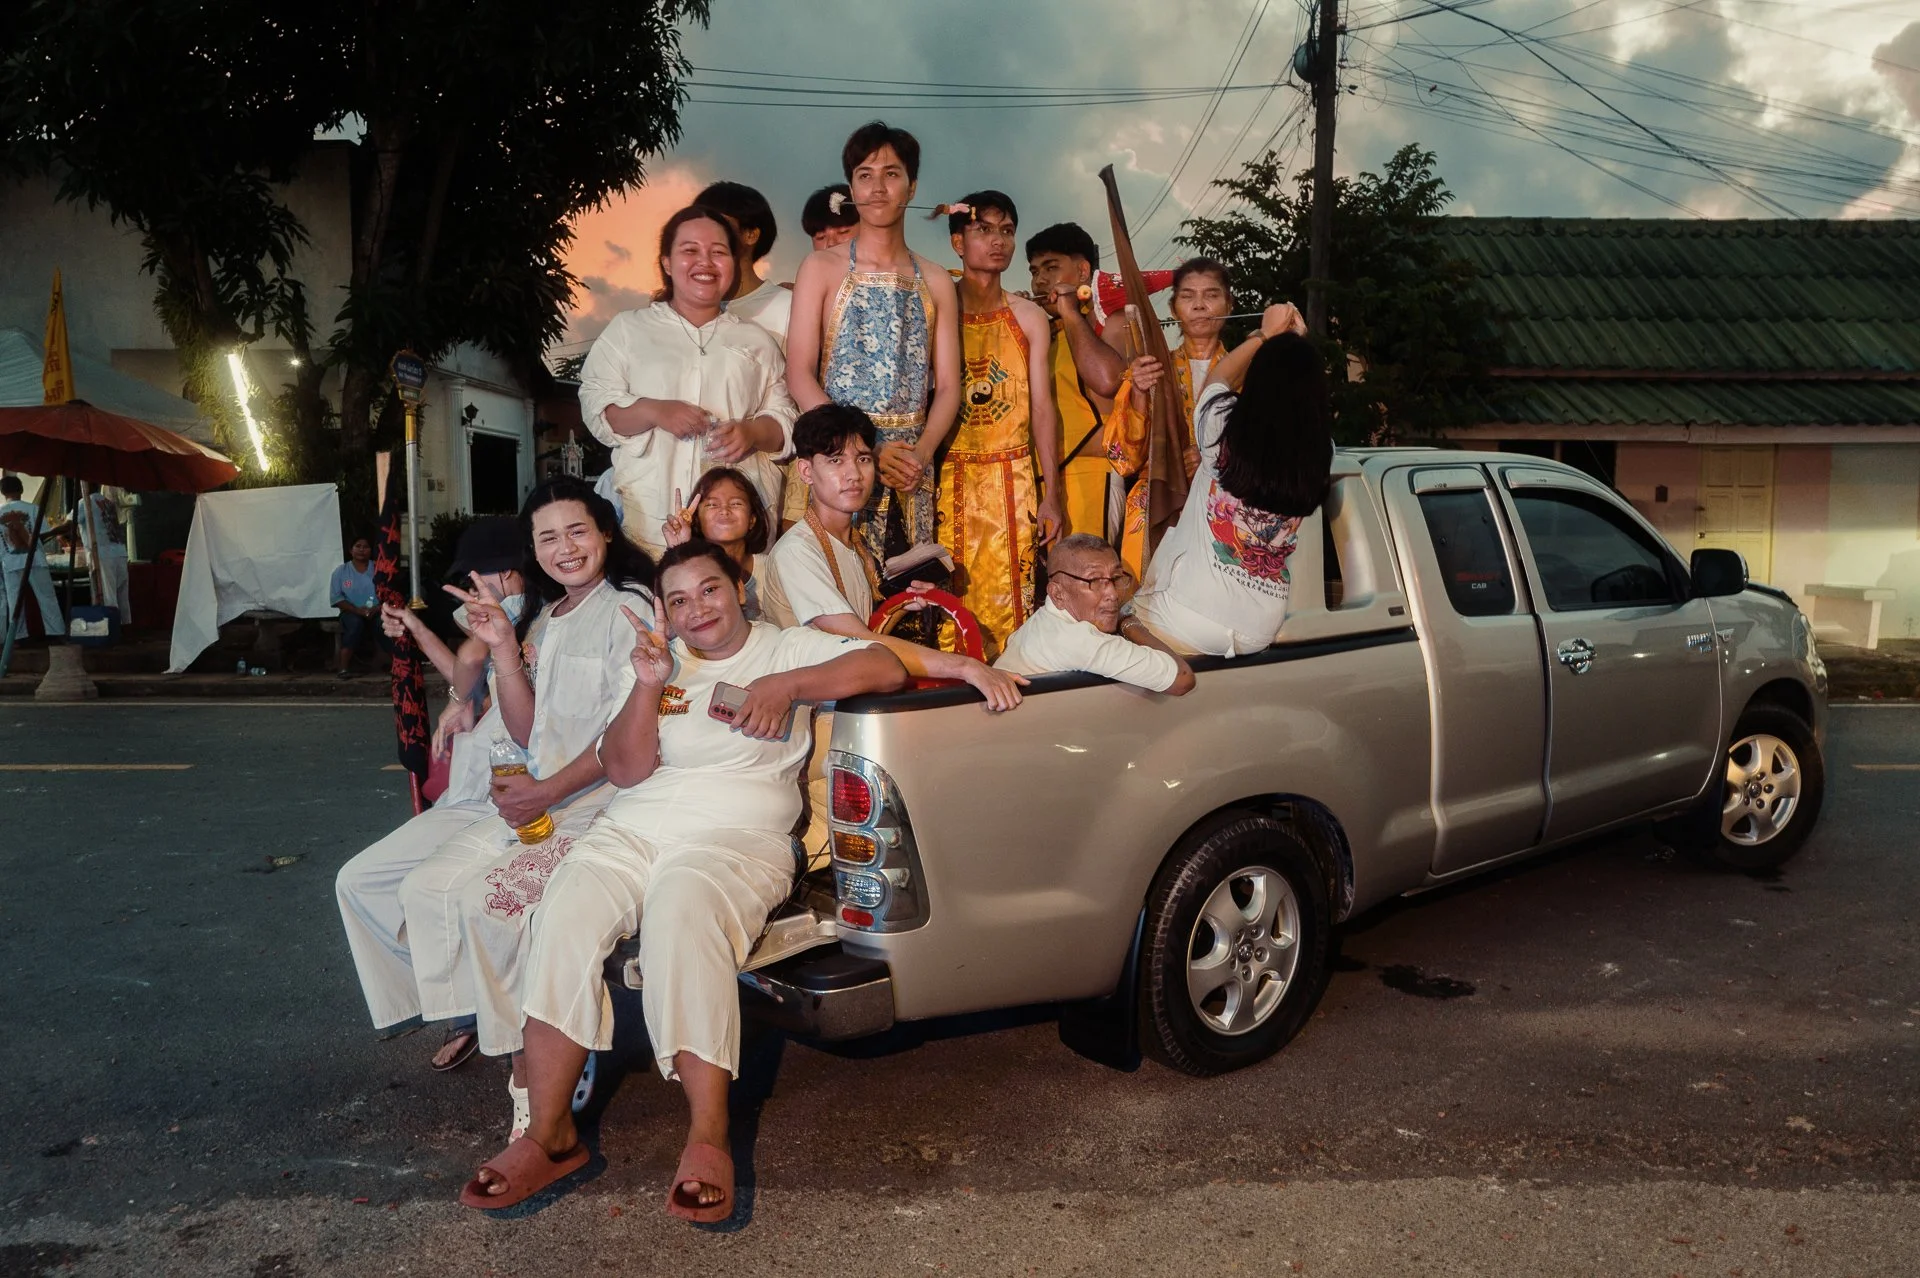
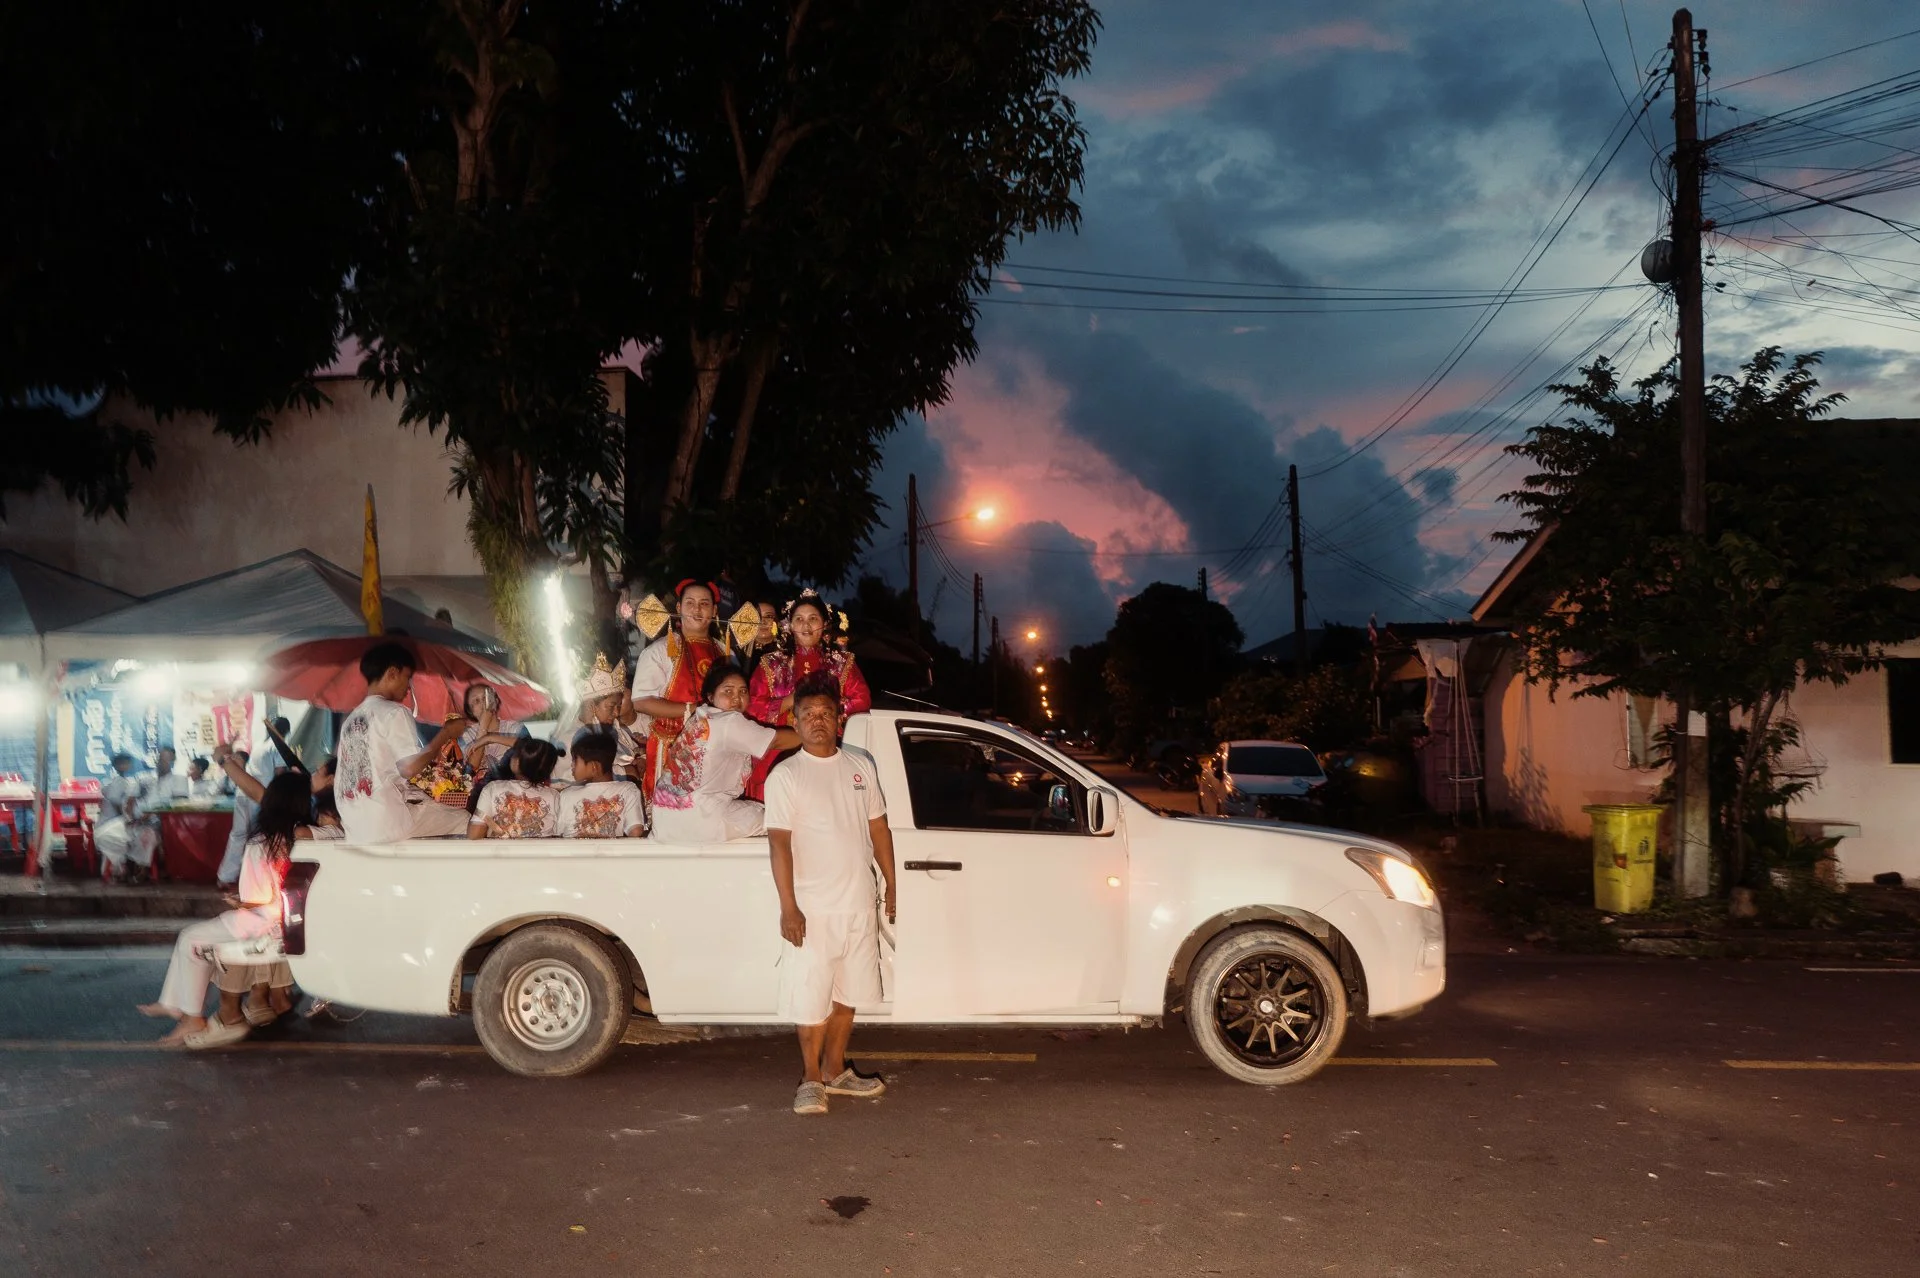
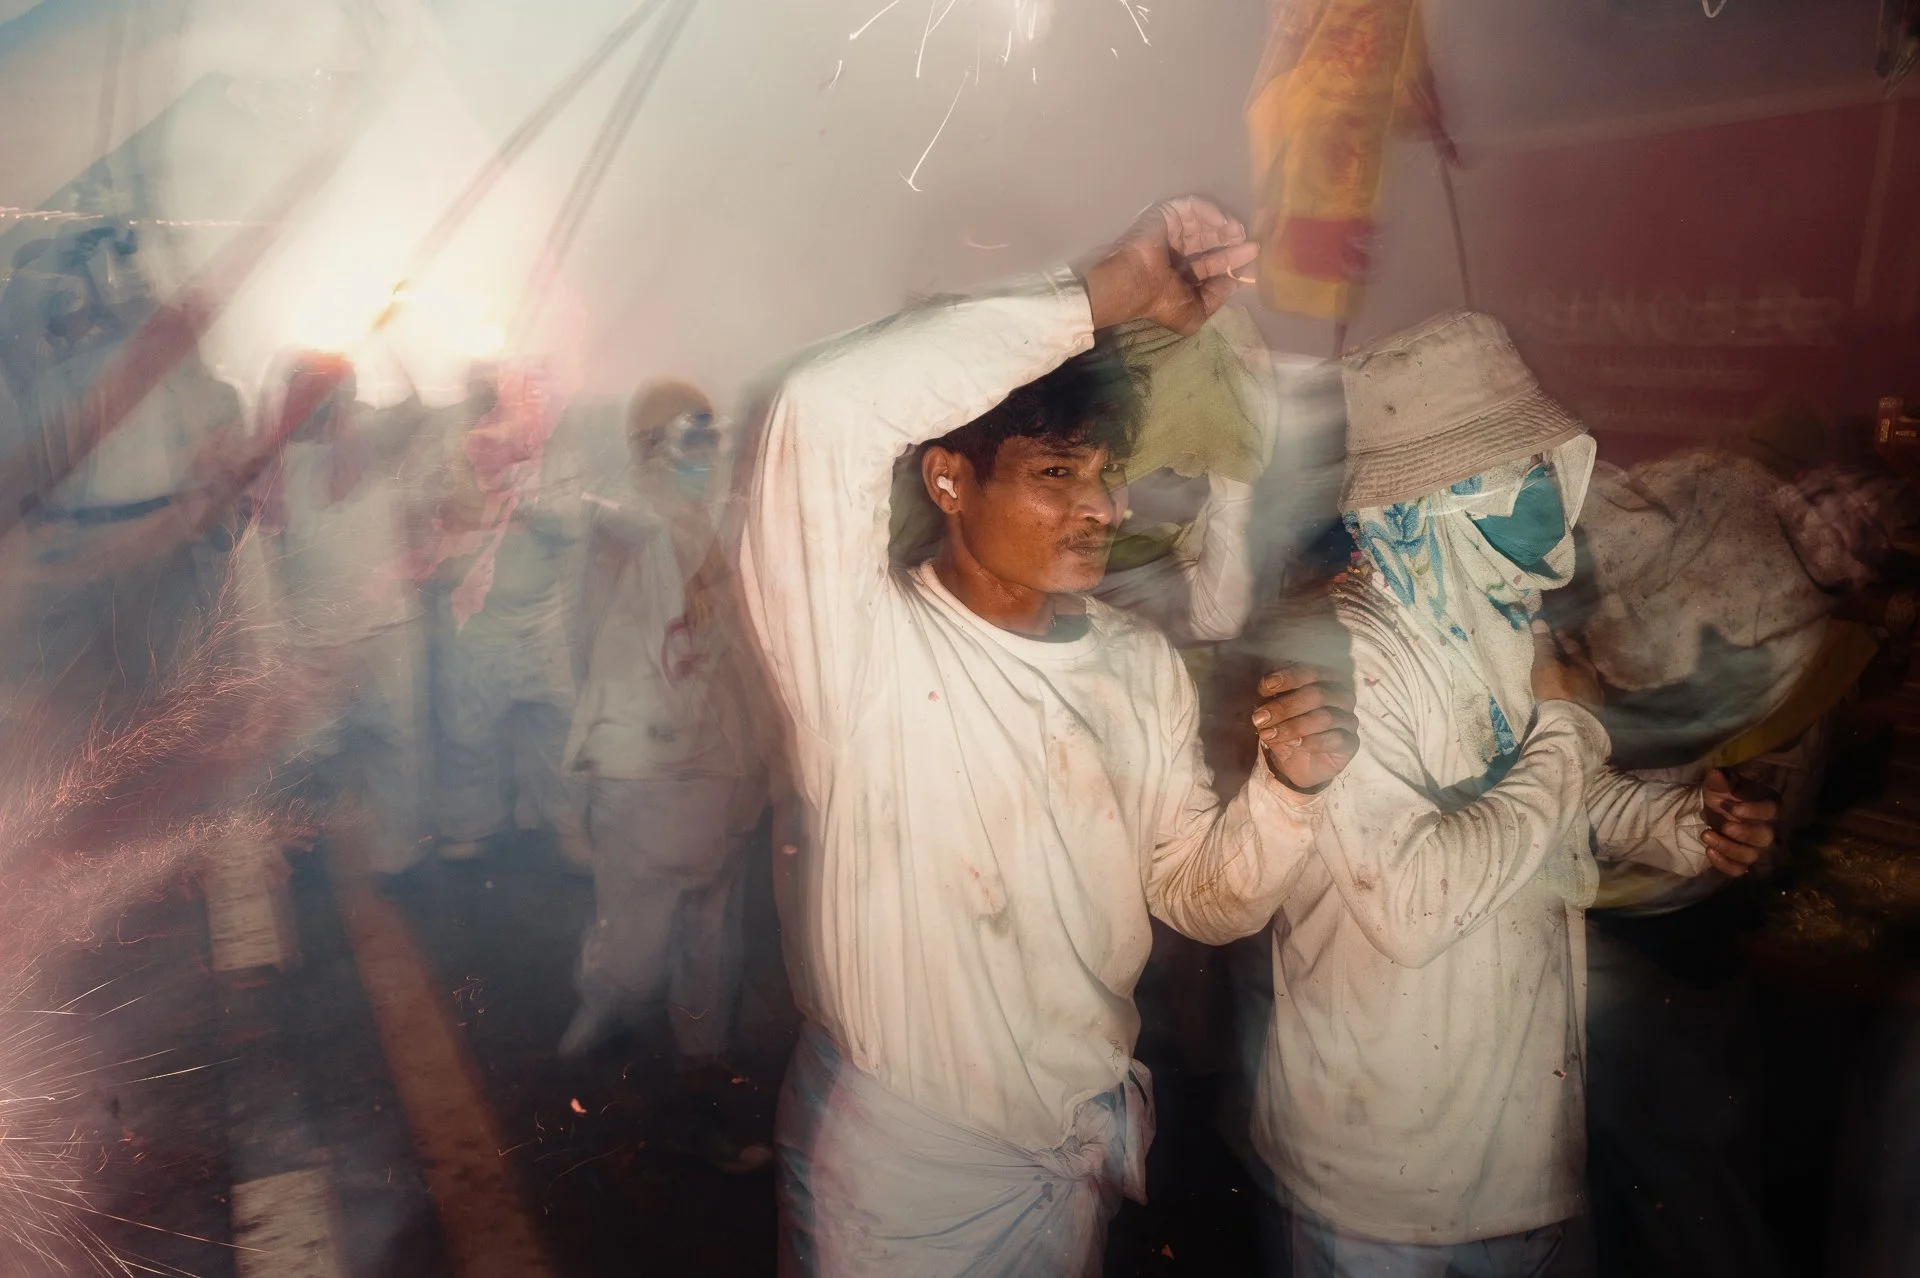
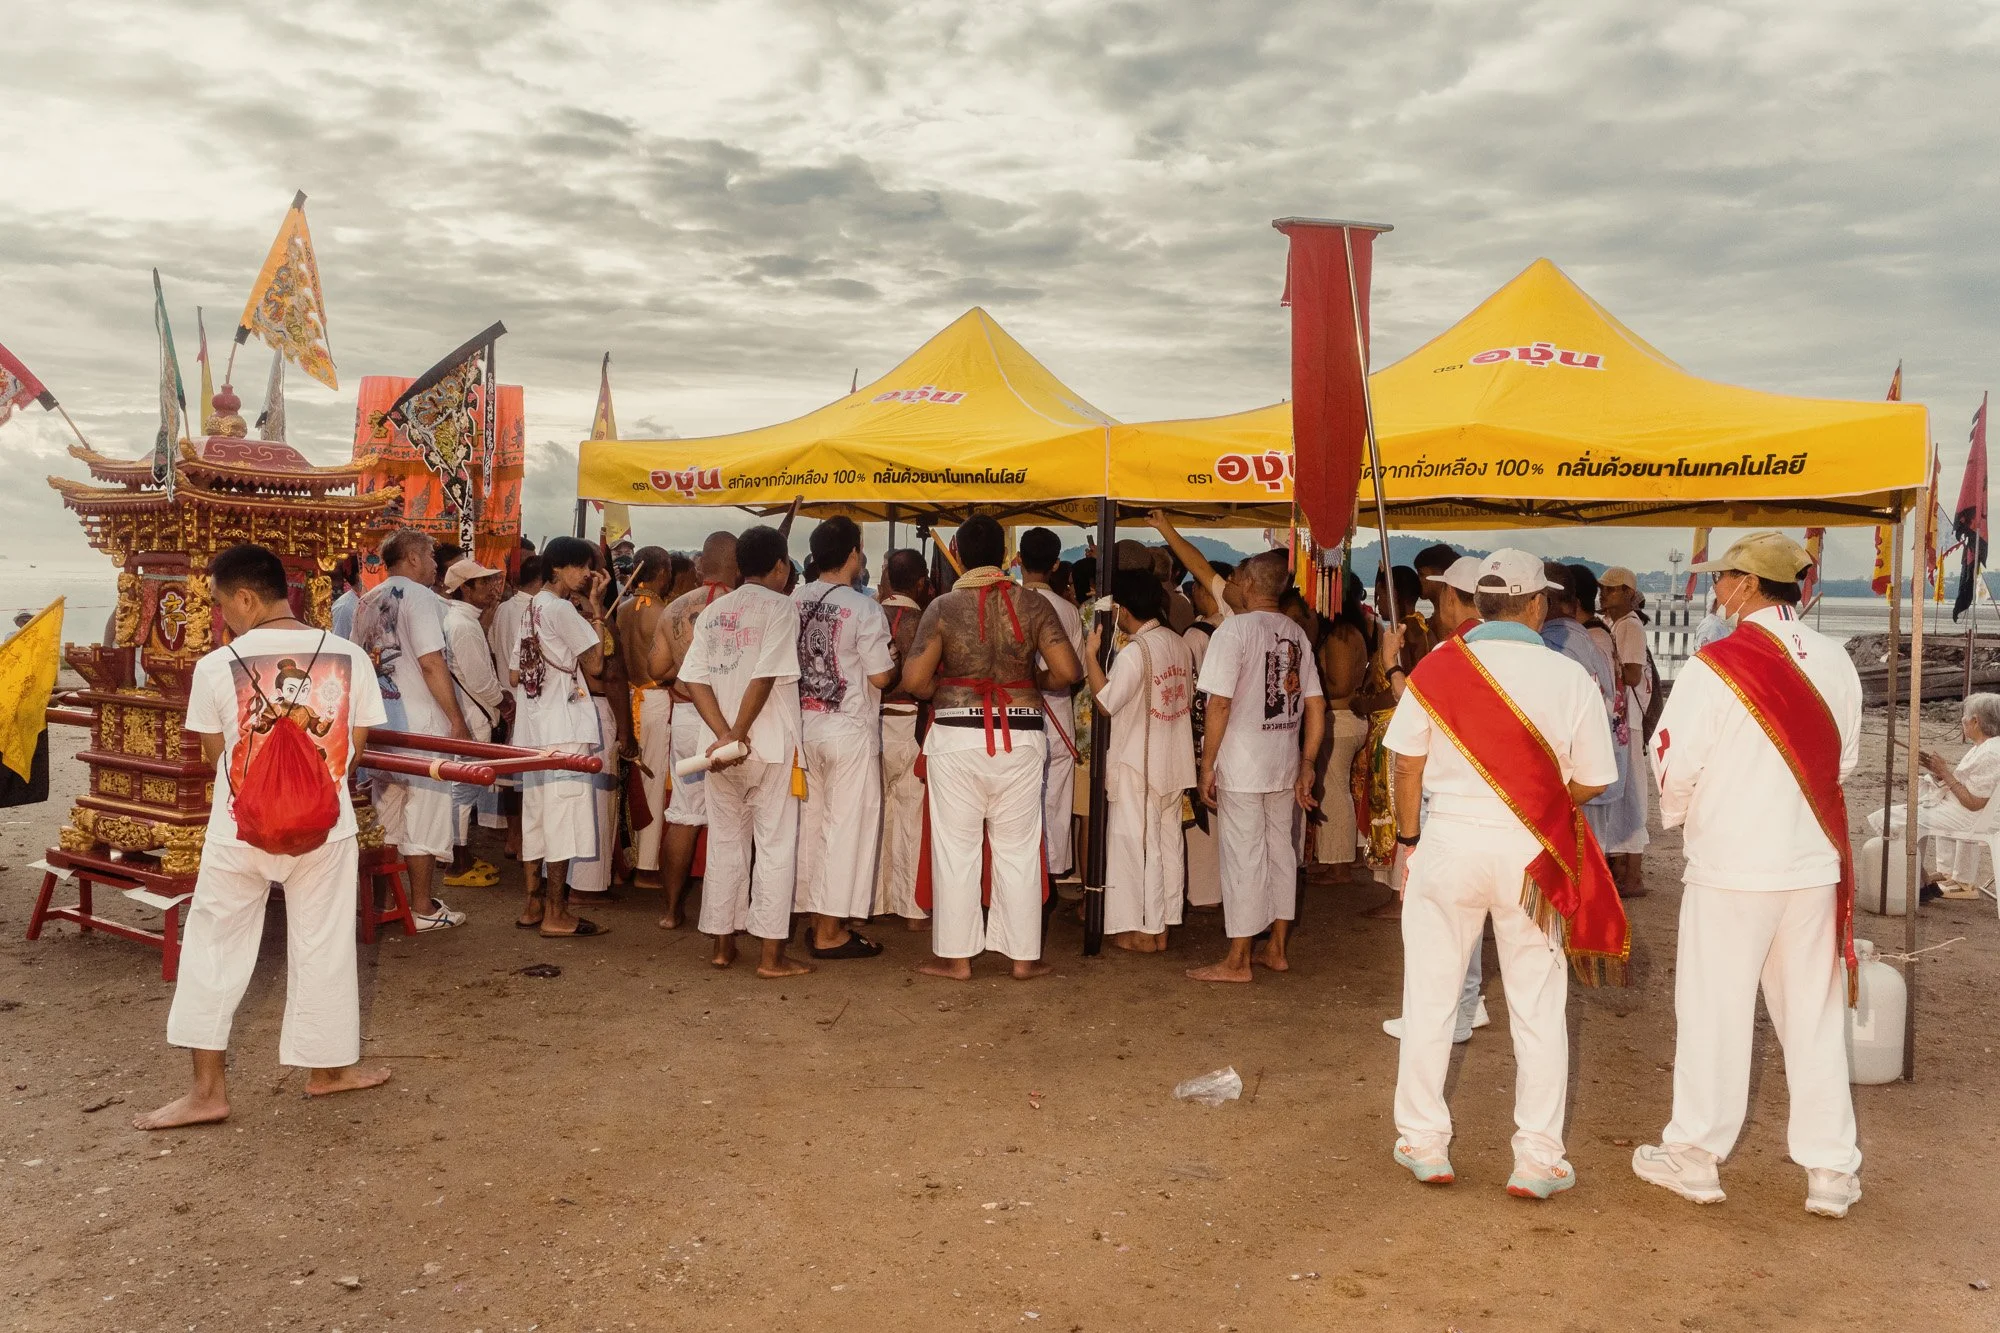
The parade lasted well over an hour. By the time we returned to the shrine, the sun was already setting.
We thought it was over, but the locals were not done yet. They all jumped onto pickup trucks and headed to a nearby beach. For us, it was time to find a ride and return to Phuket Old Town.
I am not sure if the pictures fully capture it, but that day was something truly special. I would love to return next year.
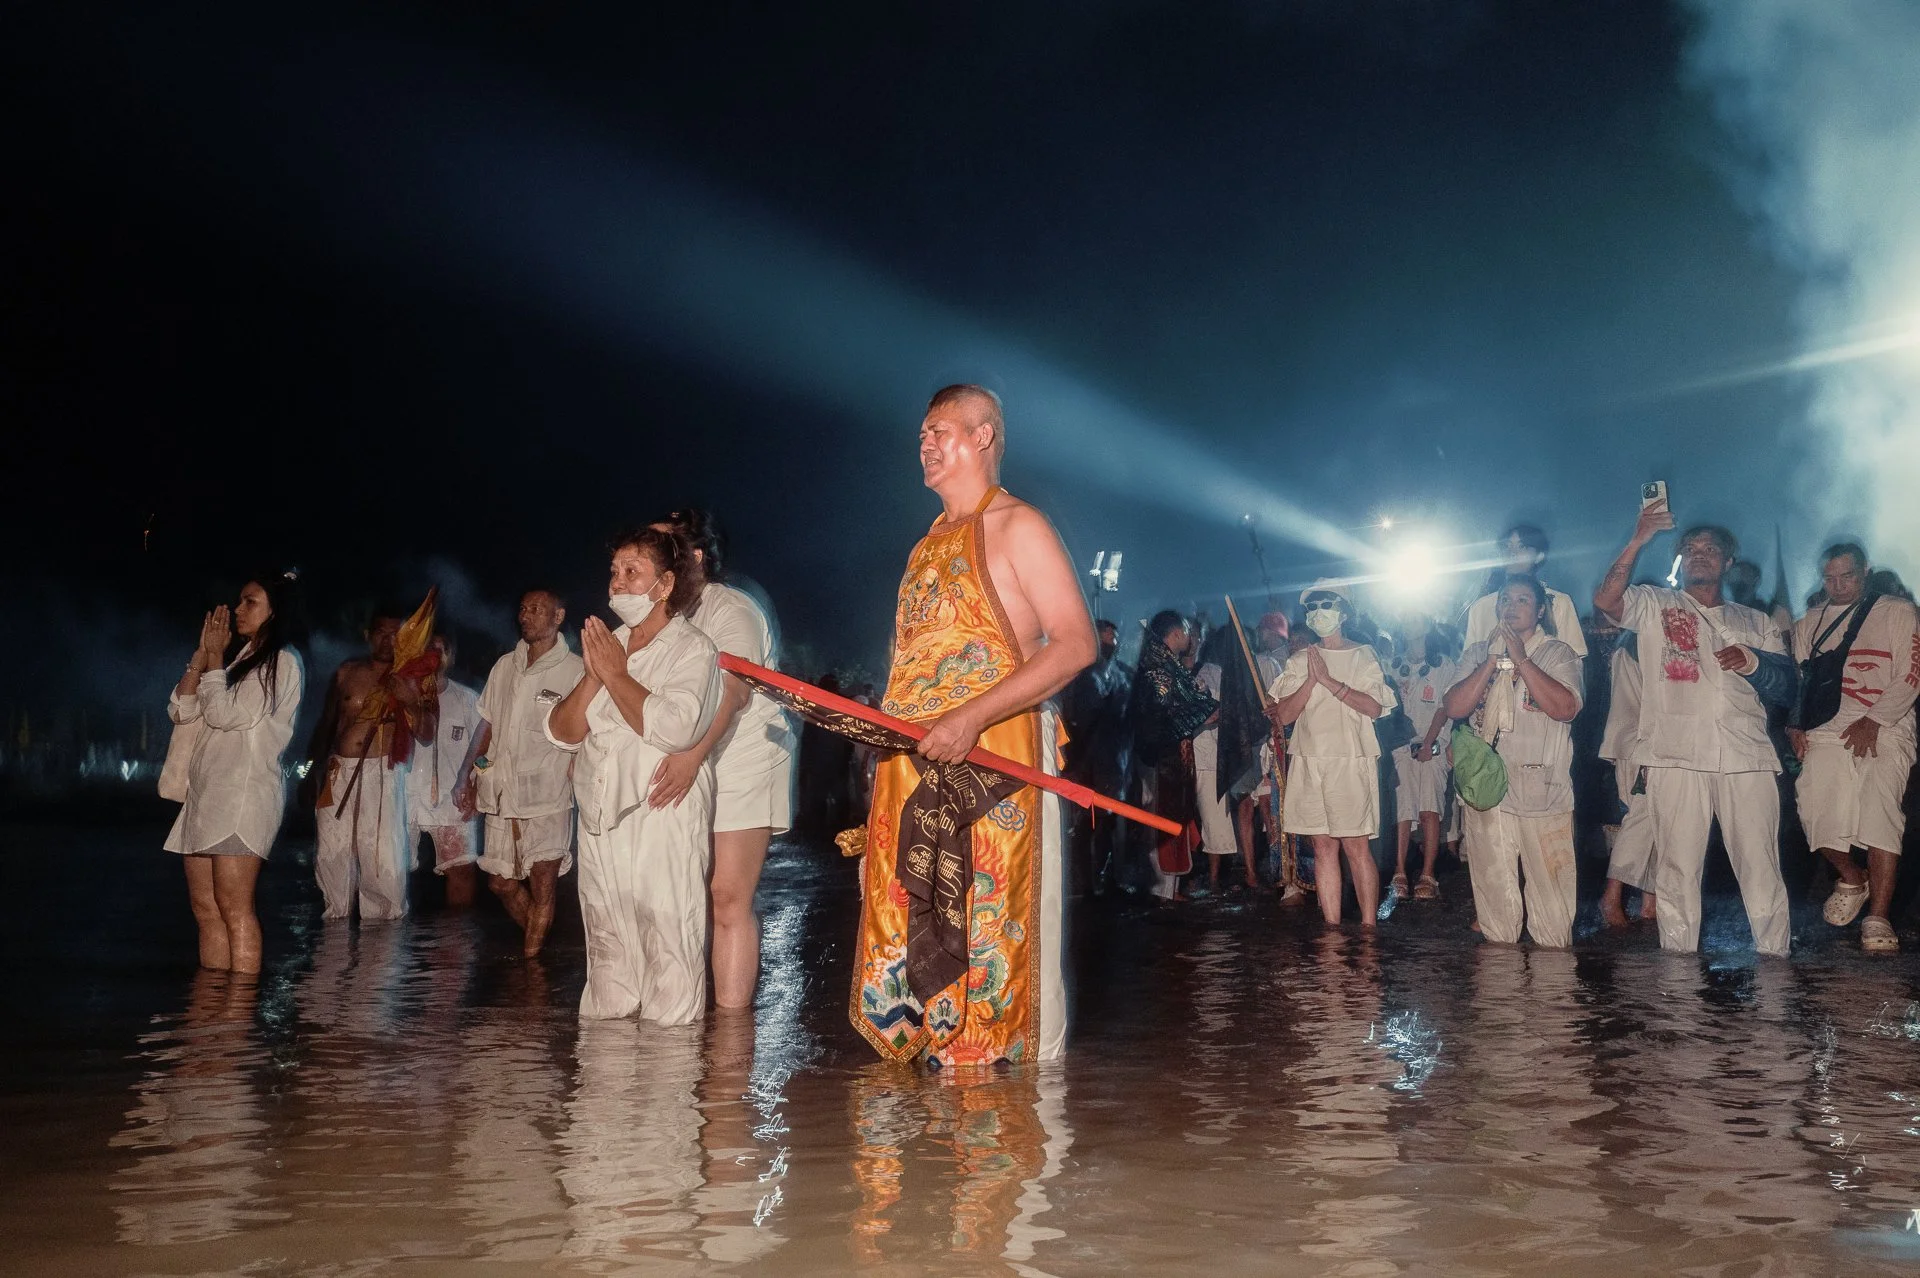
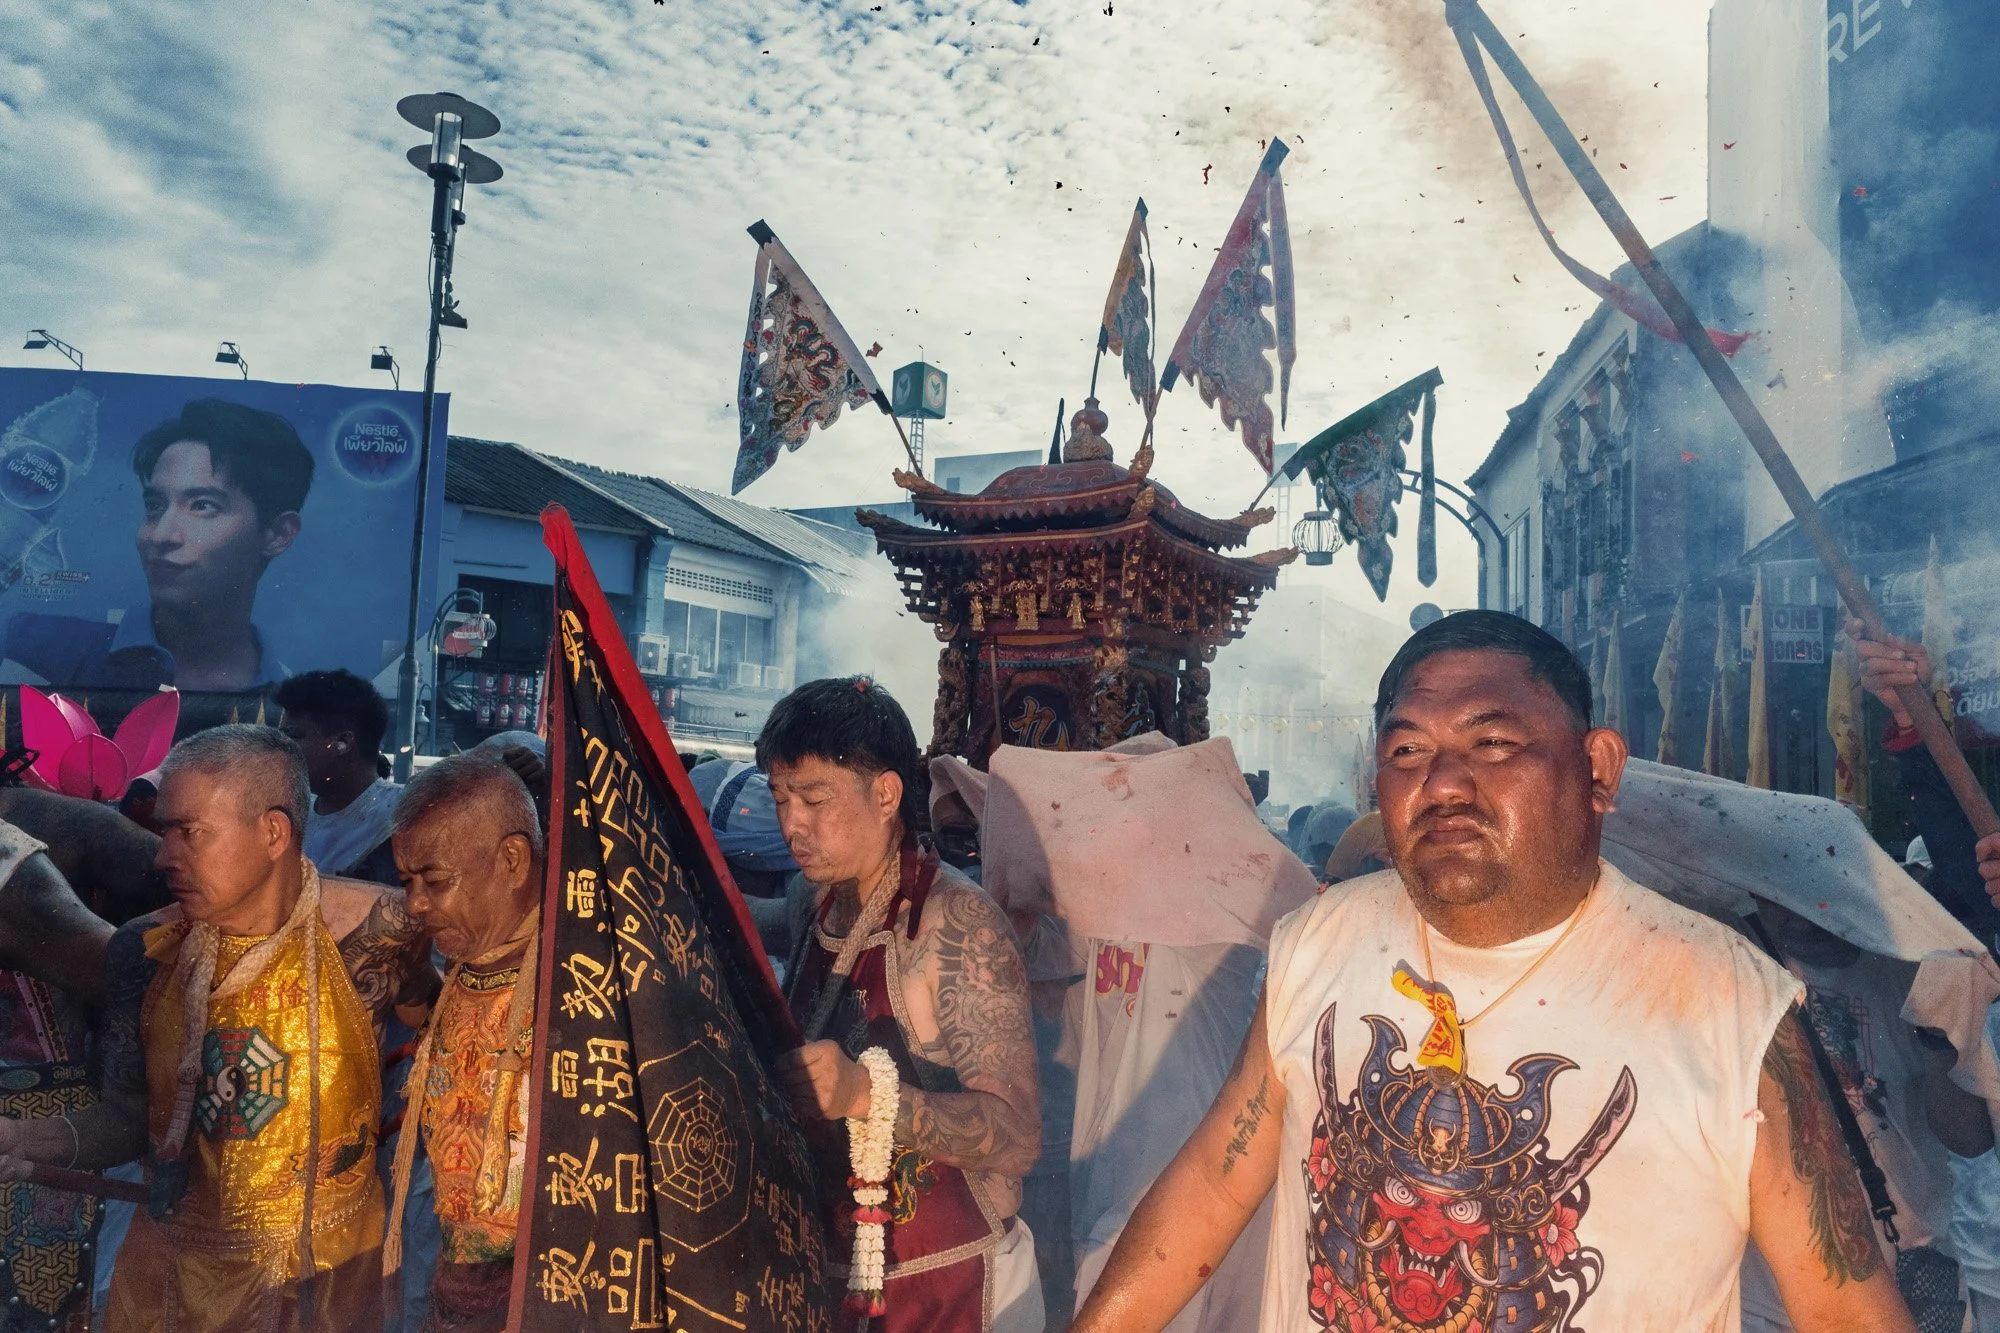
The Final Night Begins
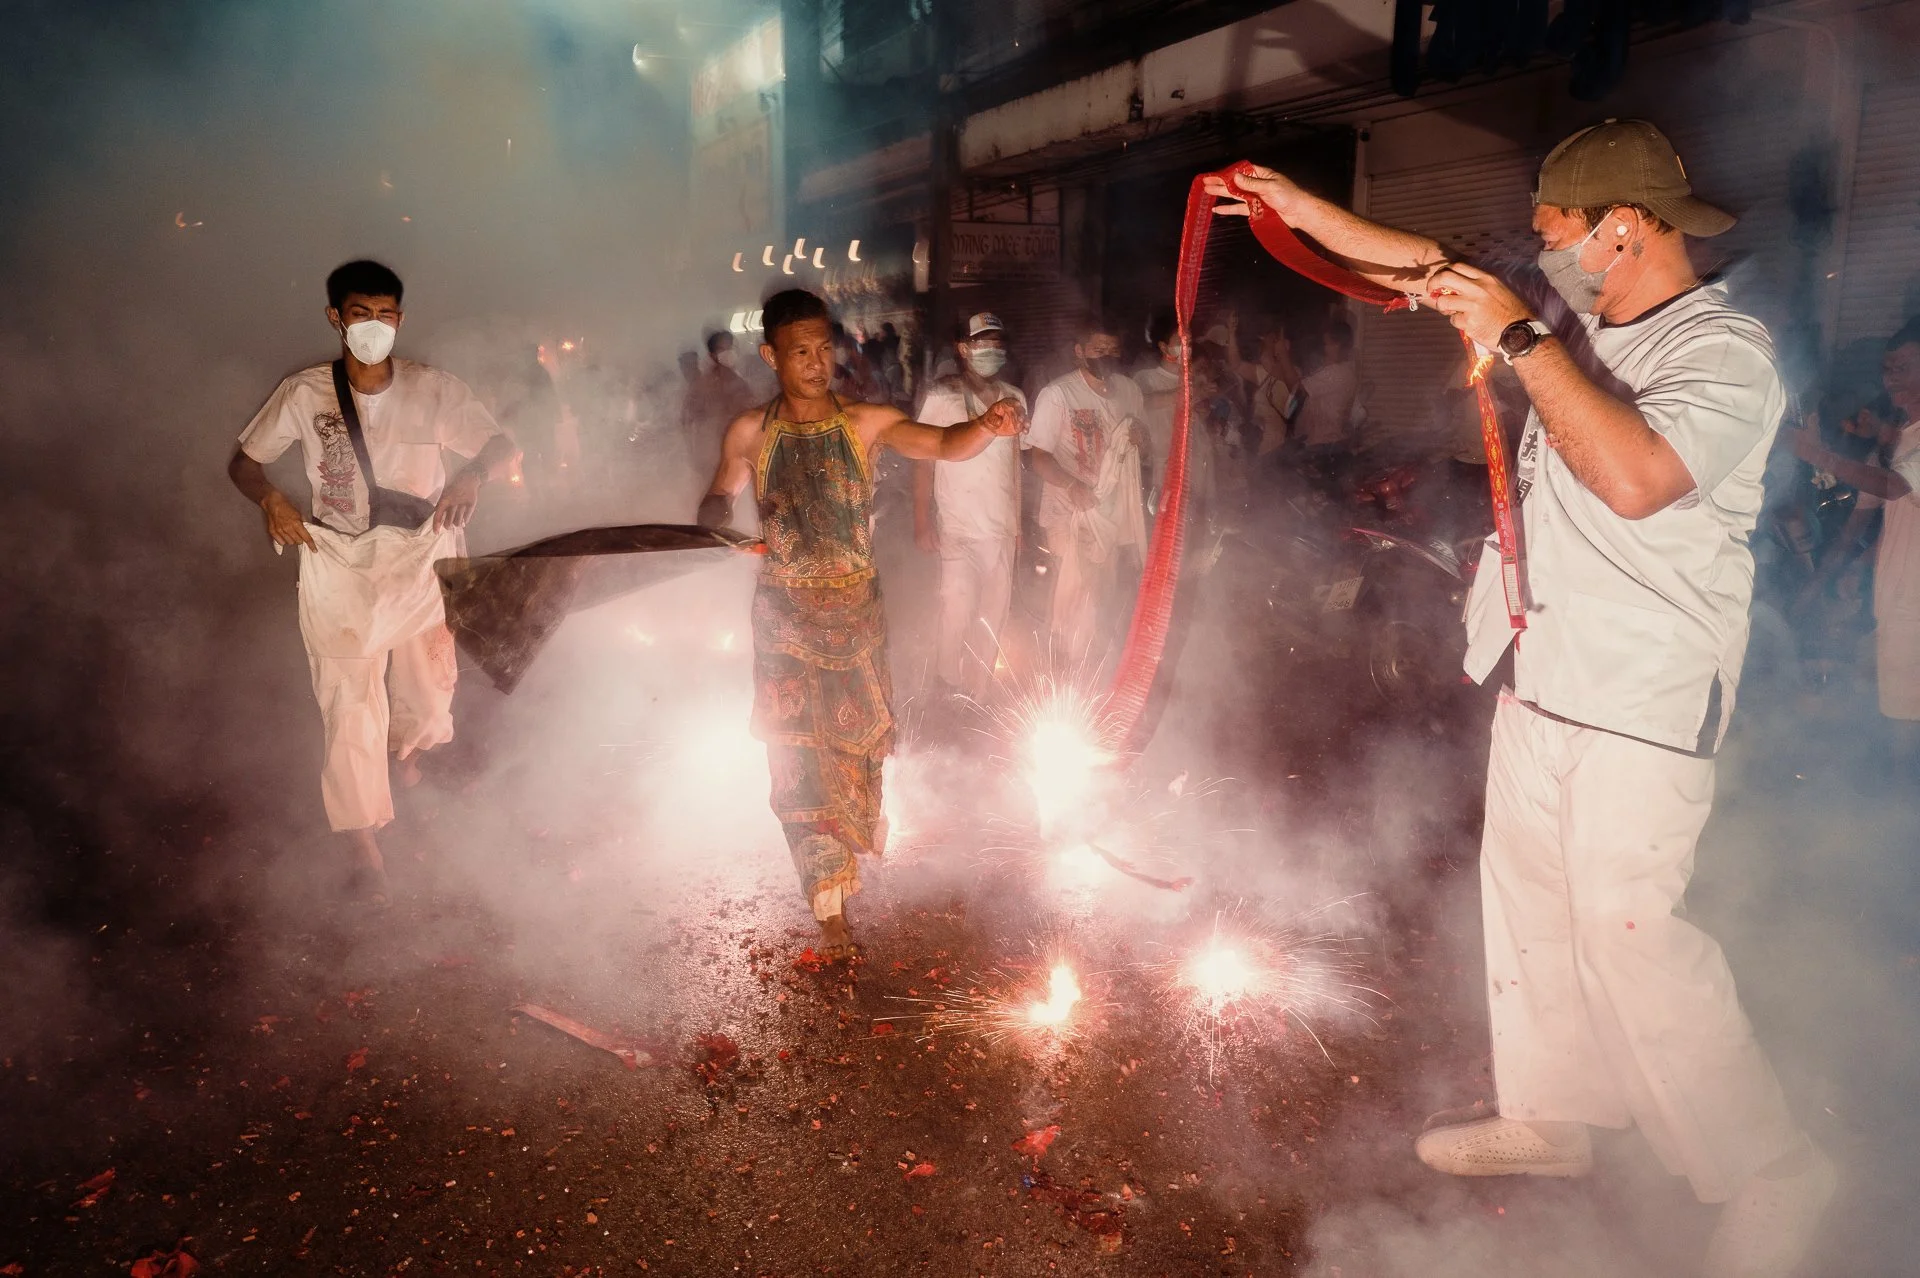
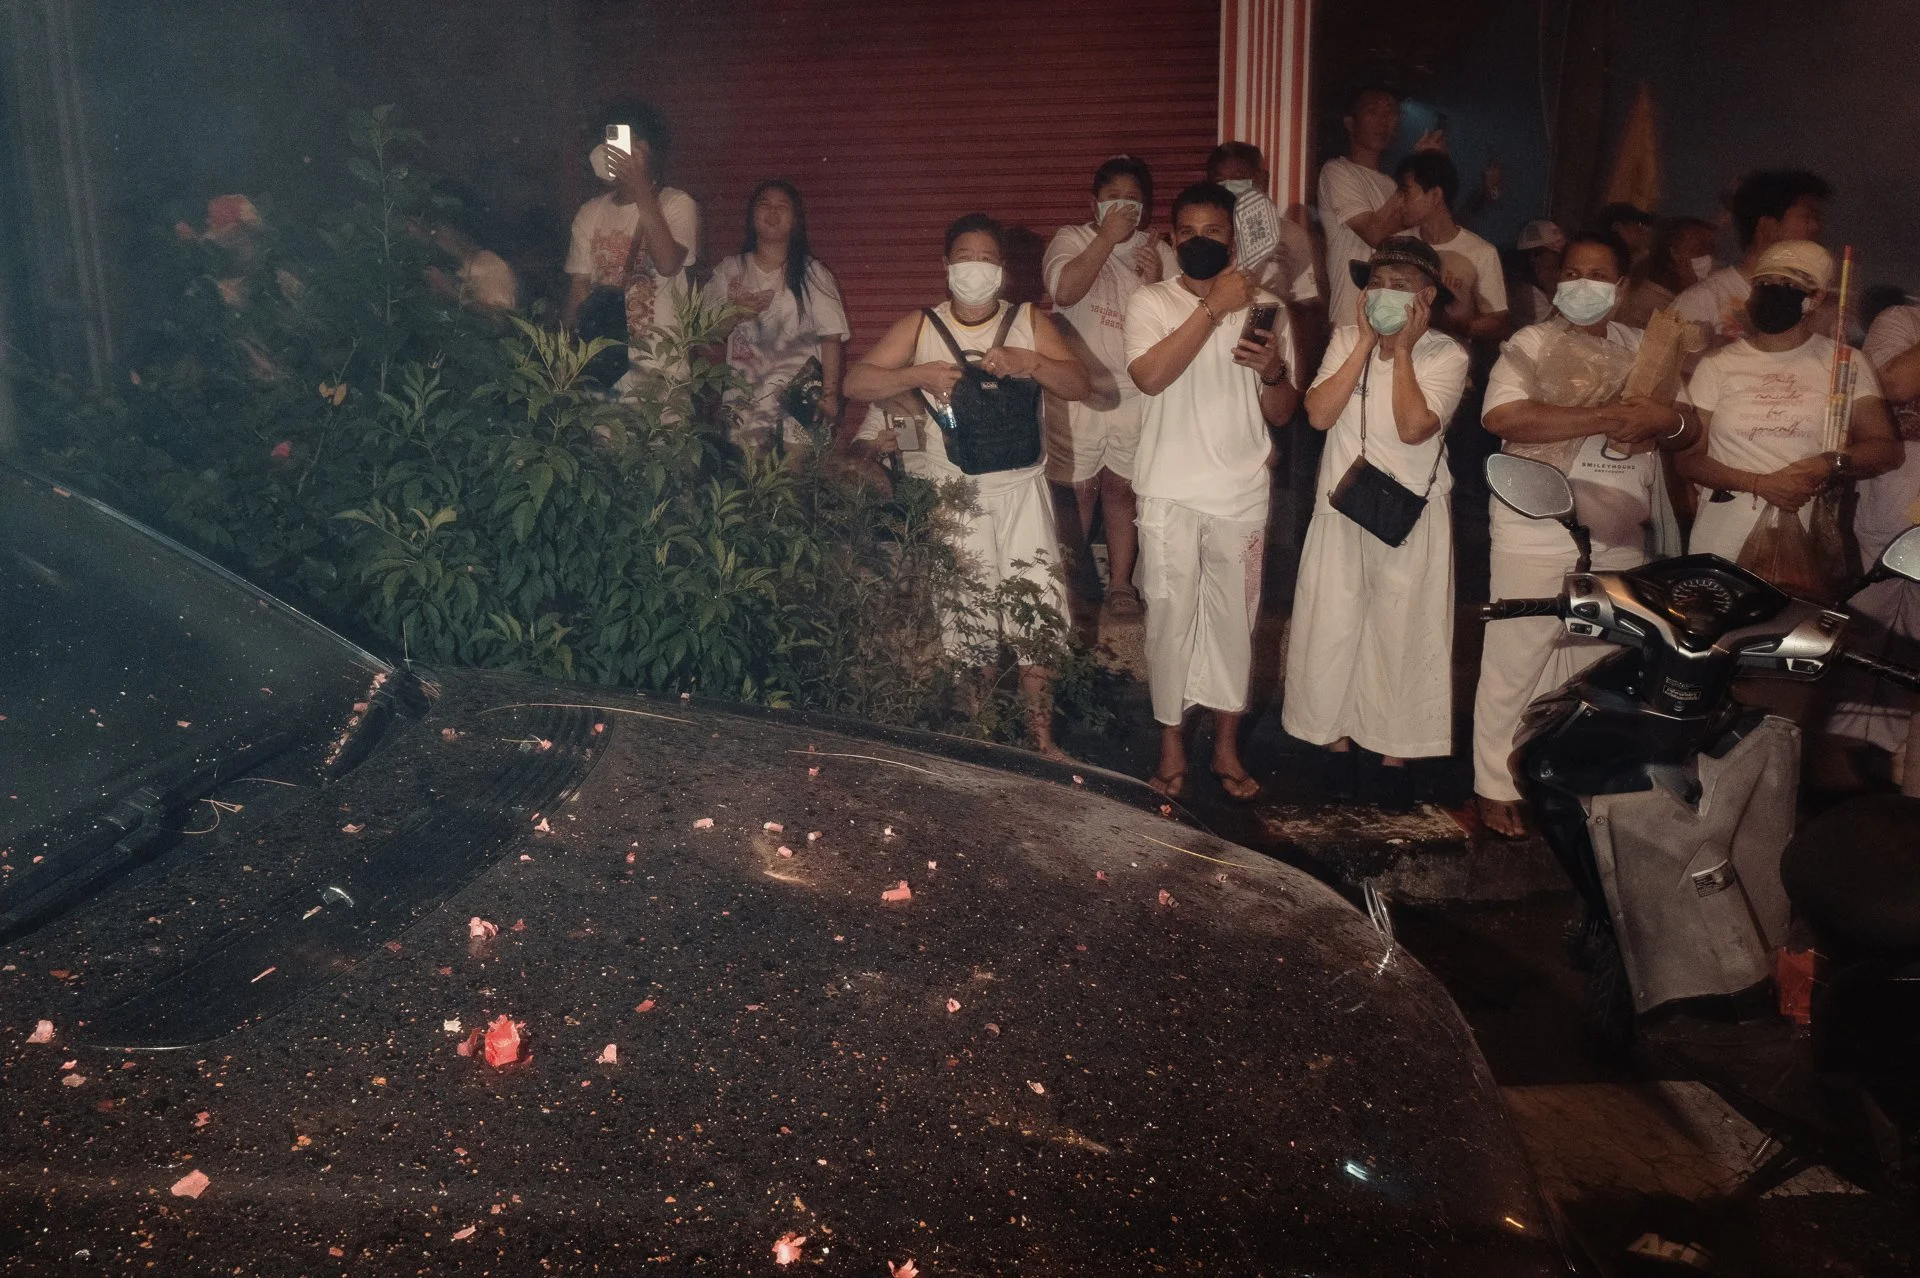
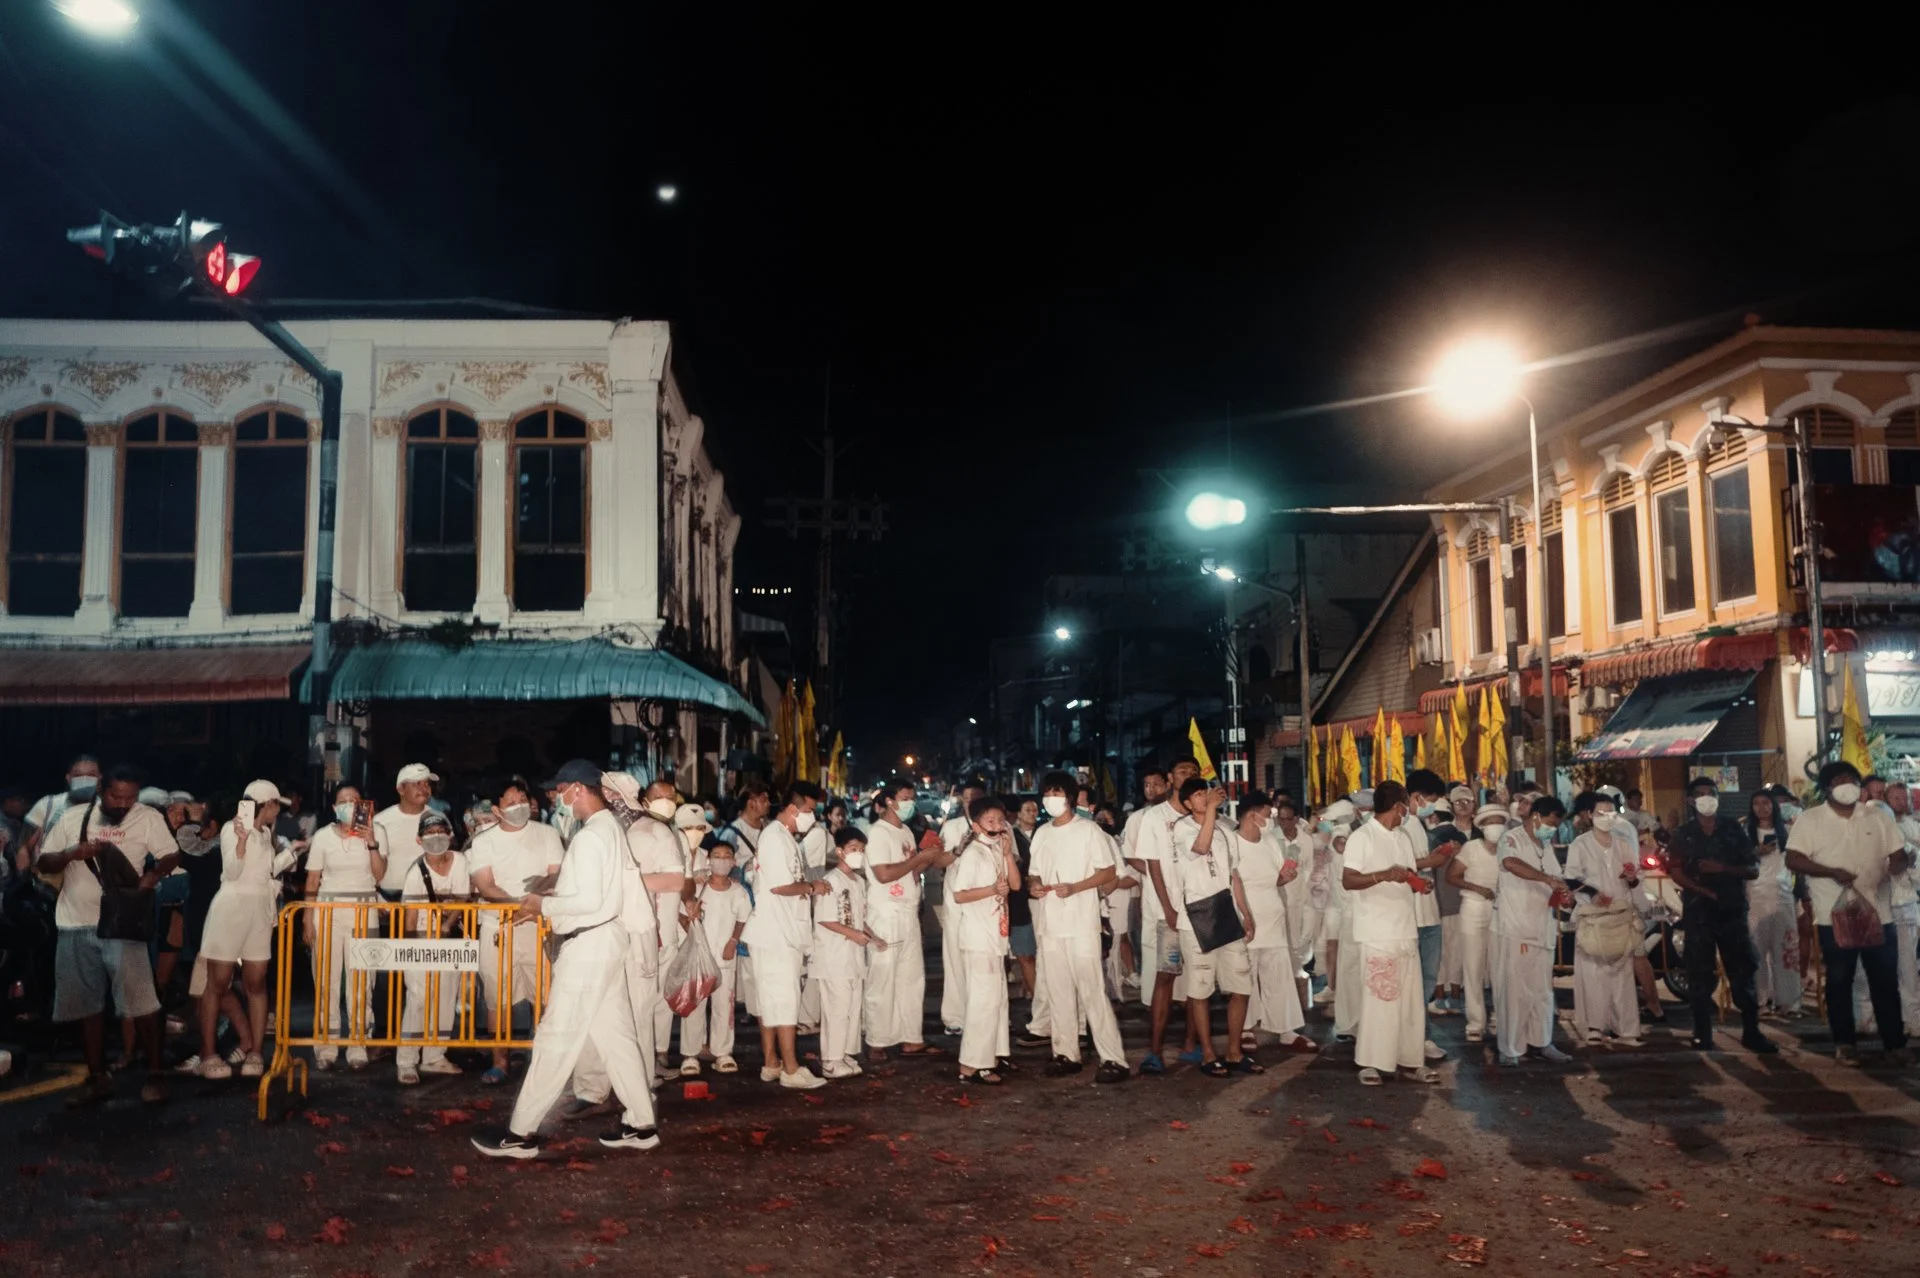
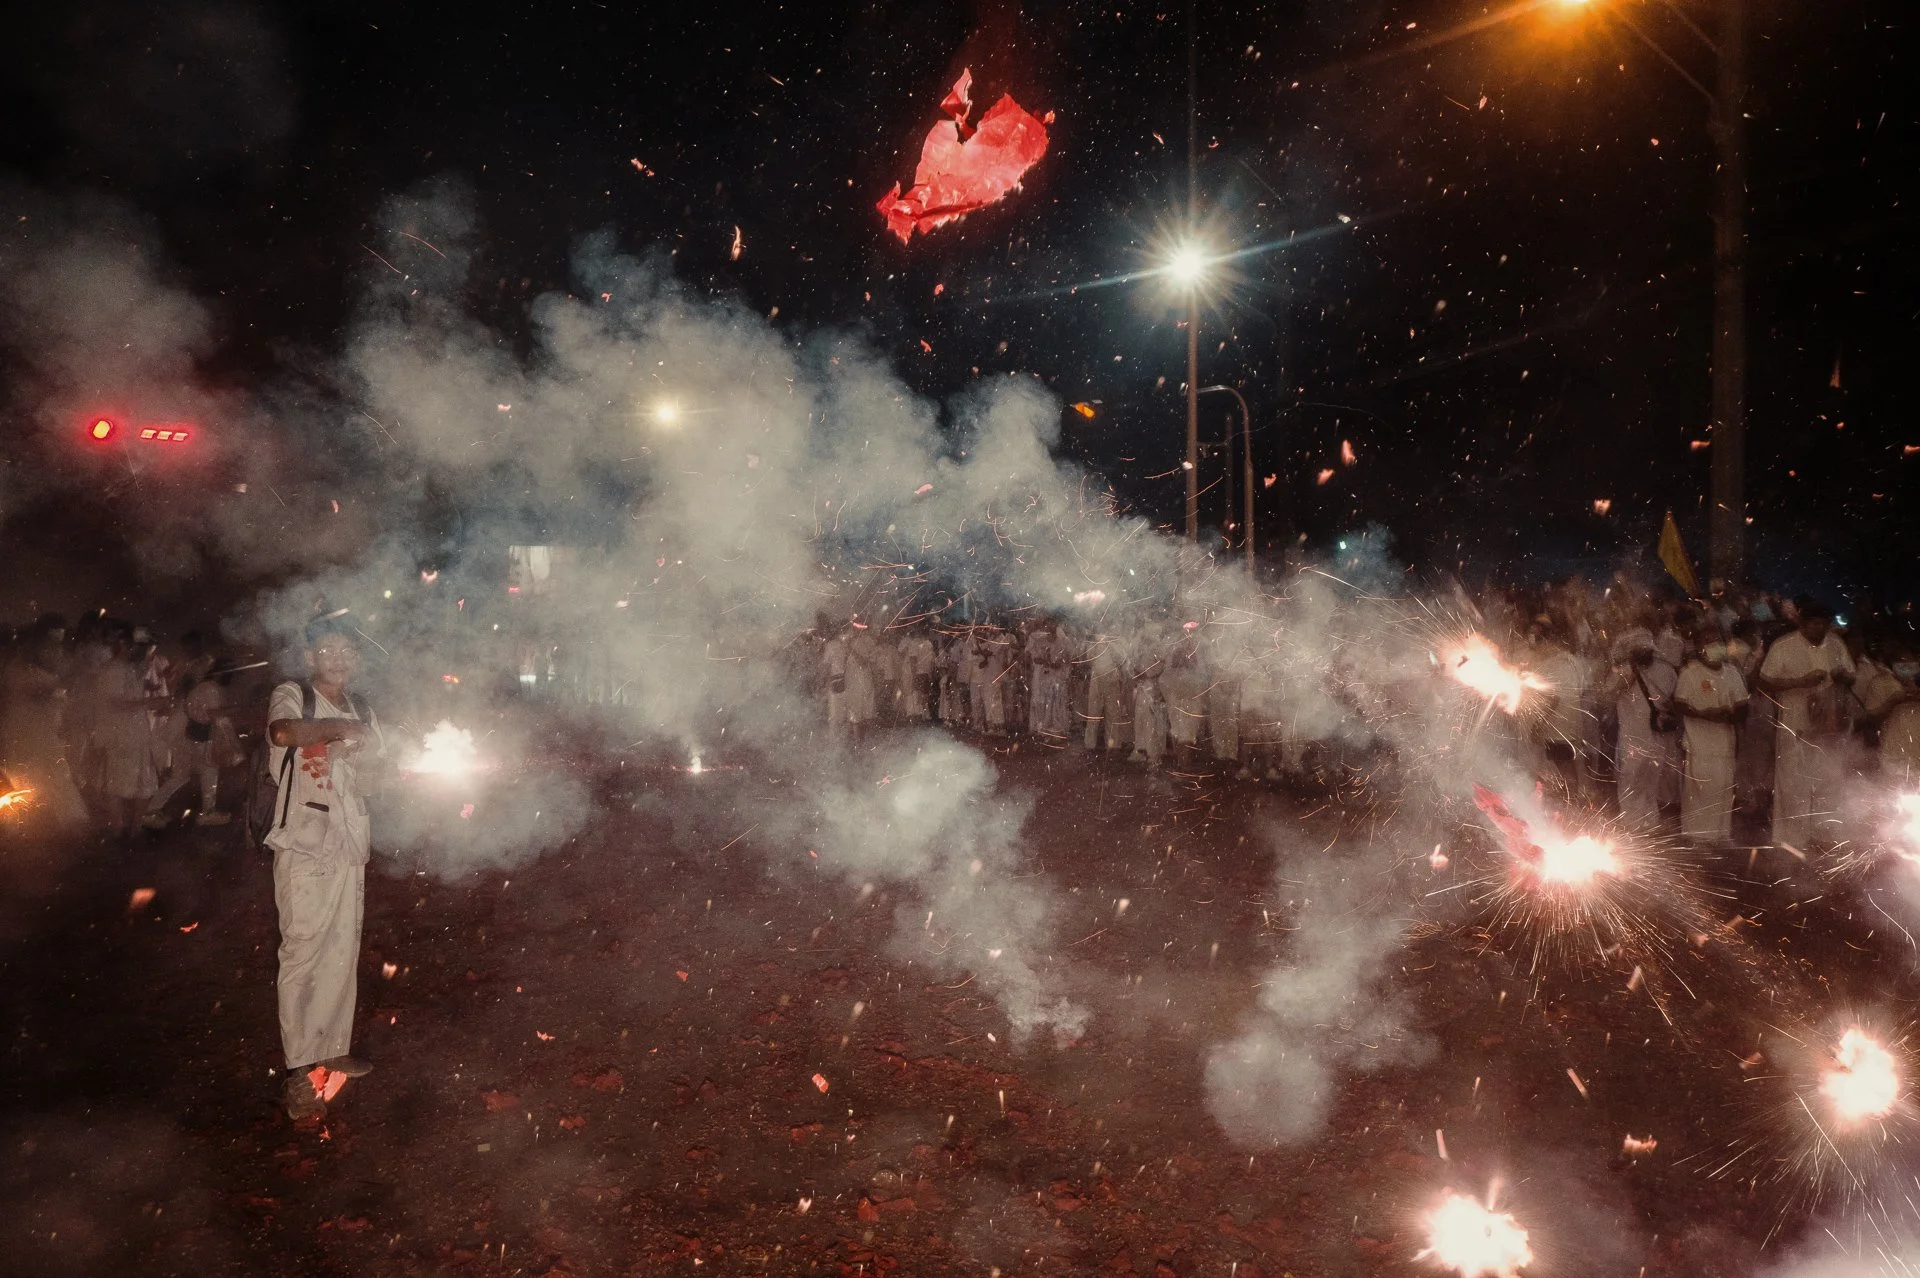
The last day of the festival arrived, and things escalated quickly.
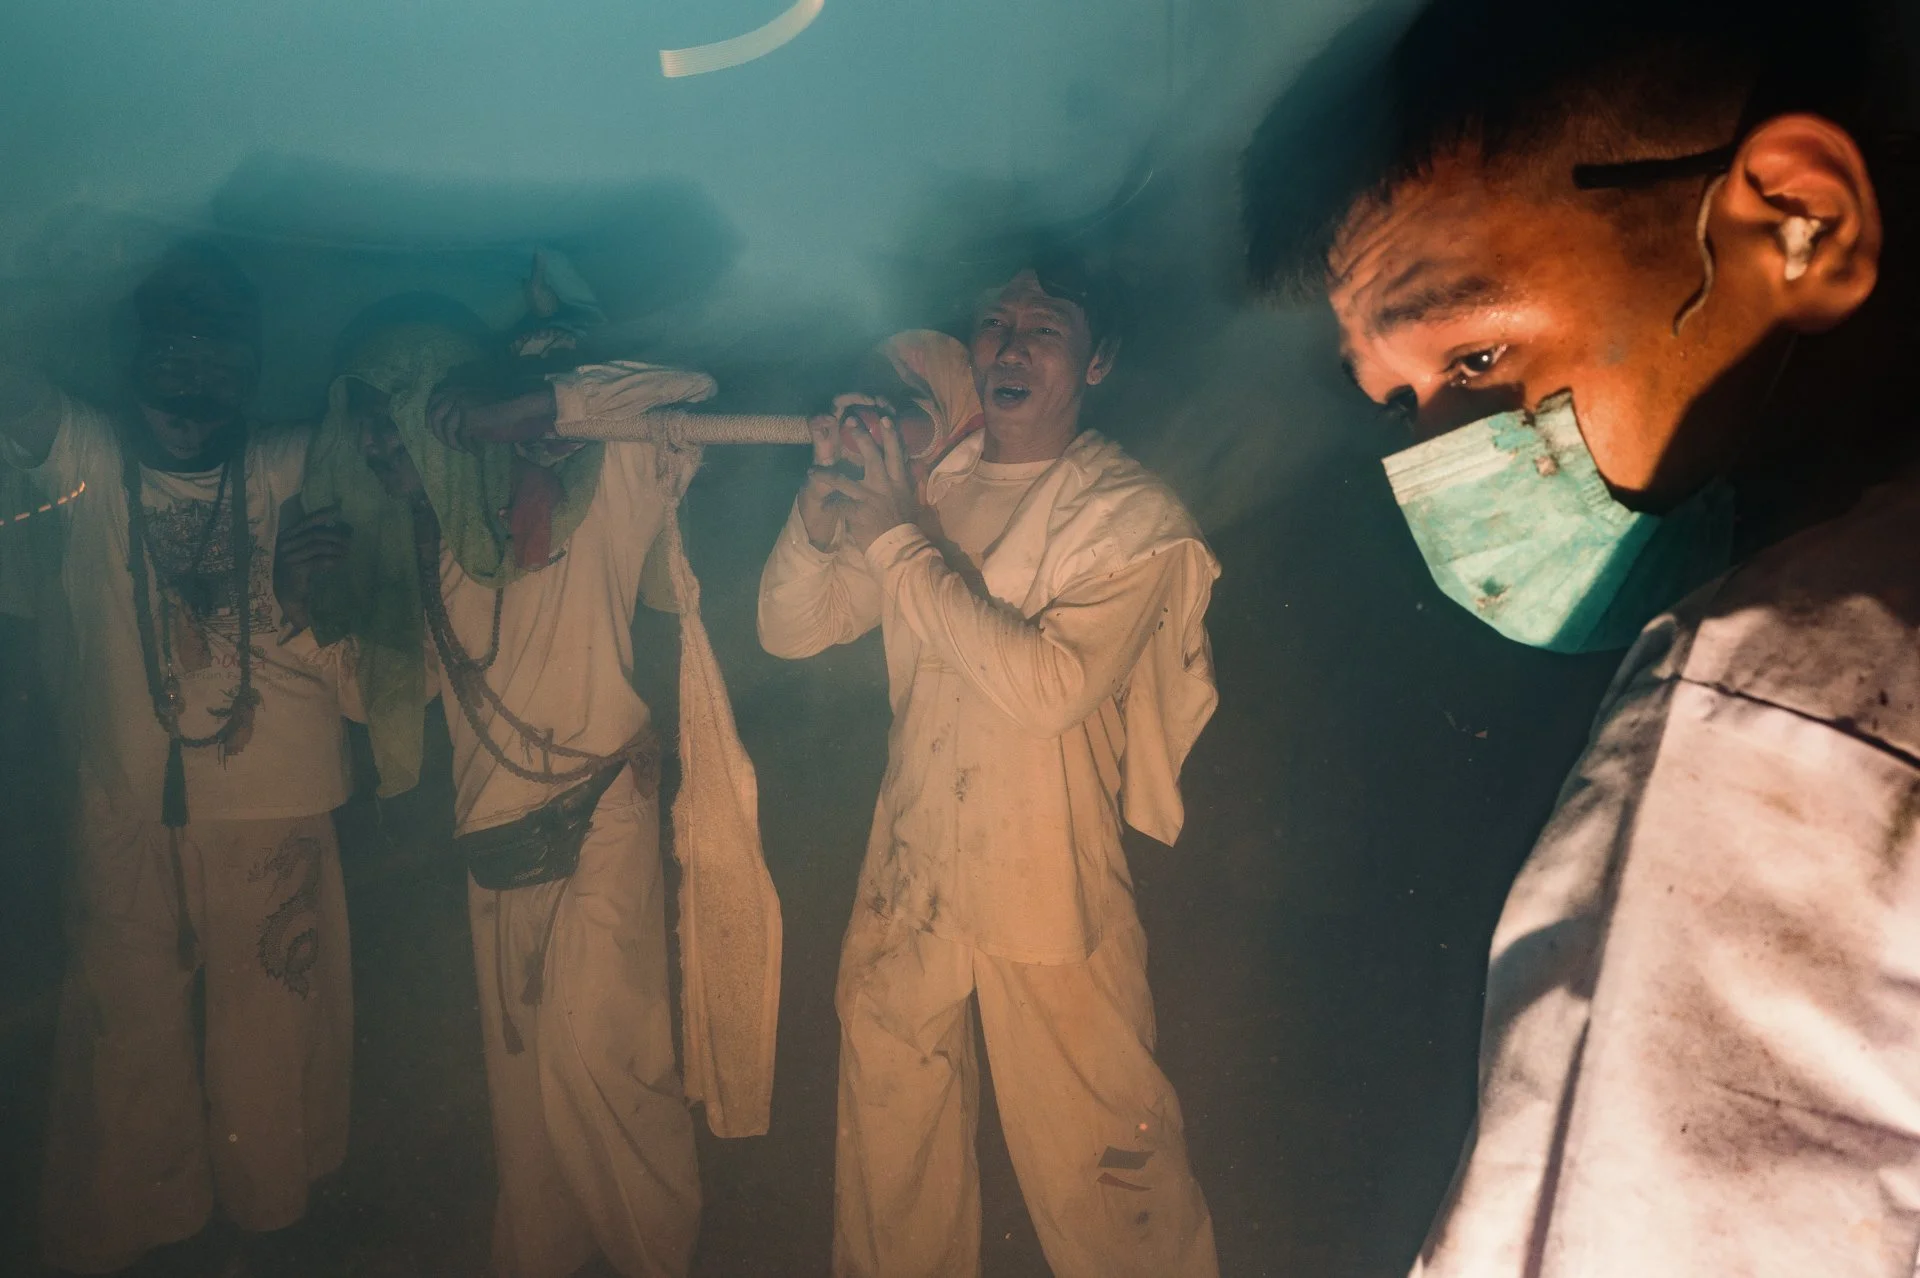
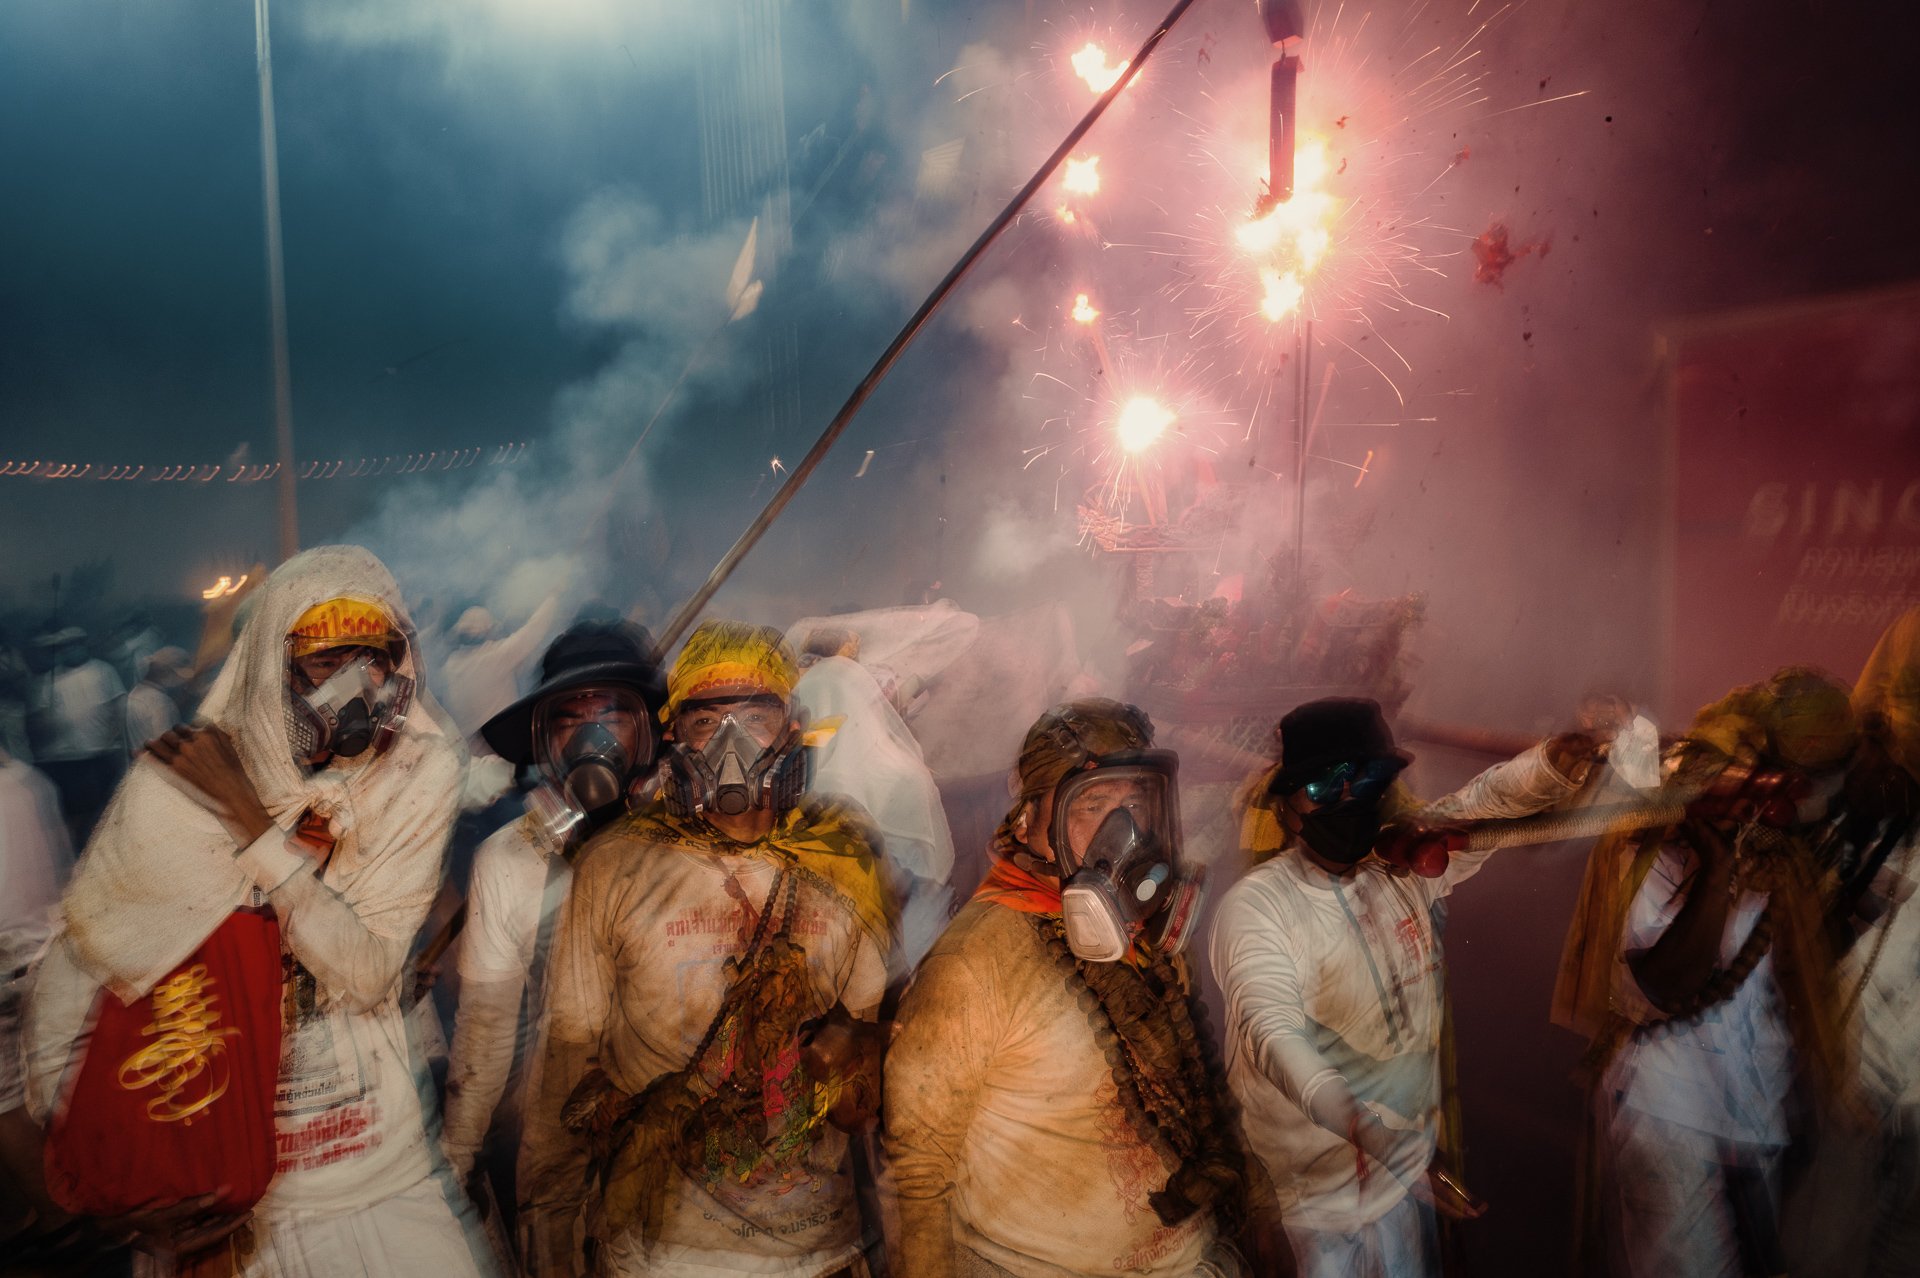
There was an event in the morning, but because of the rain, I skipped it and saved my energy for the night. The final night of the festival starts around 9 p.m. and it is absolute madness.
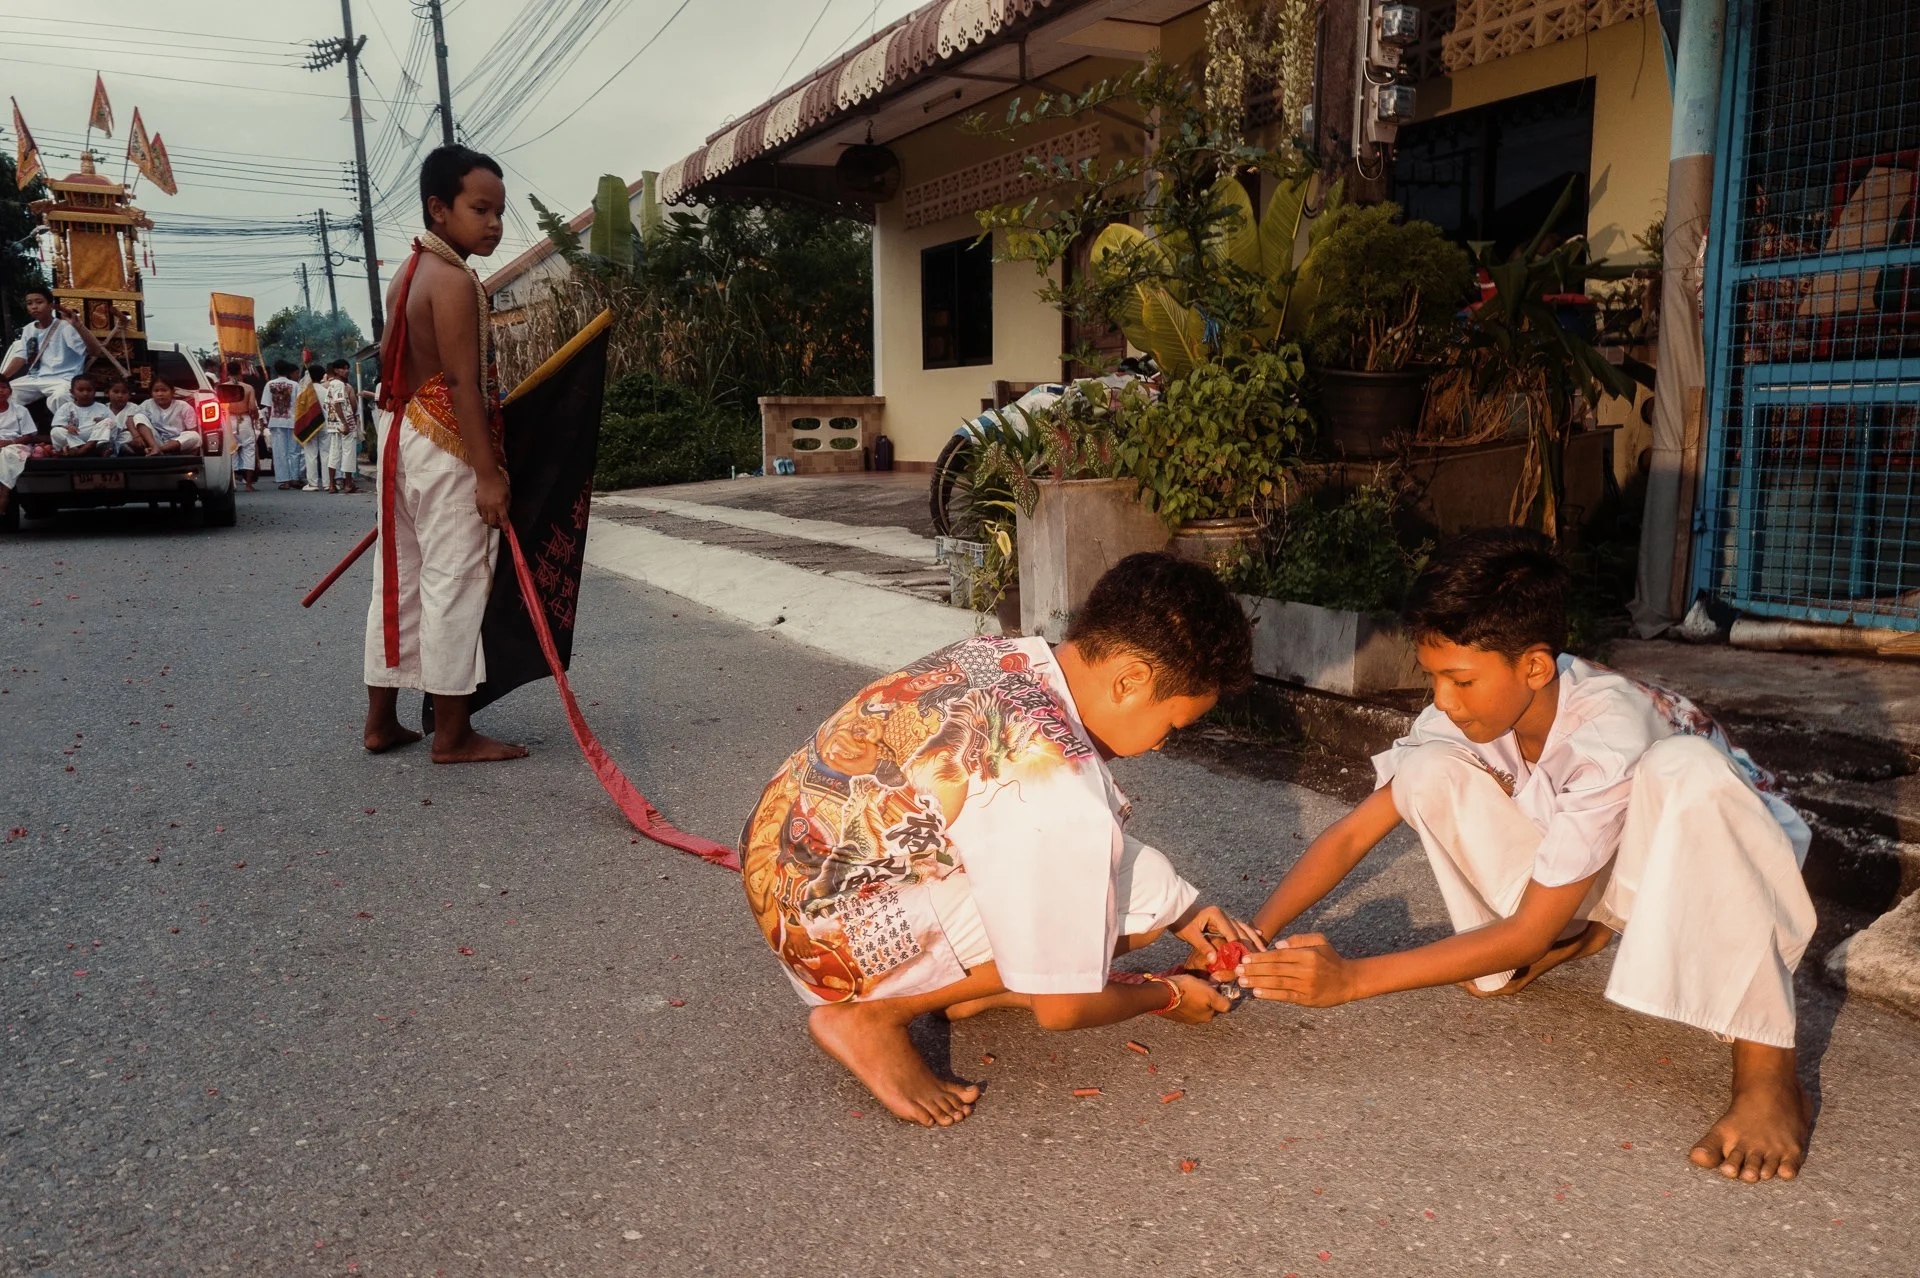
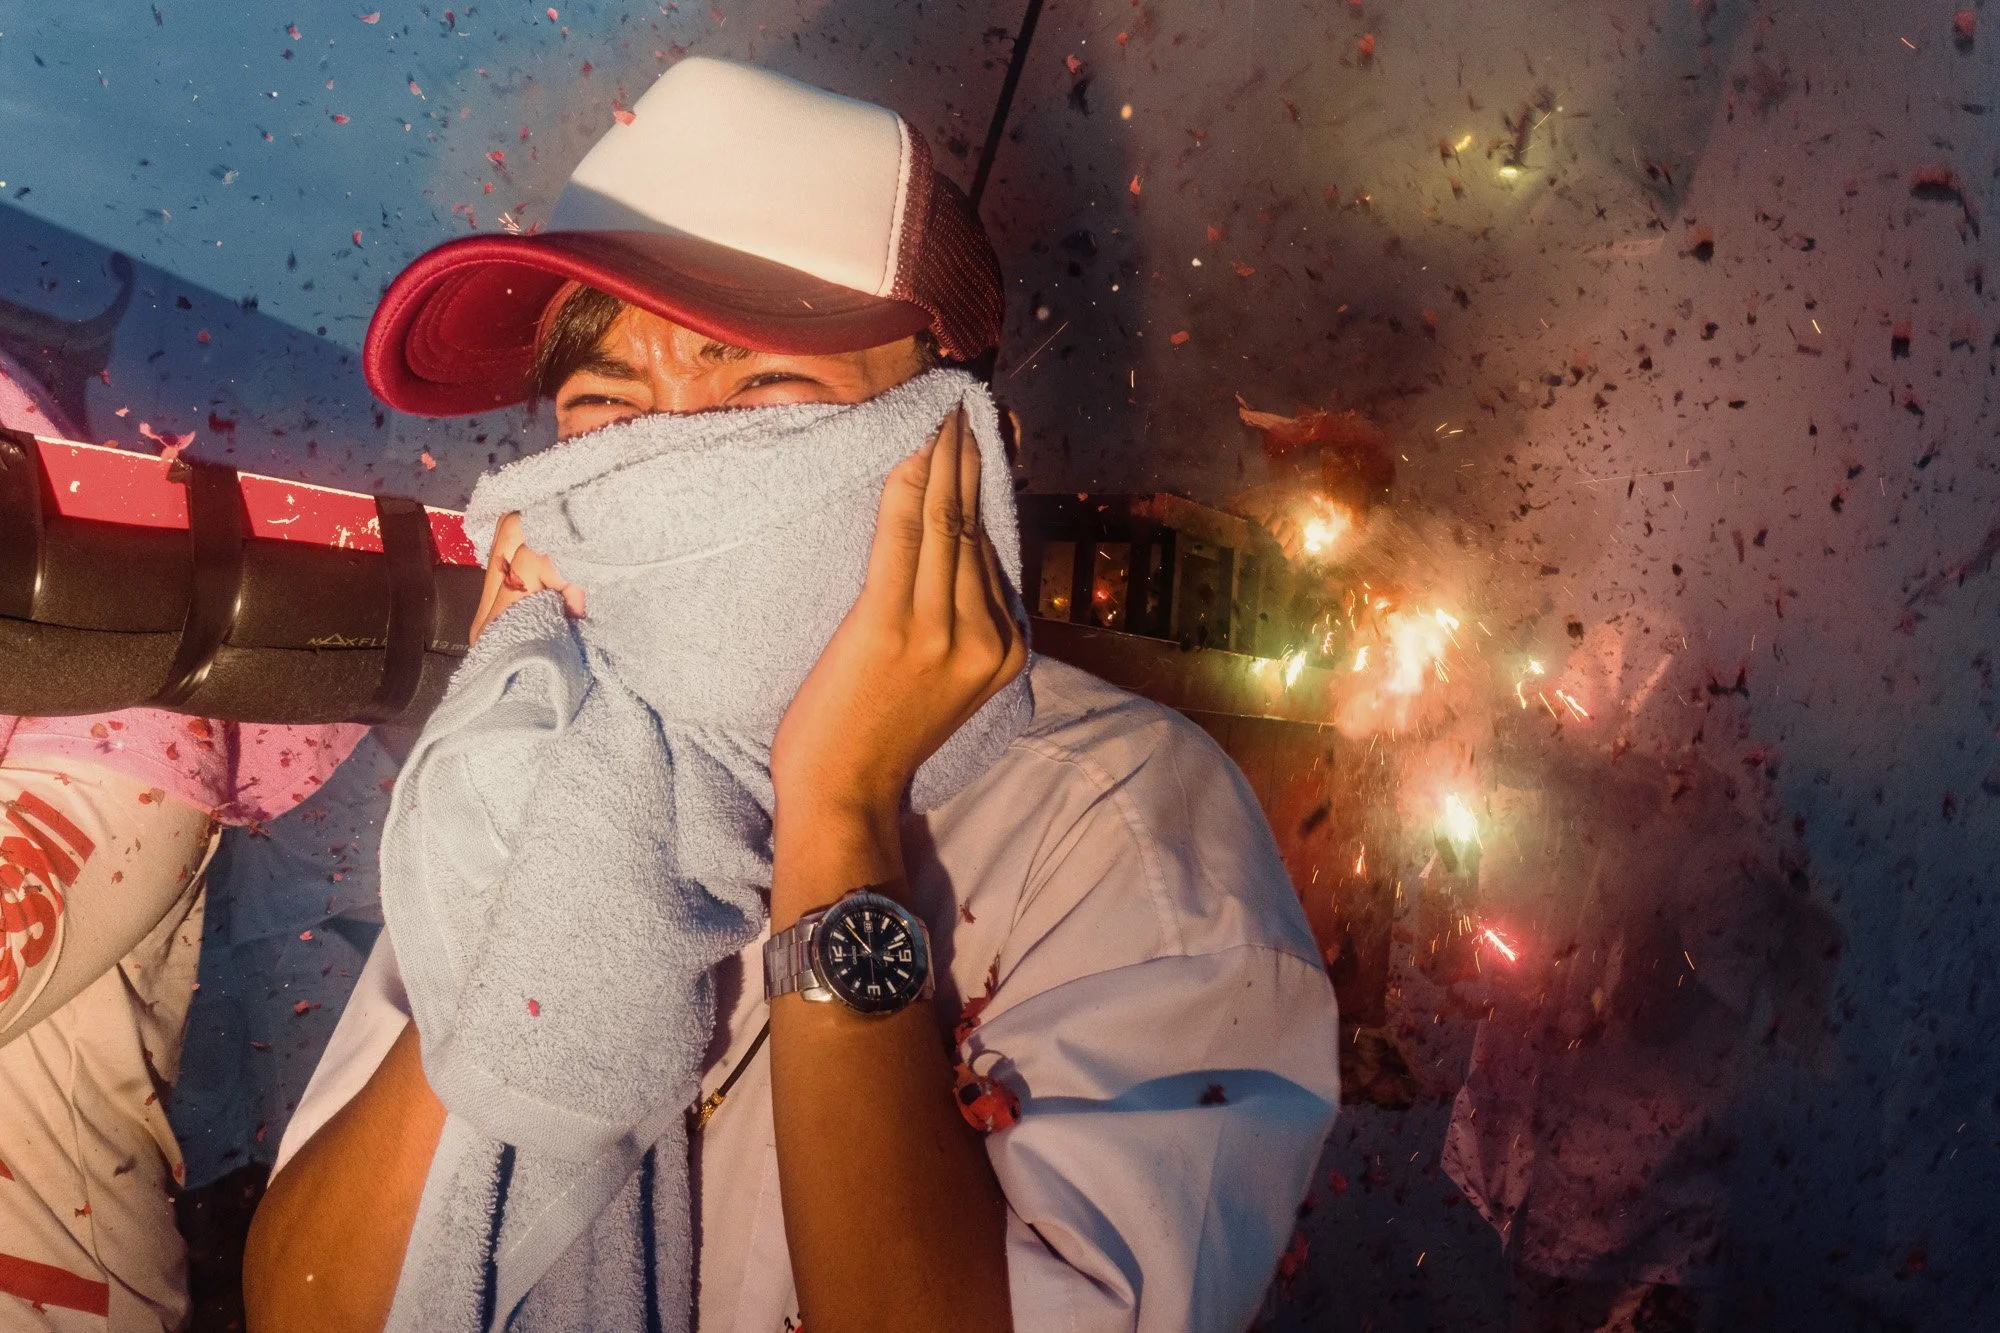
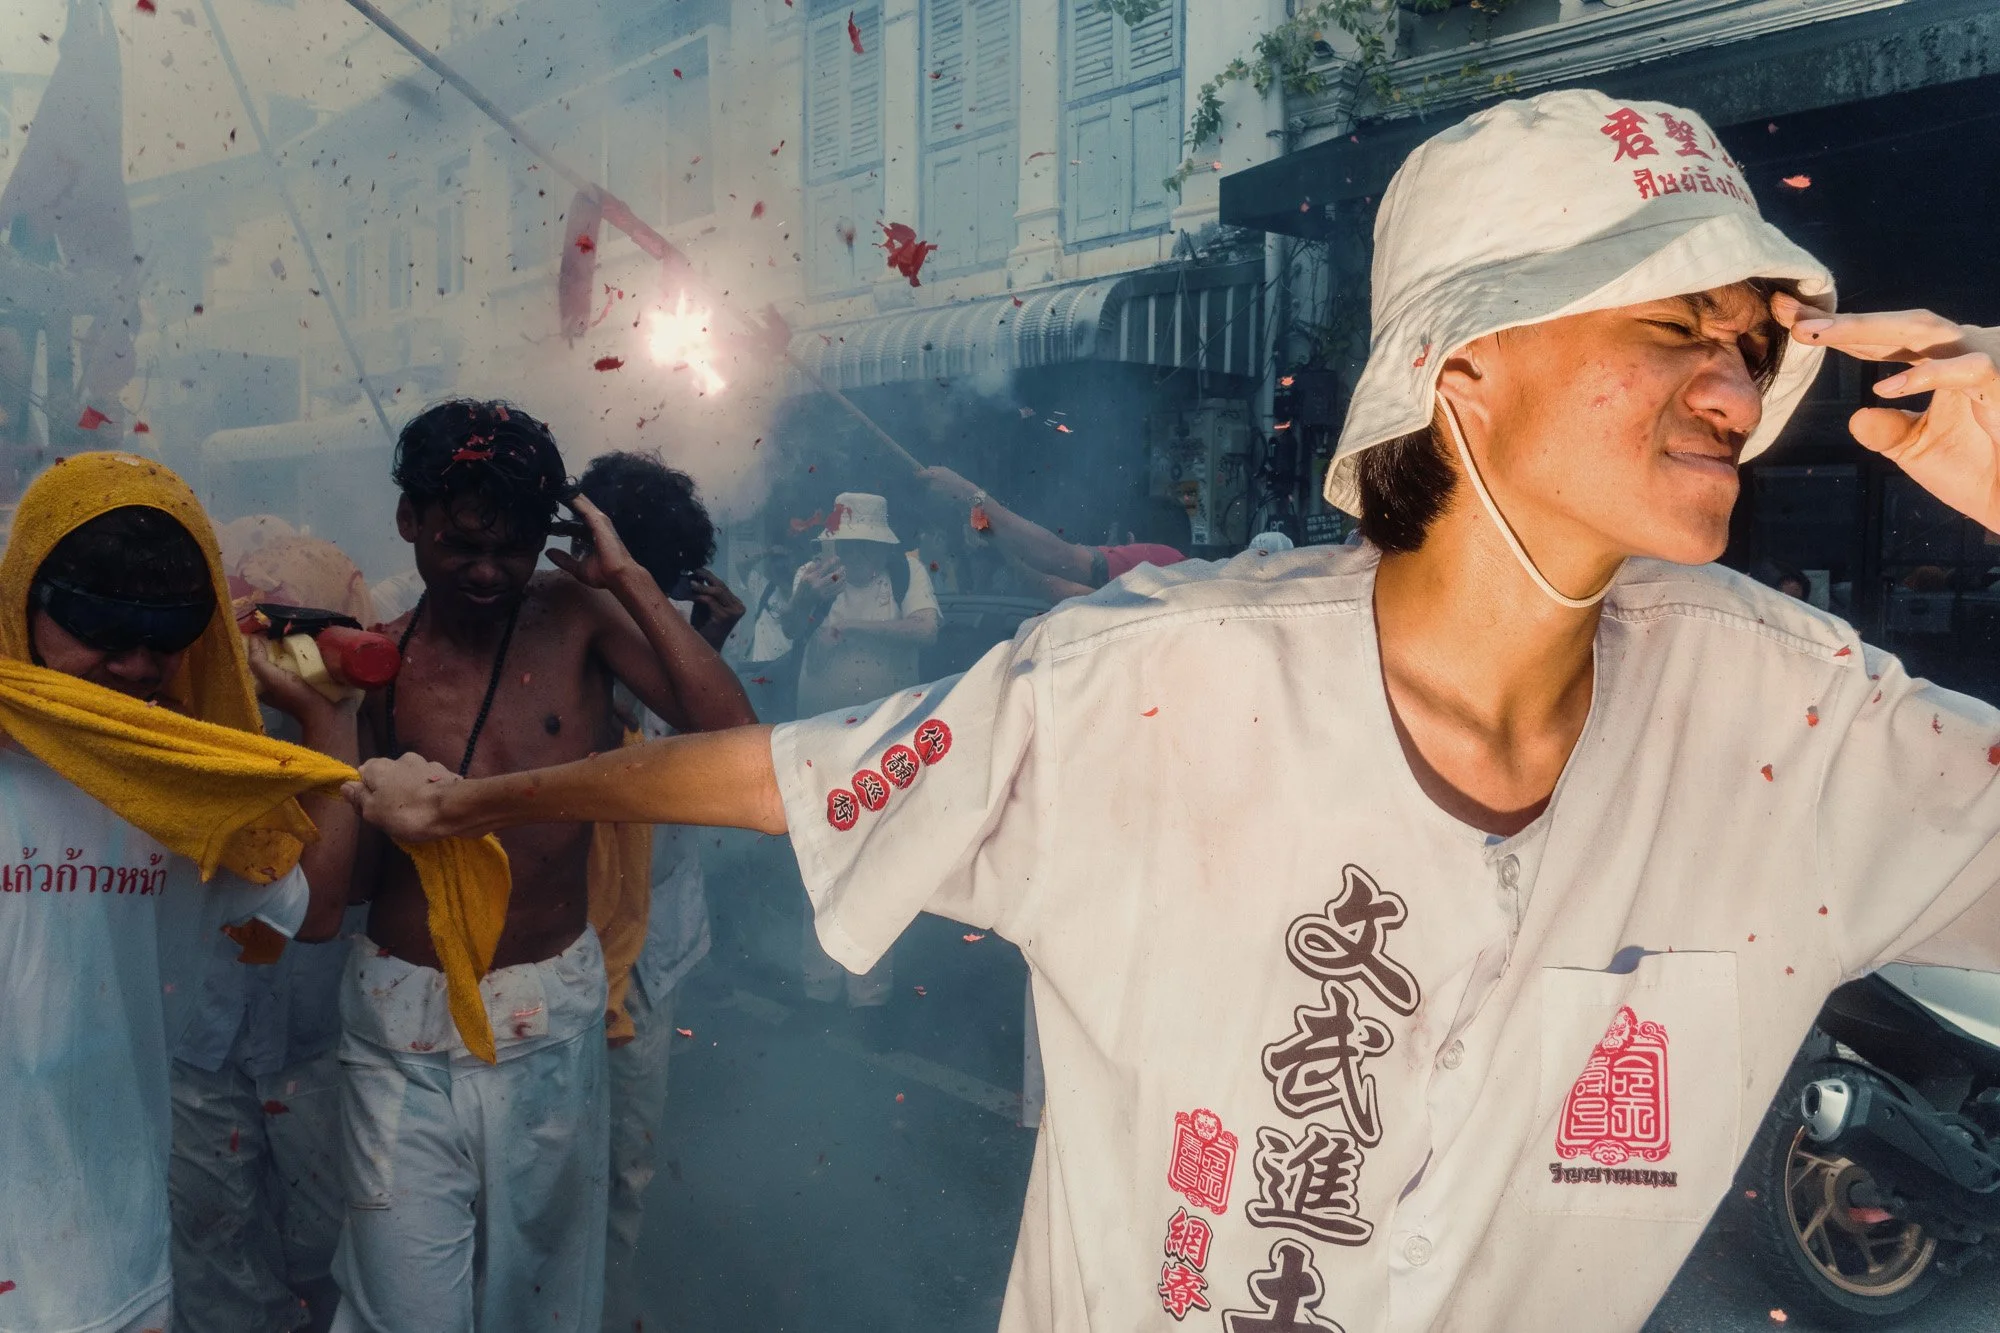
There are no piercings and no blood, but fireworks are going off everywhere for hours.
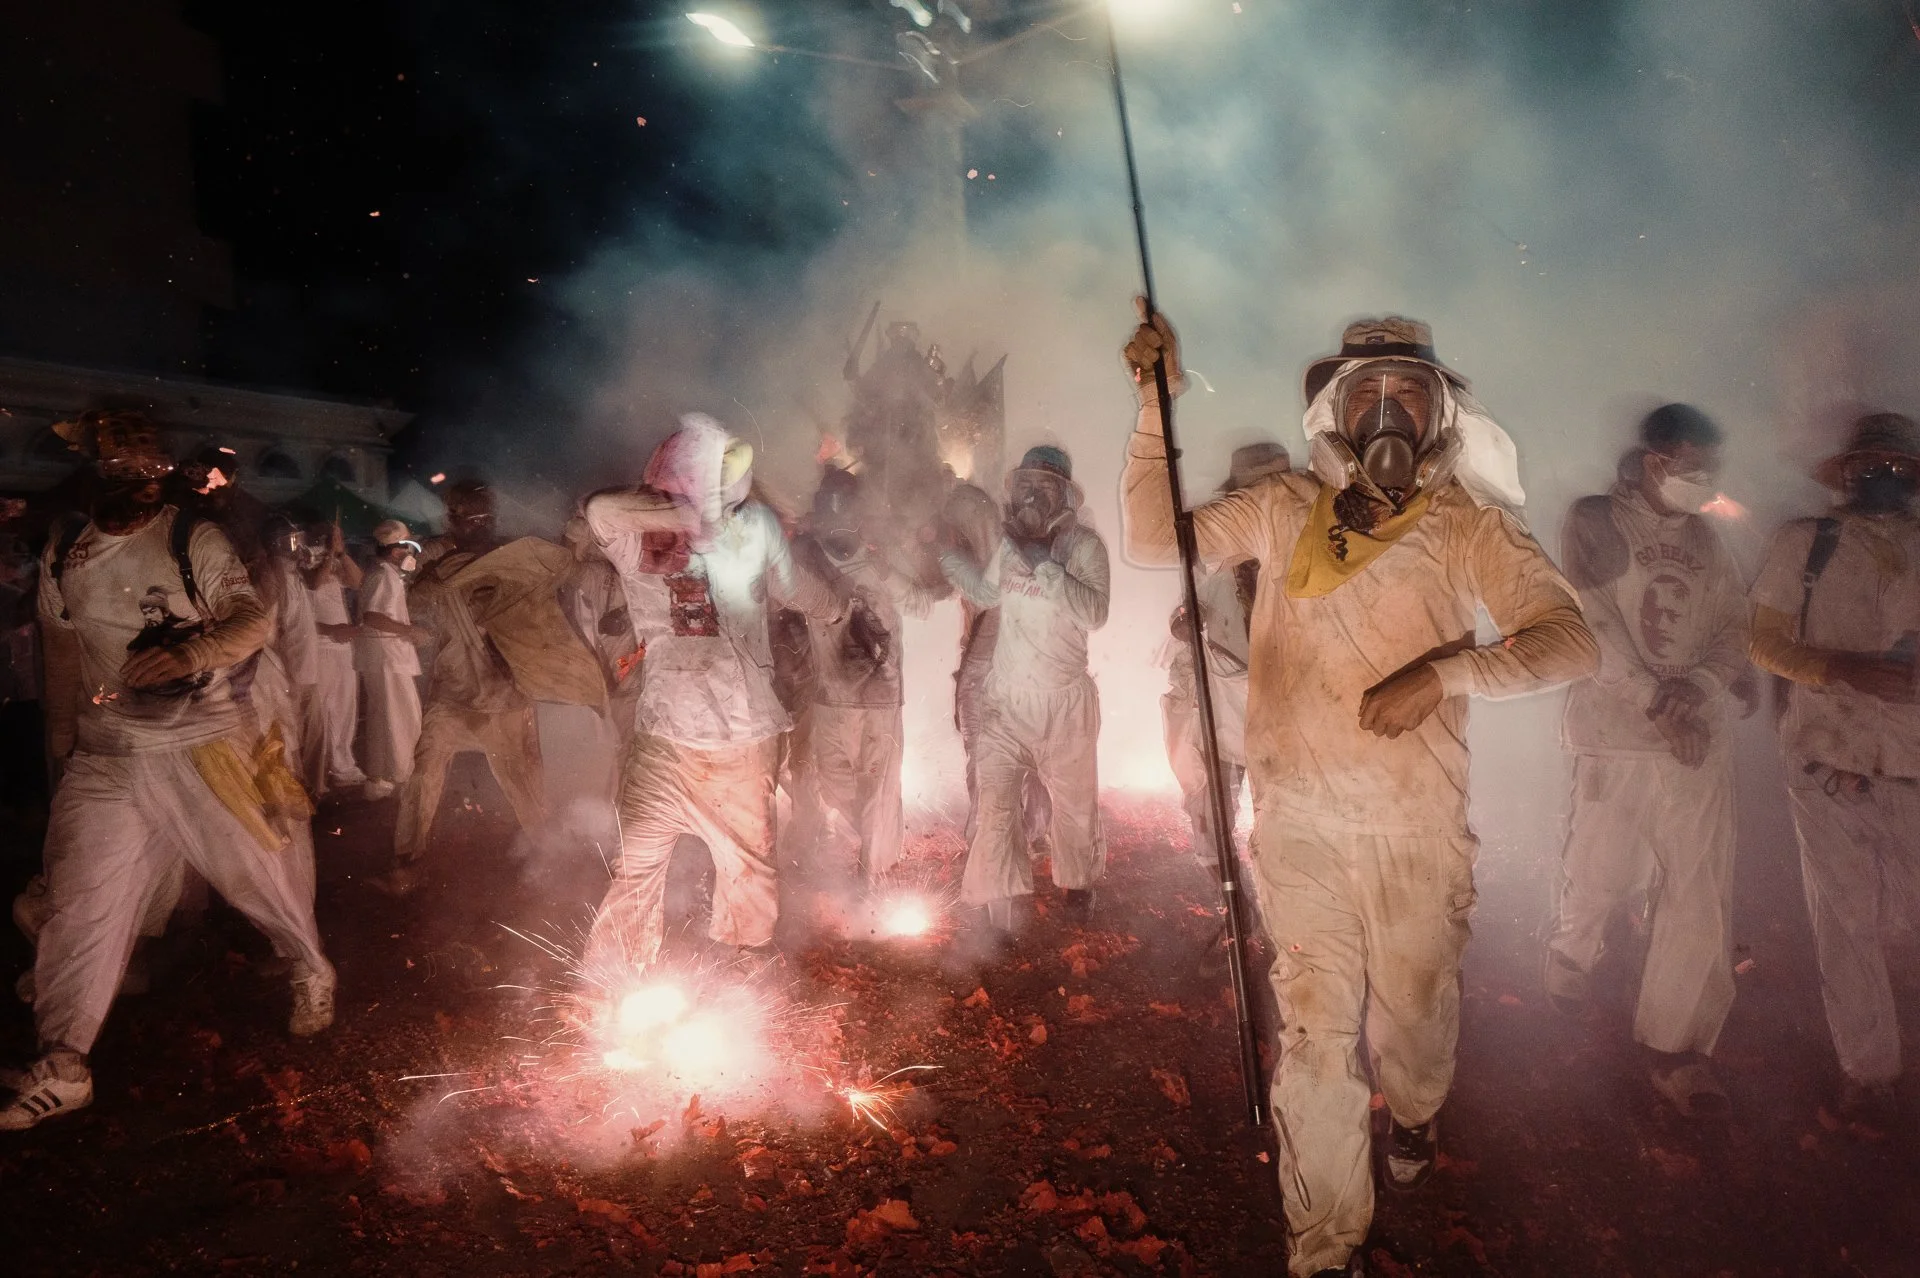
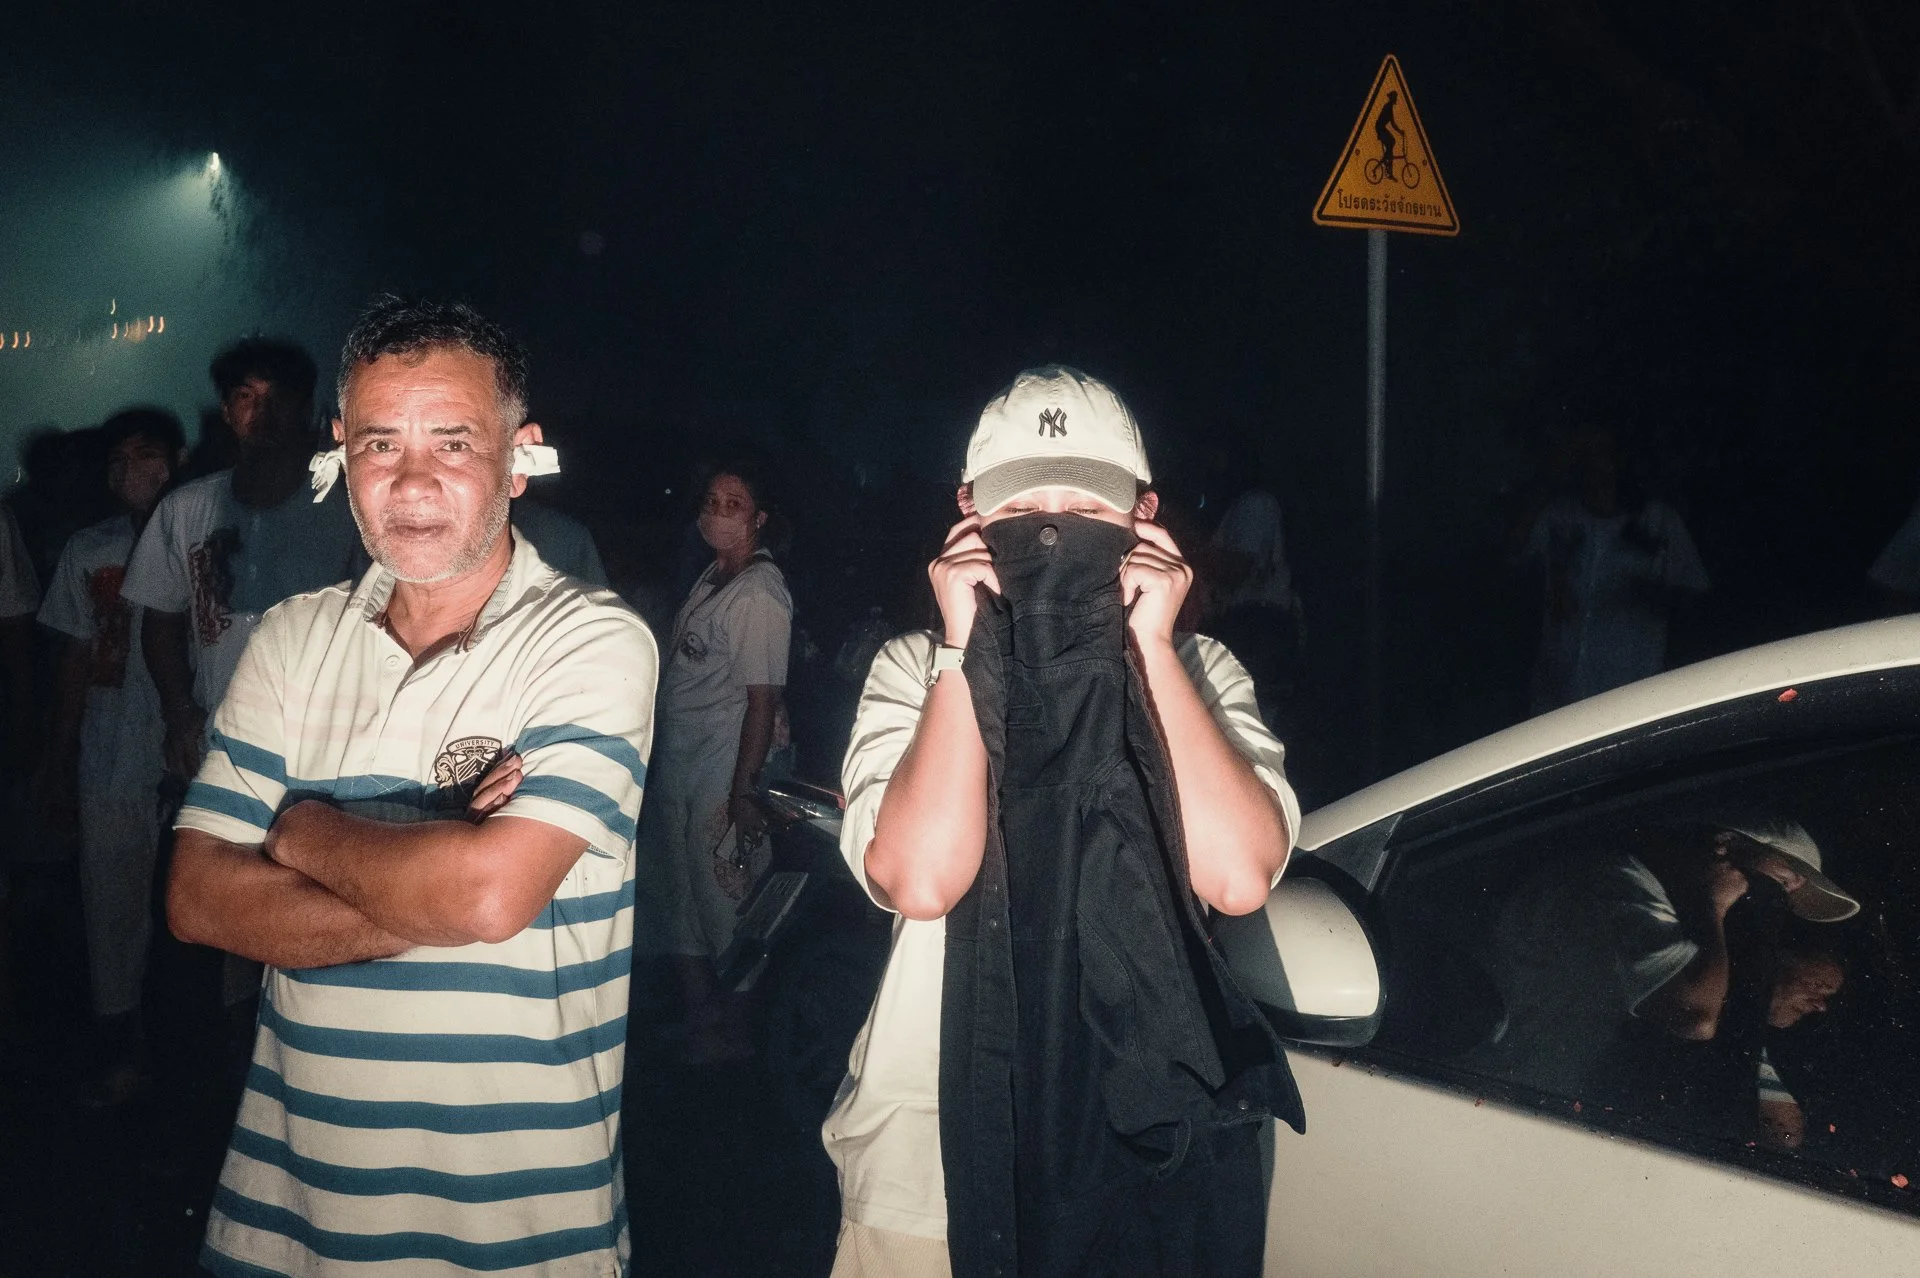
Because we had done our research, we knew we had to be prepared. Earplugs, goggles, head cover, face cover. All of it is basically mandatory.
After dinner, we suited up. I was more than ready.
42. Leica Q3 - 1/15 - f16 - ISO1600
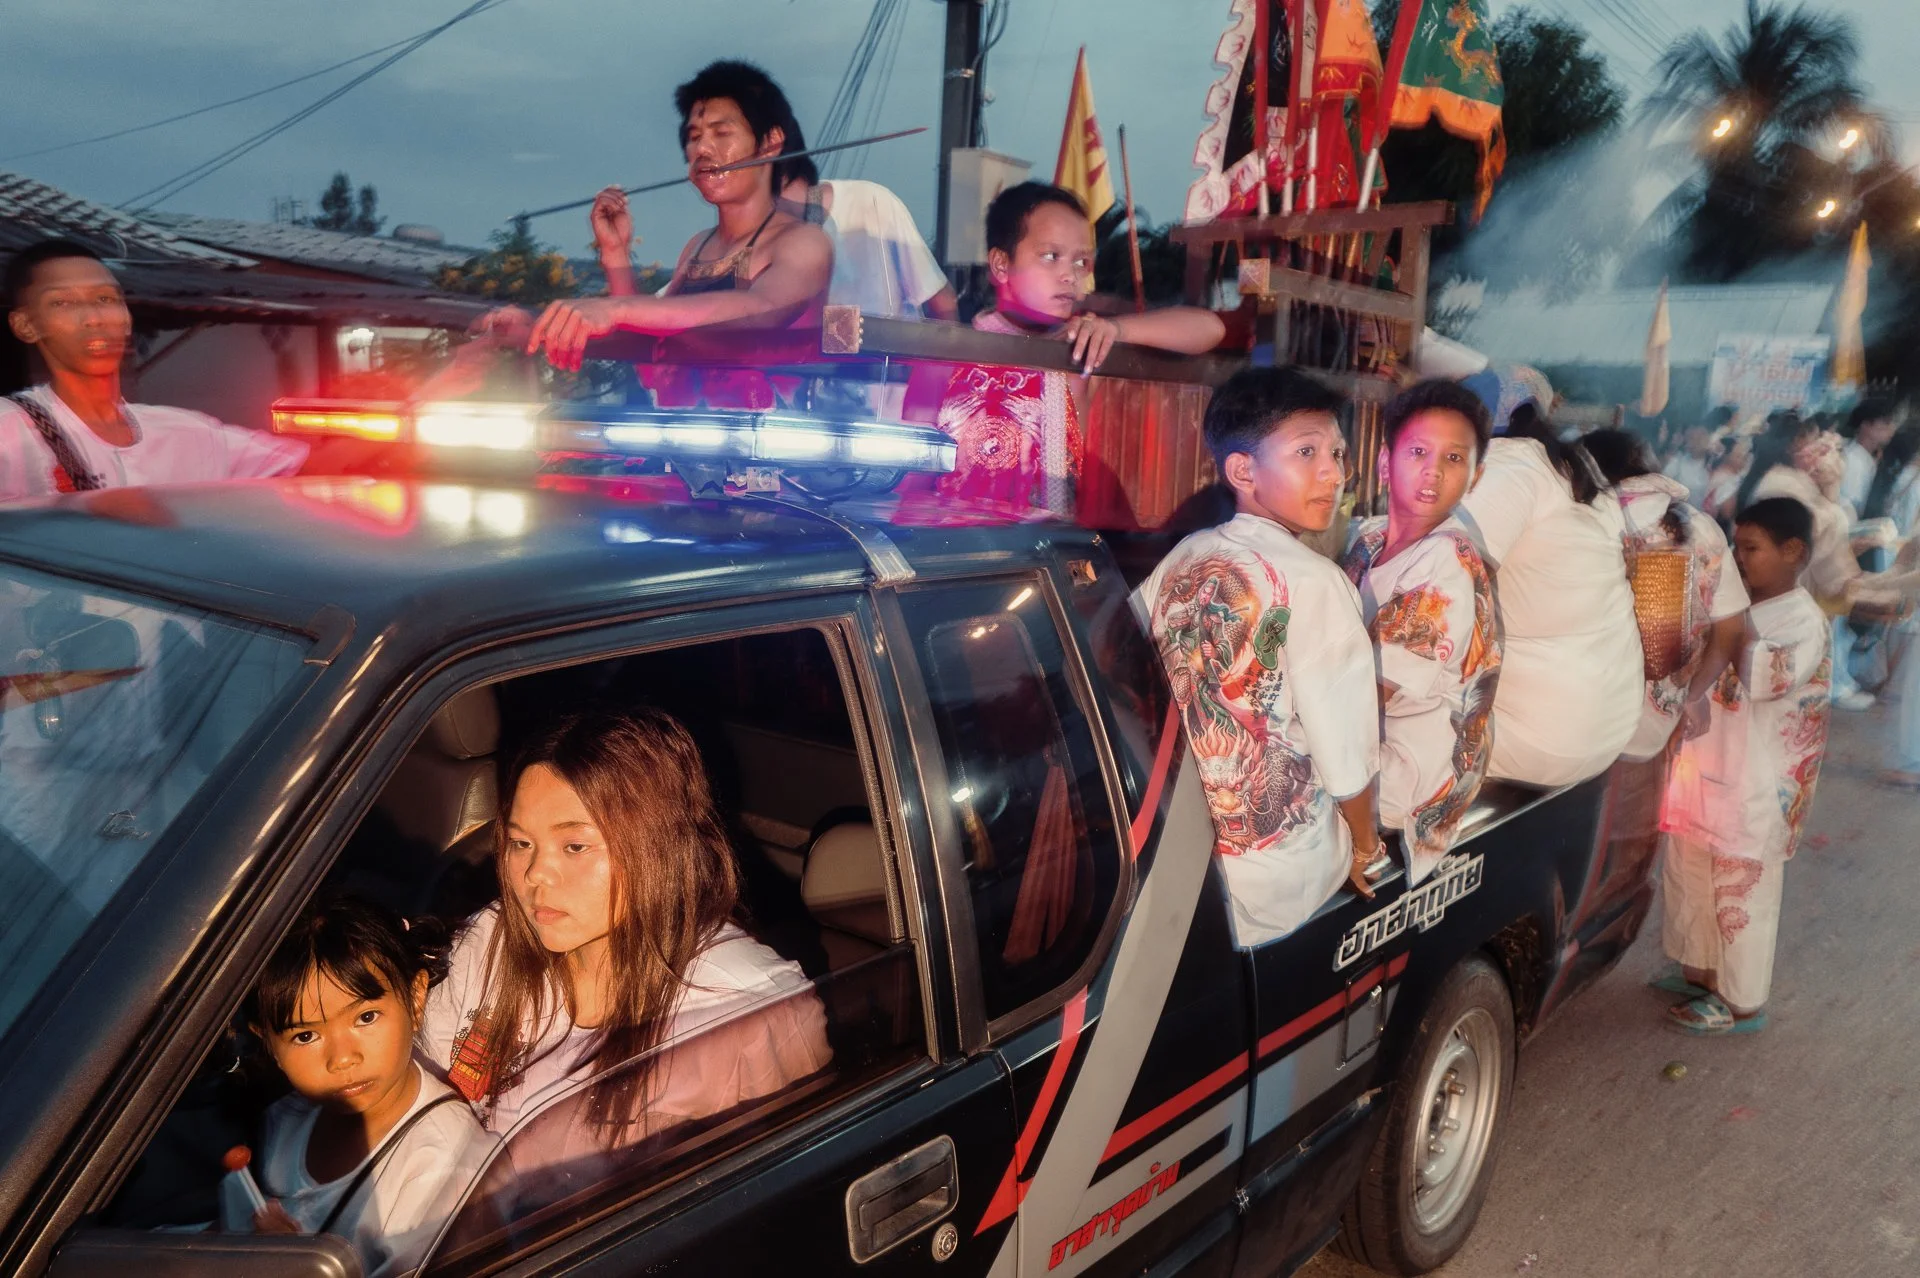
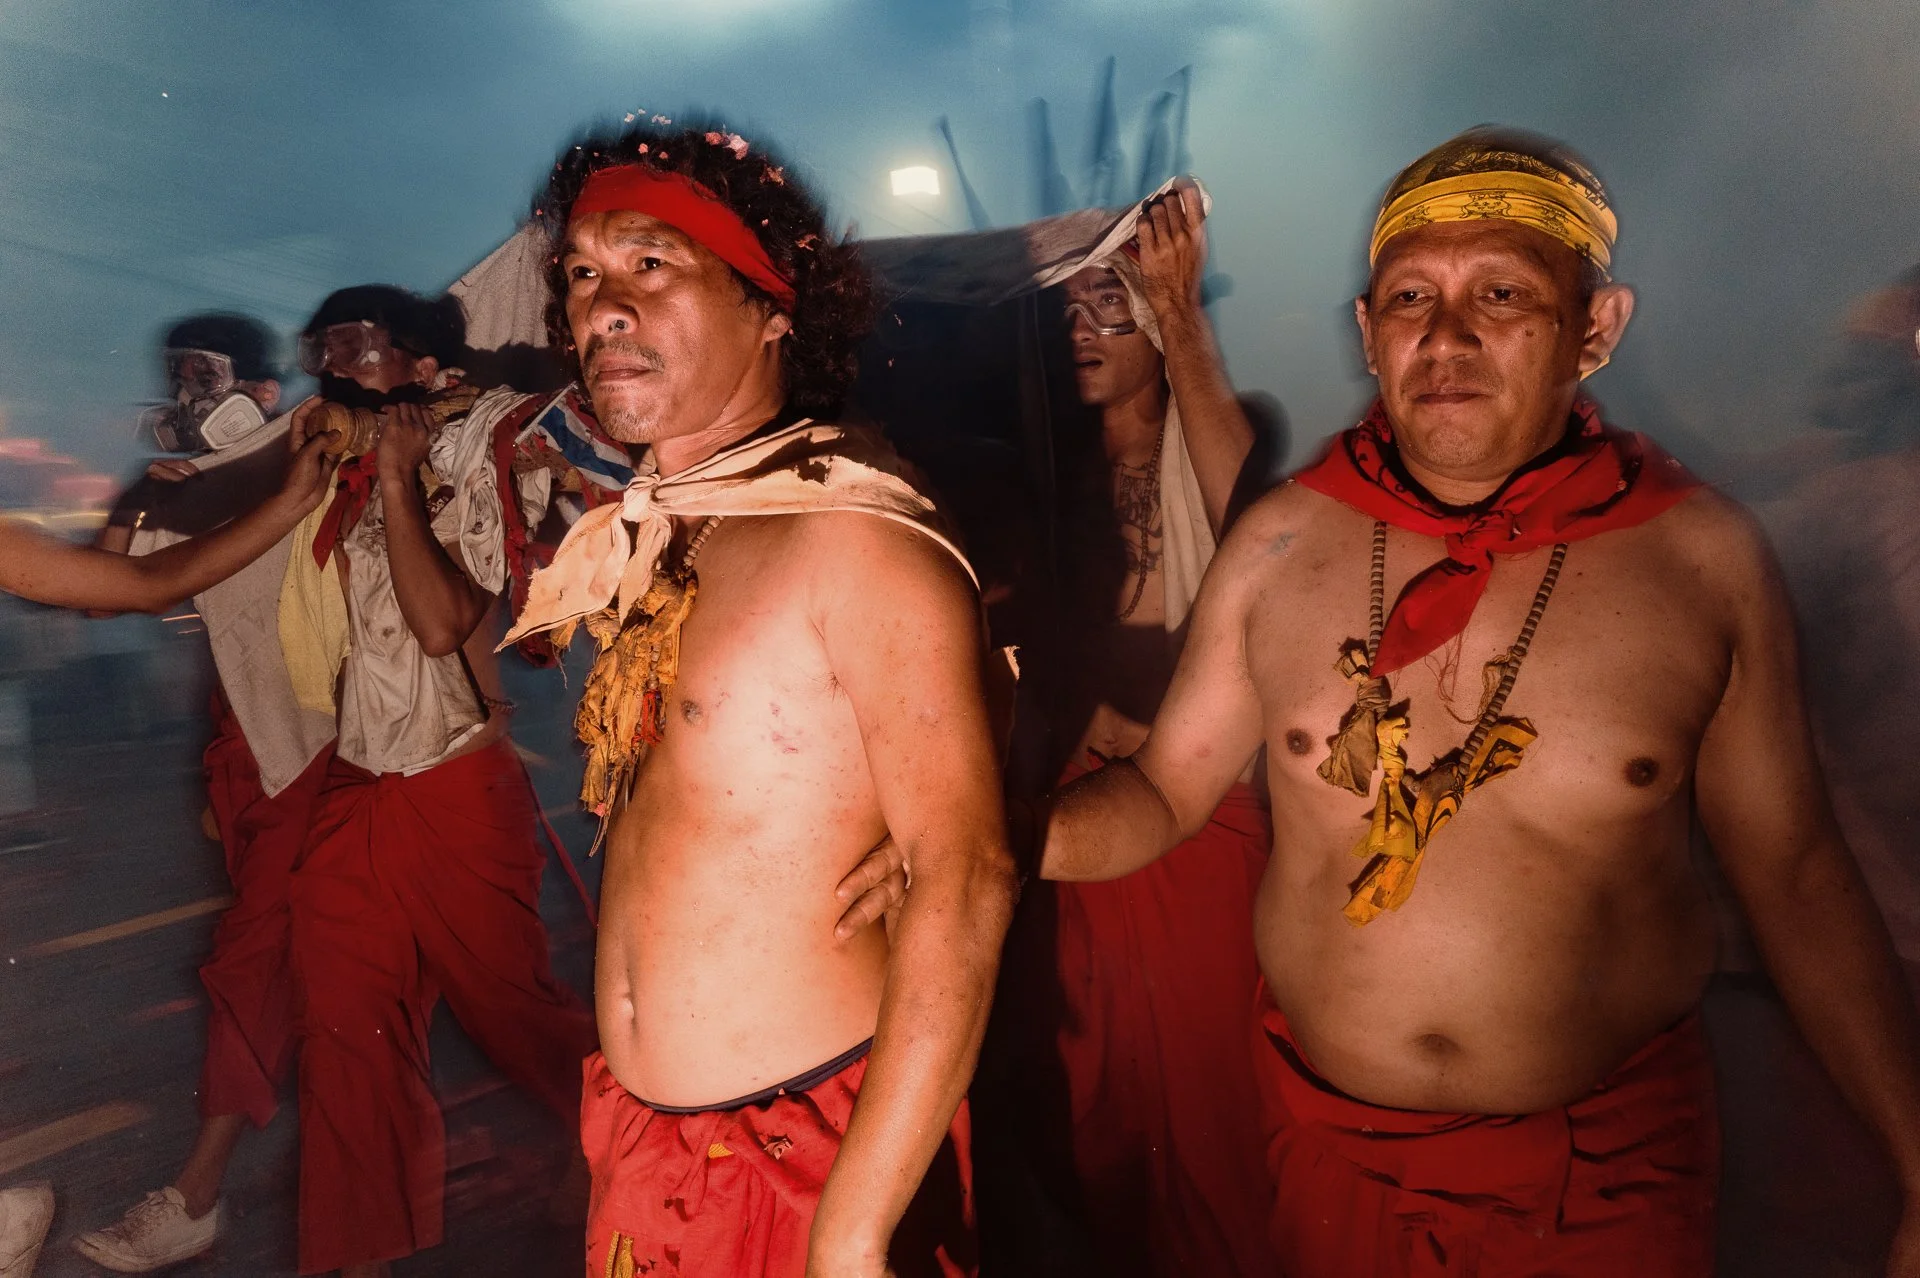
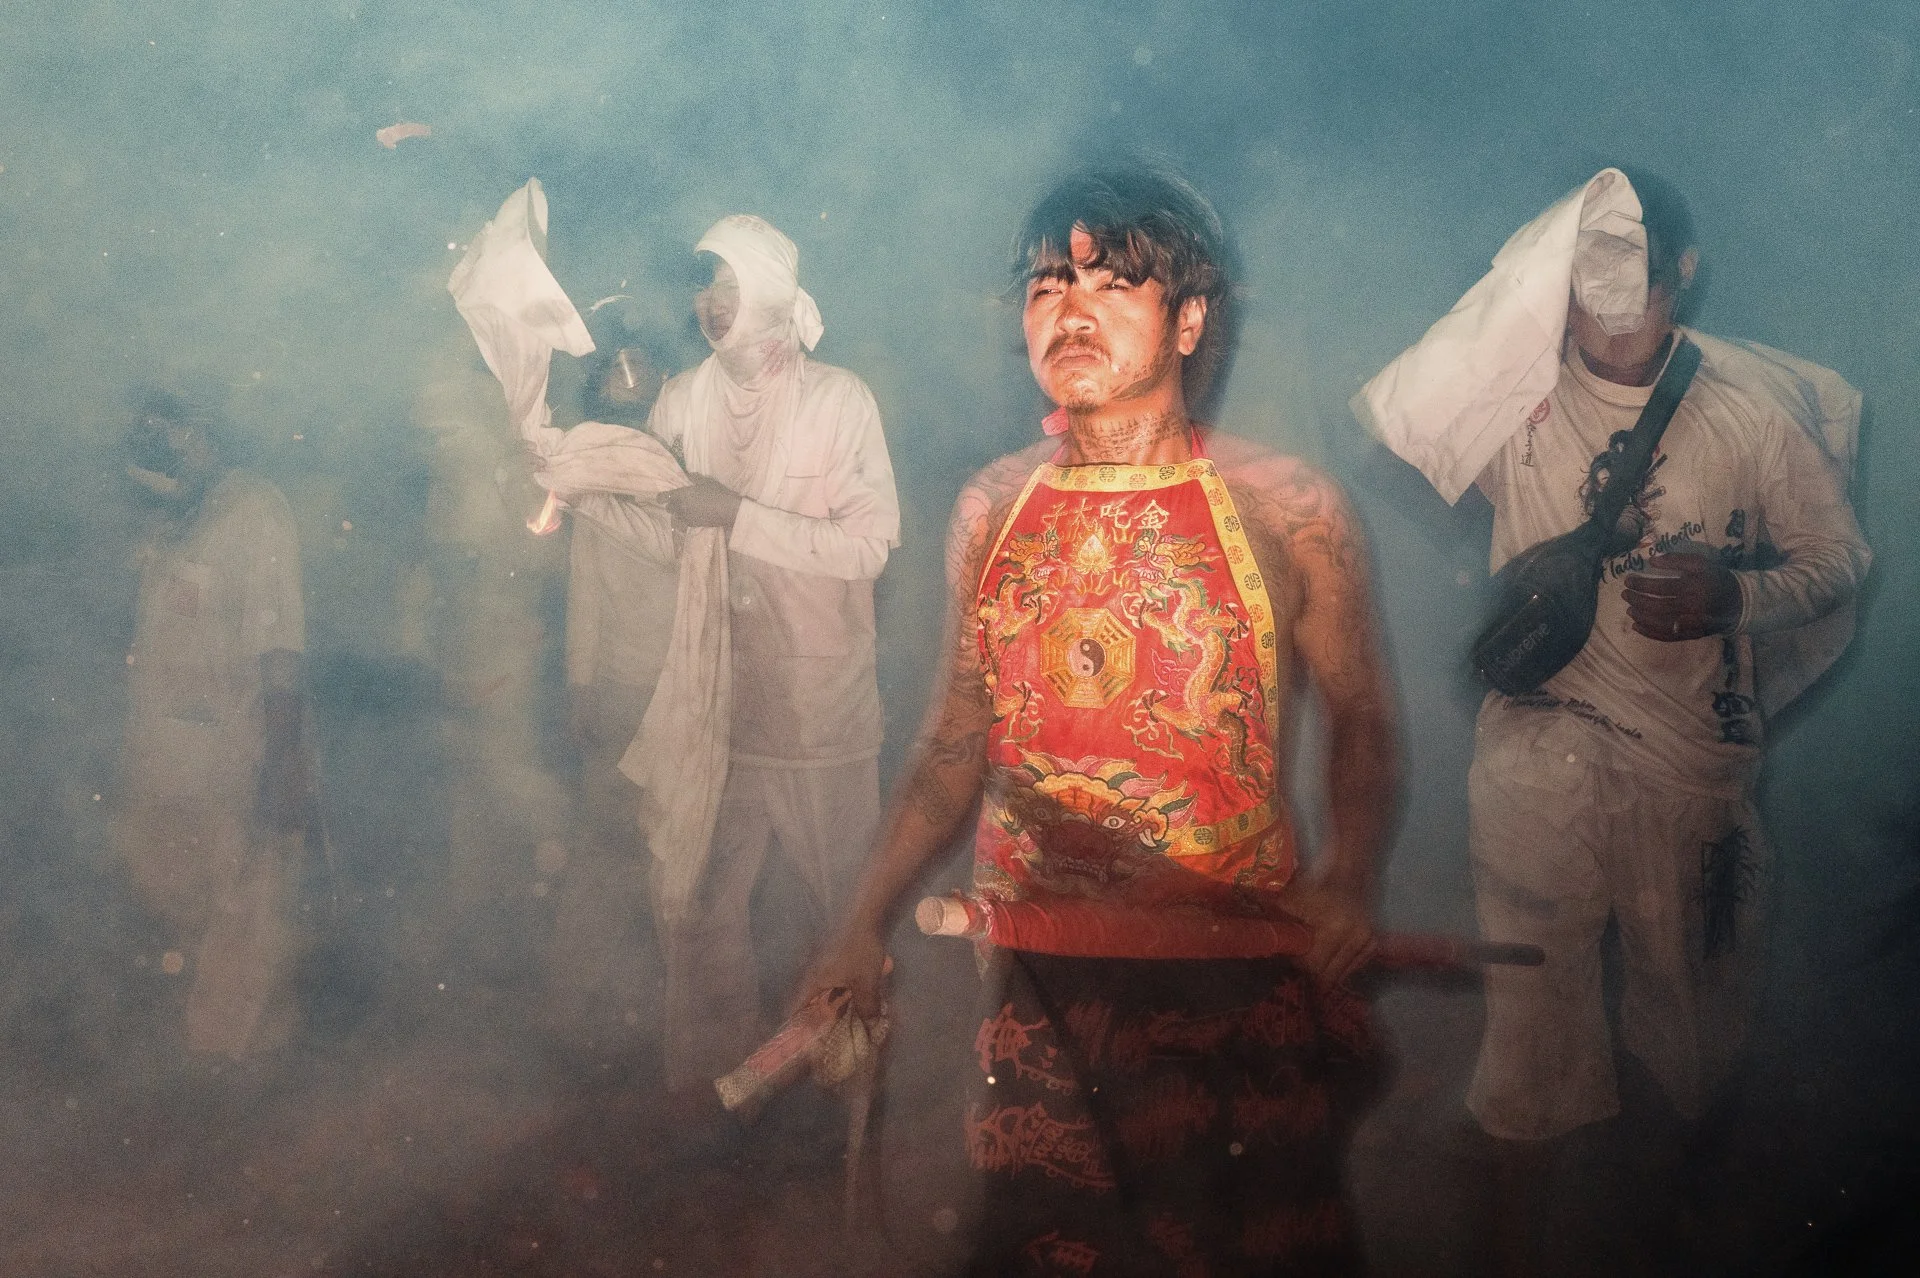
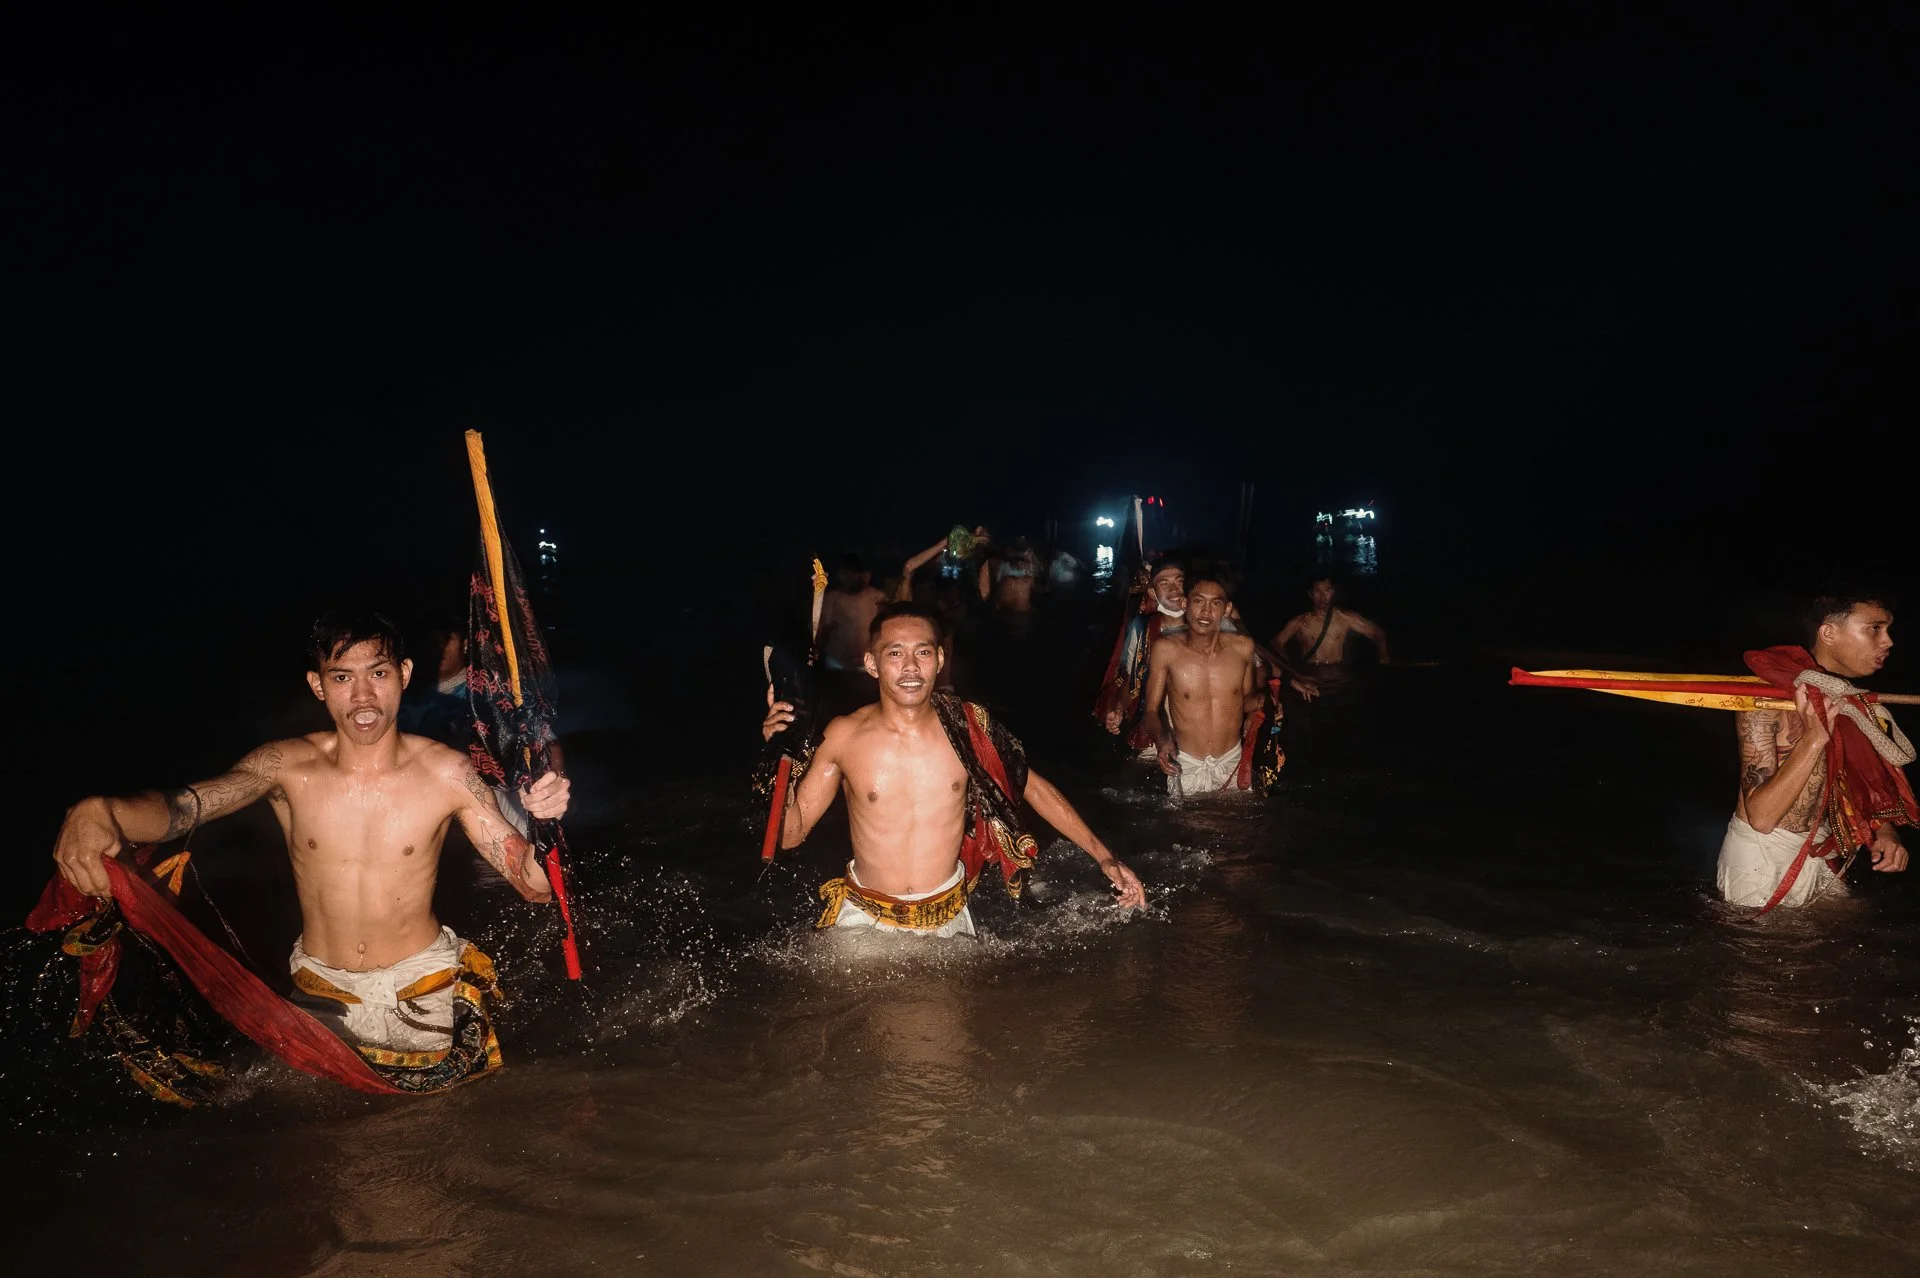
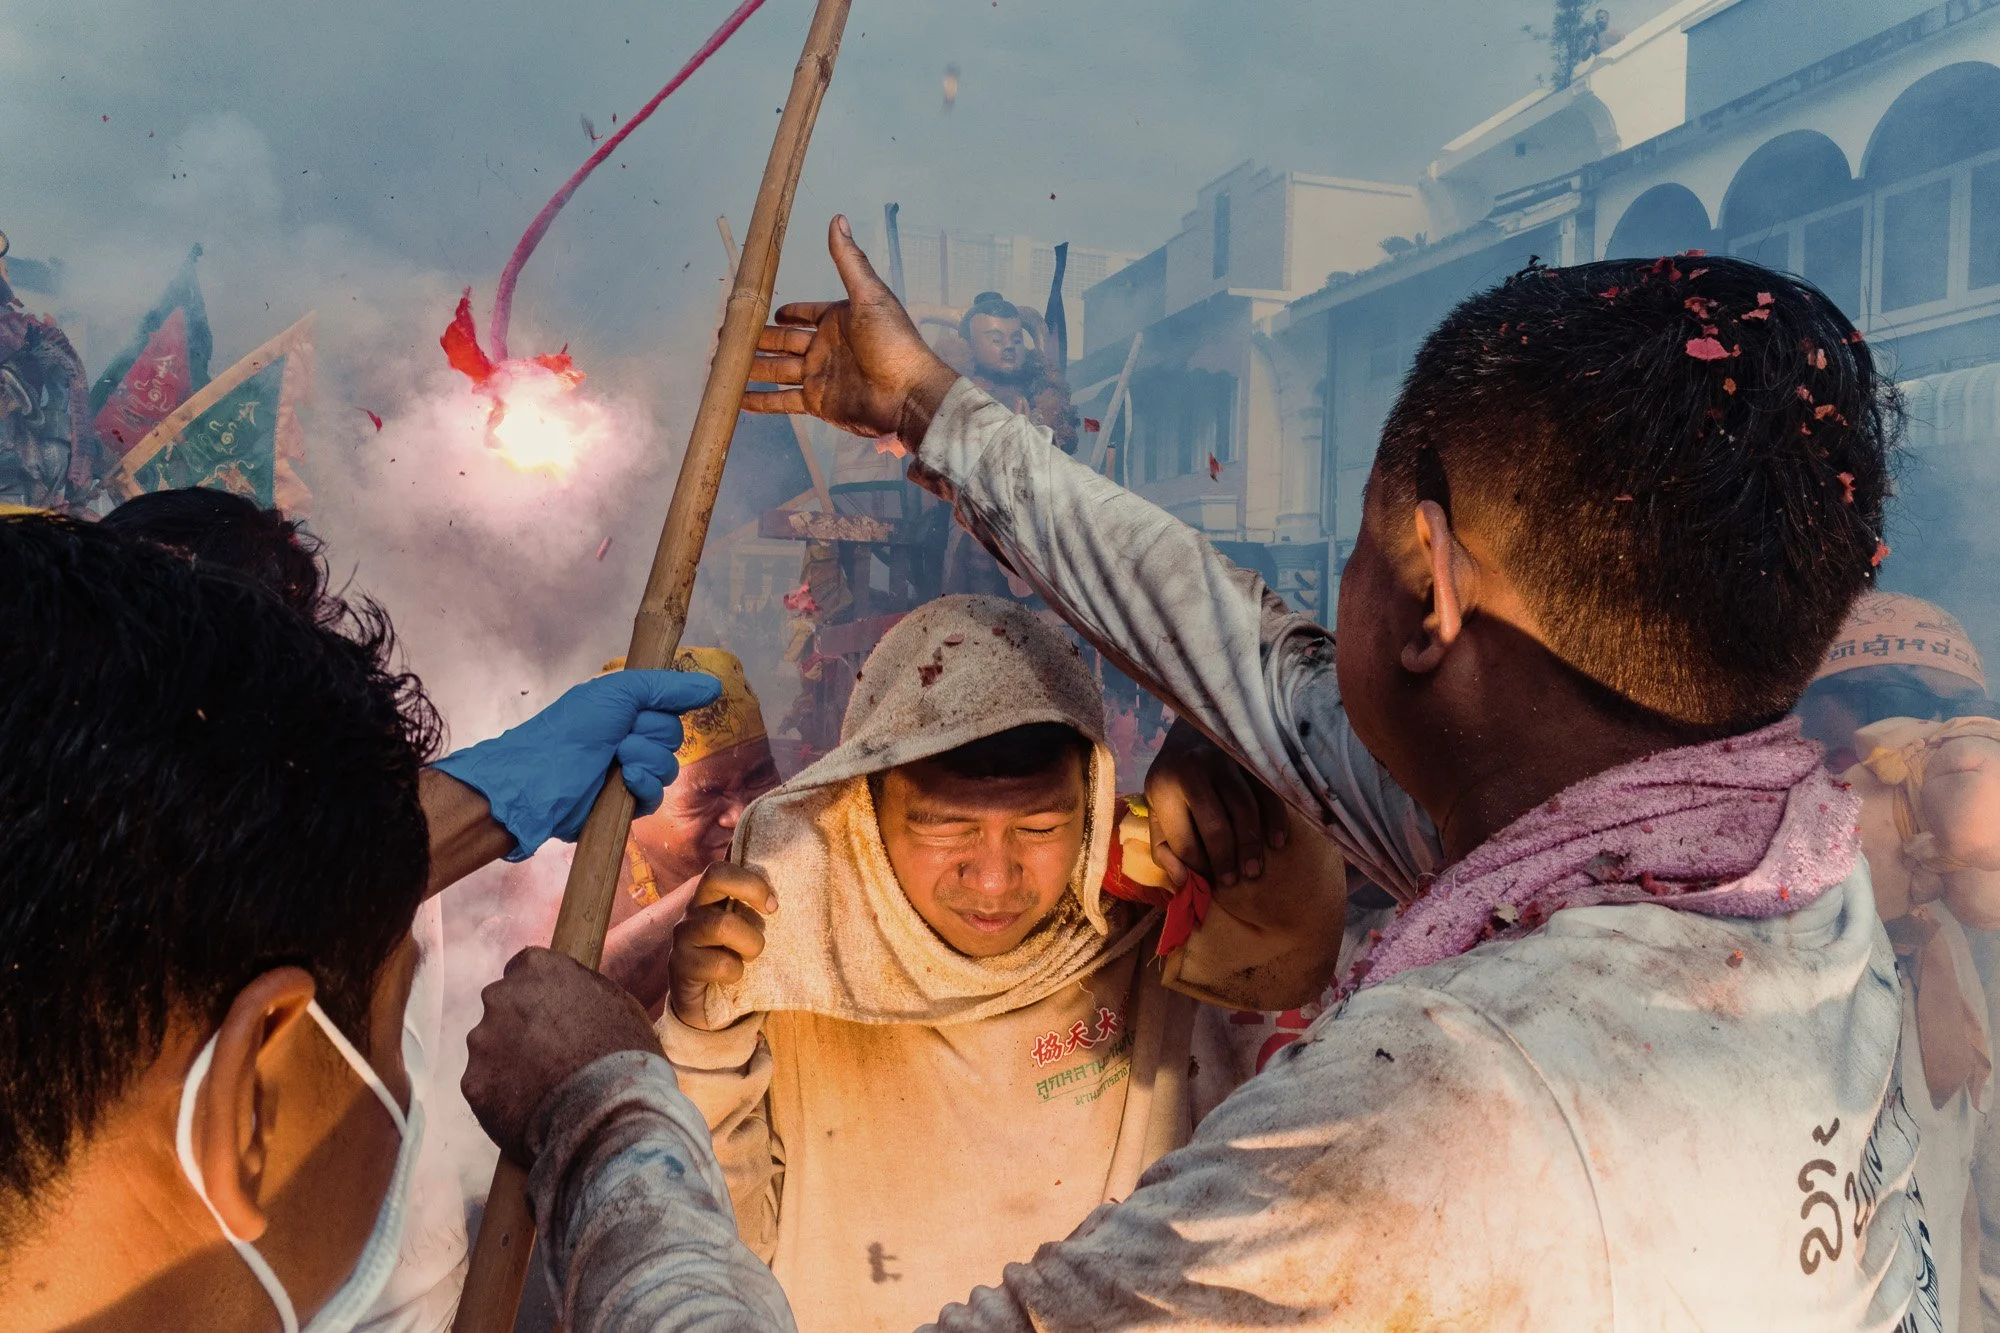
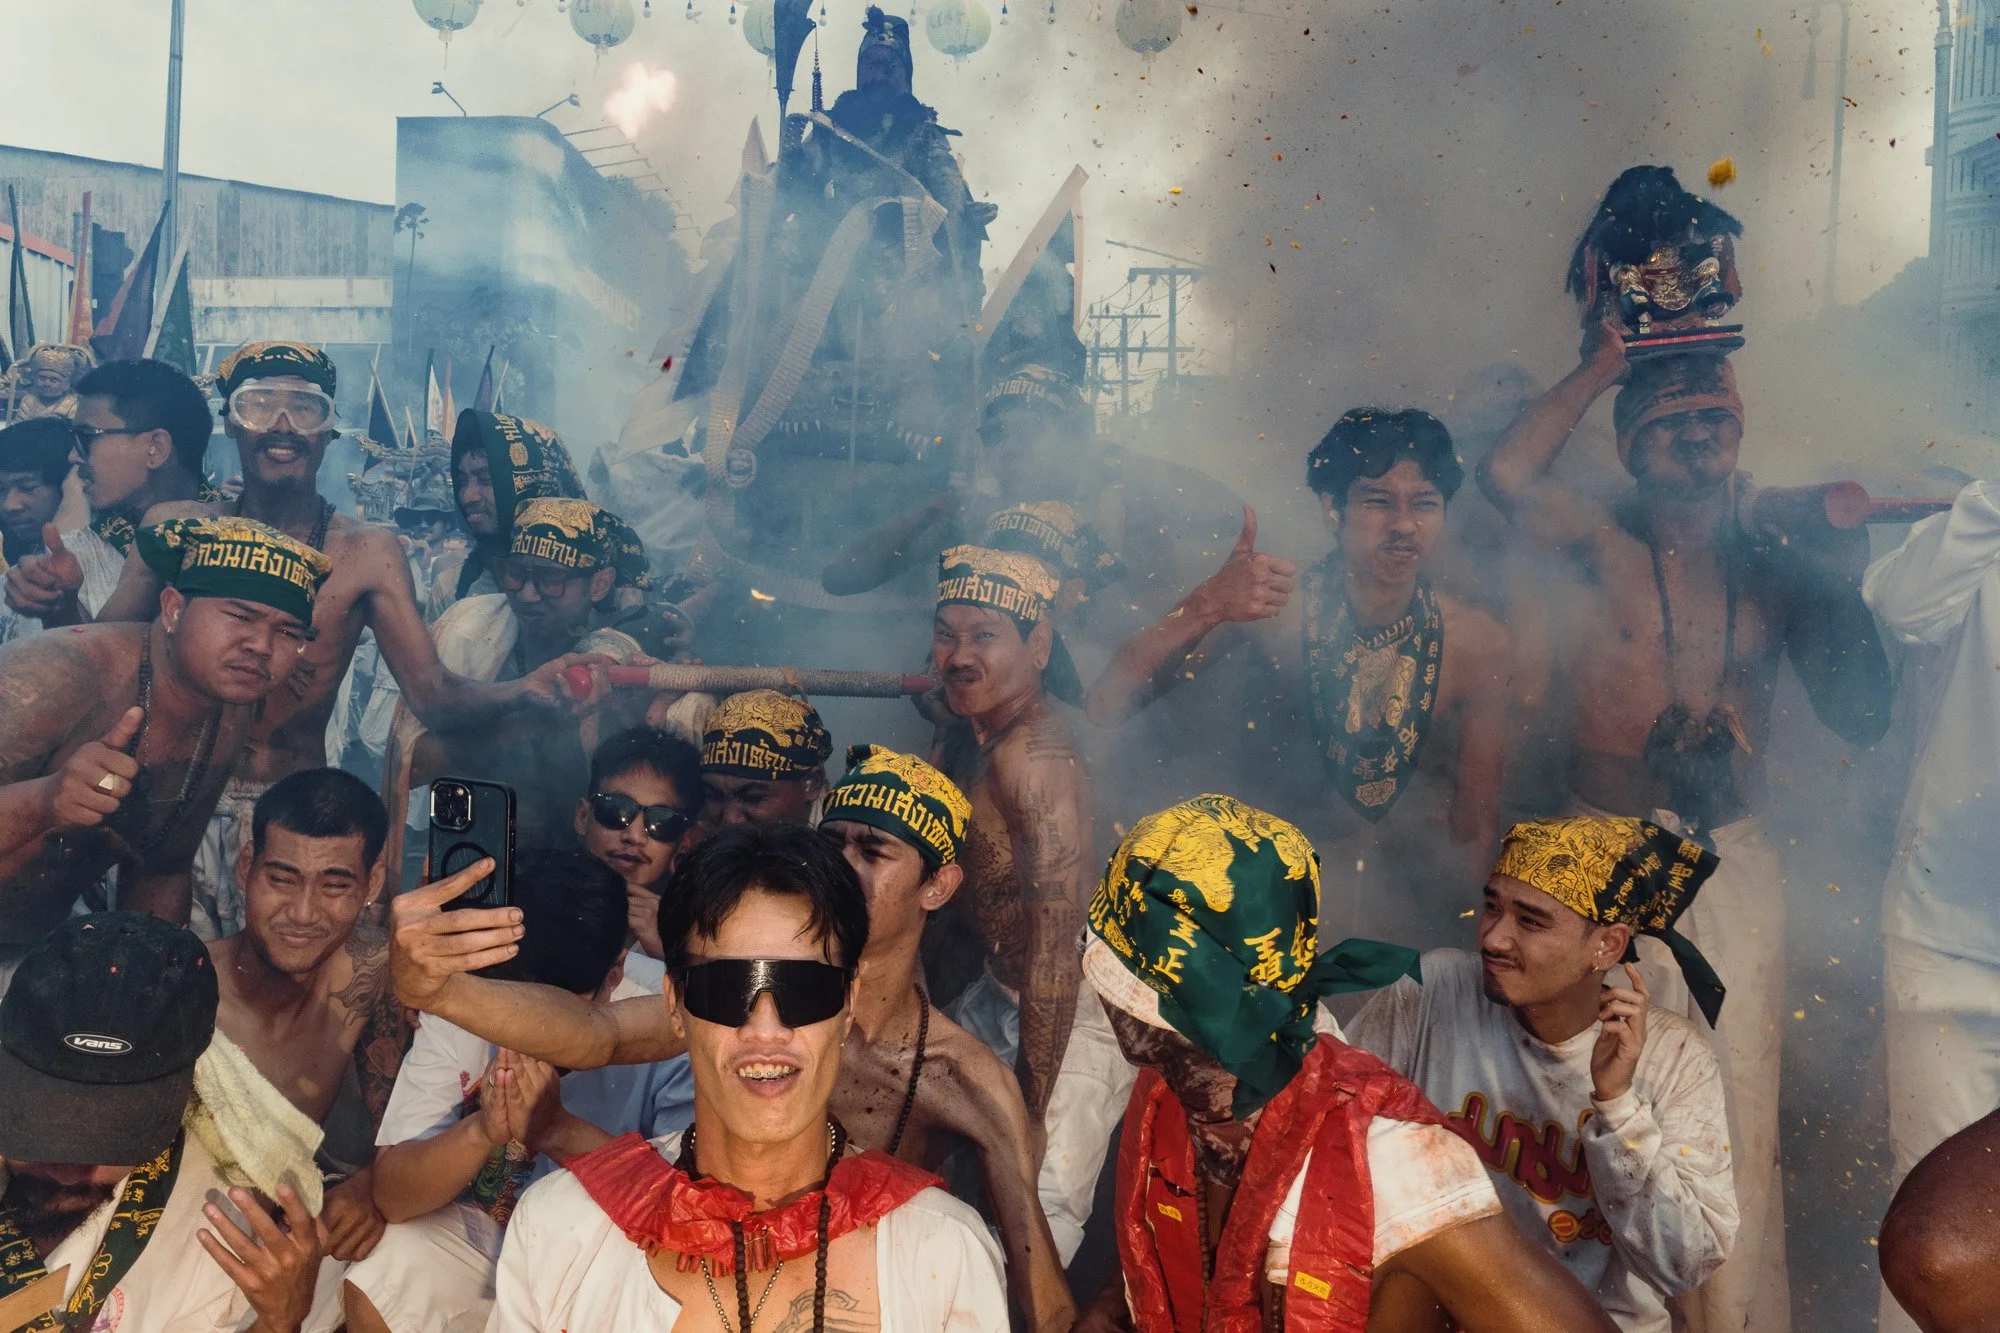
Pure Chaos
Once everything kicked off, everyone was on their own. It was impossible to stay together in the chaos.
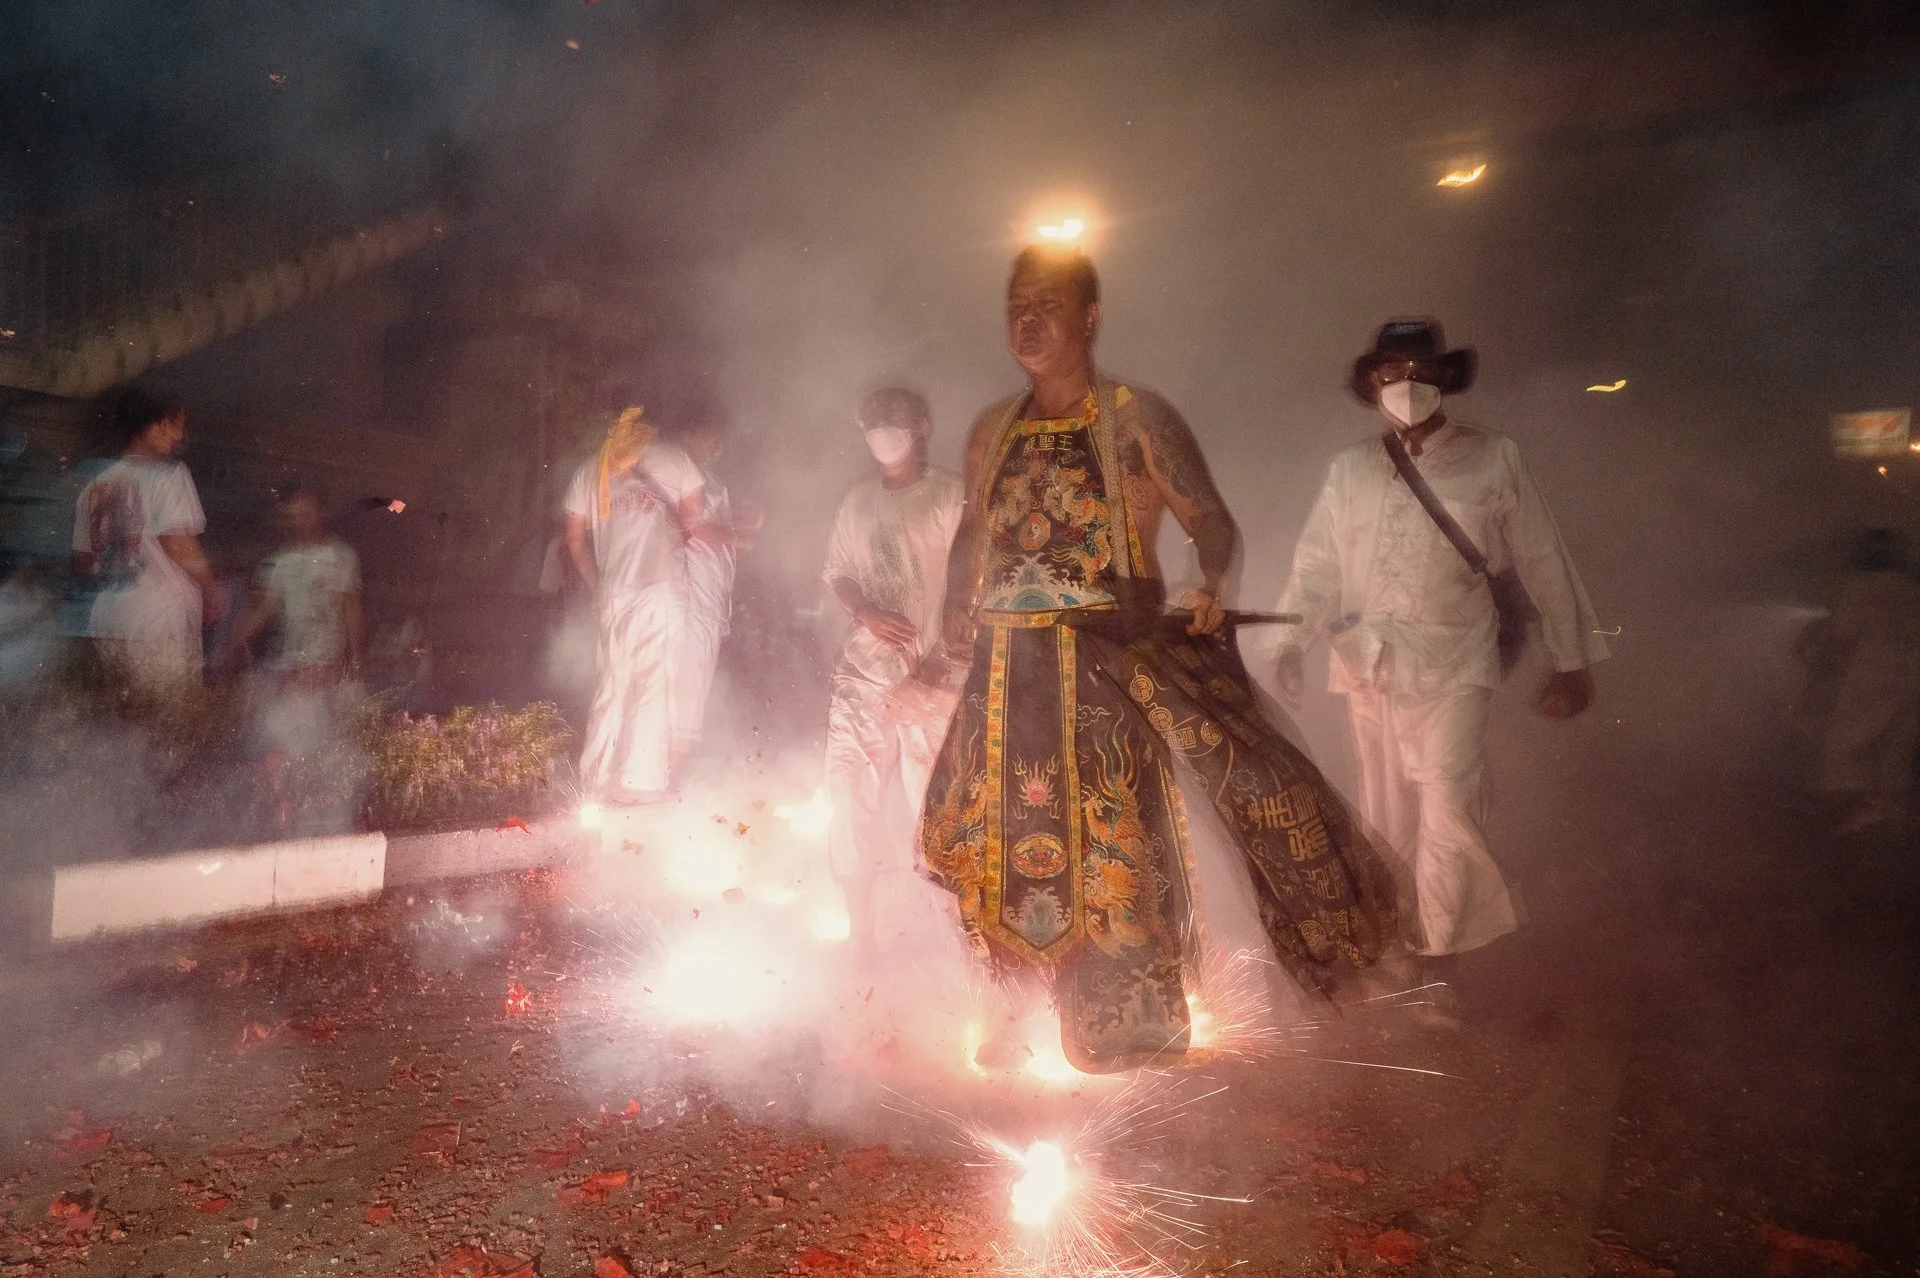
The sidewalks were packed with people throwing firecrackers. As soon as the first group of men carrying the palanquins arrived, they were completely bombarded and suddenly all hell broke loose.
I chose to shoot with the Leica Q3 instead of the Ricoh because of the dust and the expected rain.
Photographing in those conditions was extremely difficult. Firecrackers were exploding everywhere, visibility was terrible because of the smoke, and using flash was tricky since the smoke reflected the light. But when everything aligned, the results were incredible.
Despite the chaos and the insane noise levels, it was a lot of fun. Every one of us had a blast. Literally.
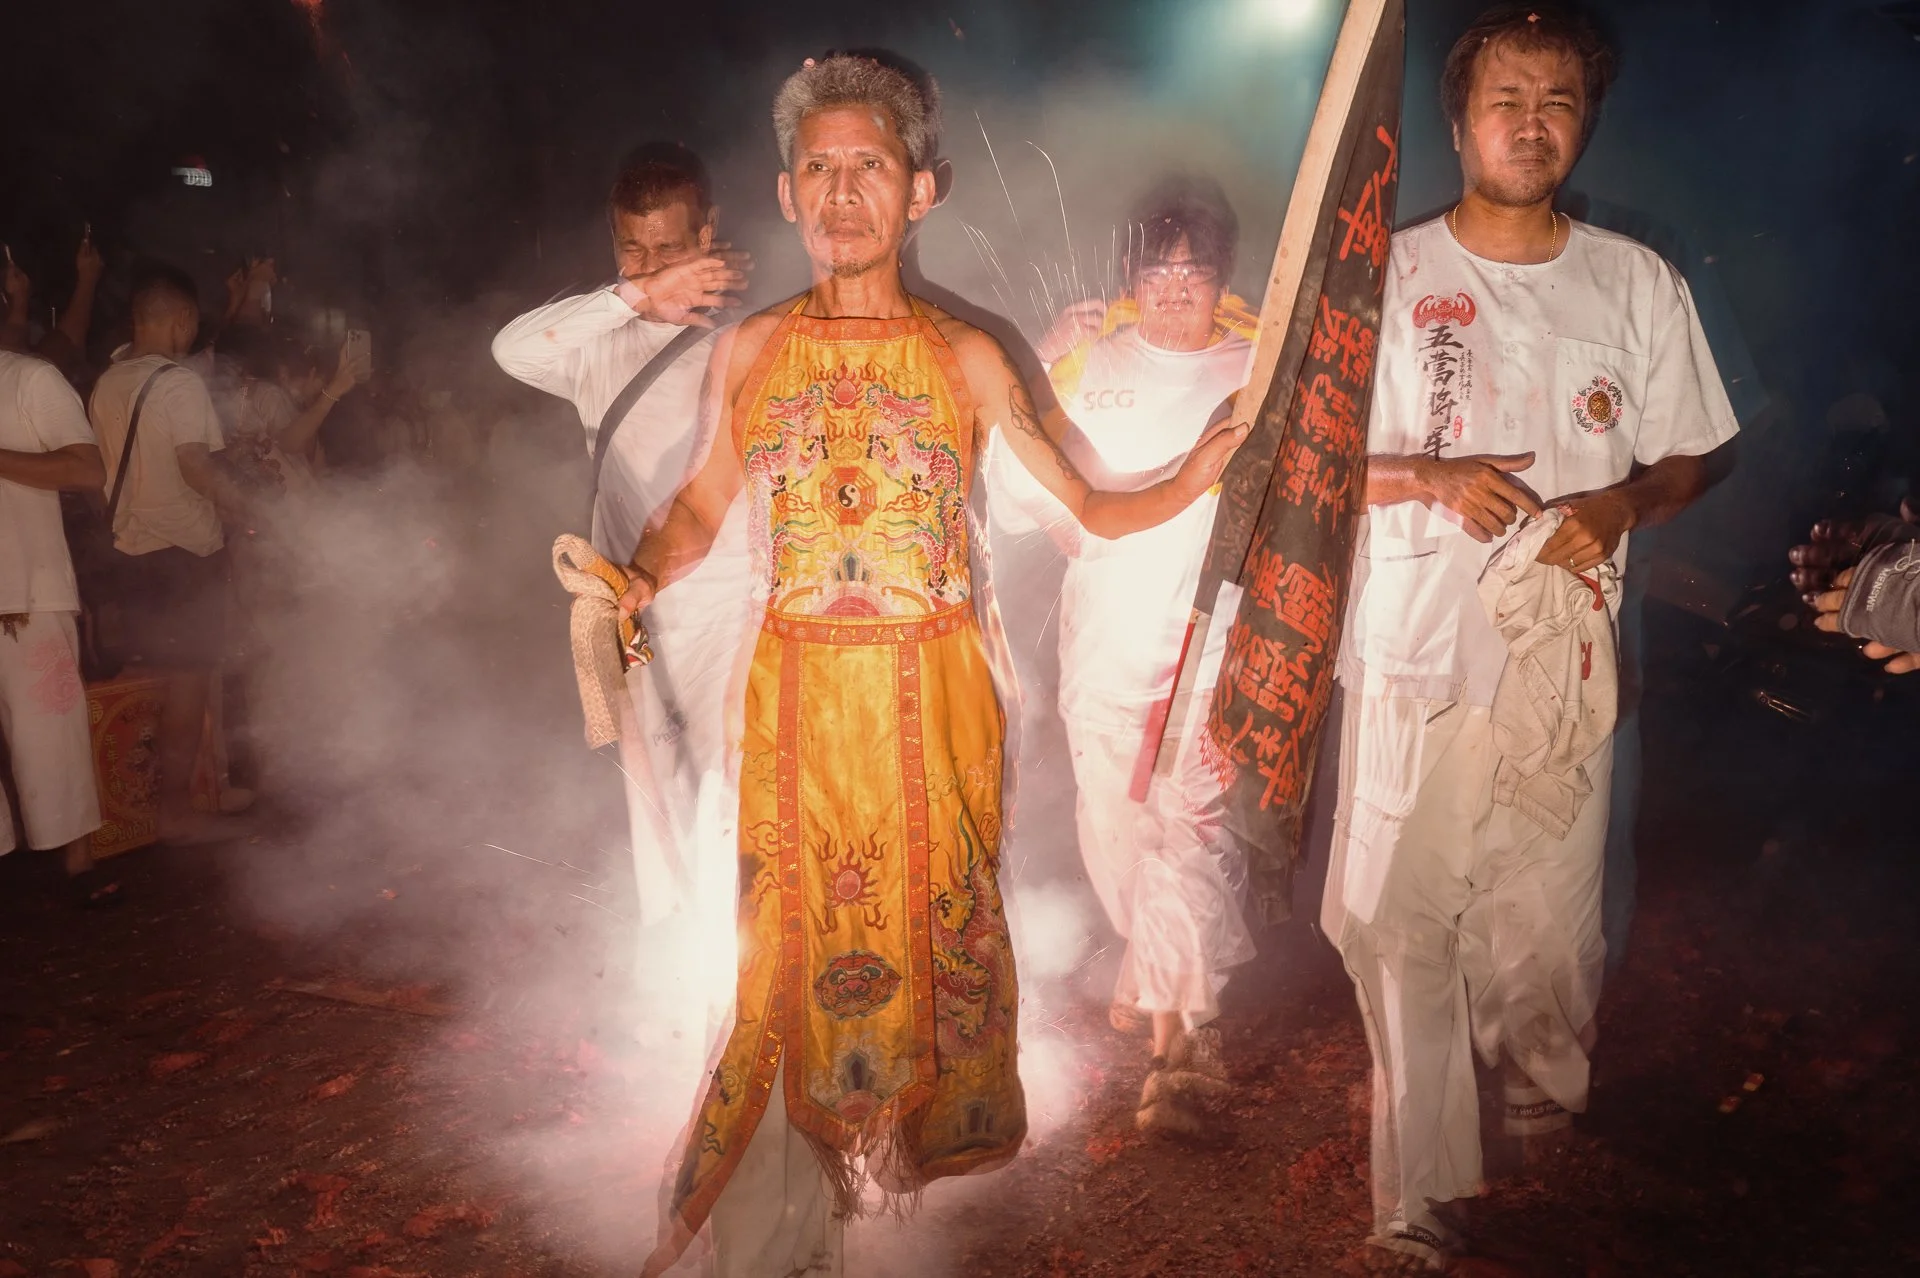
The Masongs do not wear any protection, not even shoes. They believe that their connection to the gods makes them invincible.
43. Leica Q3 - 1/8 - f11 - ISO400
44. Leica Q3 - 1/8 - f11 - ISO400

45. Leica Q3 - 1/8 - f11 - ISO400
46. Leica Q3 - 1/8 - f11 - ISO400

47. Leica Q3 - 1/8 - f11 - ISO400
48. Leica Q3 - 1/8 - f11 - ISO400
49. Leica Q3 - 1/8 - f11 - ISO800
50. Leica Q3 - 1/8 - f11 - ISO800
51. Leica Q3 - 1/8 - f11 - ISO800
52. Leica Q3 - 1/8 - f11 - ISO400
53. Leica Q3 - 1/8 - f11 - ISO400
54. Leica Q3 - 1/8 - f11 - ISO400
55. Leica Q3 - 1/8 - f/8.0 - ISO400
56. Leica Q3 - 1/8 - f/8.0 - ISO400
57. Leica Q3 - 1/8 - f/16 - ISO1600
58. Leica Q3 - 1/8 - f/16 - ISO1600
59. Leica Q3 - 1/8 - f/16 - ISO1600
60. Leica Q3 - 1/8 - f/16 - ISO1600
61. Leica Q3 - 1/8 - f/8.0 - ISO1600
62. Leica Q3 - 1/8 - f/8.0 - ISO1600
63. Leica Q3 - 1/8 - f/16 - ISO1600

64. Leica Q3 - 1/8 - f/16 - ISO1600
65. Leica Q3 - 1/8 - f/16 - ISO1600
66. Leica Q3 - 1/8 - f/16 - ISO1600
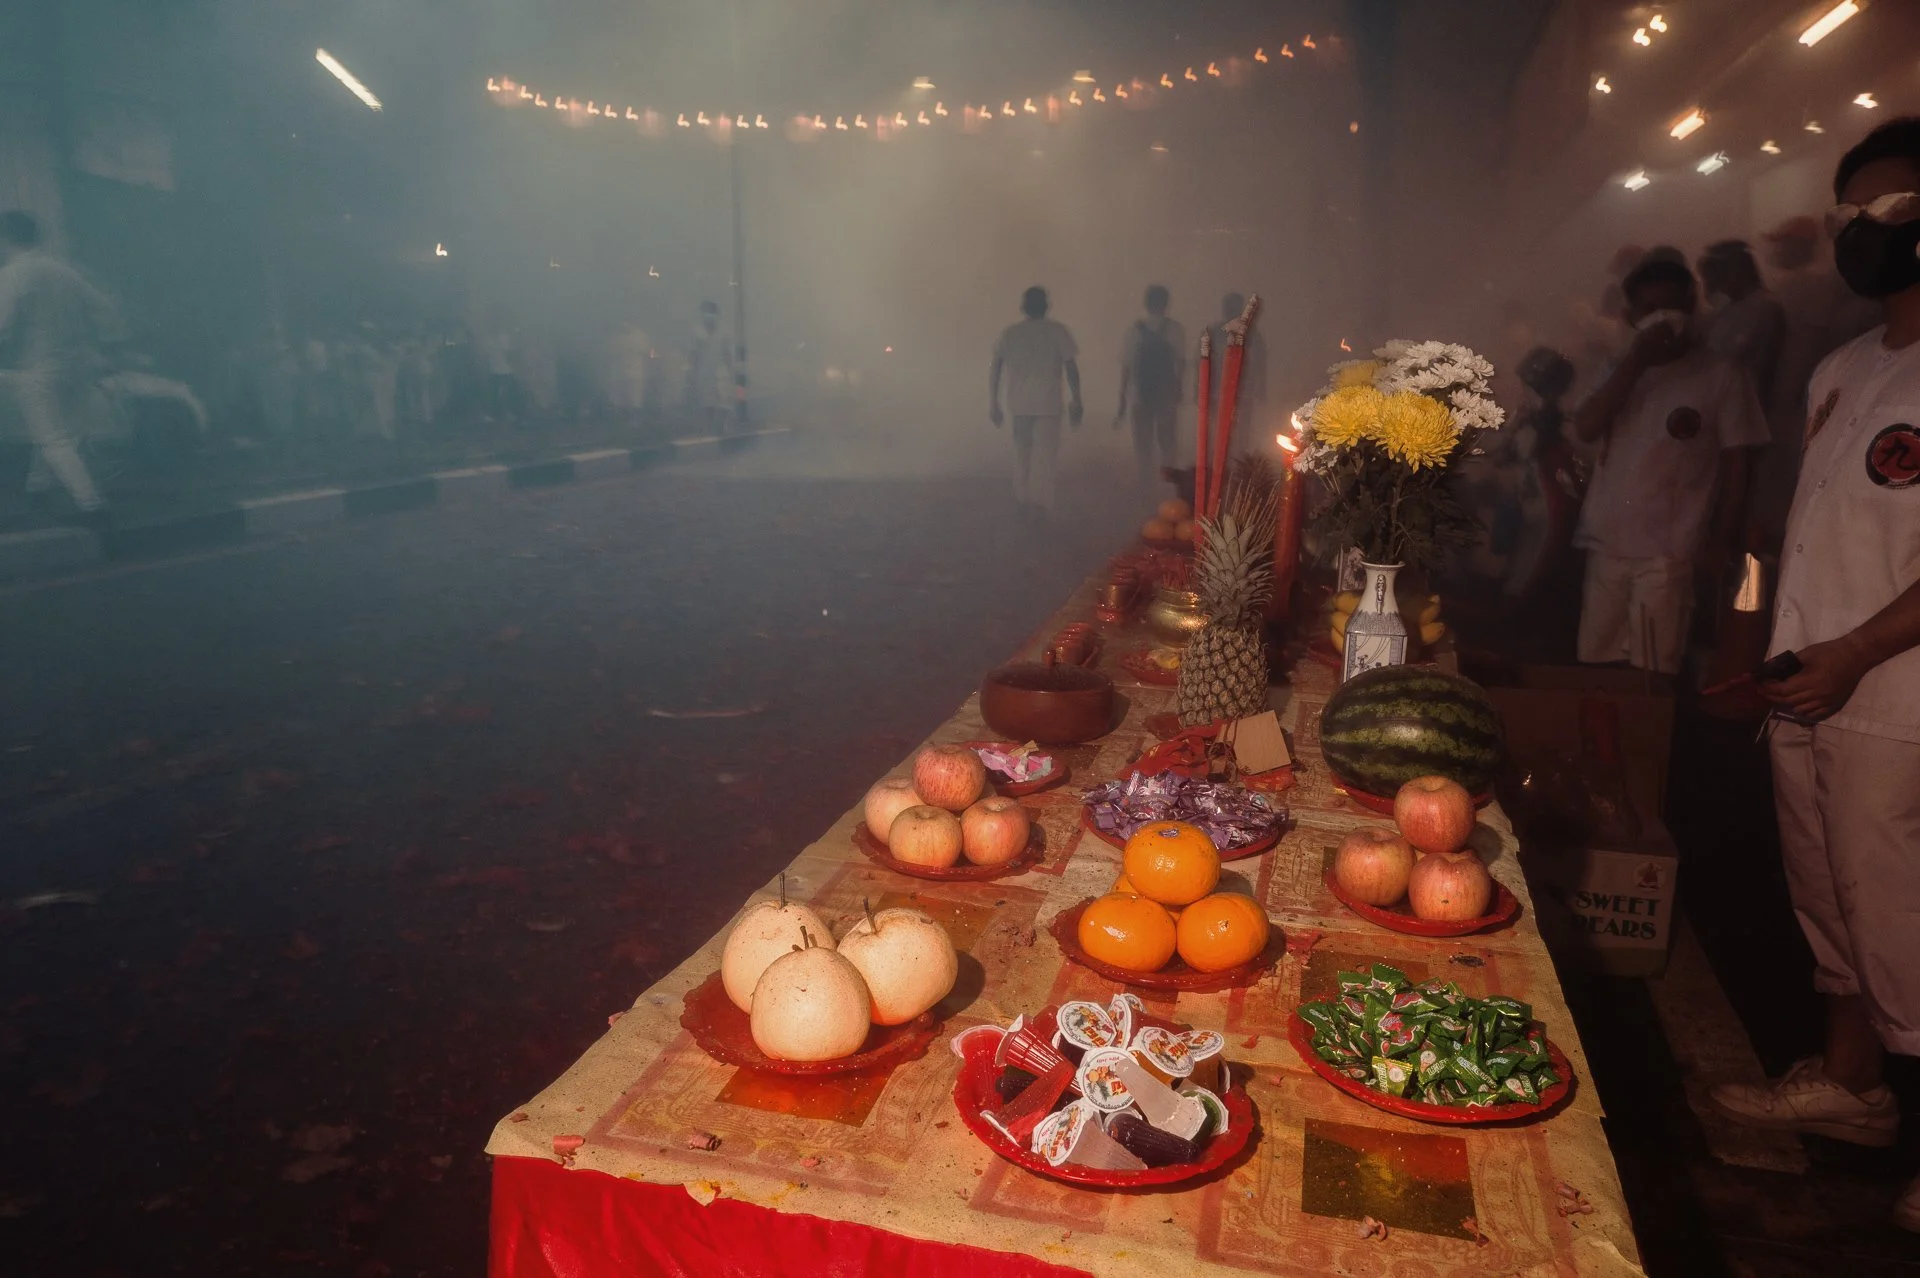
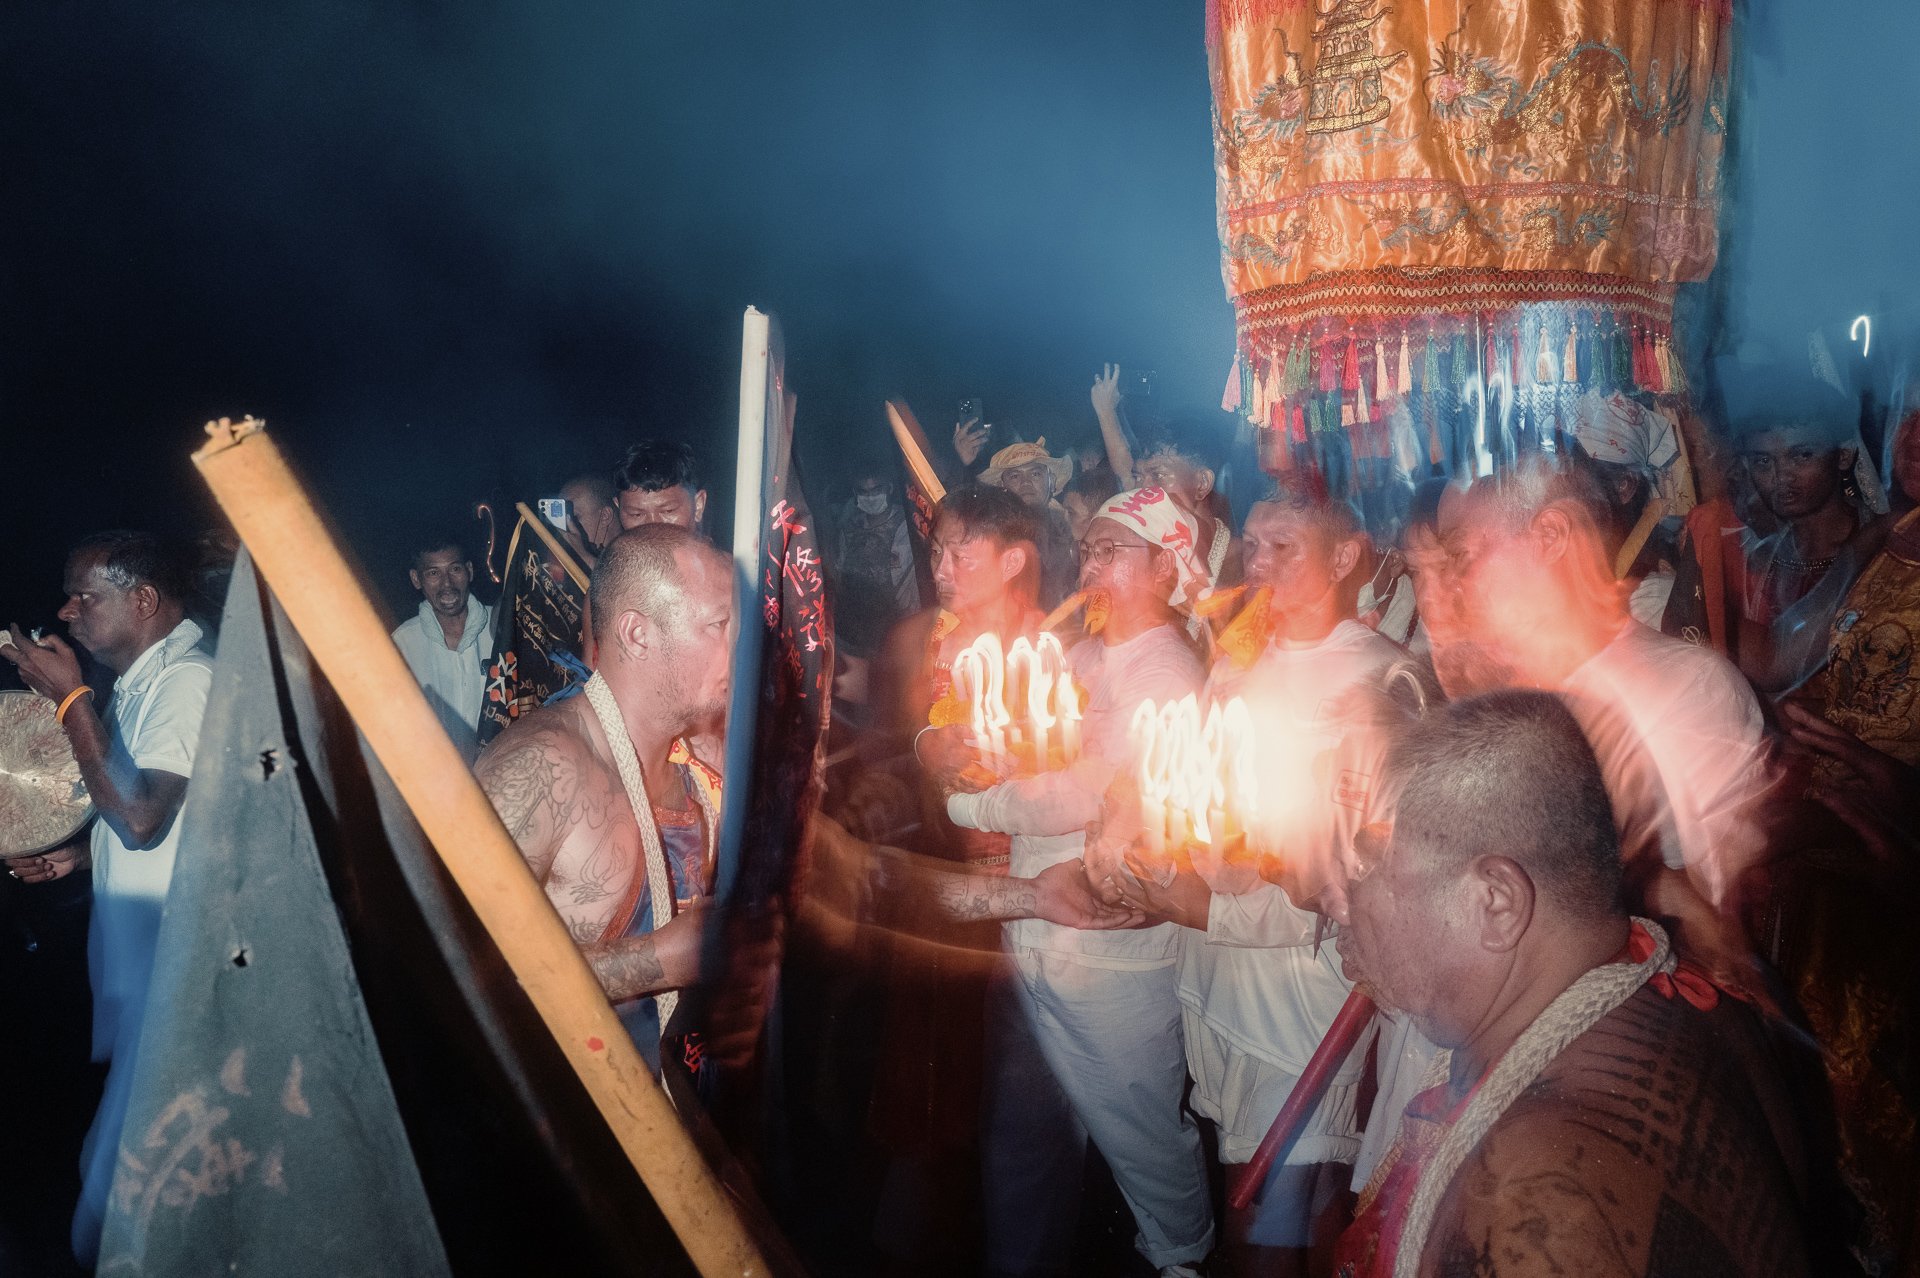
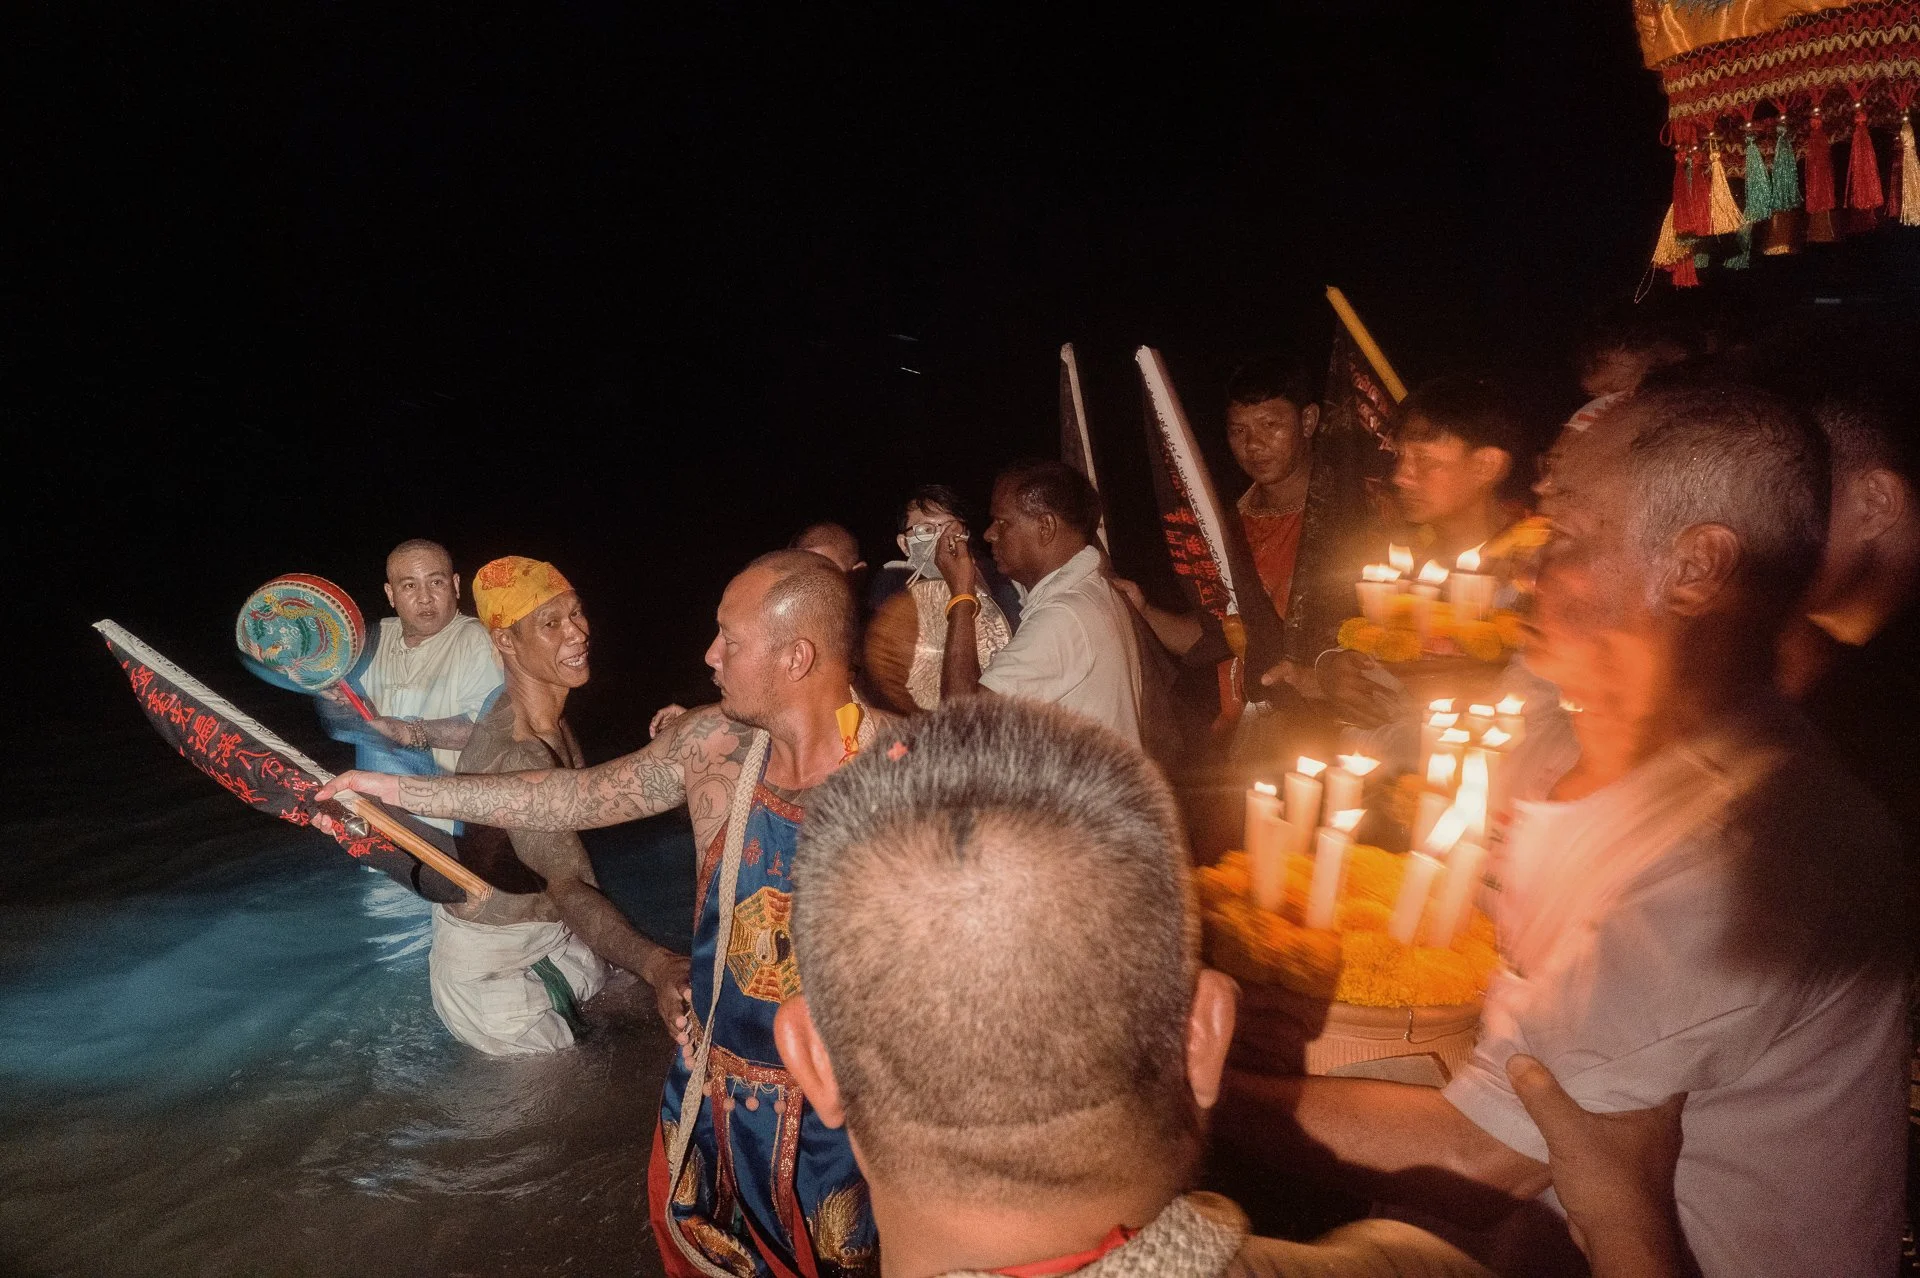
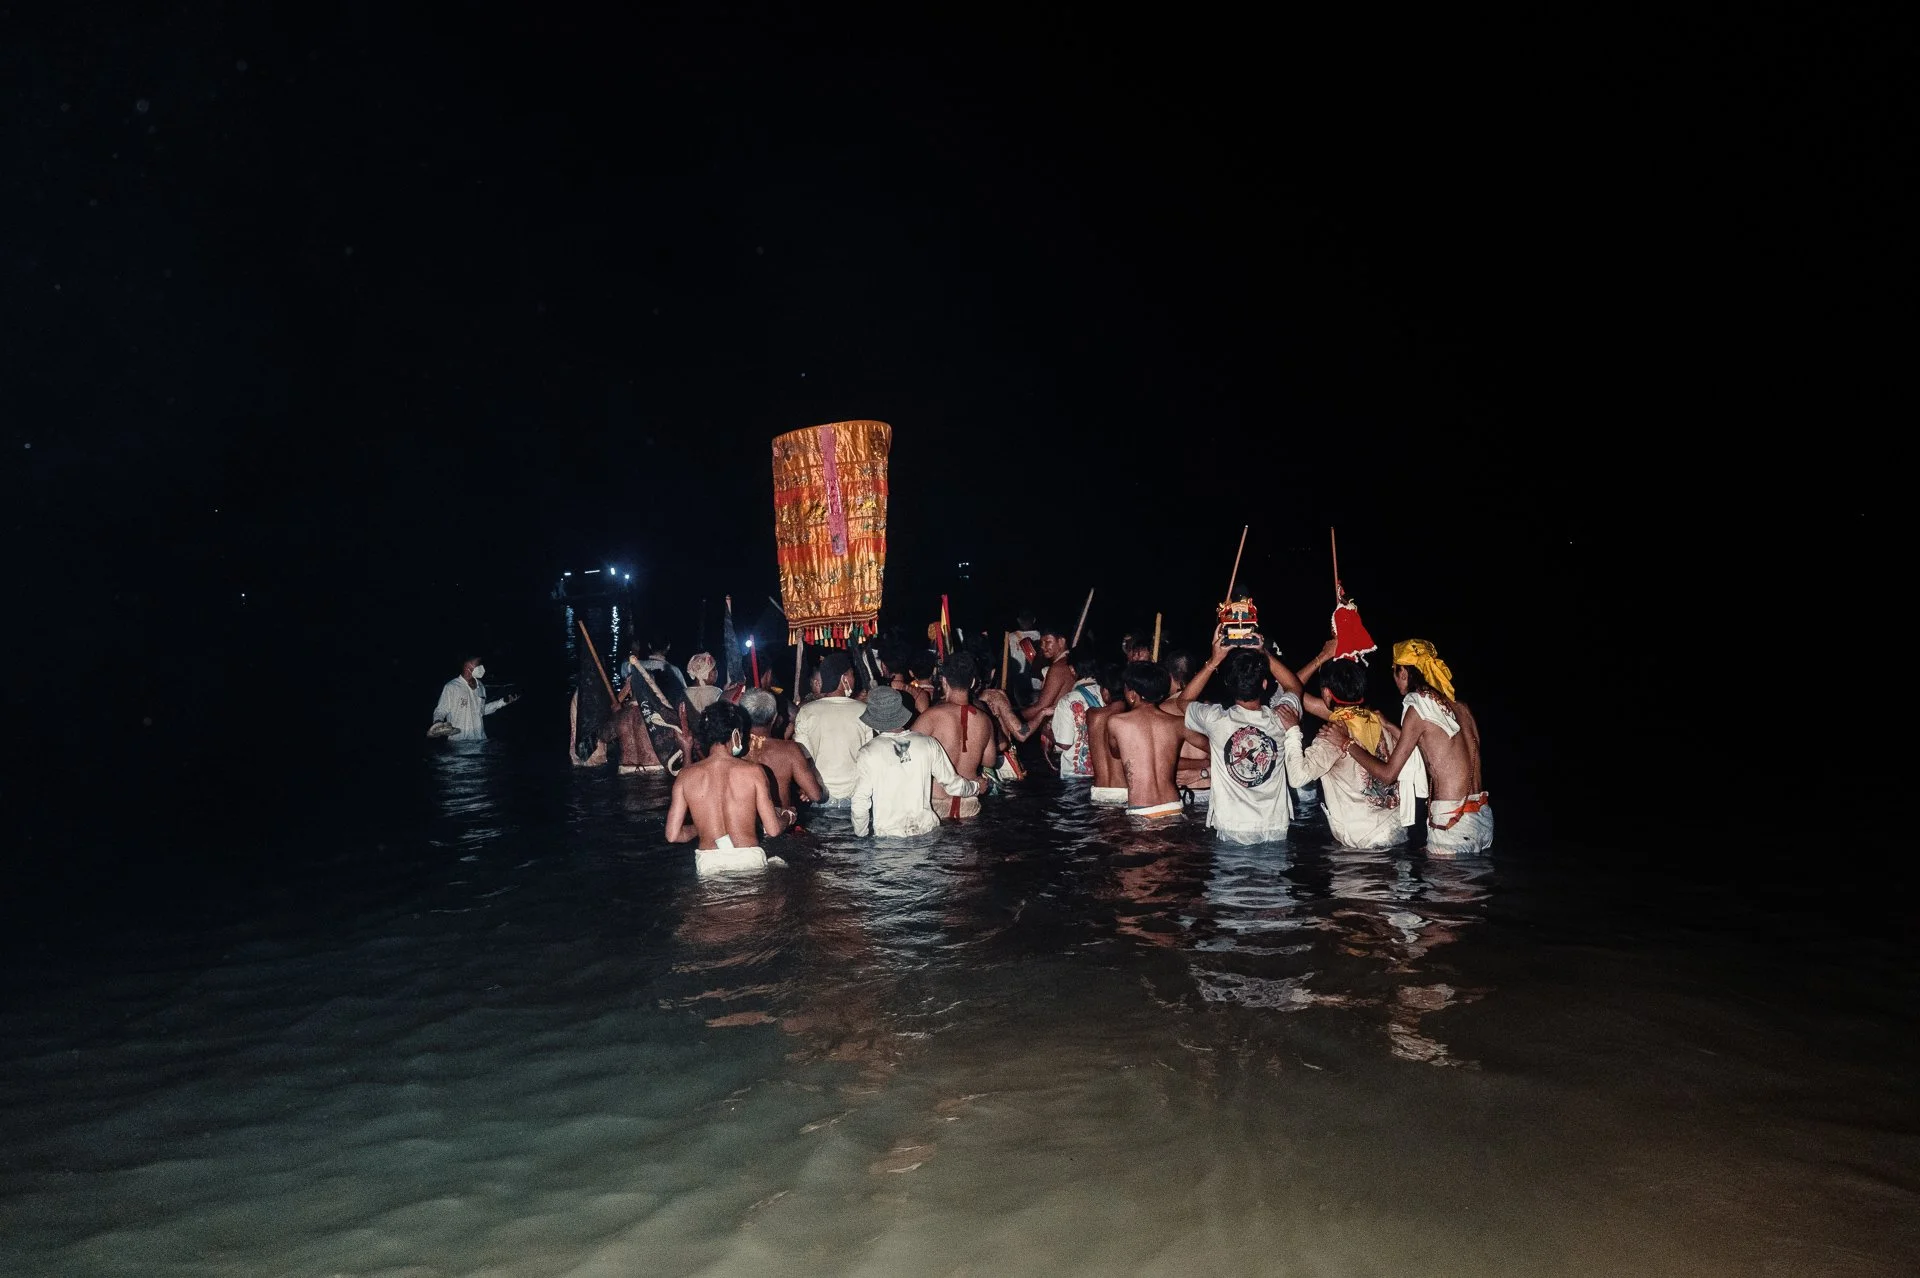
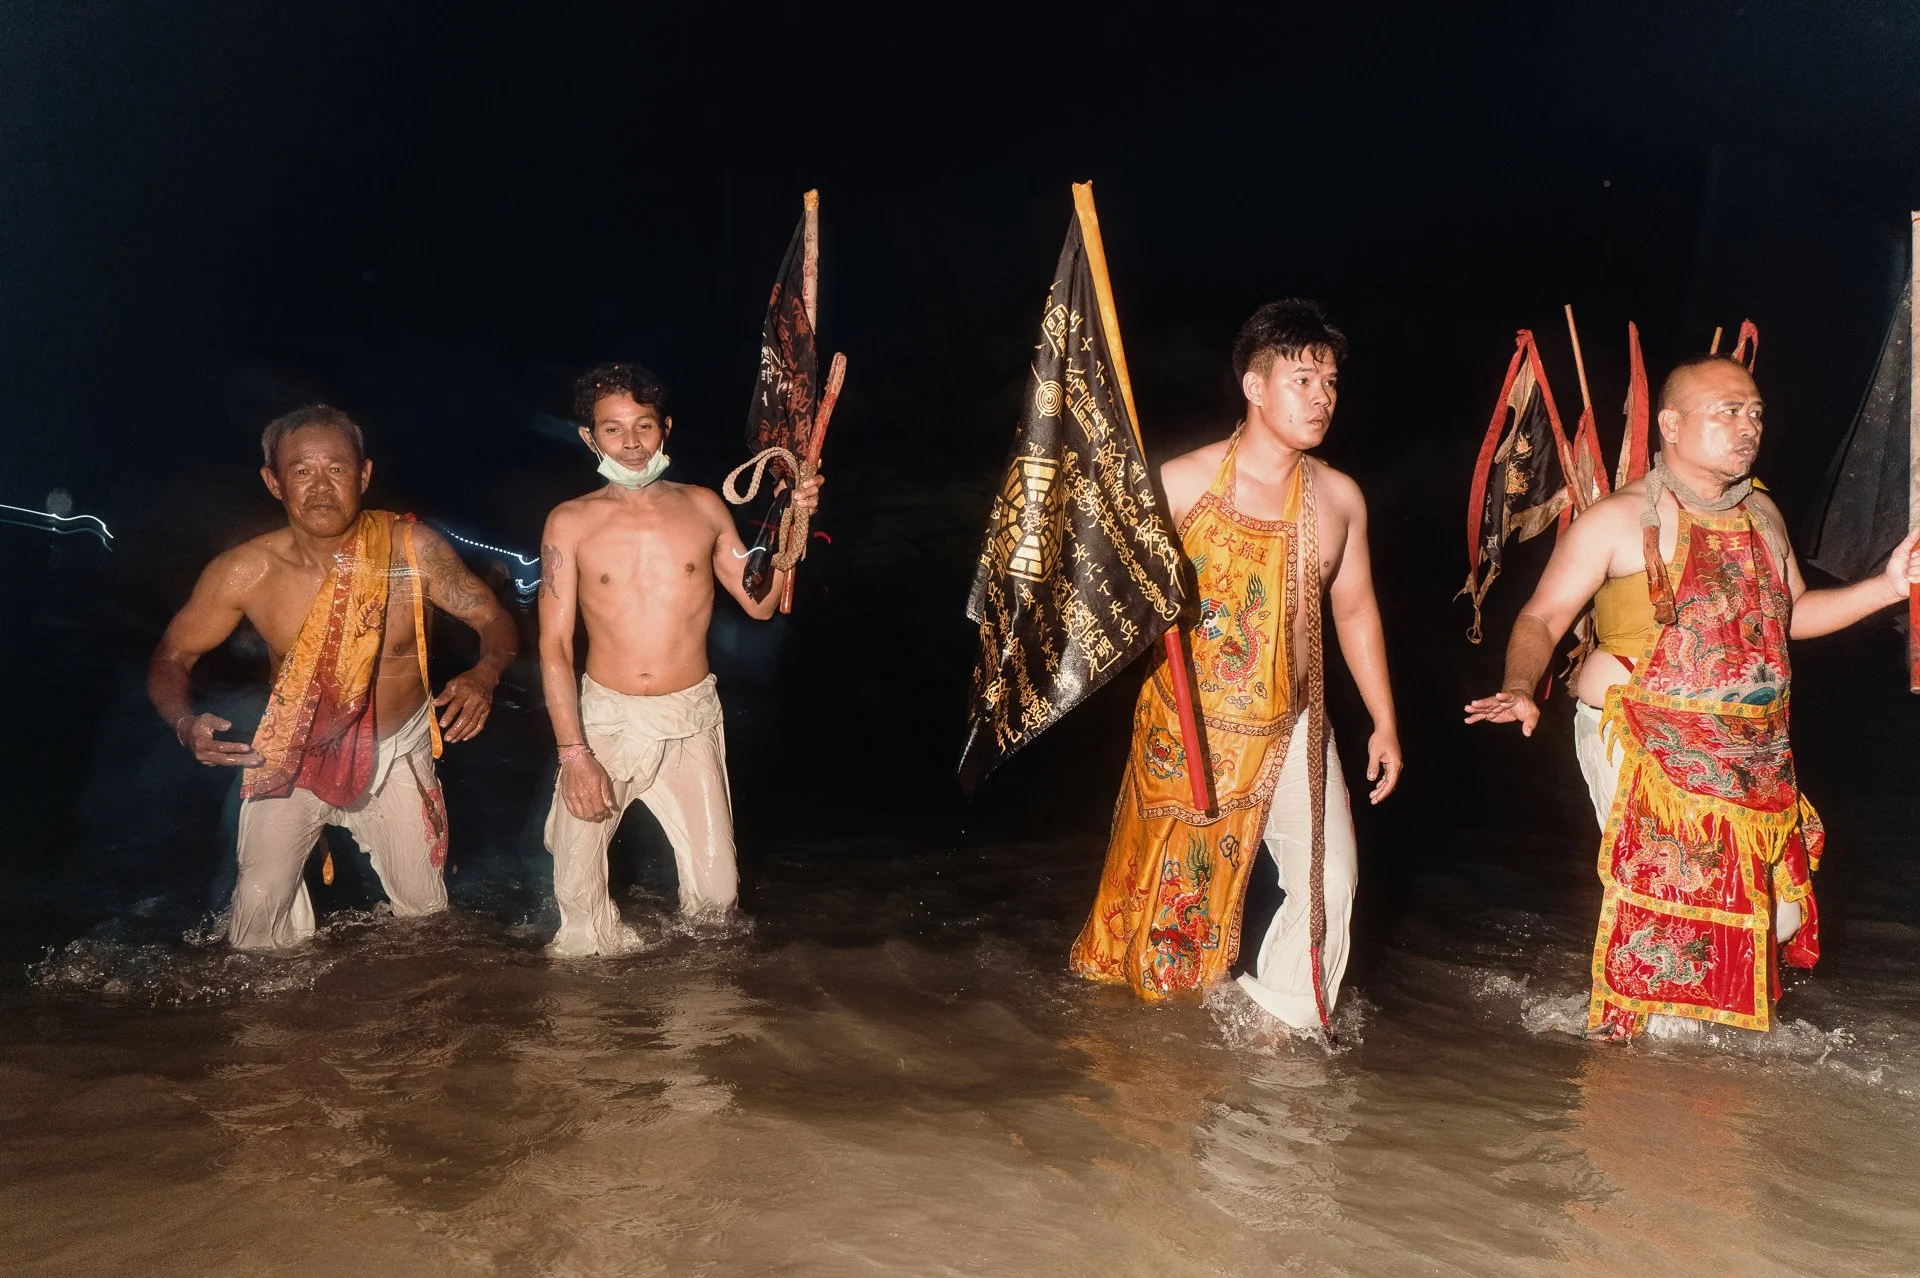
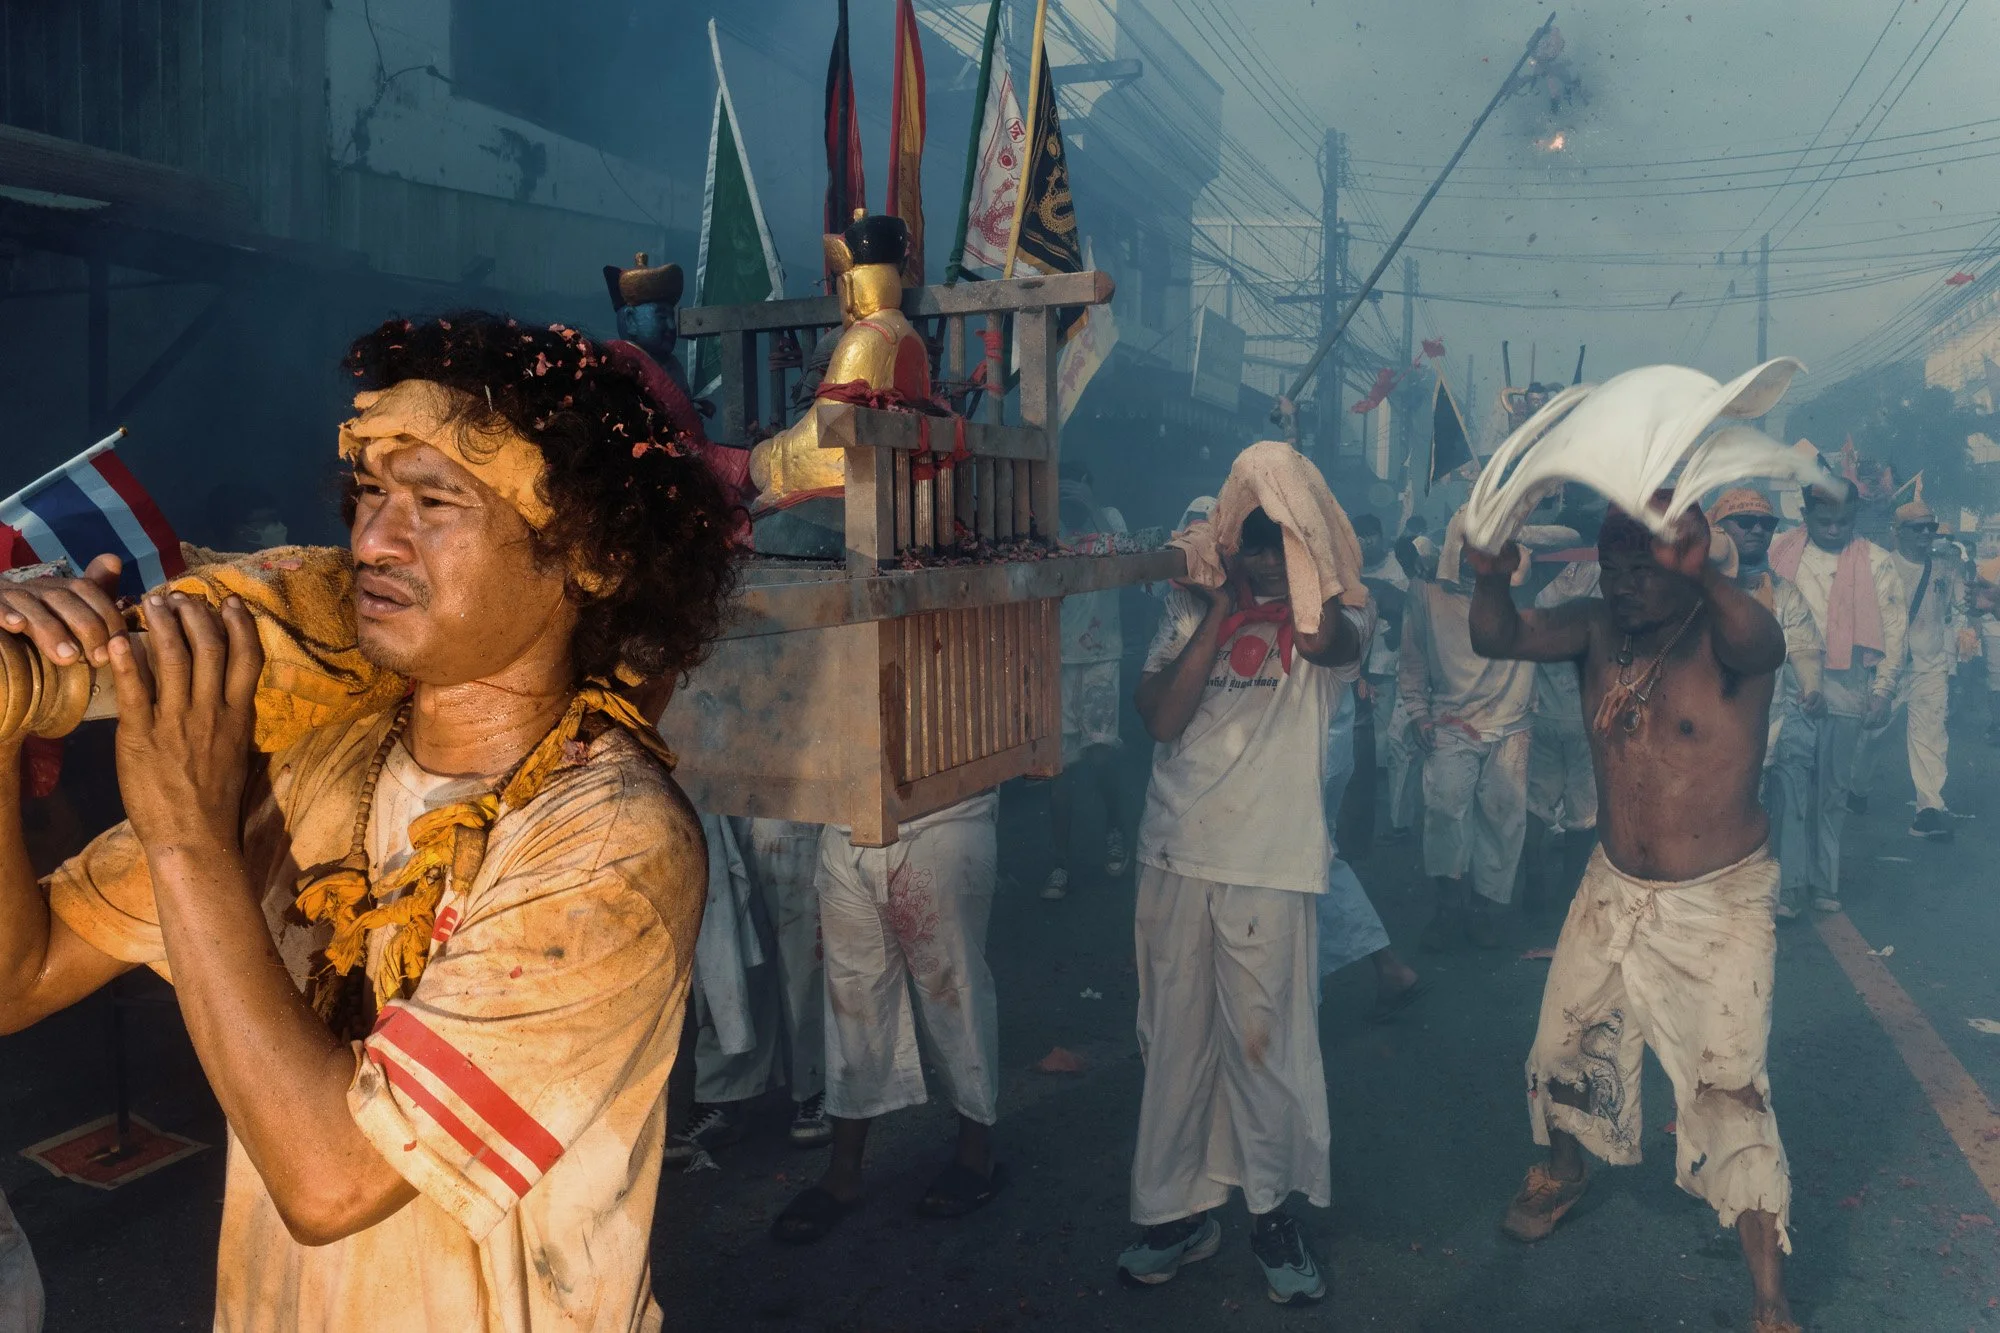
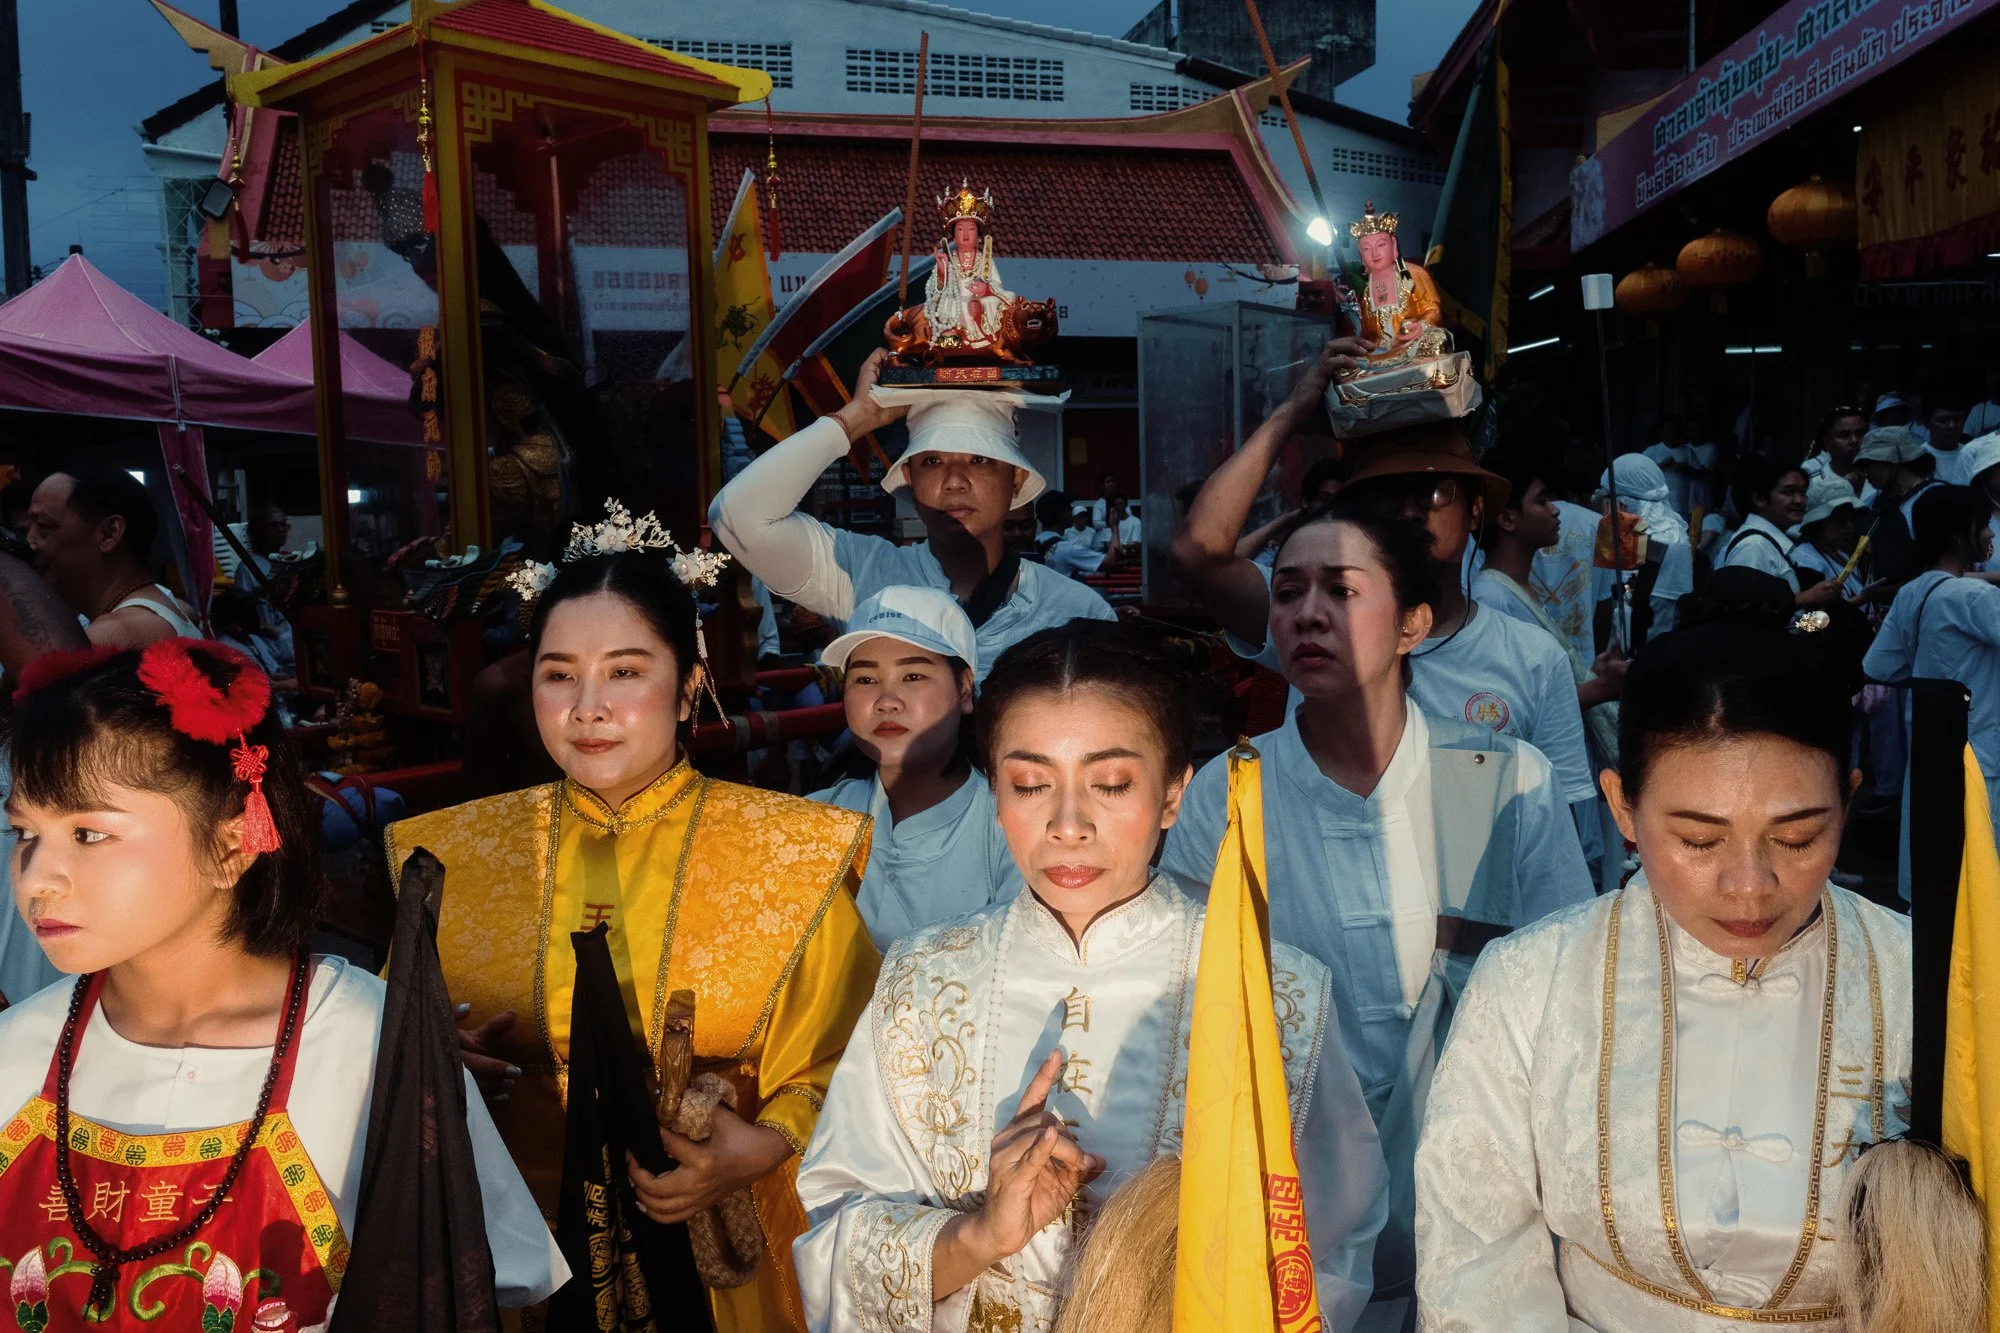
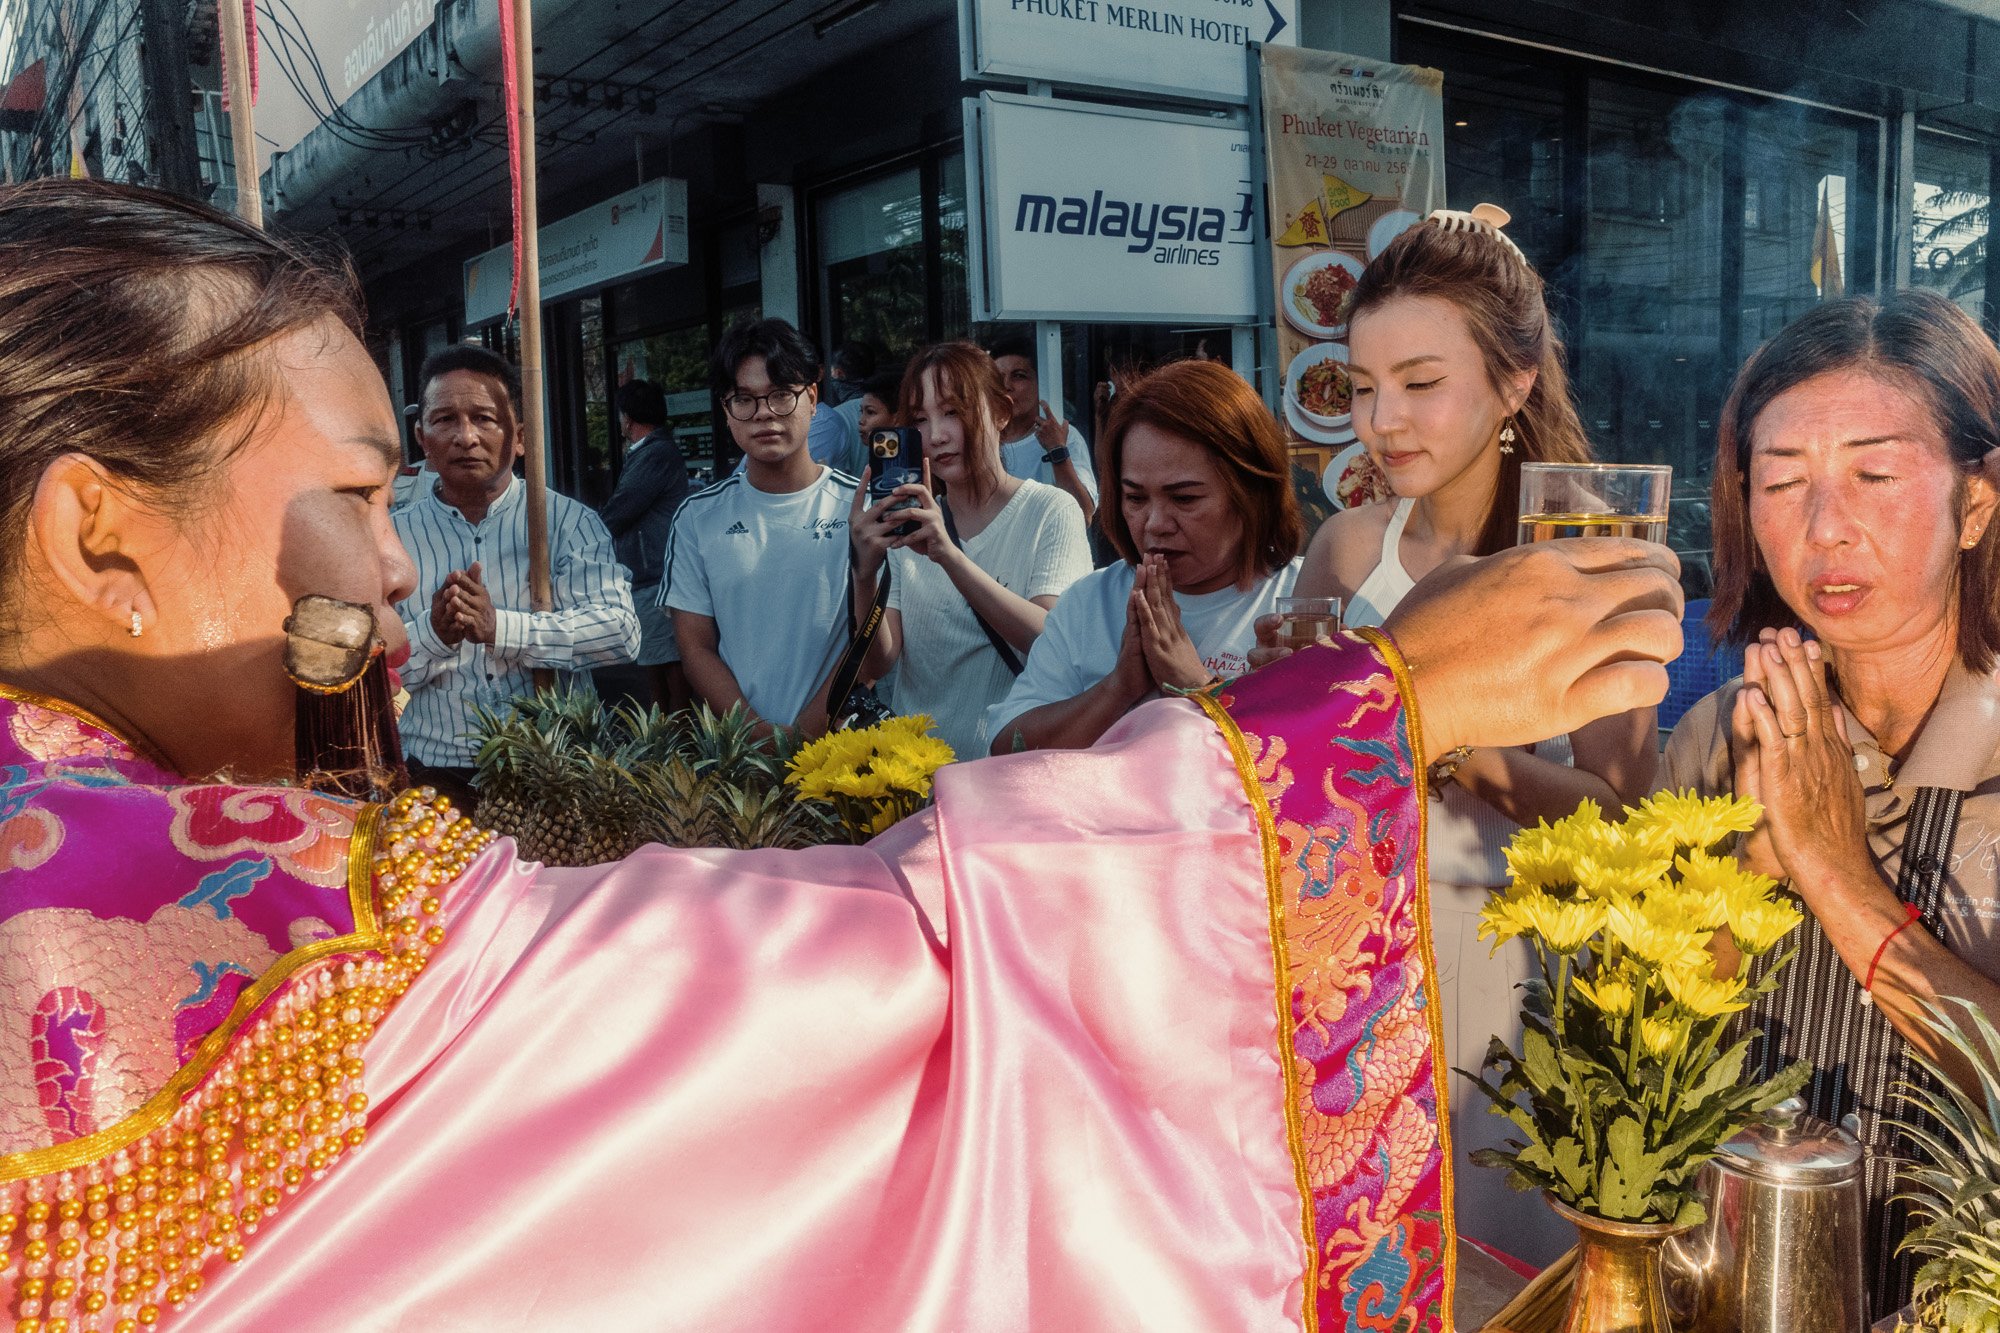
Sending Off the Gods
After walking for more than an hour, which felt much longer, I ended up at the seaside. And once again, I got lucky.
Just as I arrived, the Masongs carrying the main palanquin appeared and walked straight into the water to send off the gods for the year.
I was wearing shoes, but I followed them into the water to get the shots. Later that night, back in my room, I cleaned my shoes. Sand, shells, and an unbelievable smell came out of them. I had to put them in the washing machine the next day. It was bad. Really bad.
After some time, the Masongs returned, and that was officially the end of the festival.
Or so I thought.
67. Leica Q3 - 1/4 - f/11 - ISO1600
68. Leica Q3 - 1/4 - f/11 - ISO1600
69. Leica Q3 - 1/30 - f/11 - ISO1600
70. Leica Q3 - 1/4 - f/8.0 - ISO1600
71. Leica Q3 - 1/4 - f/8.0 - ISO1600
72. Leica Q3 - 0.5 sec - f/8.0 - ISO1600
73. Leica Q3 - 0.5 sec - f/8.0 - ISO1600
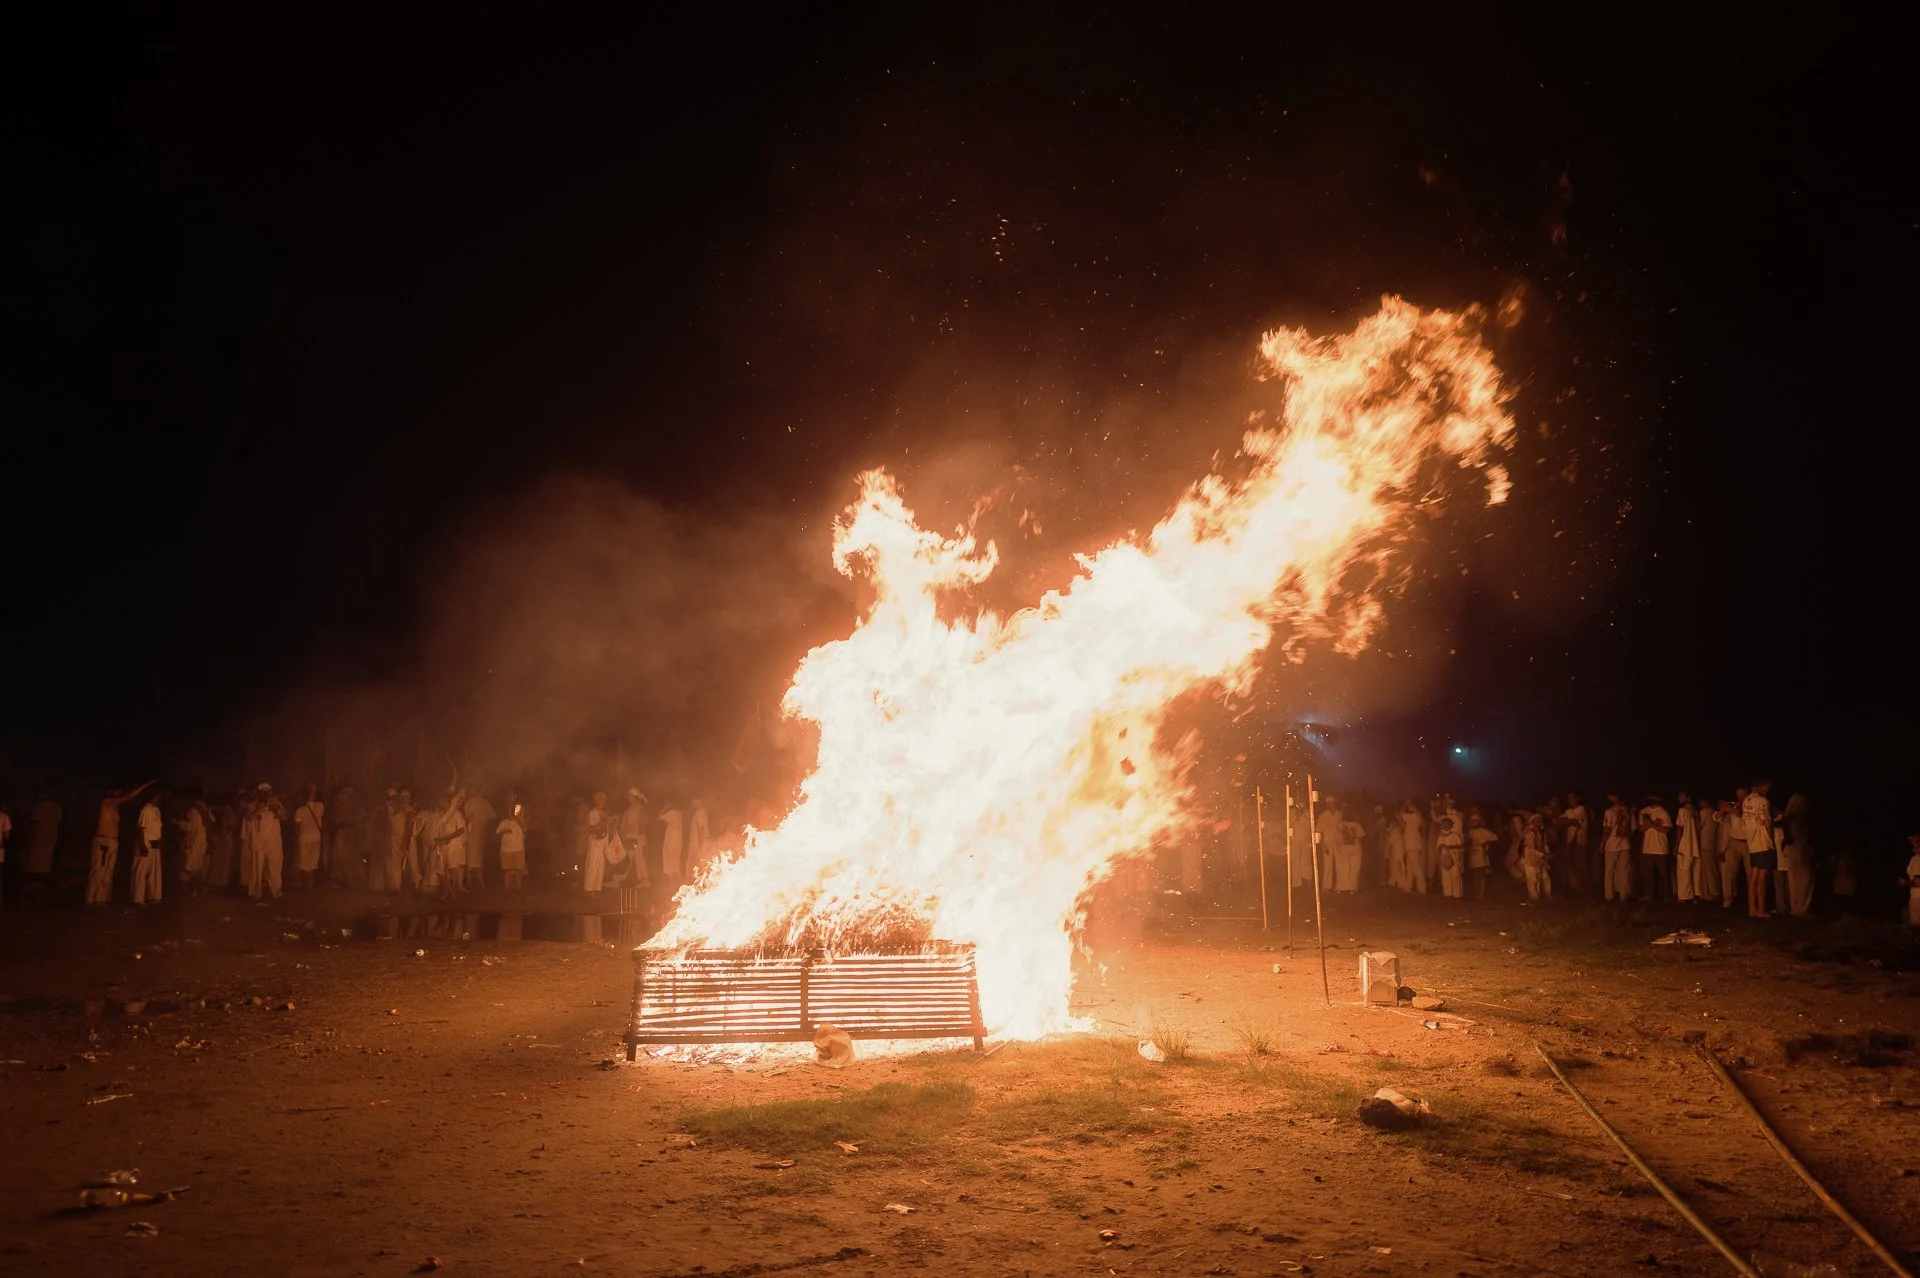
The End of an Unforgettable Journey
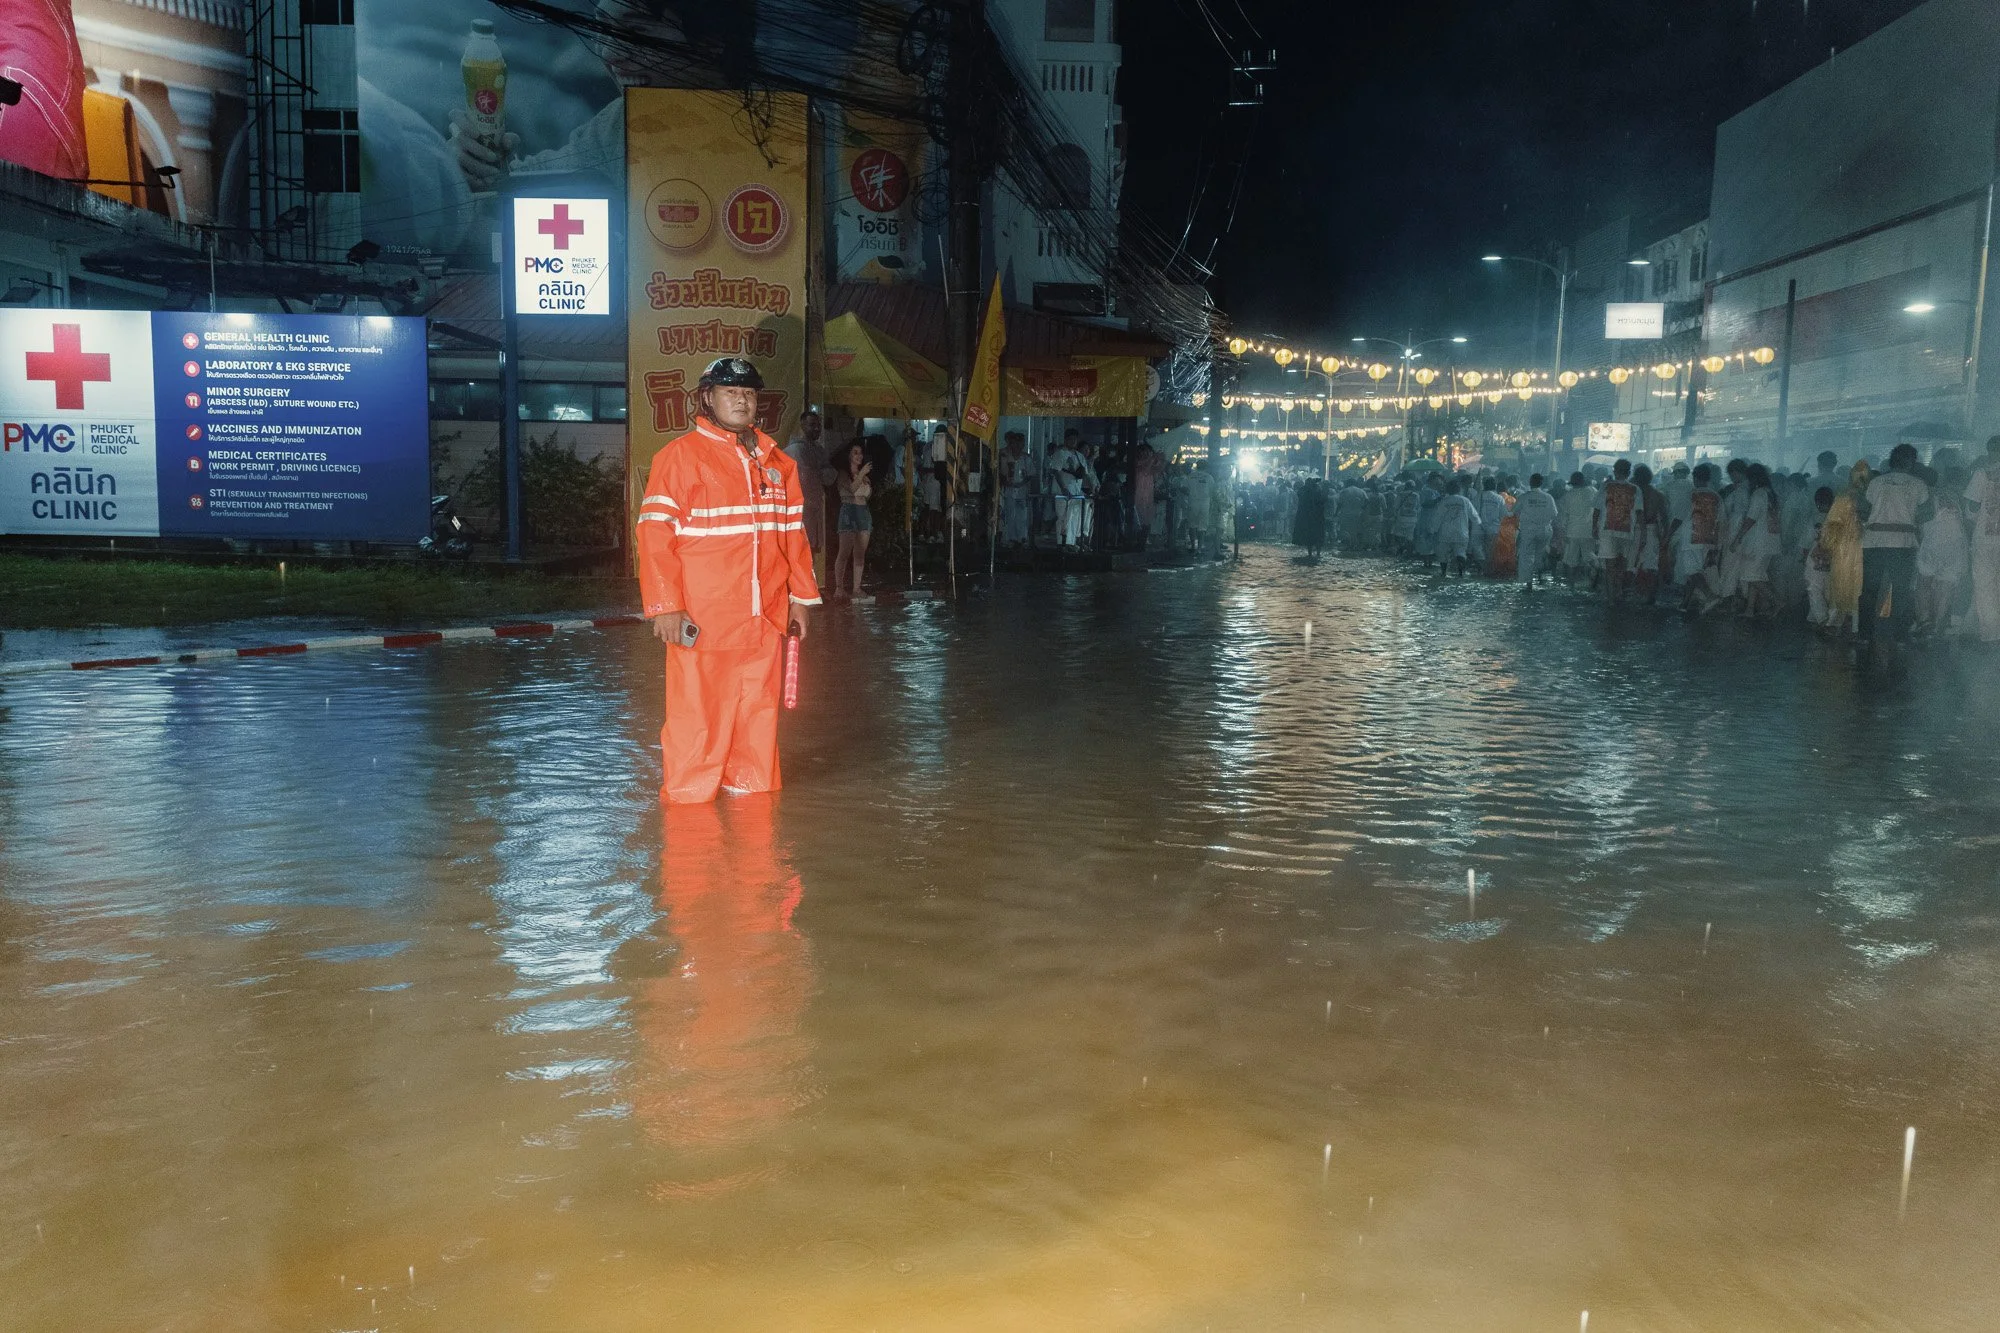
While walking back to call it a night, locals were already cleaning the streets, but the fireworks were still going. From what I heard, they continued for hours, even after the rain started again.
Overall, this year’s Vegetarian Festival was unbelievable.
There were challenges due to heavy rain, and during the festival, the former Thai queen passed away. She was very popular, and her passing had a visible impact. The parades afterward were noticeably calmer.
But regardless of all that, this was one of the best shooting experiences I have ever had. On top of that, I met so many great photographers and had an amazing time connecting with them.
I cannot wait to return next year.
And if at this point you are thinking that you wish you knew how to use flash in street photography, I have you covered. I created a video course where I explain everything you need to know, from getting started with flash to taking your street photography to the next level.
74. Leica Q3 - 1/160 - f/1.7 - ISO100
75. Leica Q3 - 1/8 - f/11 - ISO1600

Street Photography in Phuket Part Three Firecrackers, Rituals and Pure Chaos
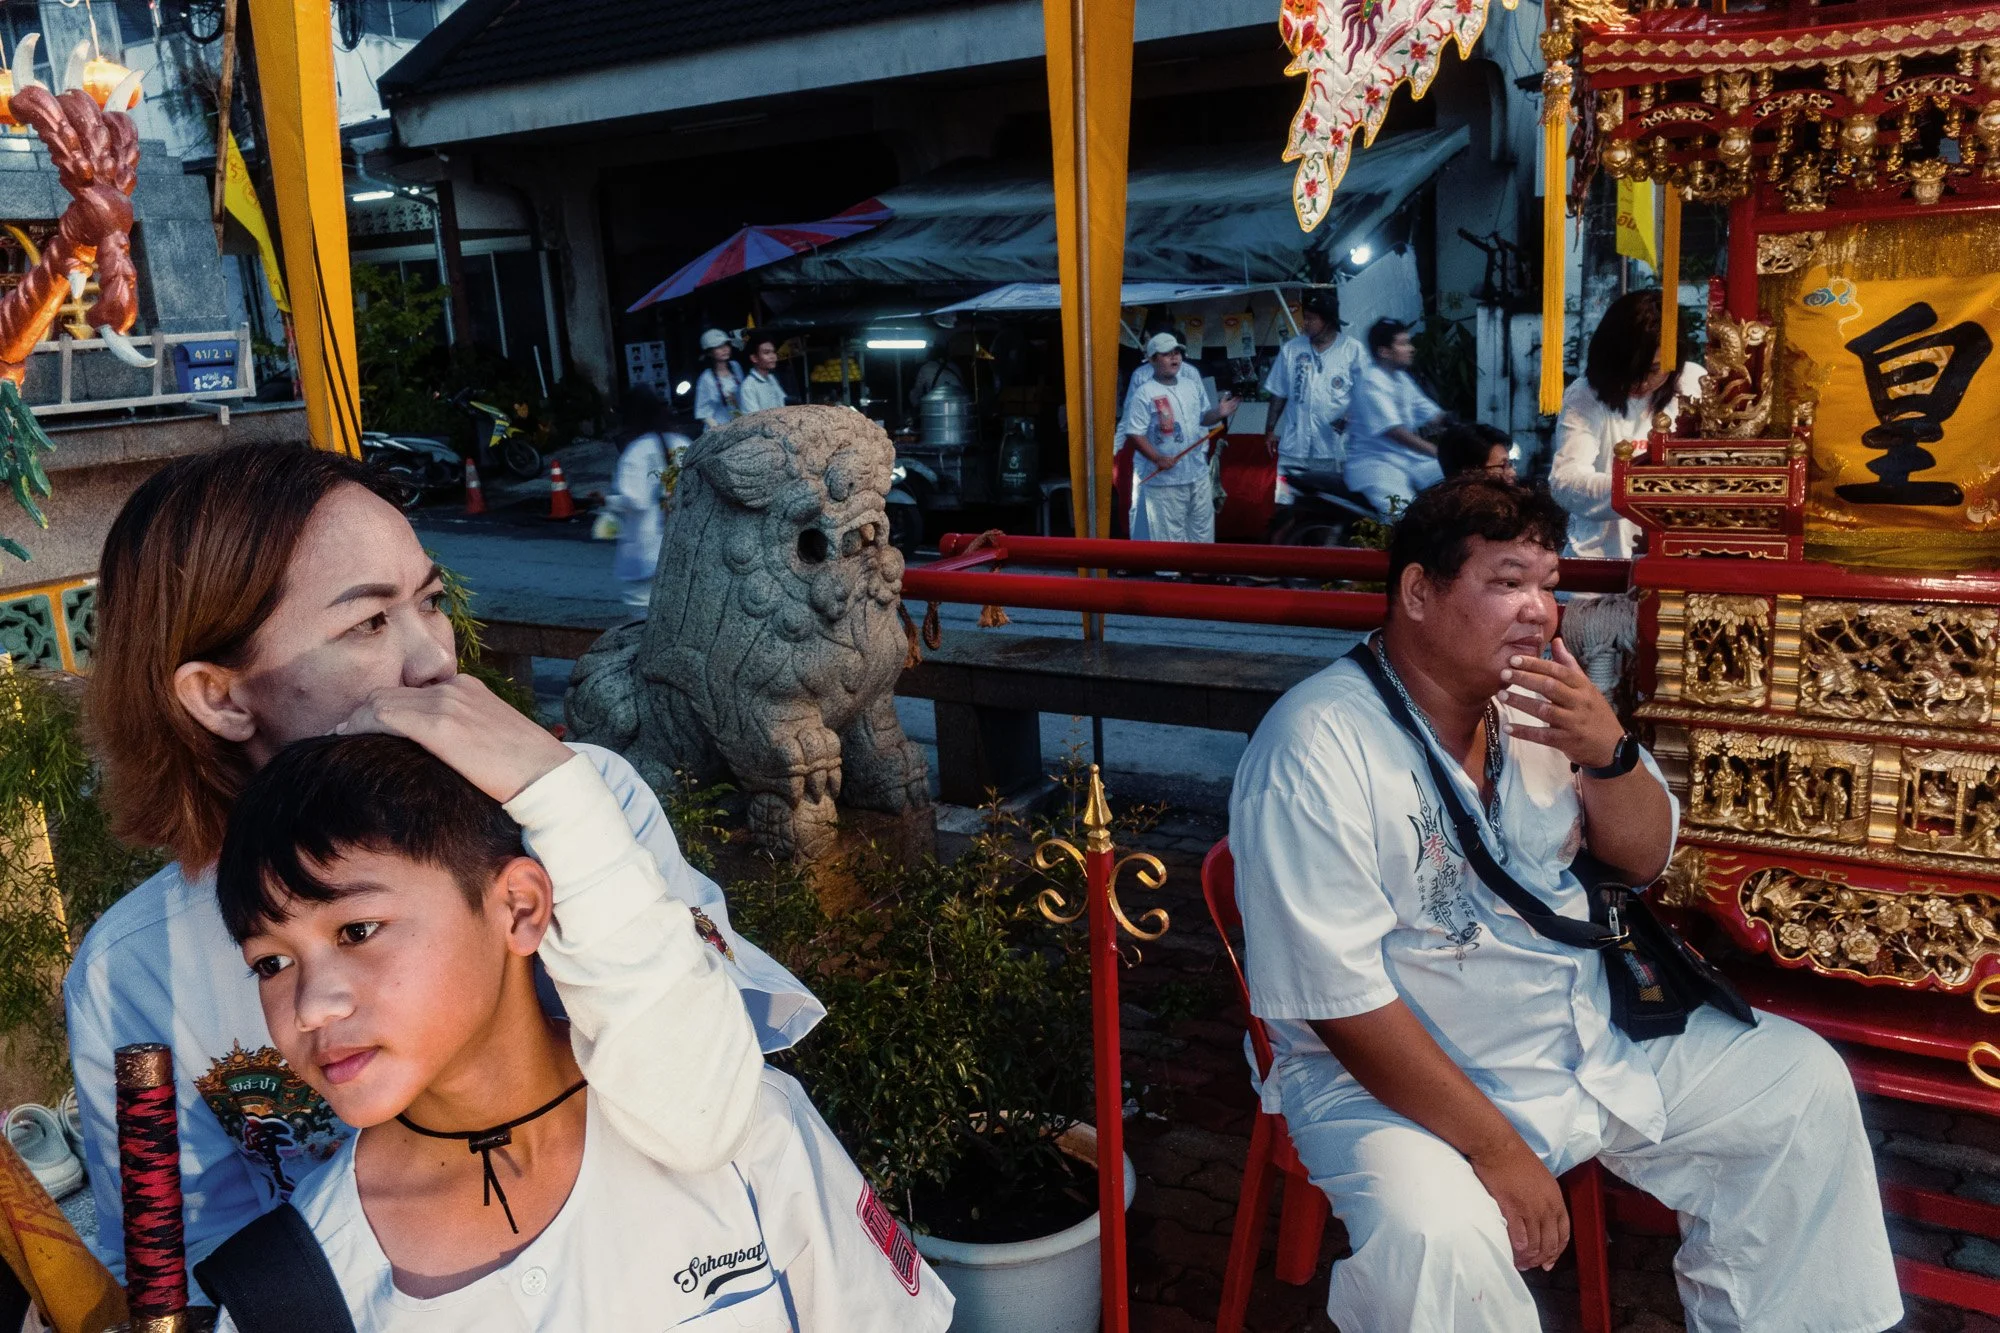
Once again, the day started early before sunrise. That was no surprise anymore. When we arrived at the shrine, it was already packed with people despite the early hour.
Since this is one of the main shrines in Phuket, there were also a lot of photographers around. Most of them were focused on capturing the Masongs during the piercing rituals. Because of how crowded it was, I did not shoot much at first. It was difficult to get clean frames, and sometimes it makes more sense to wait rather than force shots.

1. Ricoh GRIV - 1/15 - f/11 - ISO800
When the Parade Kicks Off
Not long after, the parade started and it kicked off with a bang. Literally. Even though there were already many people watching, that was nothing compared to what was about to come later.
2. Ricoh GRIV - 1/125 - f/11 - ISO800
3. Ricoh GRIV - 1/80 - f/11 - ISO800
Some of the Masongs took a detour to the seaside to perform a ritual. Unfortunately, I am not sure what it was about since I do not speak the language. I also did not want to disturb them, so I kept my distance and skipped close up shots.

4. Ricoh GRIV - 1/800 - f/11 - ISO800
5. Ricoh GRIV - 1/320 - f/11 - ISO800
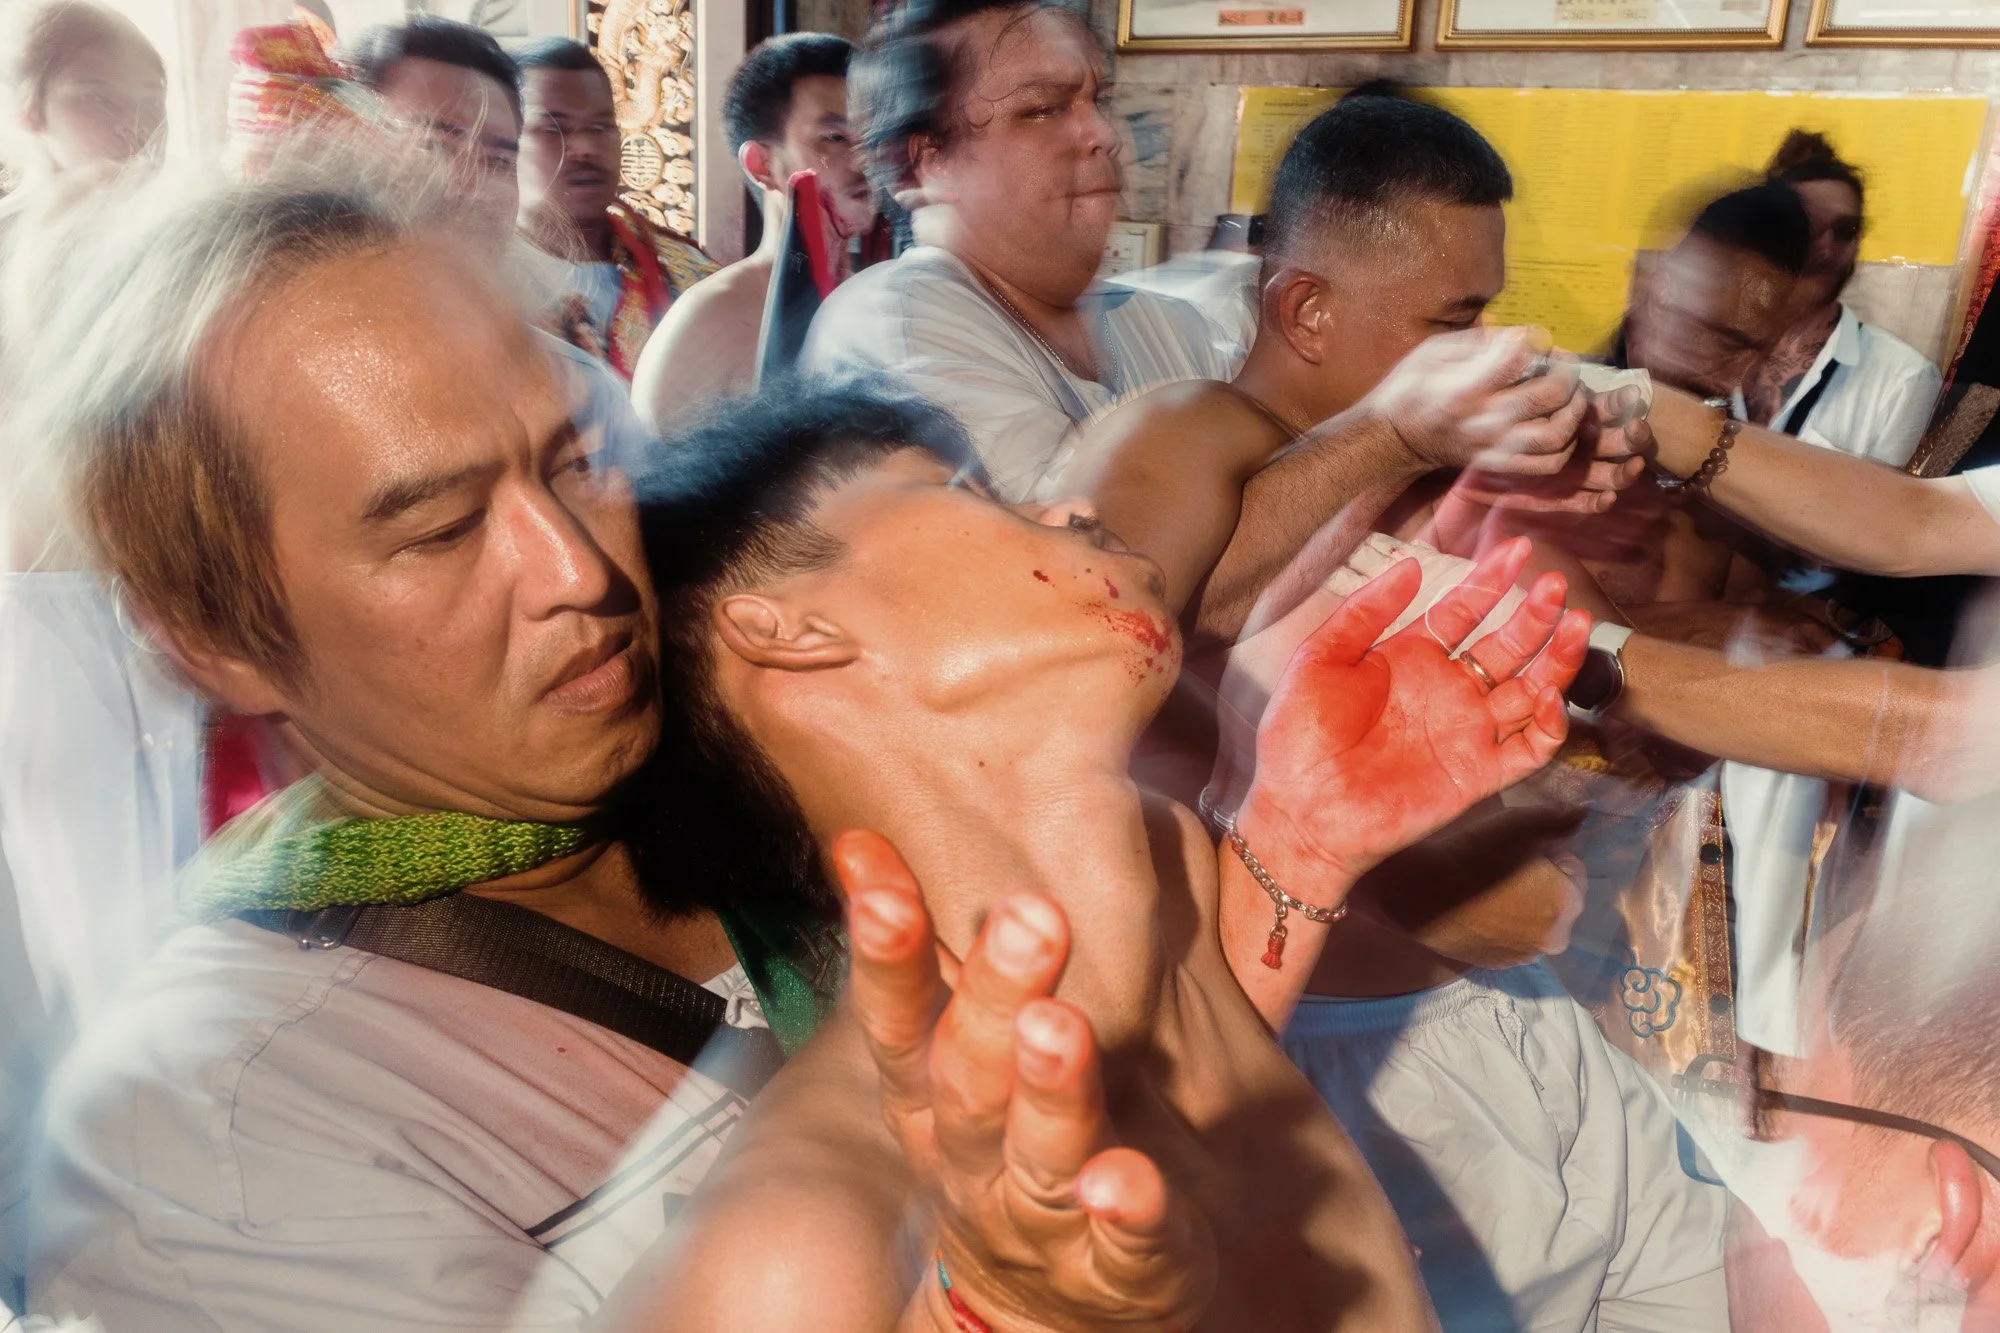
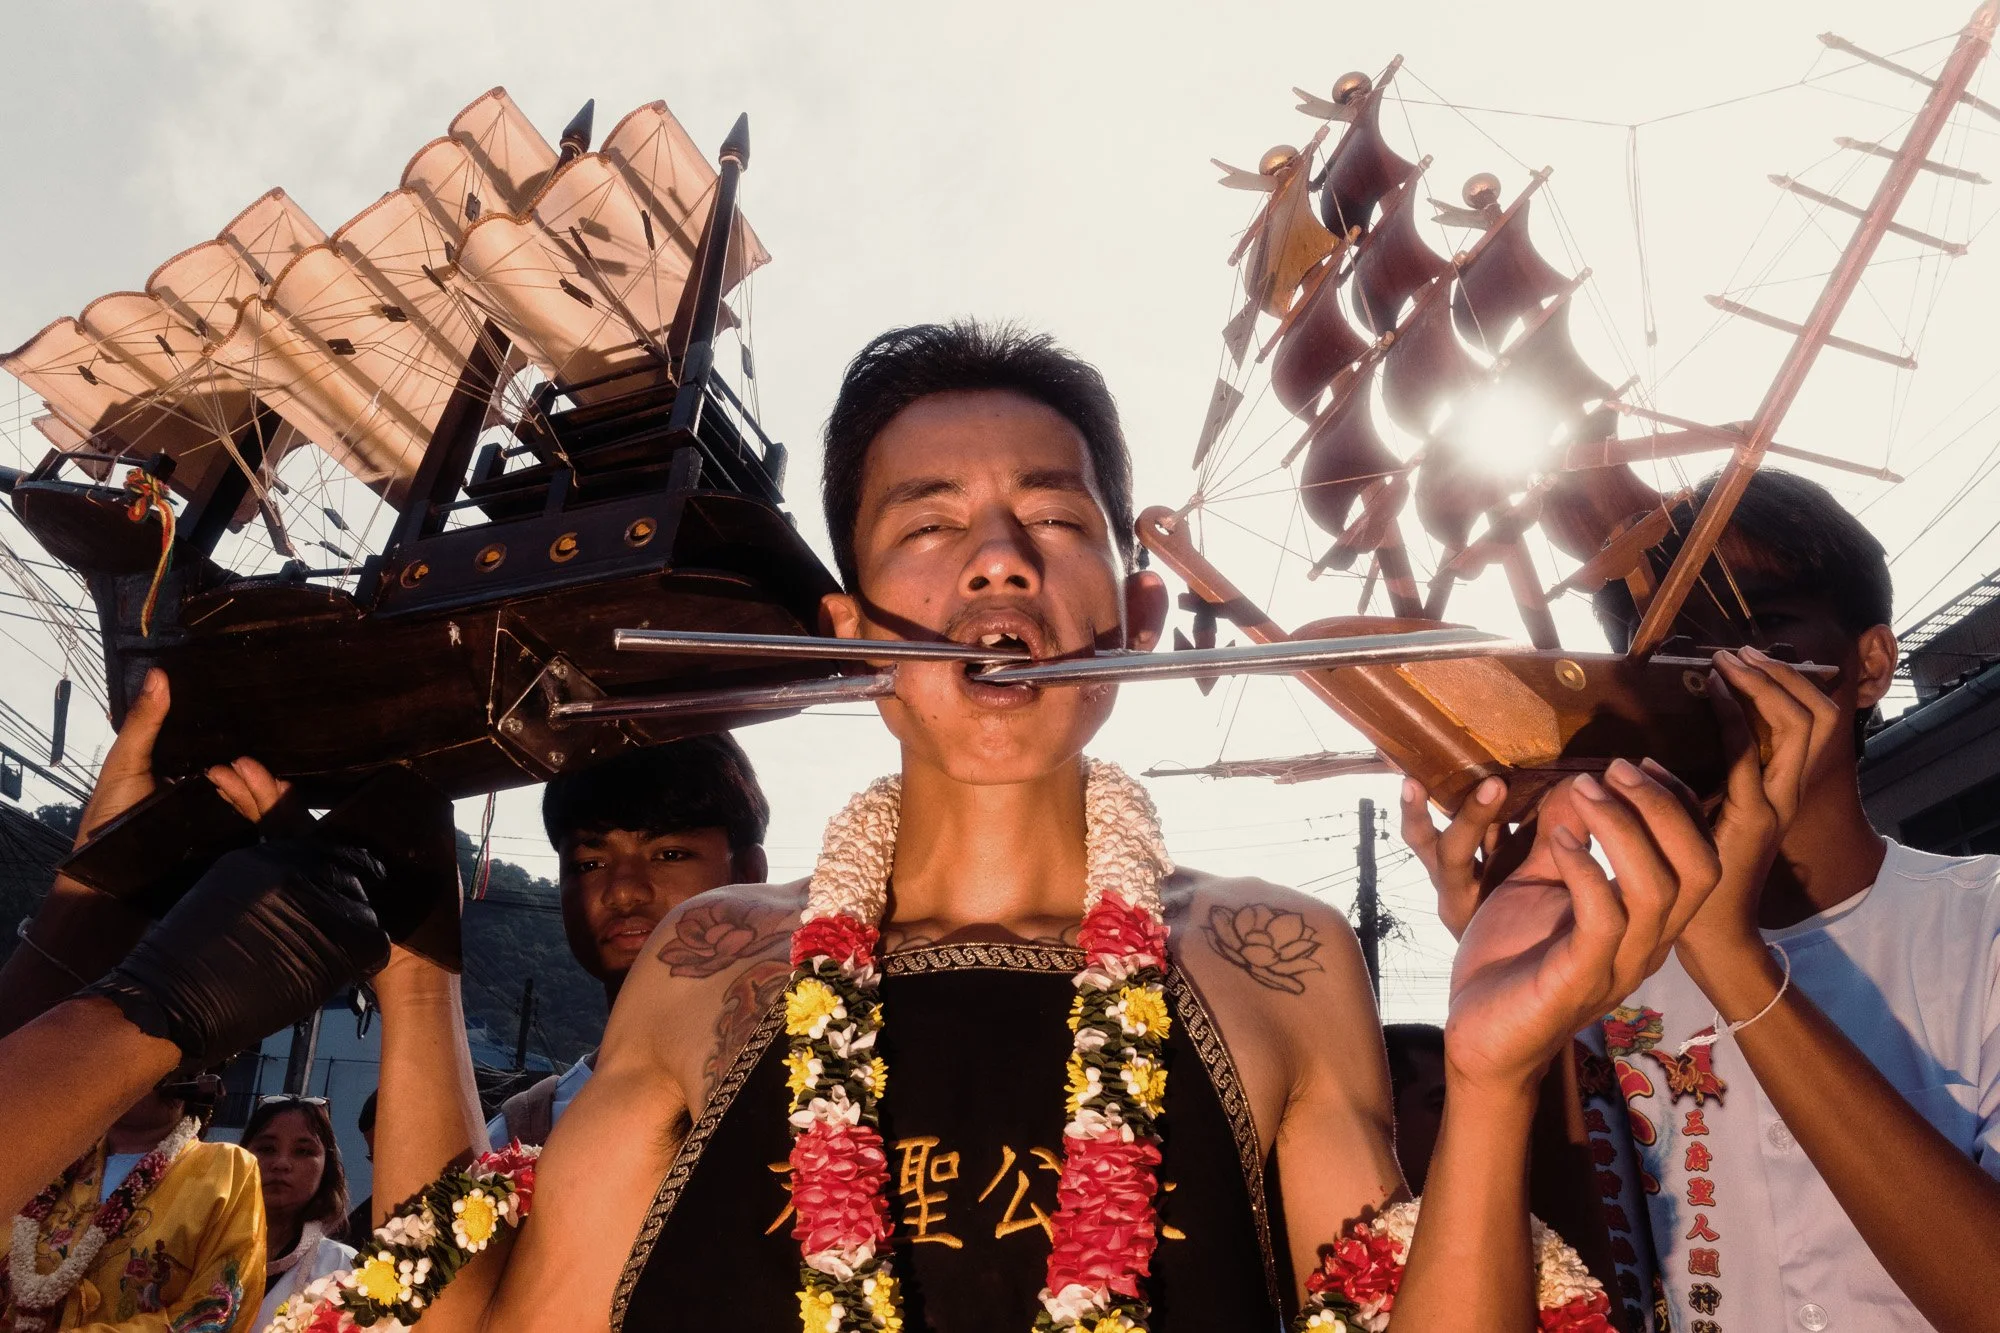
When I caught up with the rest of the parade, things escalated very quickly. There was so much going on that it was hard to keep track of everything. I did take some close up images of the more extreme moments that I can show here but they are a bit too intense for YouTube.
6. Ricoh GRIV - 1/1000 - f/11 - ISO800
At certain spots, I noticed Masongs waiting along the route. I am not sure why, but visually it made for an interesting scene. Masongs standing still, people sitting behind them, and a Western guy casually sipping his drink in the middle of it all.

7. Ricoh GRIV - 1/640 - f/11 - ISO800
This is exactly why it is important not to focus only on the obvious moments. Some of the best images happen on the sidelines.
8. Ricoh GRIV - 1/320 - f/11 - ISO800
It is hard to imagine what these Masongs endure to get their piercings. The one in the middle of this scene looked like he could be a sailor, but who knows.

9. Ricoh GRIV - 1/800 - f/11 - ISO800
Watching the Parade from the Edges
Along the streets, people were watching the parade go by. Some covered their ears to protect themselves from the constant explosions of the firecrackers.
10. Ricoh GRIV - 1/320 - f/11 - ISO200
11. Ricoh GRIV - 1/800 - f/11 - ISO200
12. Ricoh GRIV - 1/400 - f/11 - ISO200
I noticed an elderly woman sitting next to the parade route. Maybe she was waiting for a Masong to stop and bless her, to rid her of evil spirits.
13. Ricoh GRIV - 1/200 - f/11 - ISO200
One image in particular sums up the madness for me. Firecrackers exploding in every direction, smoke filling the frame, and everything happening in the blink of an eye.
14. Ricoh GRIV - 1/500 - f/11 - ISO200
One elderly Masong stood out to me during this parade. He was full of energy and moved with incredible confidence. I saw him multiple times that day, and every time he impressed me. Truly amazing to watch.

15. Ricoh GRIV - 1/320 - f/11 - ISO200
16. Ricoh GRIV - 1/160 - f/11 - ISO200
That day, there were an incredible number of spectators. It really showed how important this festival is for the local community. In another moment, I captured a group of people watching the parade together. It looked like a whole family, multiple generations all sharing the same experience.
17. Ricoh GRIV - 1/200 - f/11 - ISO200
In the old town center, the firecrackers were especially intense. The men carrying the palanquins were absolutely bombarded. Smoke everywhere, explosions nonstop, and hardly any visibility at times. At one point, bystanders stacked a massive amount of firecrackers on top of a palanquin. The reason was simple. The crew carrying it wanted to take a selfie while the firecrackers went off. Absolute madness.
18. Ricoh GRIV - 1/200 - f/11 - ISO200

19. Ricoh GRIV - 1/200 - f/11 - ISO200
20. Ricoh GRIV - 1/200 - f/11 - ISO200
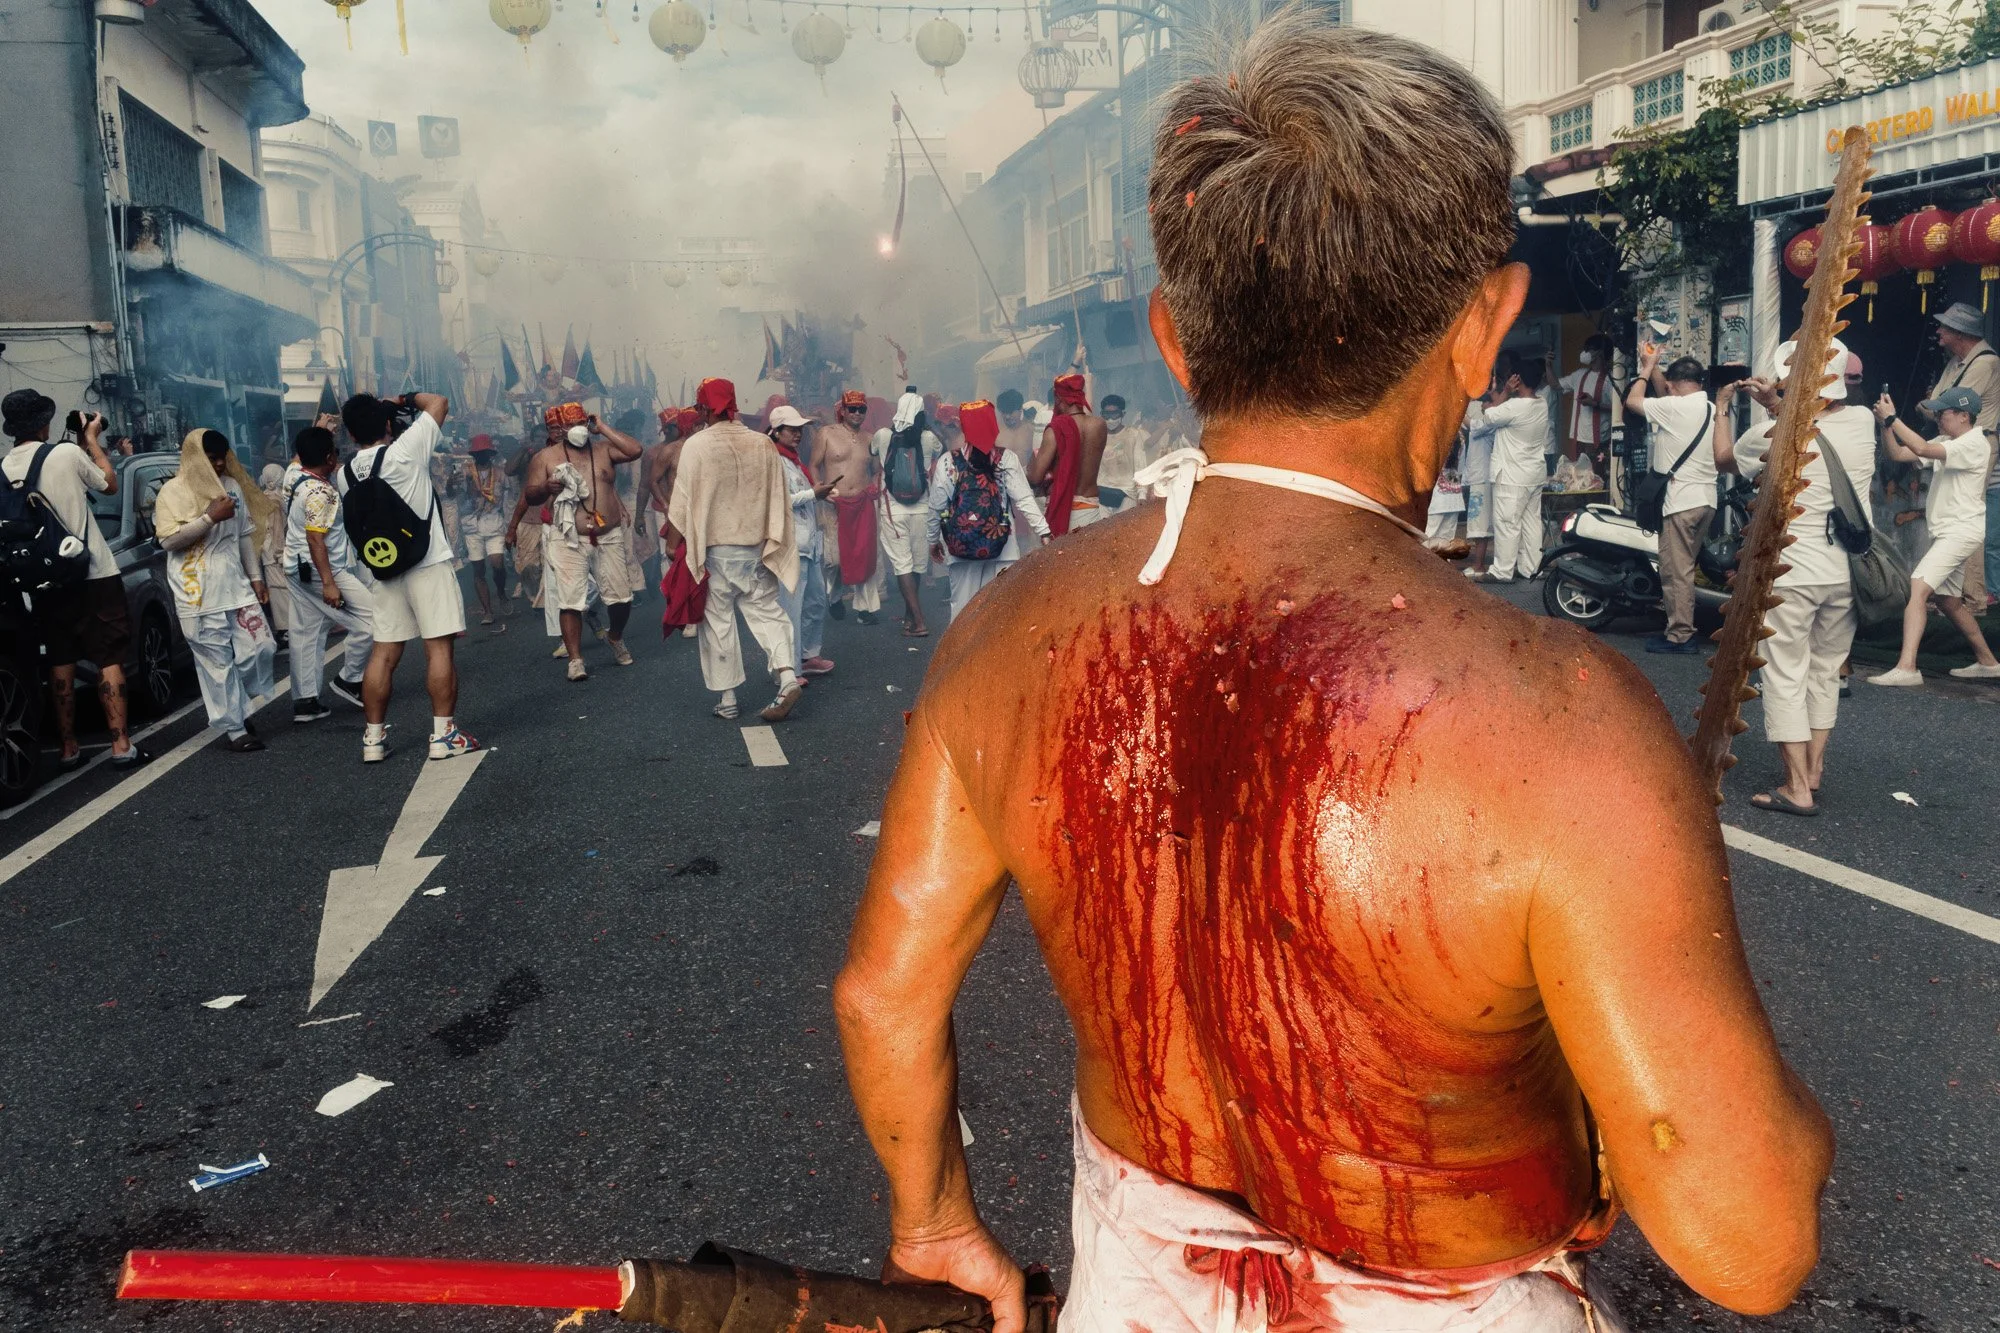
21. Ricoh GRIV - 1/320 - f/11 - ISO200
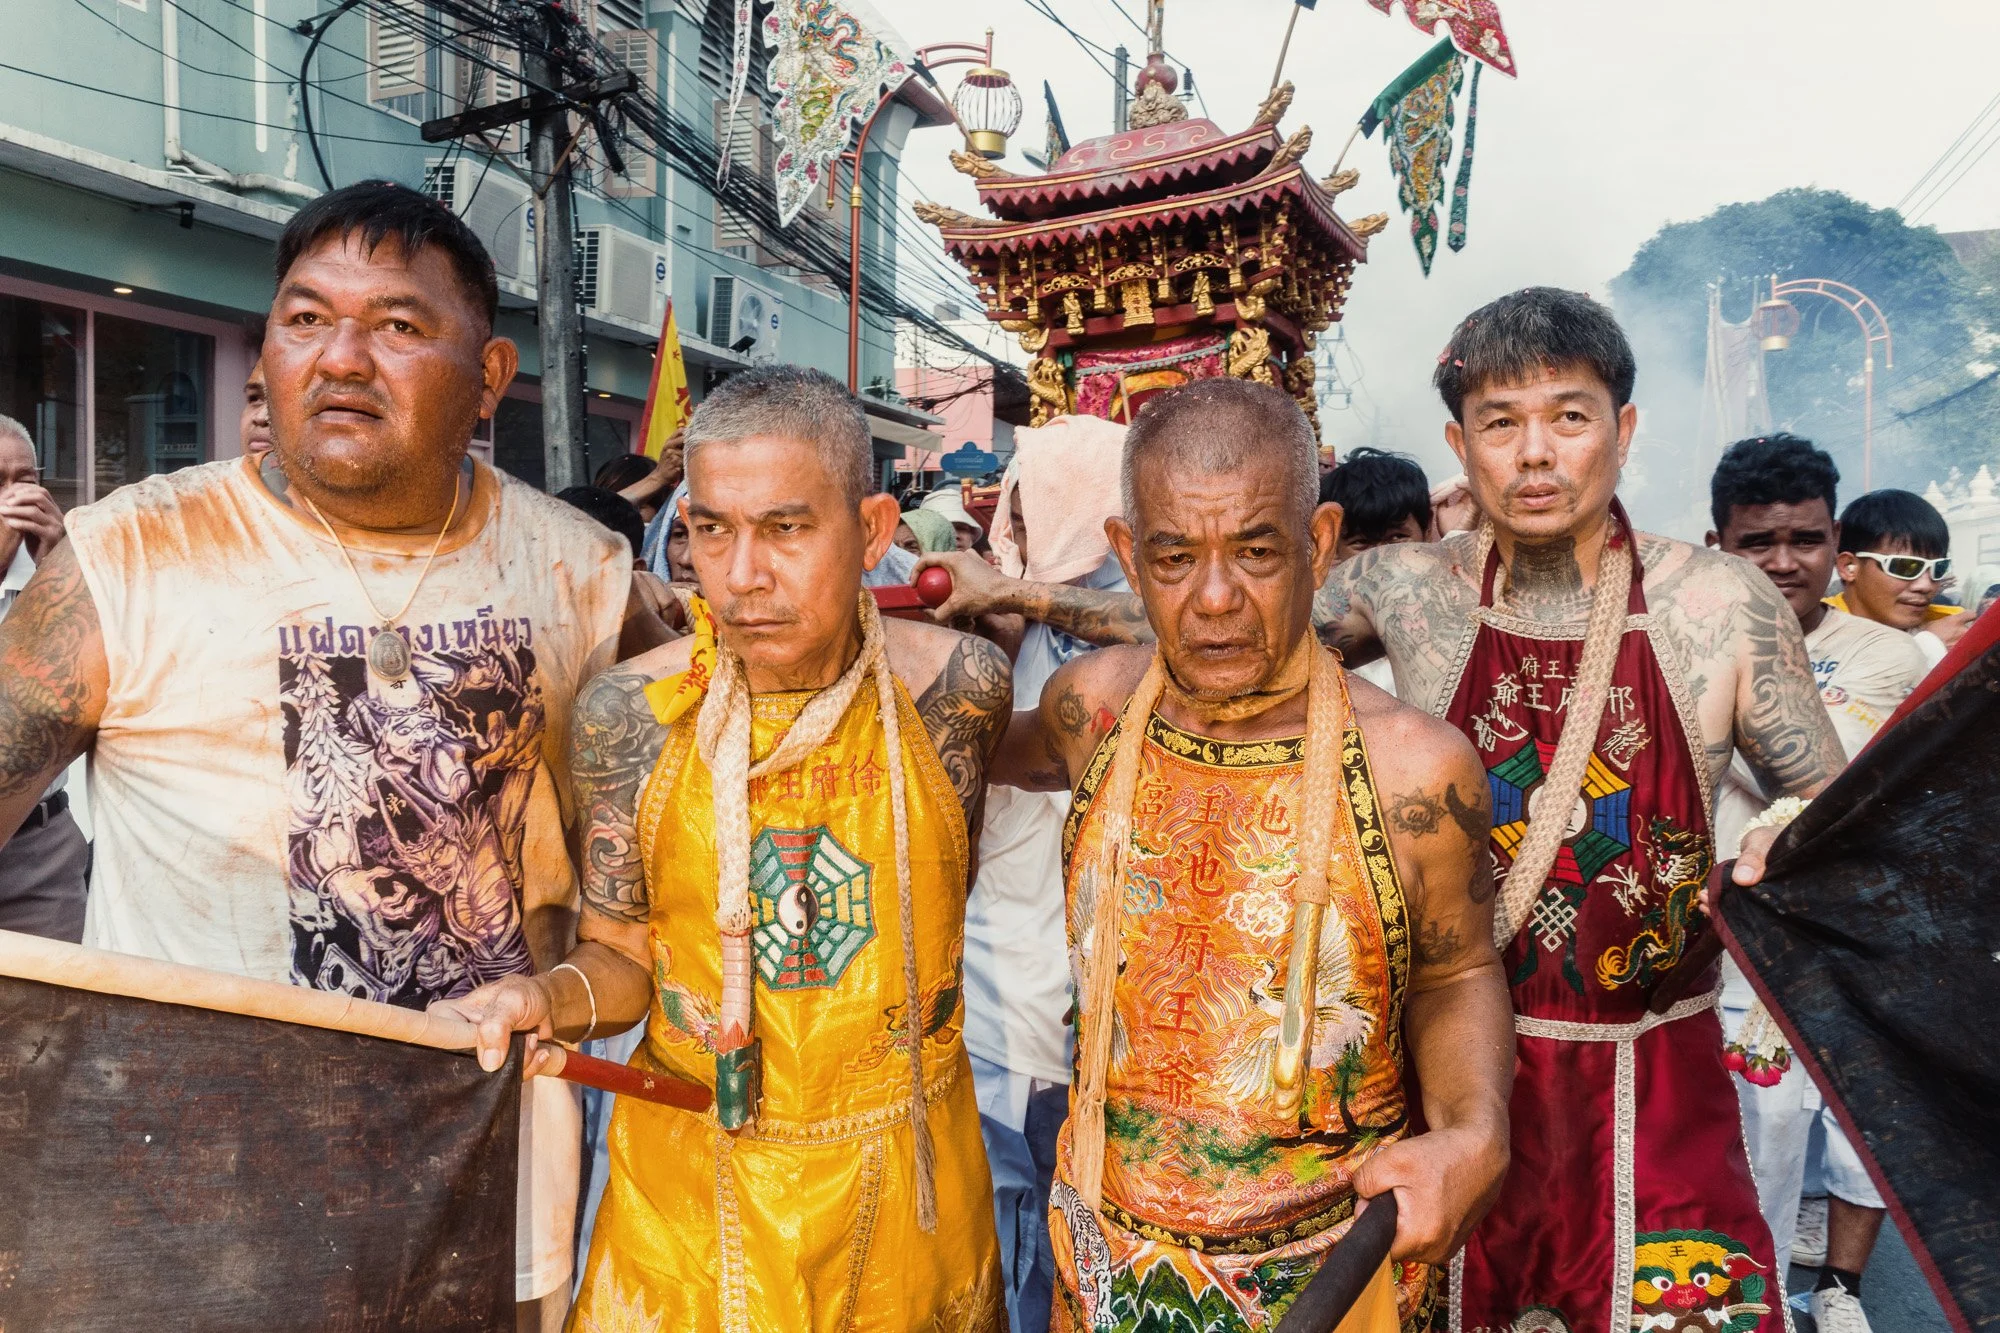
Jui Tui Shrine Before Sunrise
The next day we headed to Jui Tui Shrine, the most important shrine in Phuket. As expected, it was extremely crowded. Still, I managed to get a few images before the parade started.

22. Ricoh GRIV - 1/6 - f/8.0 - ISO800
One Masong entered a trance and prepared himself for the ritual before being pierced. Outside, a group of female Masongs were getting ready for the parade. Nearby, another Masong was patiently waiting for his turn to enter the shrine.

23. Ricoh GRIV - 1/6 - f/8.0 - ISO800
24. Ricoh GRIV - 1/250 - f/9.0 - ISO800
25. Ricoh GRIV - 1/13 - f/9.0 - ISO800
Then I spotted something I had never seen before. A Masong completely covered in gold paint. Even without a piercing, he stood out immediately.

26. Ricoh GRIV - 1/6 - f/9.0 - ISO800
The Final Parade and a Quiet Ending
When the parade began, I saw a Masong blessing people right in the middle of the road.
This parade was wild again, with lots of firecrackers, but this time I tried to stay out of the chaos as much as possible.
27. Ricoh GRIV - 1/640 - f/11 - ISO400
28. Ricoh GRIV - 1/320 - f/11 - ISO400
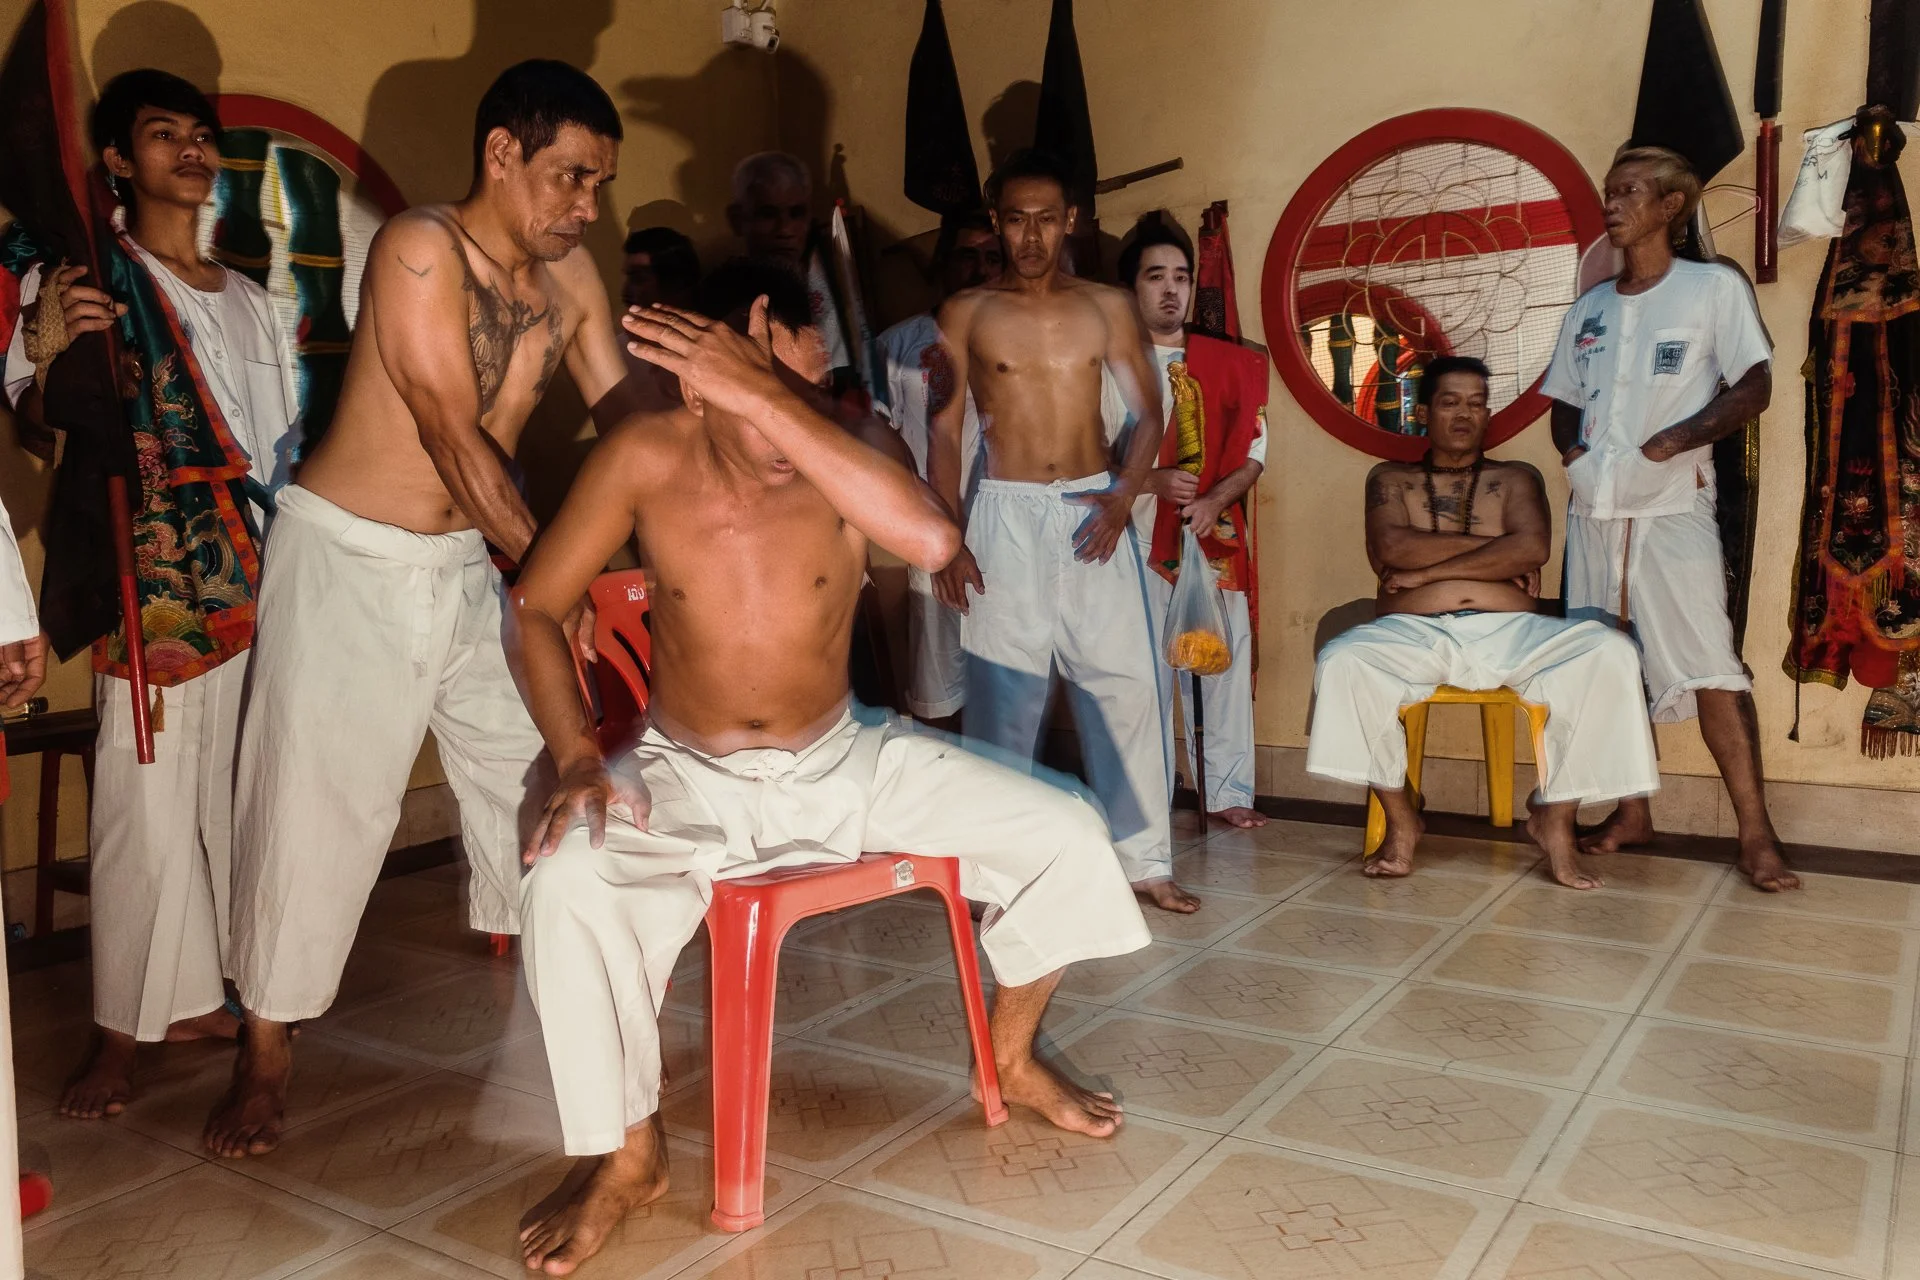
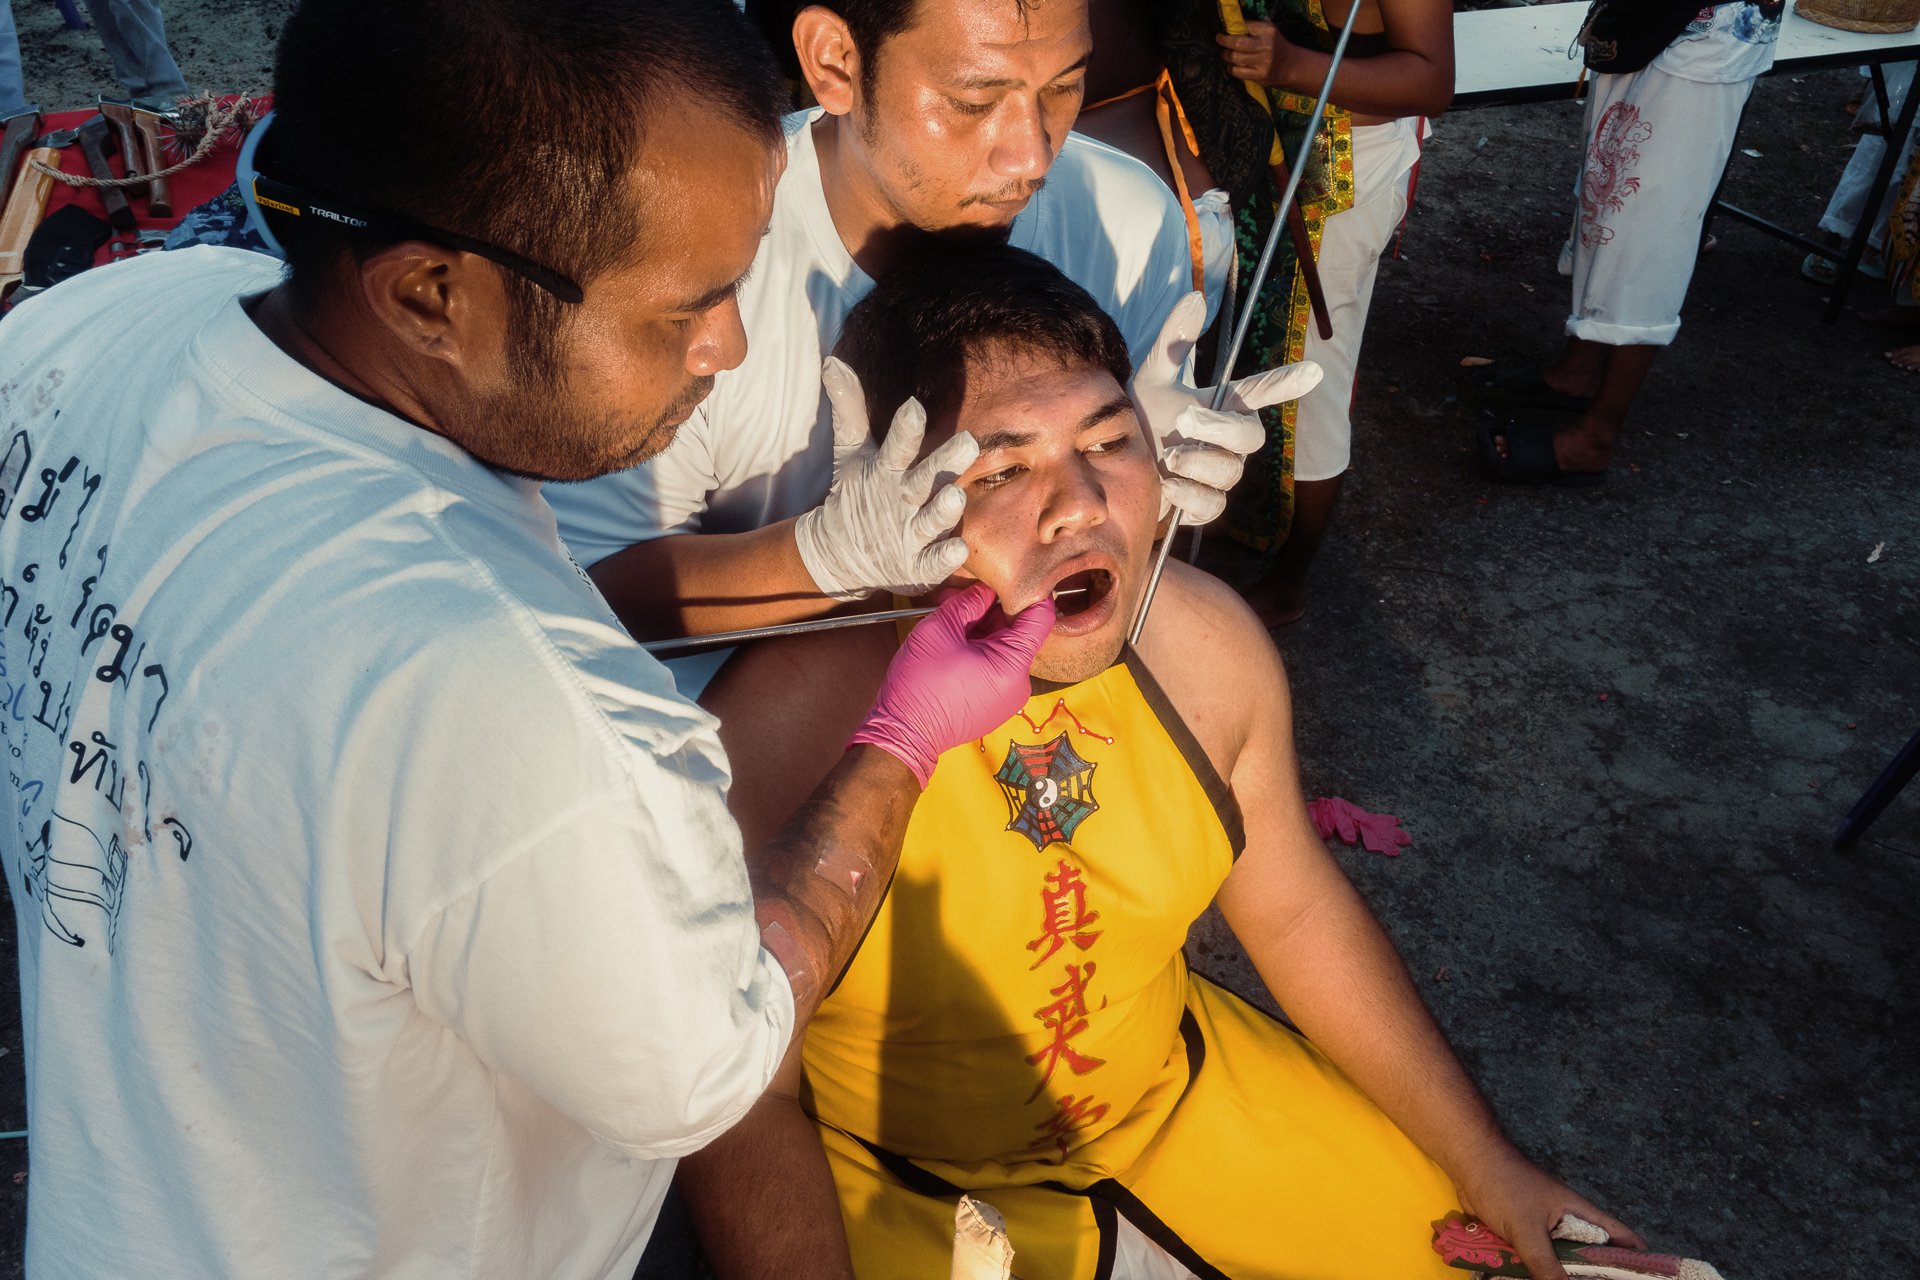
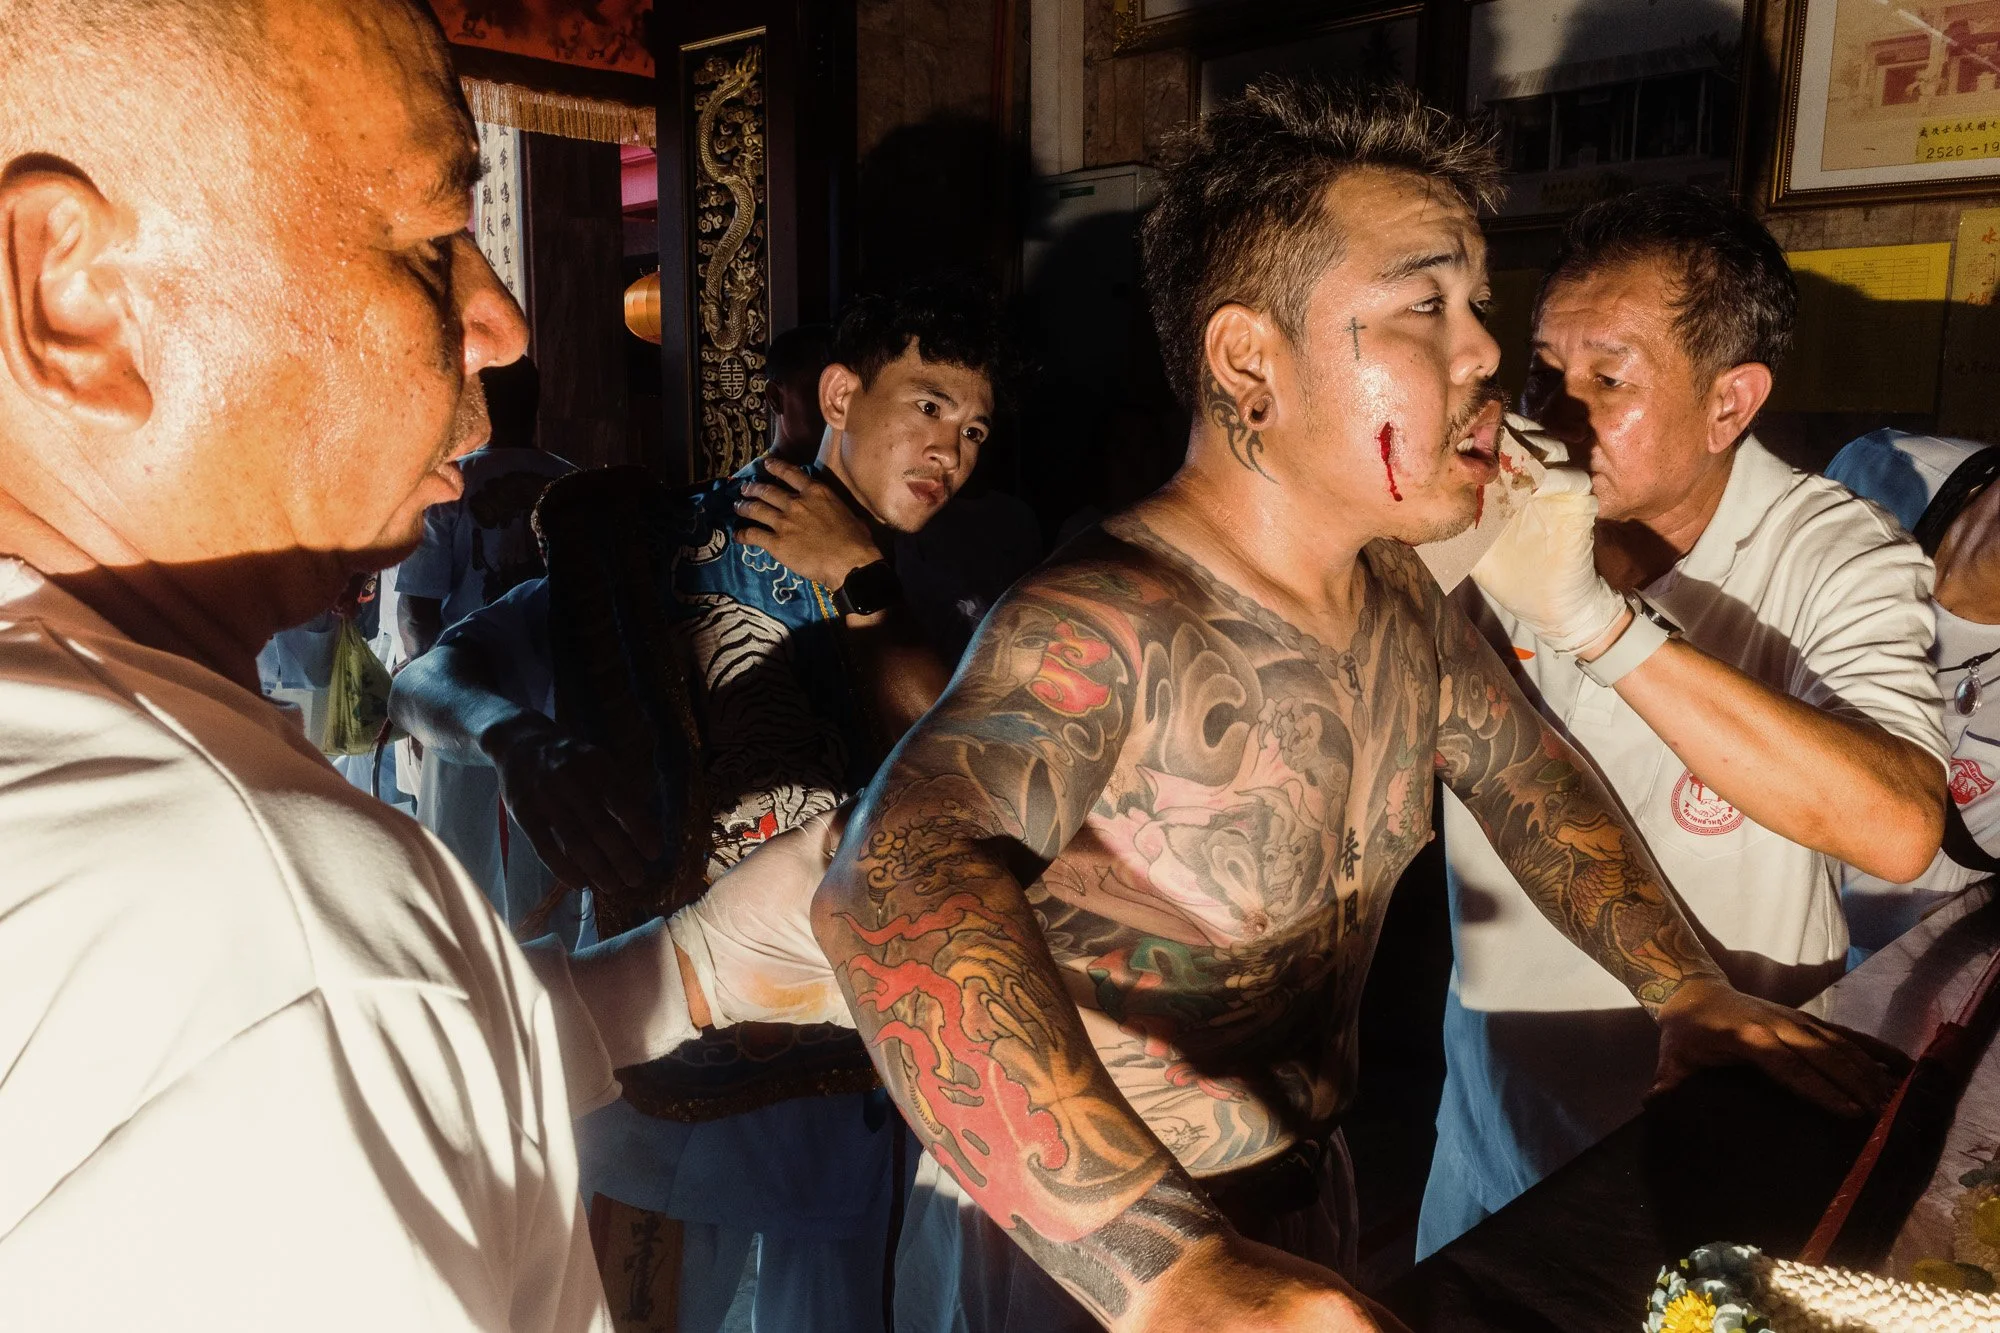
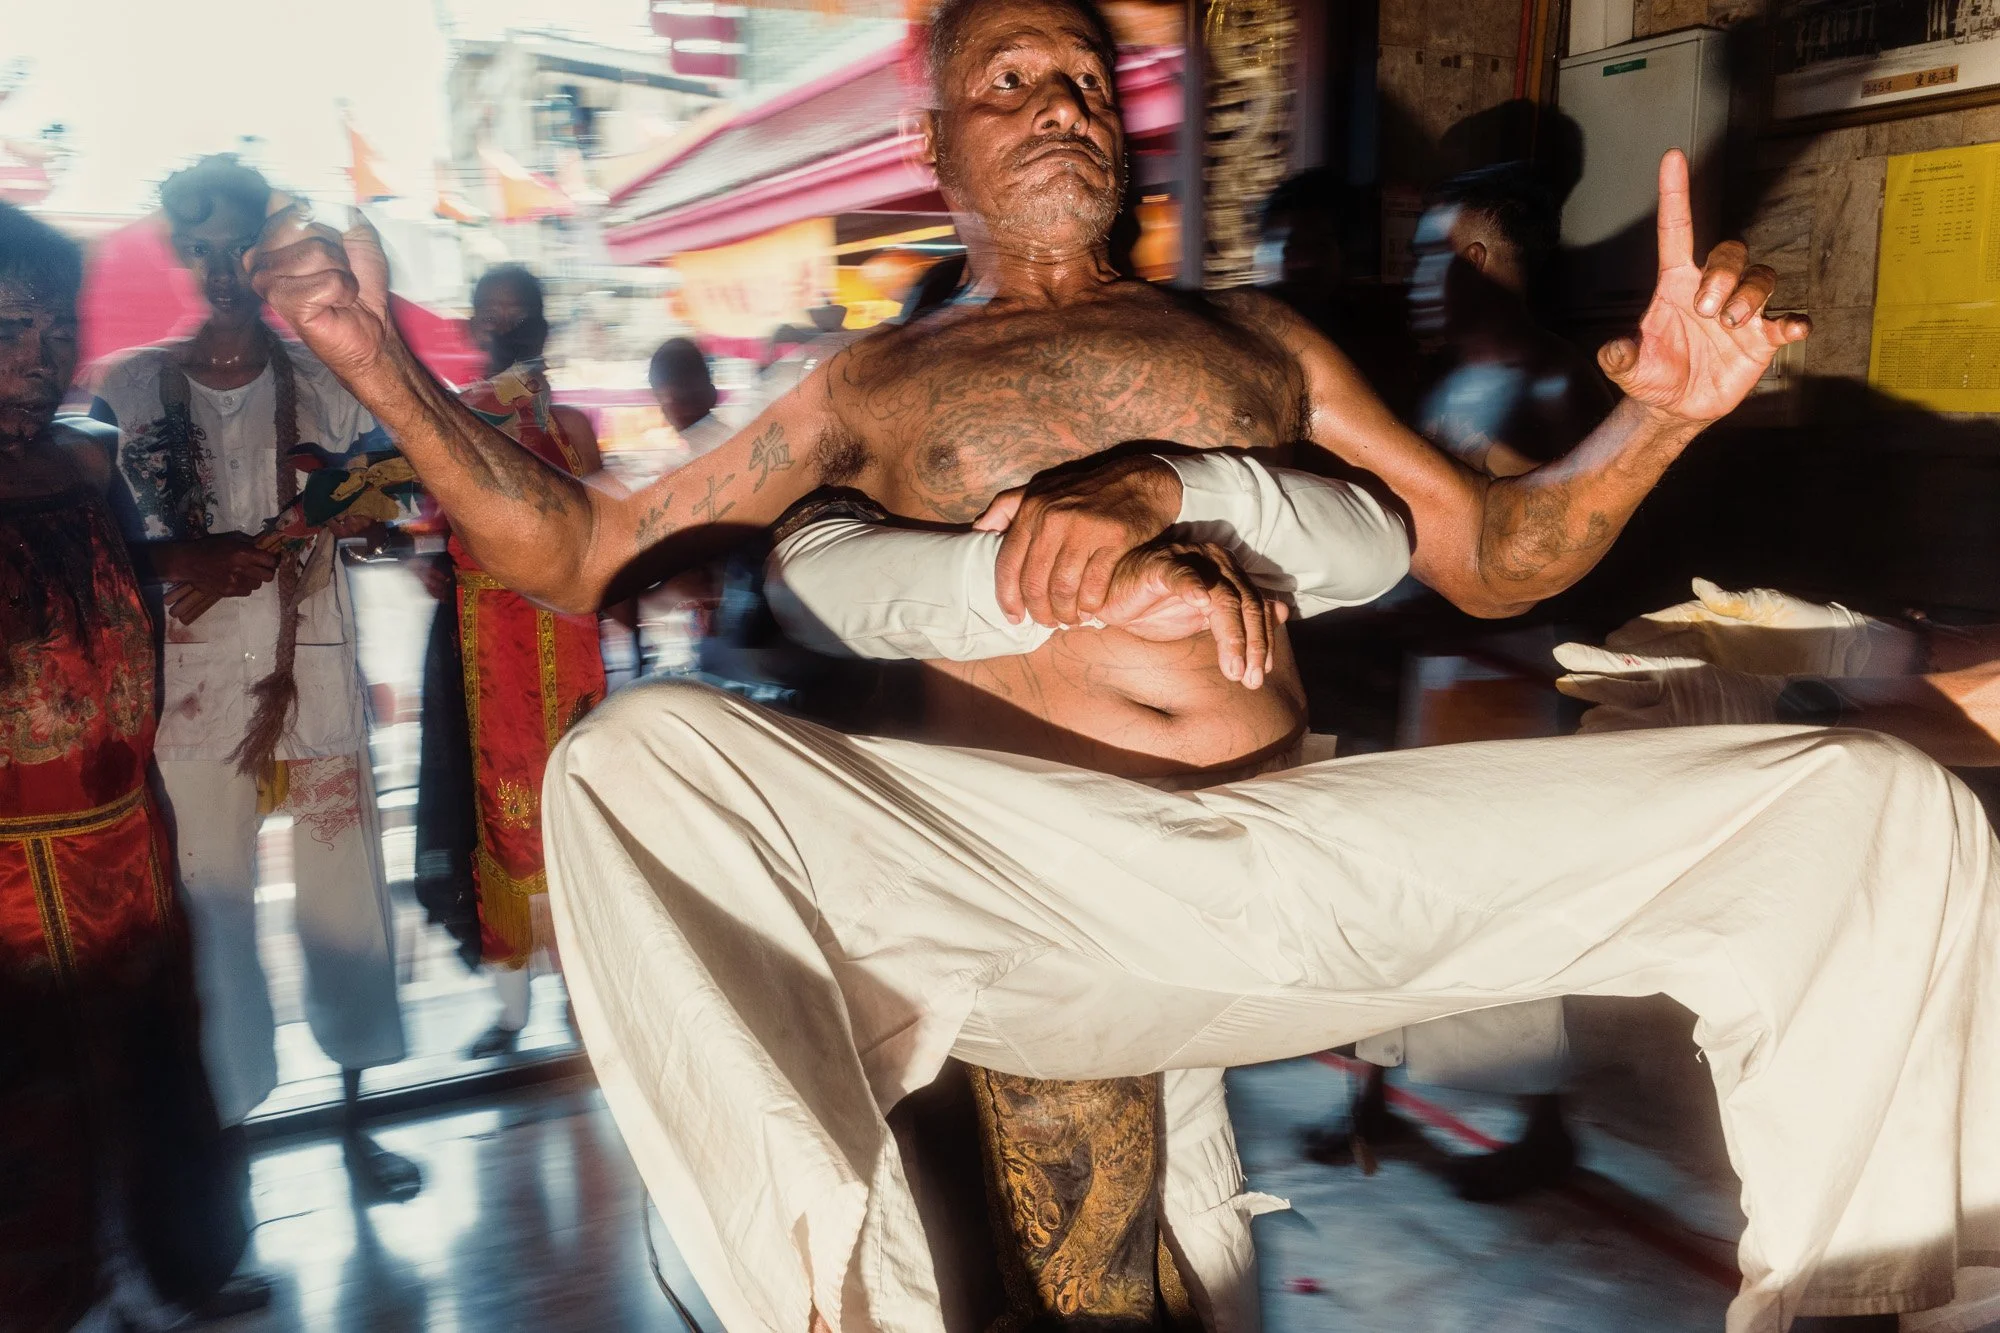
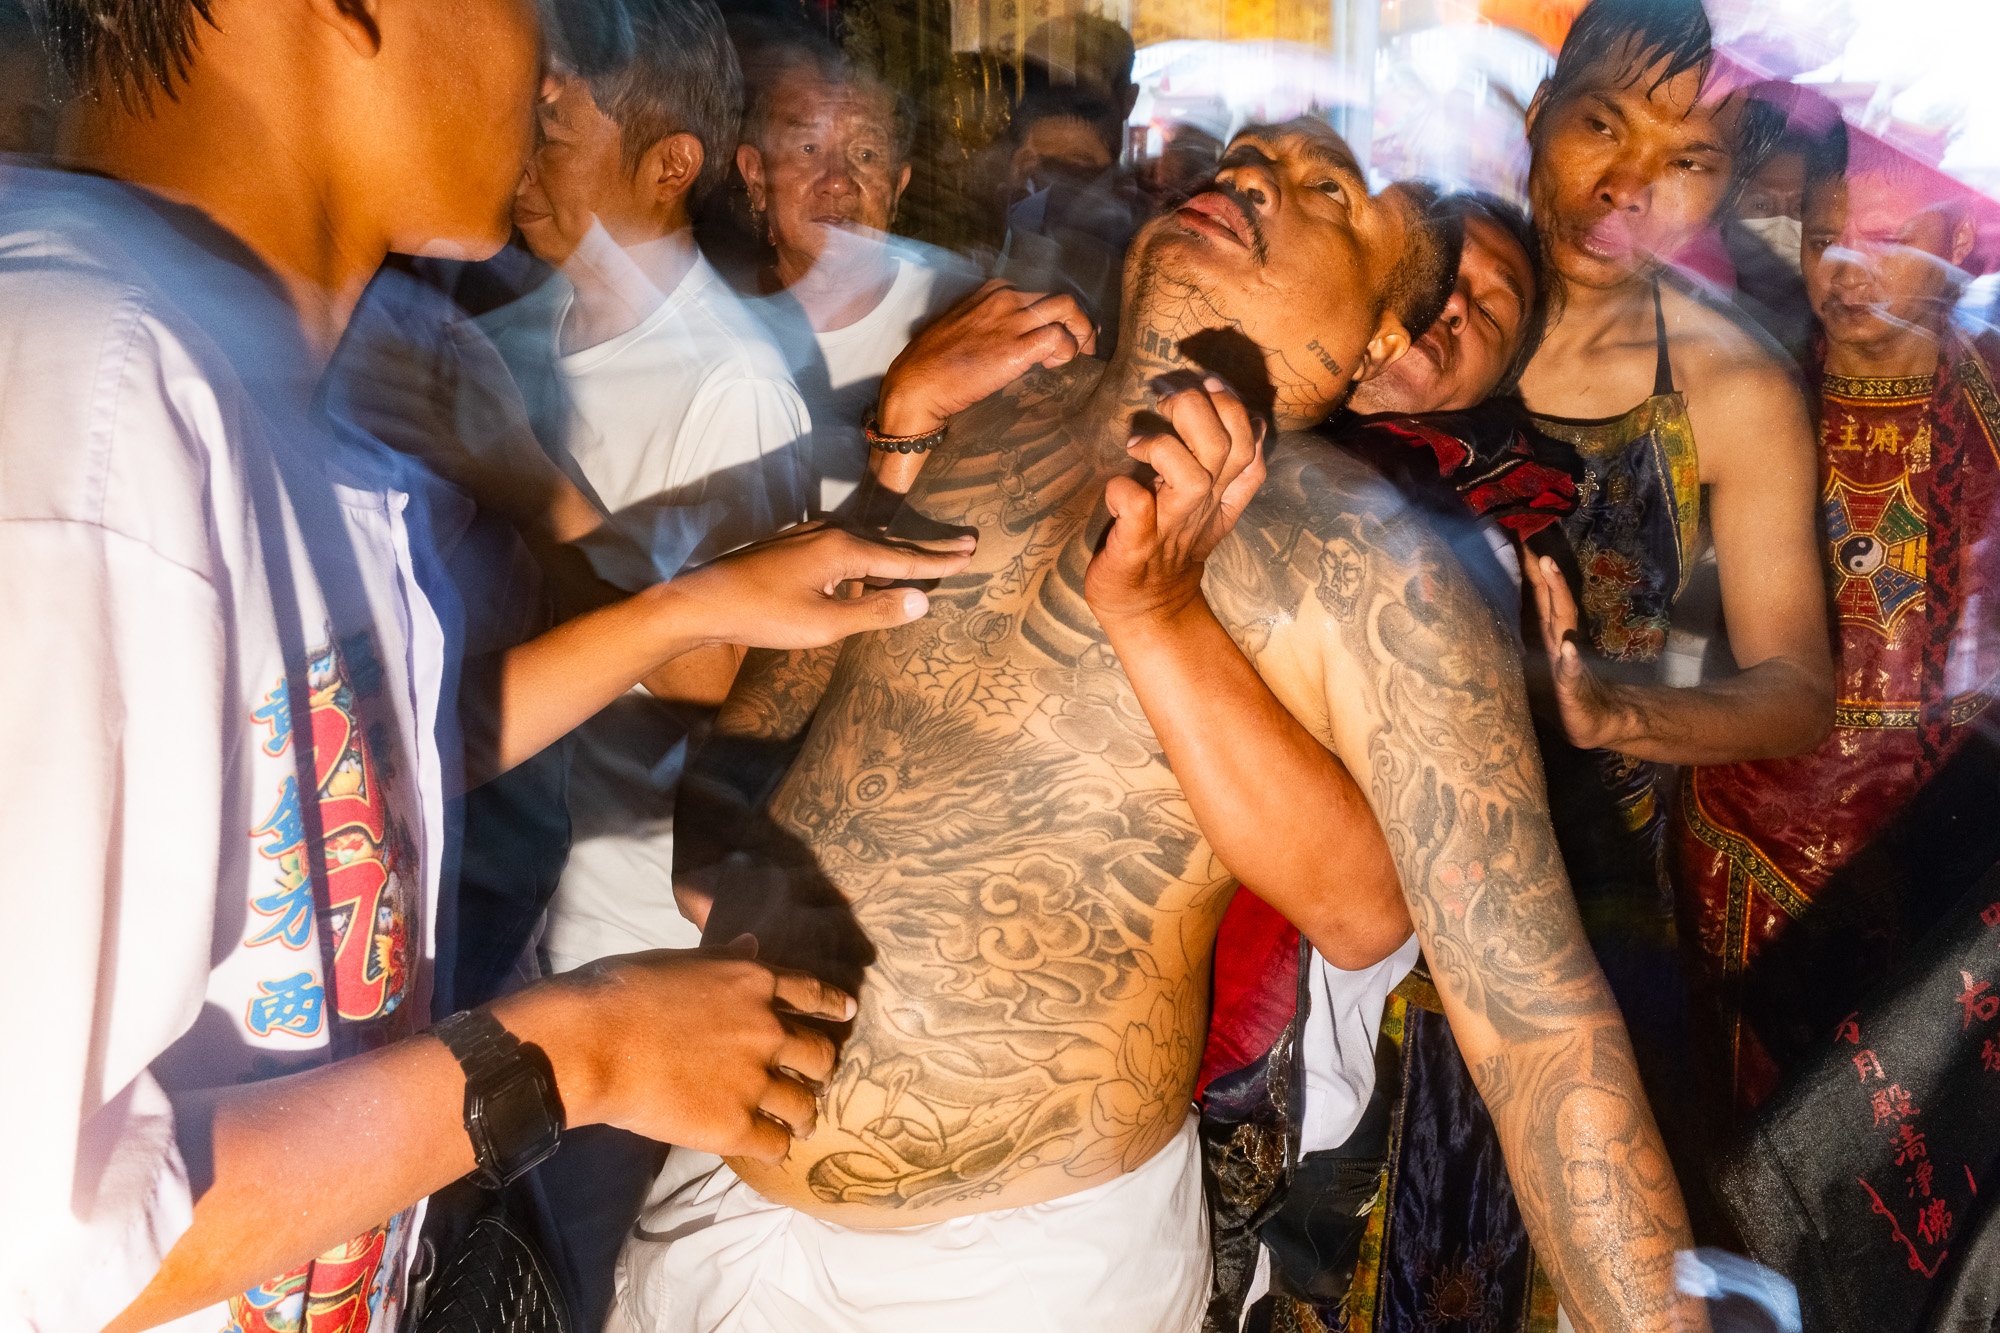
Instead of following the parade for long, I decided to return to Jui Tui Shrine. I wanted to photograph the Masongs when they came back to begin the procedure that brings them out of trance.
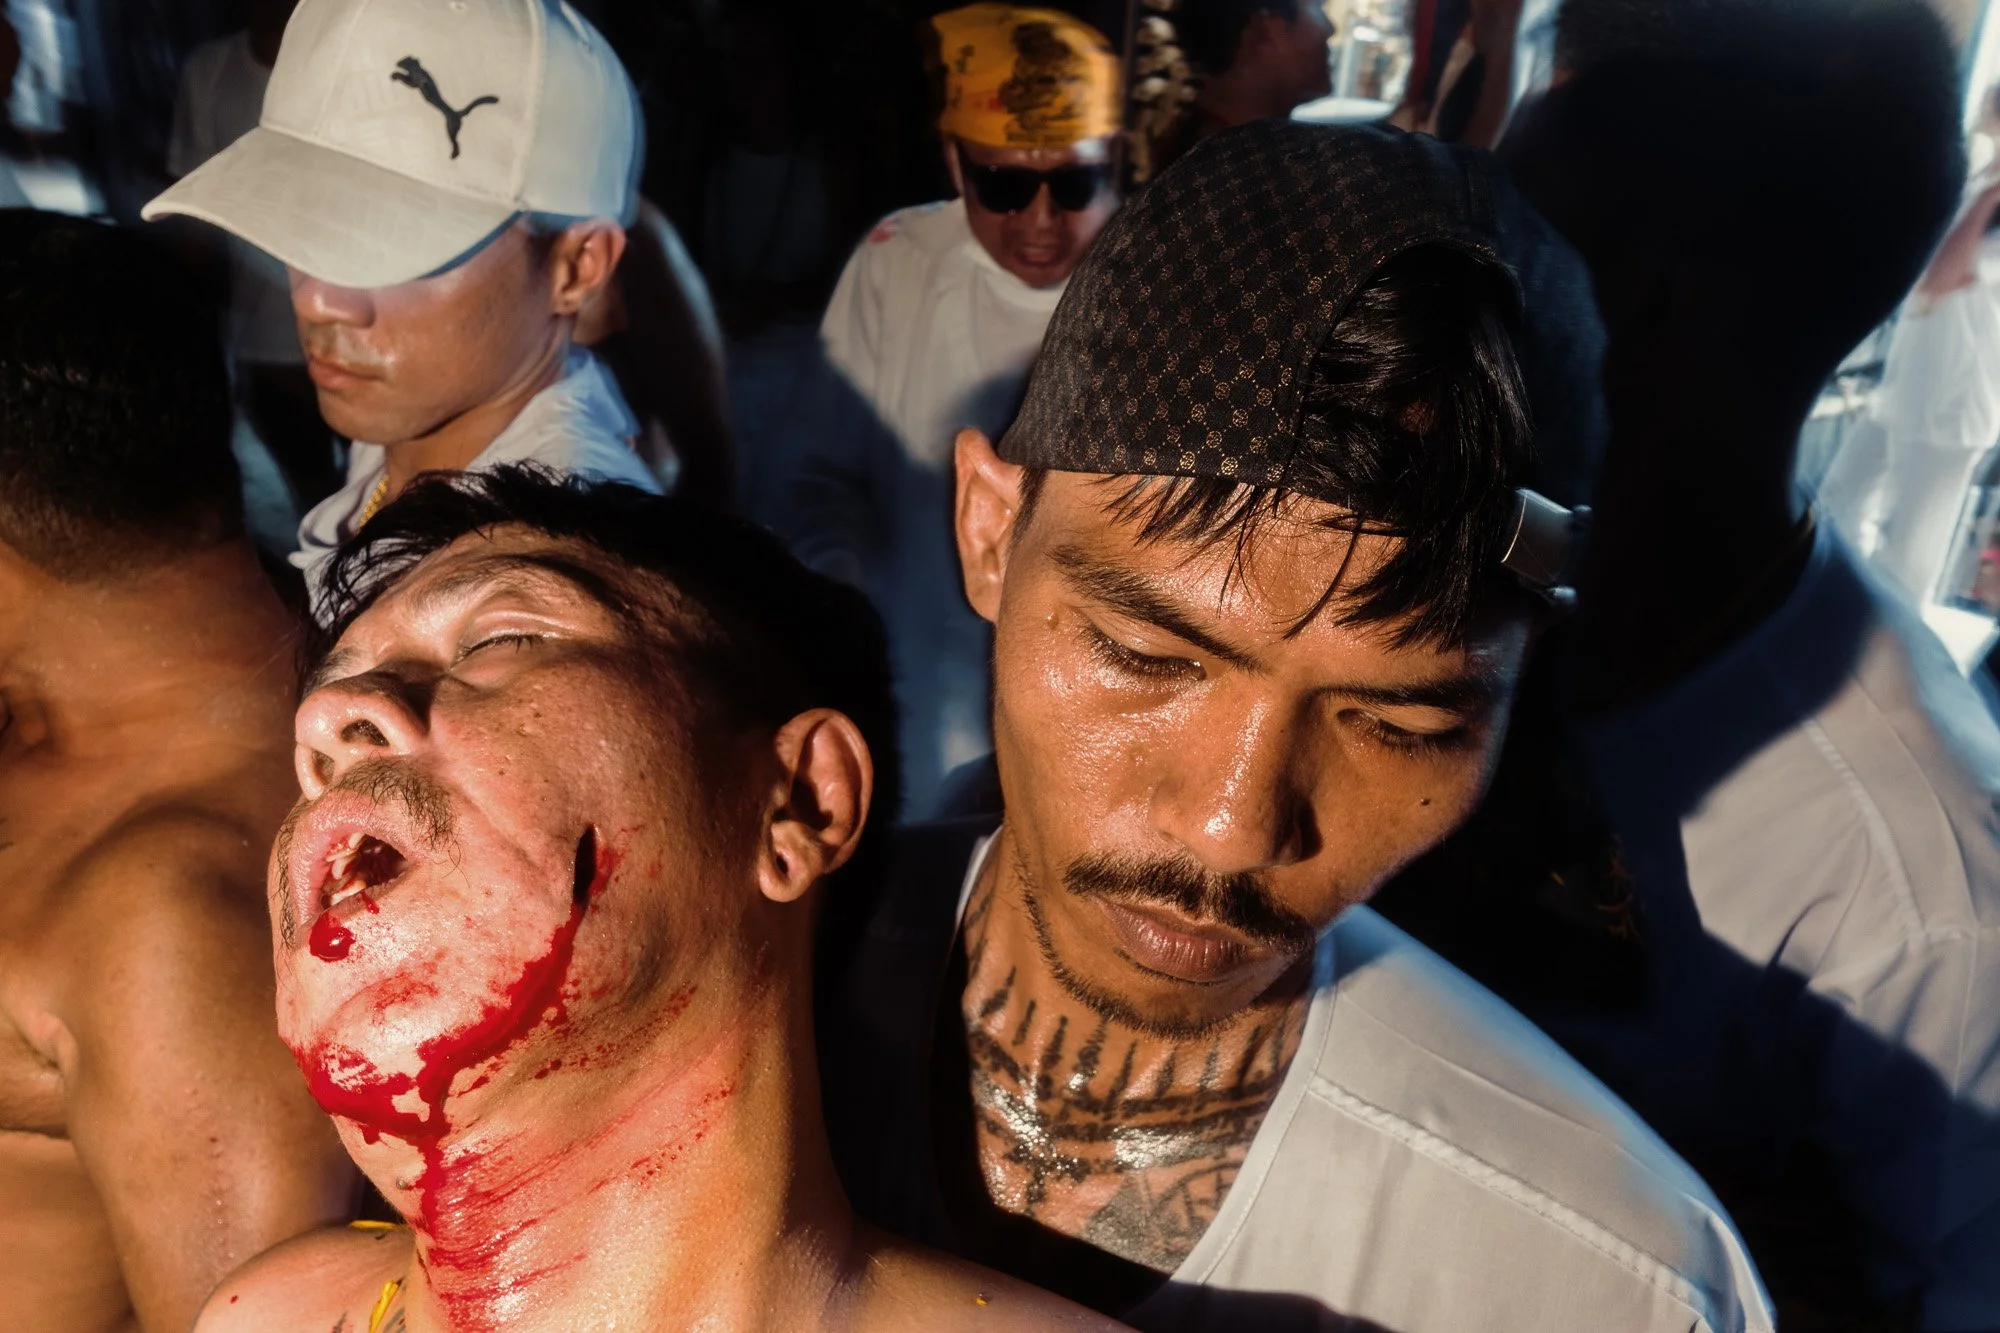
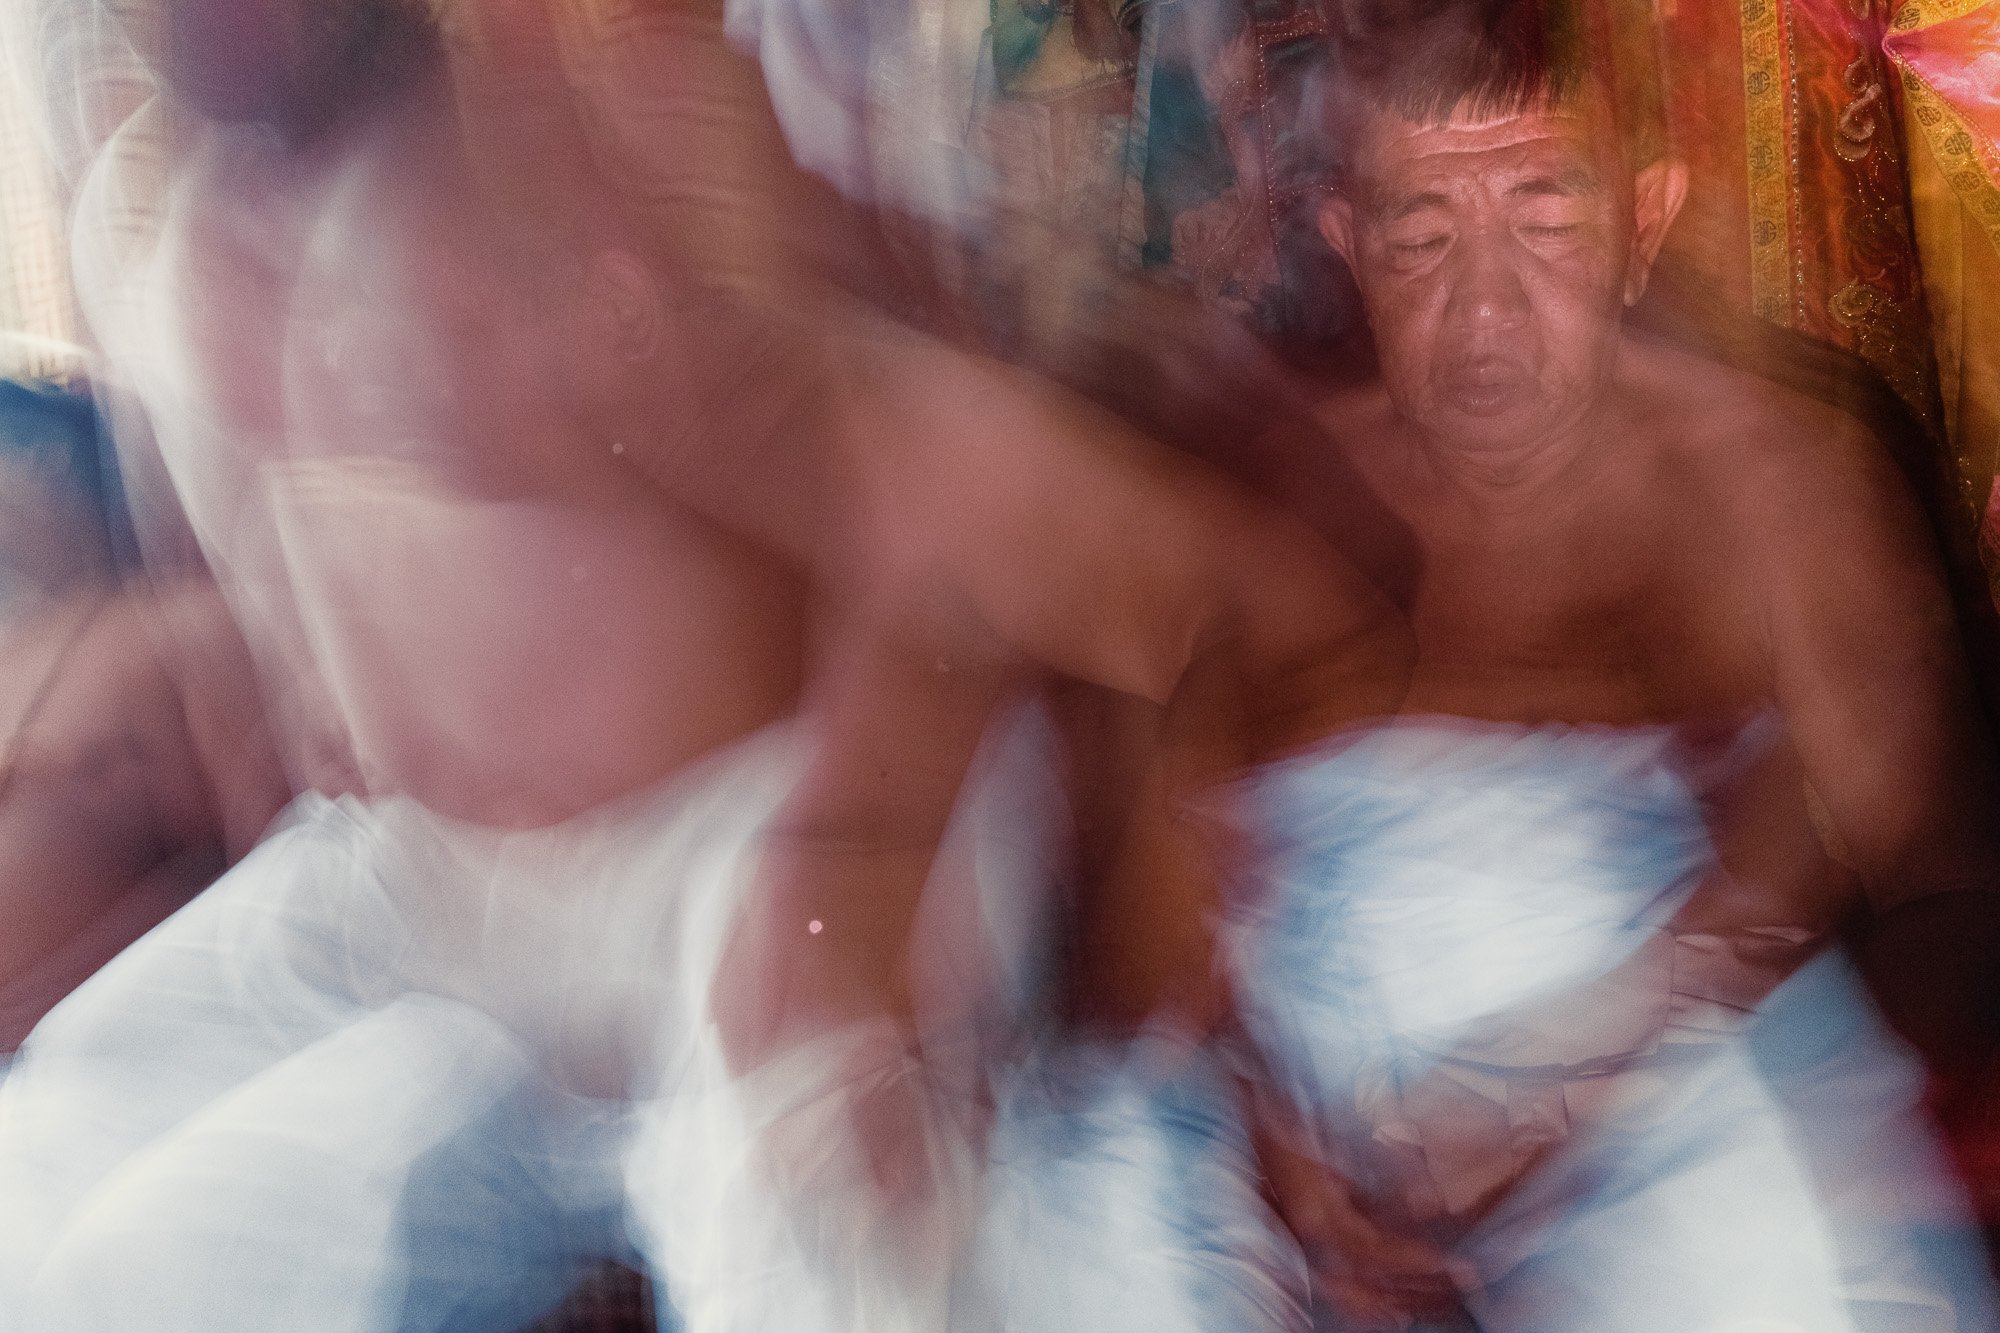
Luckily, there were almost no other photographers around. We waited for about an hour, and it was an incredible experience. Usually, Masongs who have piercings get them removed before entering the shrine.
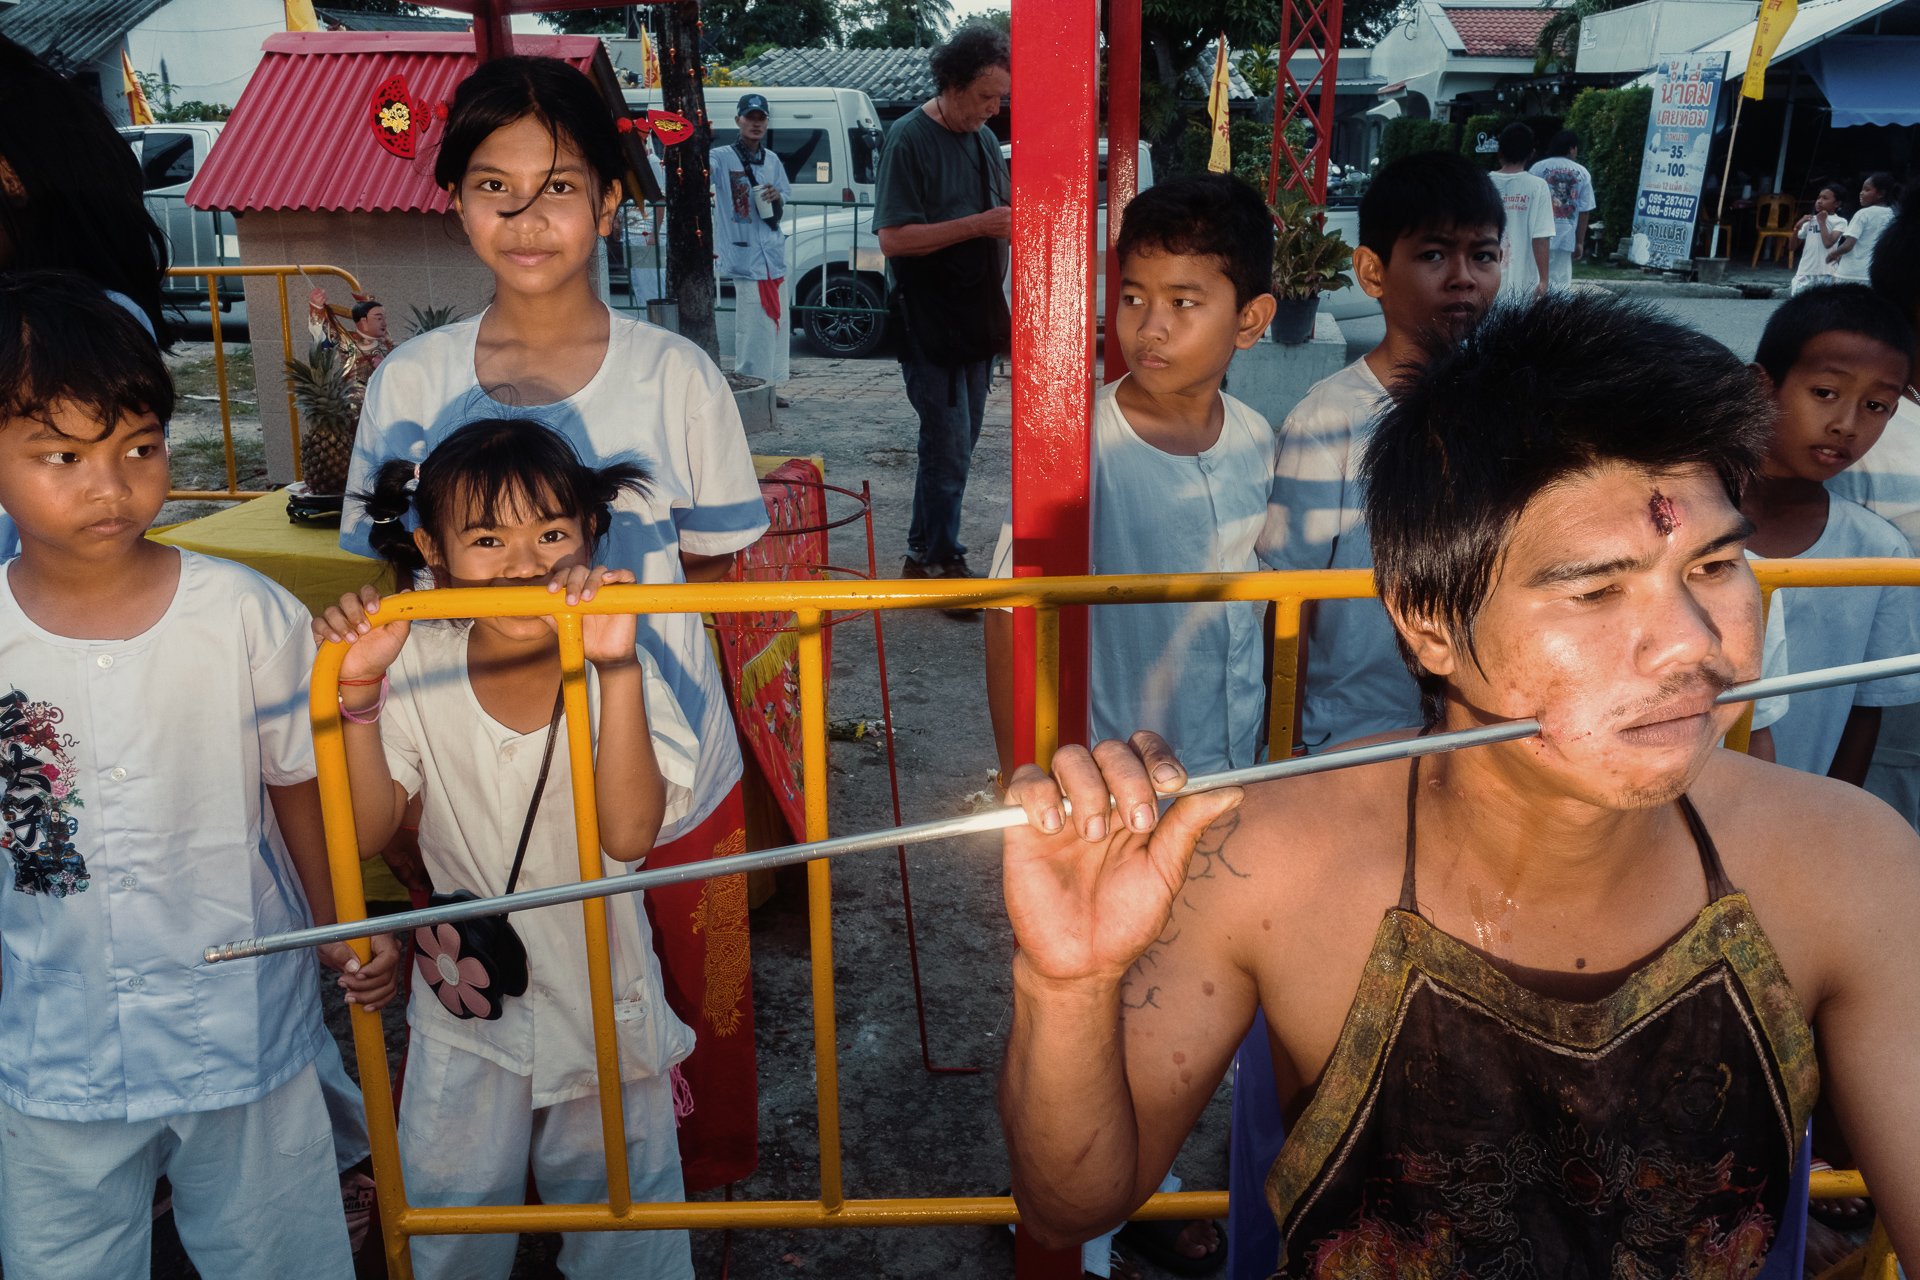
Some Masongs had deep cuts in their cheeks. Witnessing this process up close was truly powerful.
29. Ricoh GRIV - 1/200 - f/11 - ISO400
30. Ricoh GRIV - 1/25 - f/11 - ISO100
31. Ricoh GRIV - 1/25 - f/4.0 - ISO100
32. Ricoh GRIV - 1/13 - f/9.0 - ISO100
33. Ricoh GRIV - 0.5 sec - f/9.0 - ISO100

34. Ricoh GRIV - 1/4 - f/9.0 - ISO100

35. Ricoh GRIV - 1/4 - f/9.0 - ISO100

36. Ricoh GRIV - 1/15 - f/9.0 - ISO100
37. Ricoh GRIV - 1/13 - f/9.0 - ISO200
And if at this point you are thinking that you wish you knew how to use flash in street photography, I have you covered. I created a video course where I explain everything you need to know, from getting started with flash to taking your street photography to the next level.

Street Photography in Phuket The 200th Anniversary Parade and a Day Full of Surprises
In the last part of this series, we ended with flooded streets and a city soaked after hours of relentless rain. My shoes were still wet the next morning, but it was time for a new street photography adventure. Once again things did not go as expected.
A Slow Start and Gloomy Light
At the shrine I did not shoot much. It was simply too crowded and the light was still very dim. Instead, I caught up with a few friends while waiting for the parade to begin.

1. Ricoh GRIV - 1/8 - f/11 - ISO800
The streets had dried overnight, but the sky was extremely dark, and that made photographing more difficult. In this light everything felt a bit flat, and I knew that this was not going to be the most productive morning.
I came across a Masong with a huge piercing in his face. I am glad is wasn’t windy that day

2. Ricoh GRIV - 1/25 - f/11 - ISO800
3. Ricoh GRIV - 1/40 - f/11 - ISO800

4. Ricoh GRIV - 1/25 - f/11 - ISO800
5. Ricoh GRIV - 1/25 - f/11 - ISO800
I used a man in a pickup truck who was filming as a foreground element. It added context and separated the layers nicely. In the background, you can see the parade and a Masong with a truly extreme piercing.
The morning light never really improved, so I decided to call it quits earlier than planned. I needed to recharge because the evening event was going to be much bigger. And it absolutely was.
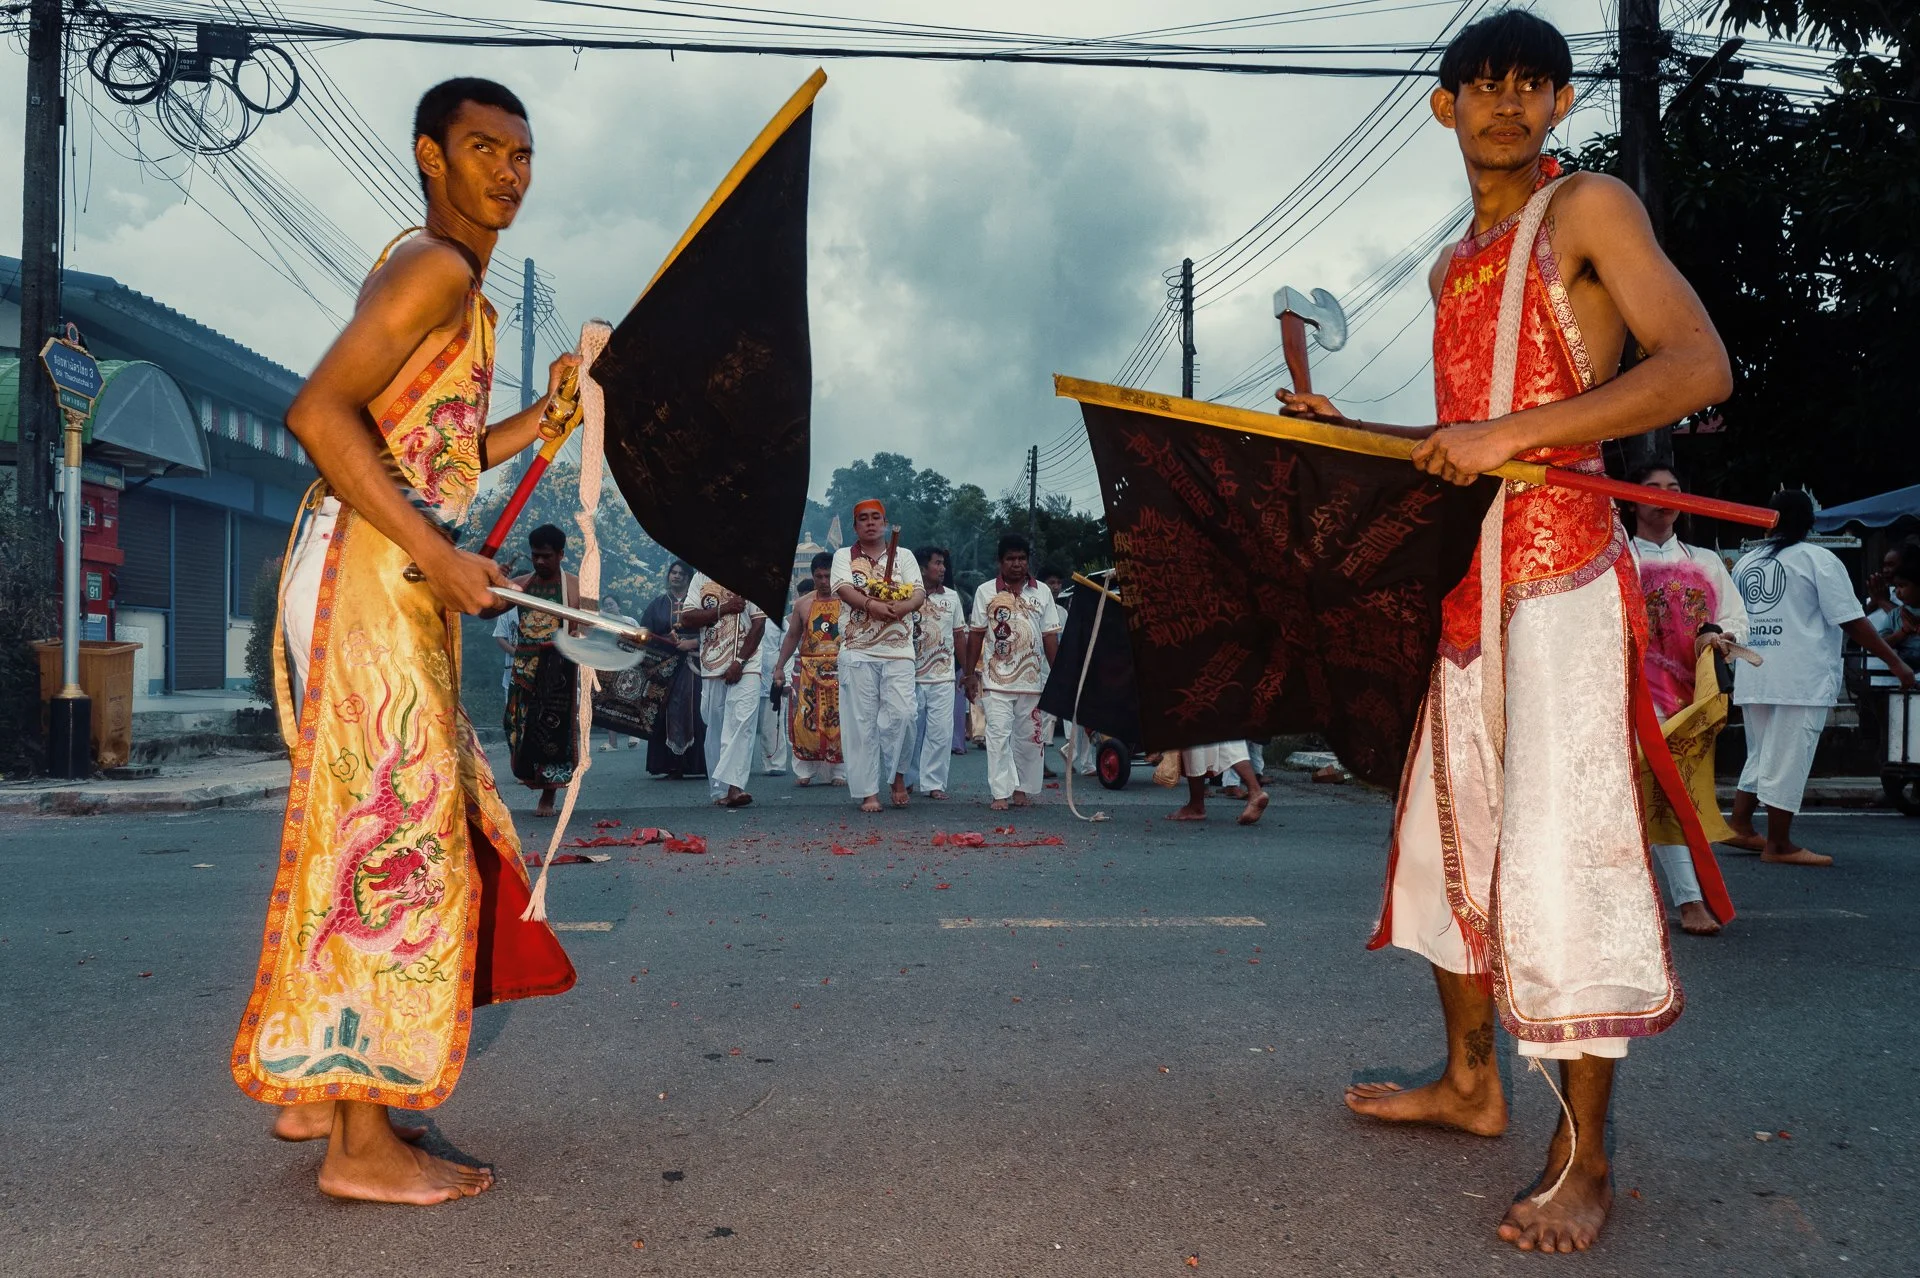
The 200th Anniversary Parade
This year marked the 200th anniversary of the festival, and for that occasion a major parade was scheduled. It started at the seaside and went all the way to Kathu Shrine, which is believed to be the oldest shrine in Phuket. The total distance was around 12 kilometers.

6. Ricoh GRIV - 1/100 - f/8.0 - ISO800
7. Ricoh GRIV - 1/6 - f/8.0 - ISO800
8. Ricoh GRIV - 1/10 - f/8.0 - ISO800

9. Ricoh GRIV - 0.3 sec - f/8.0 - ISO800
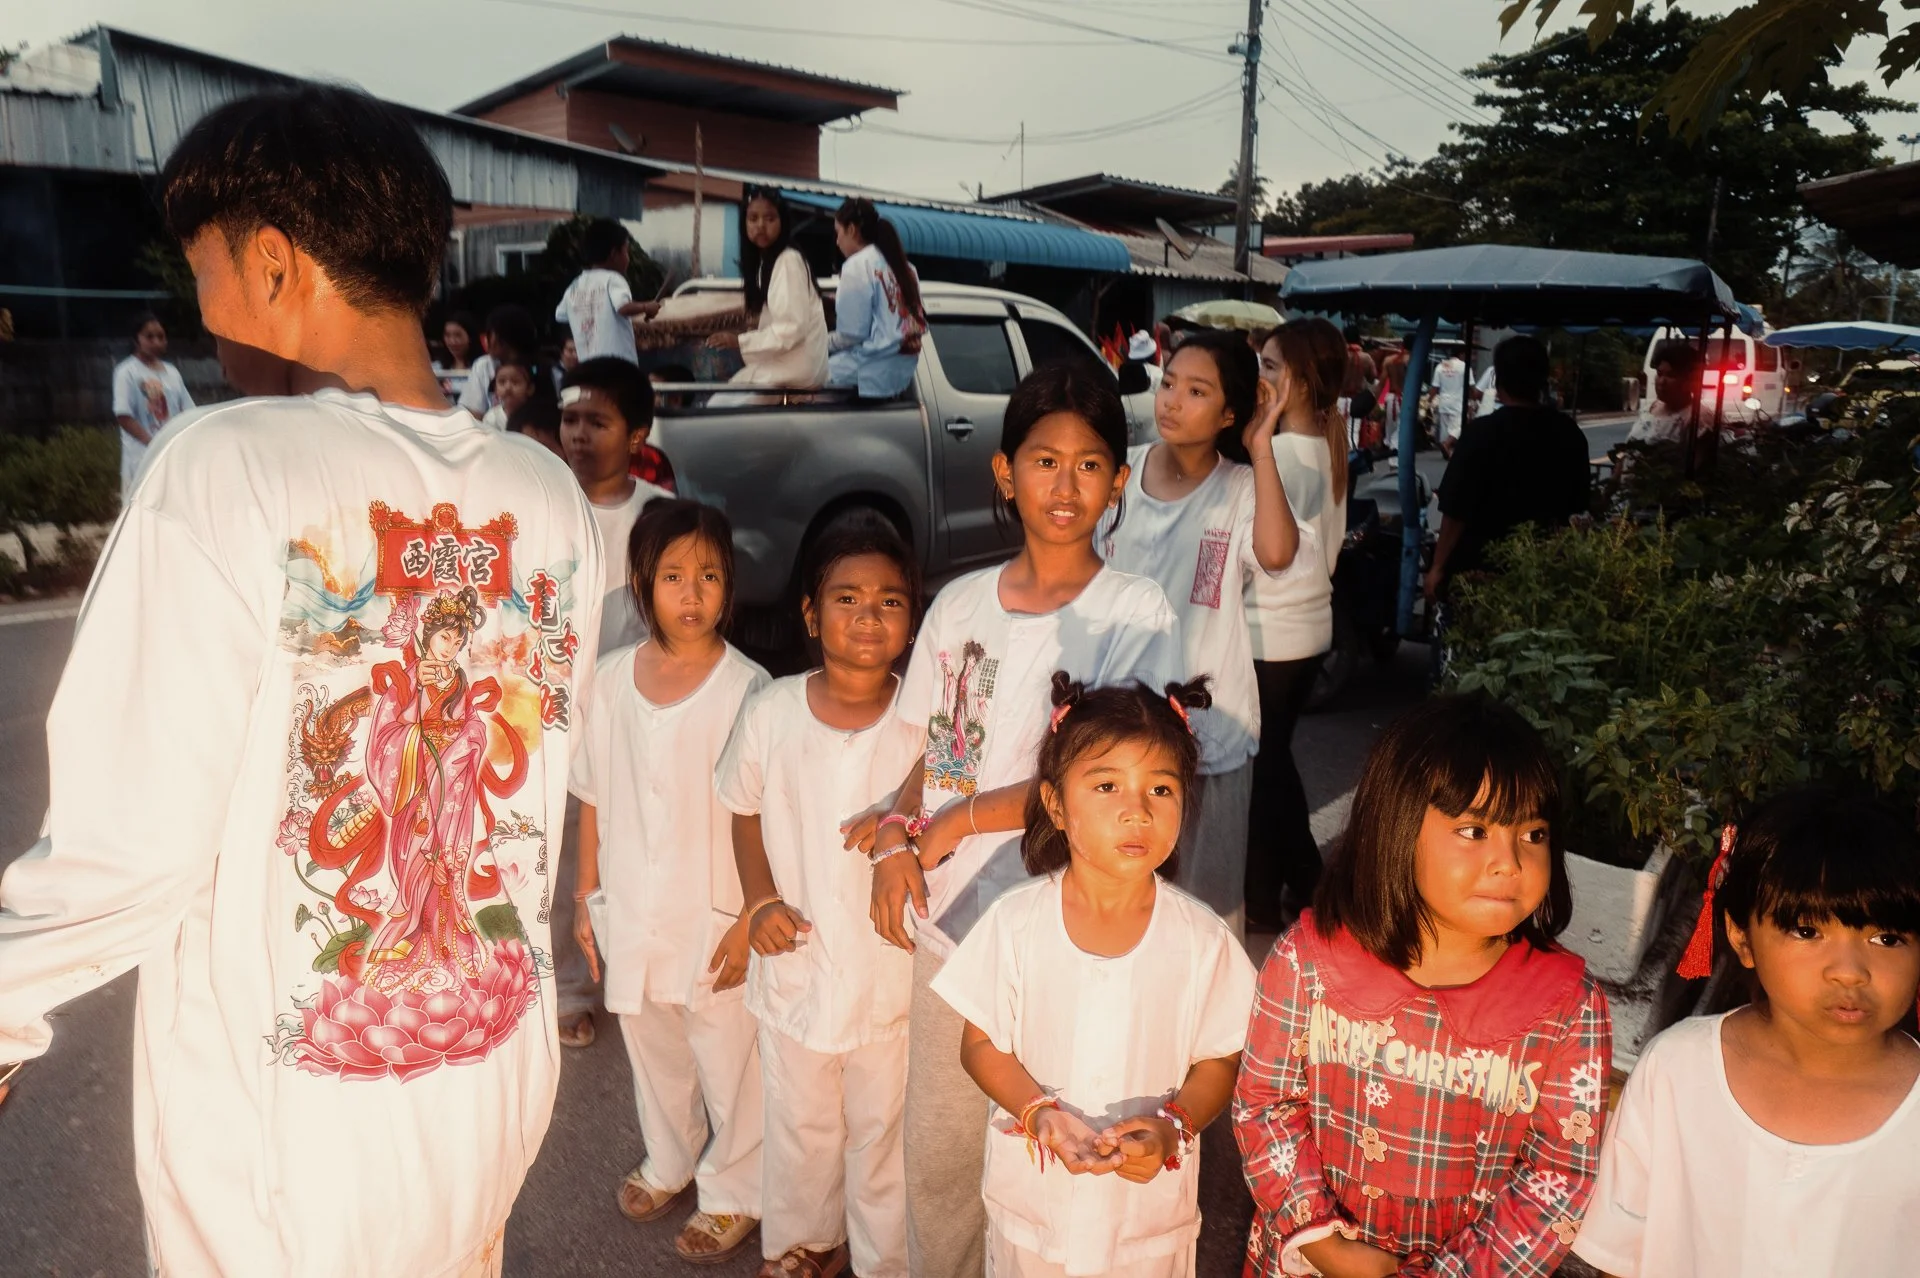
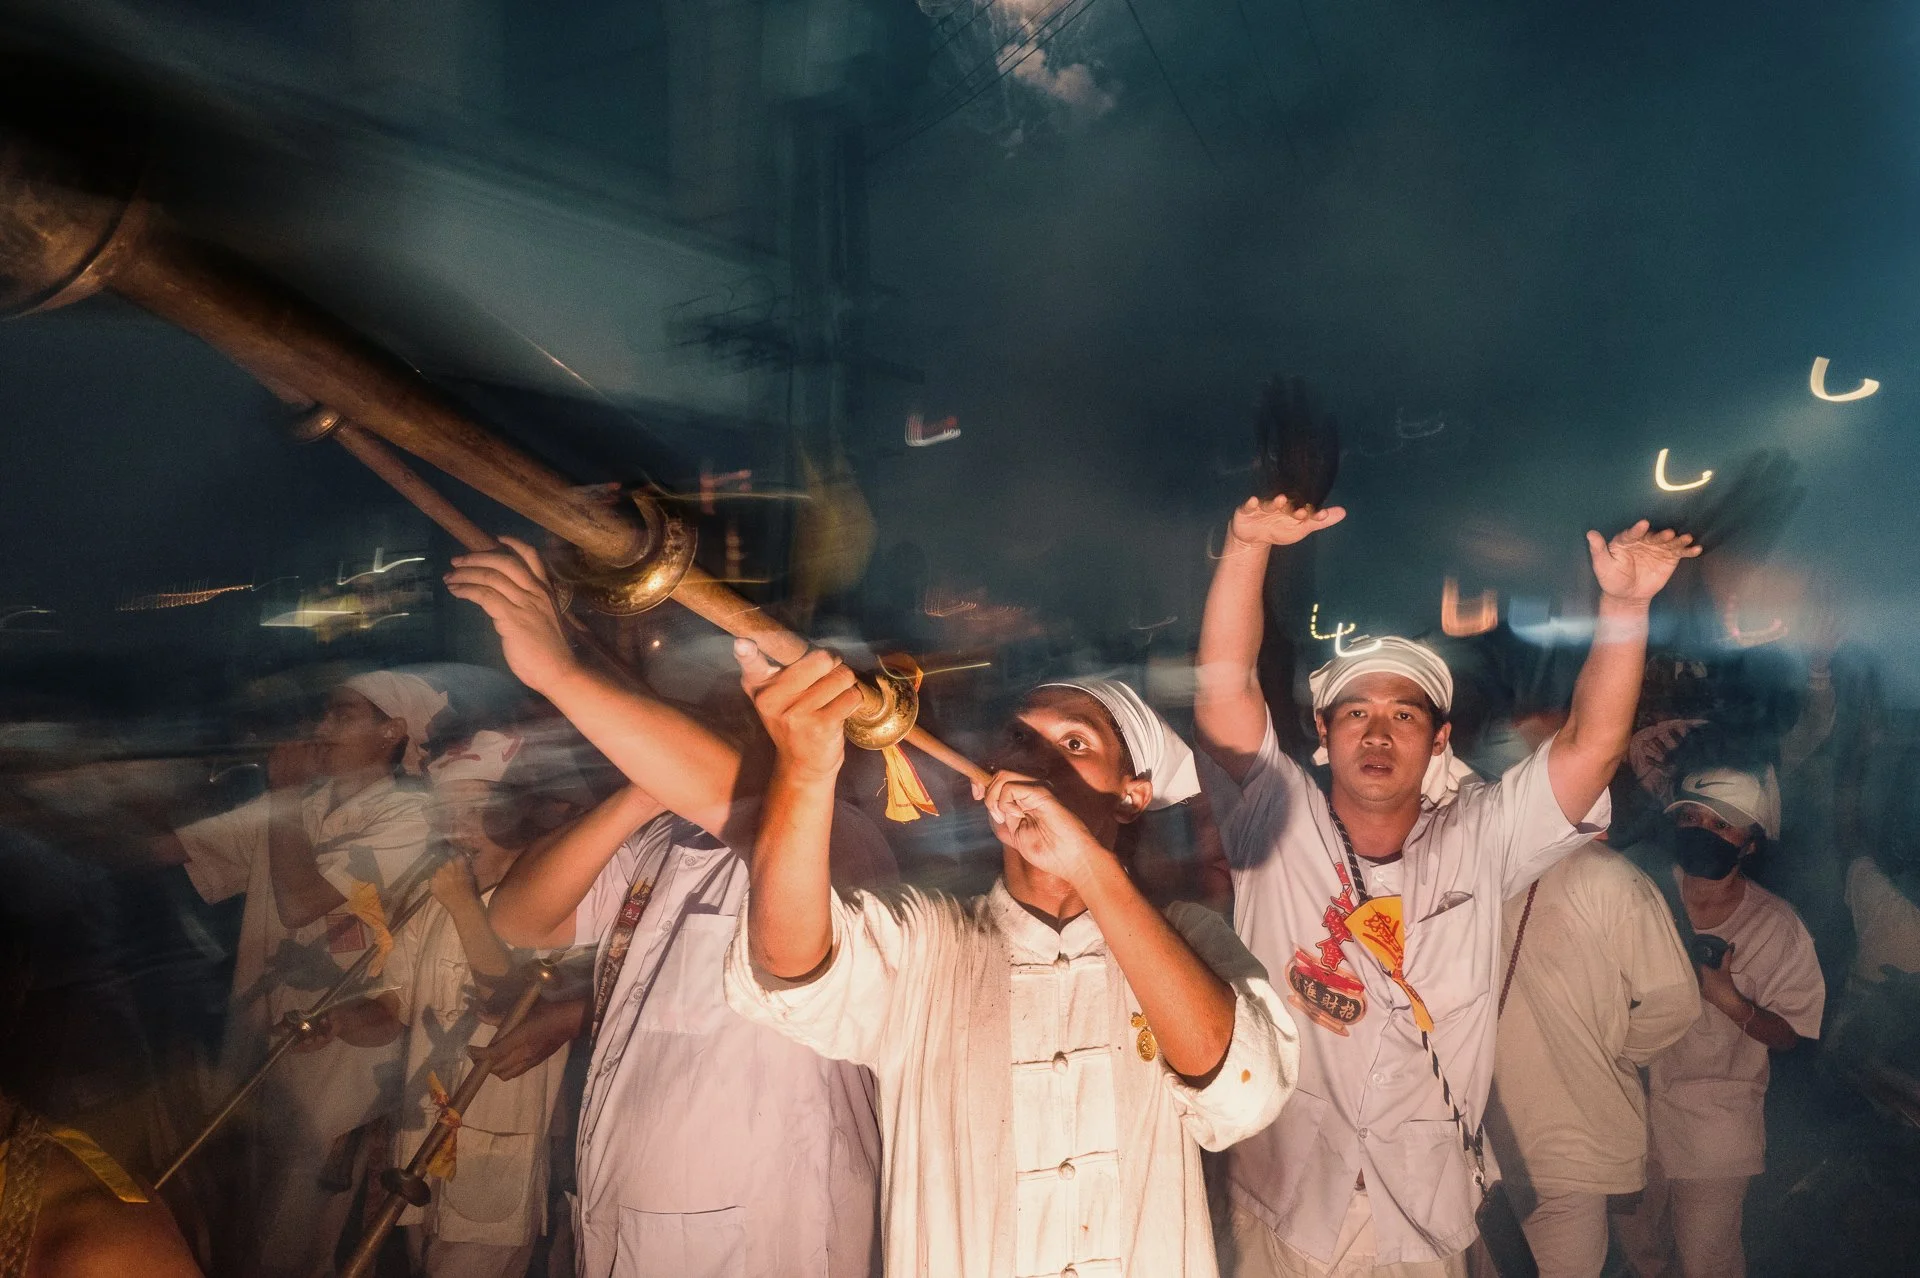
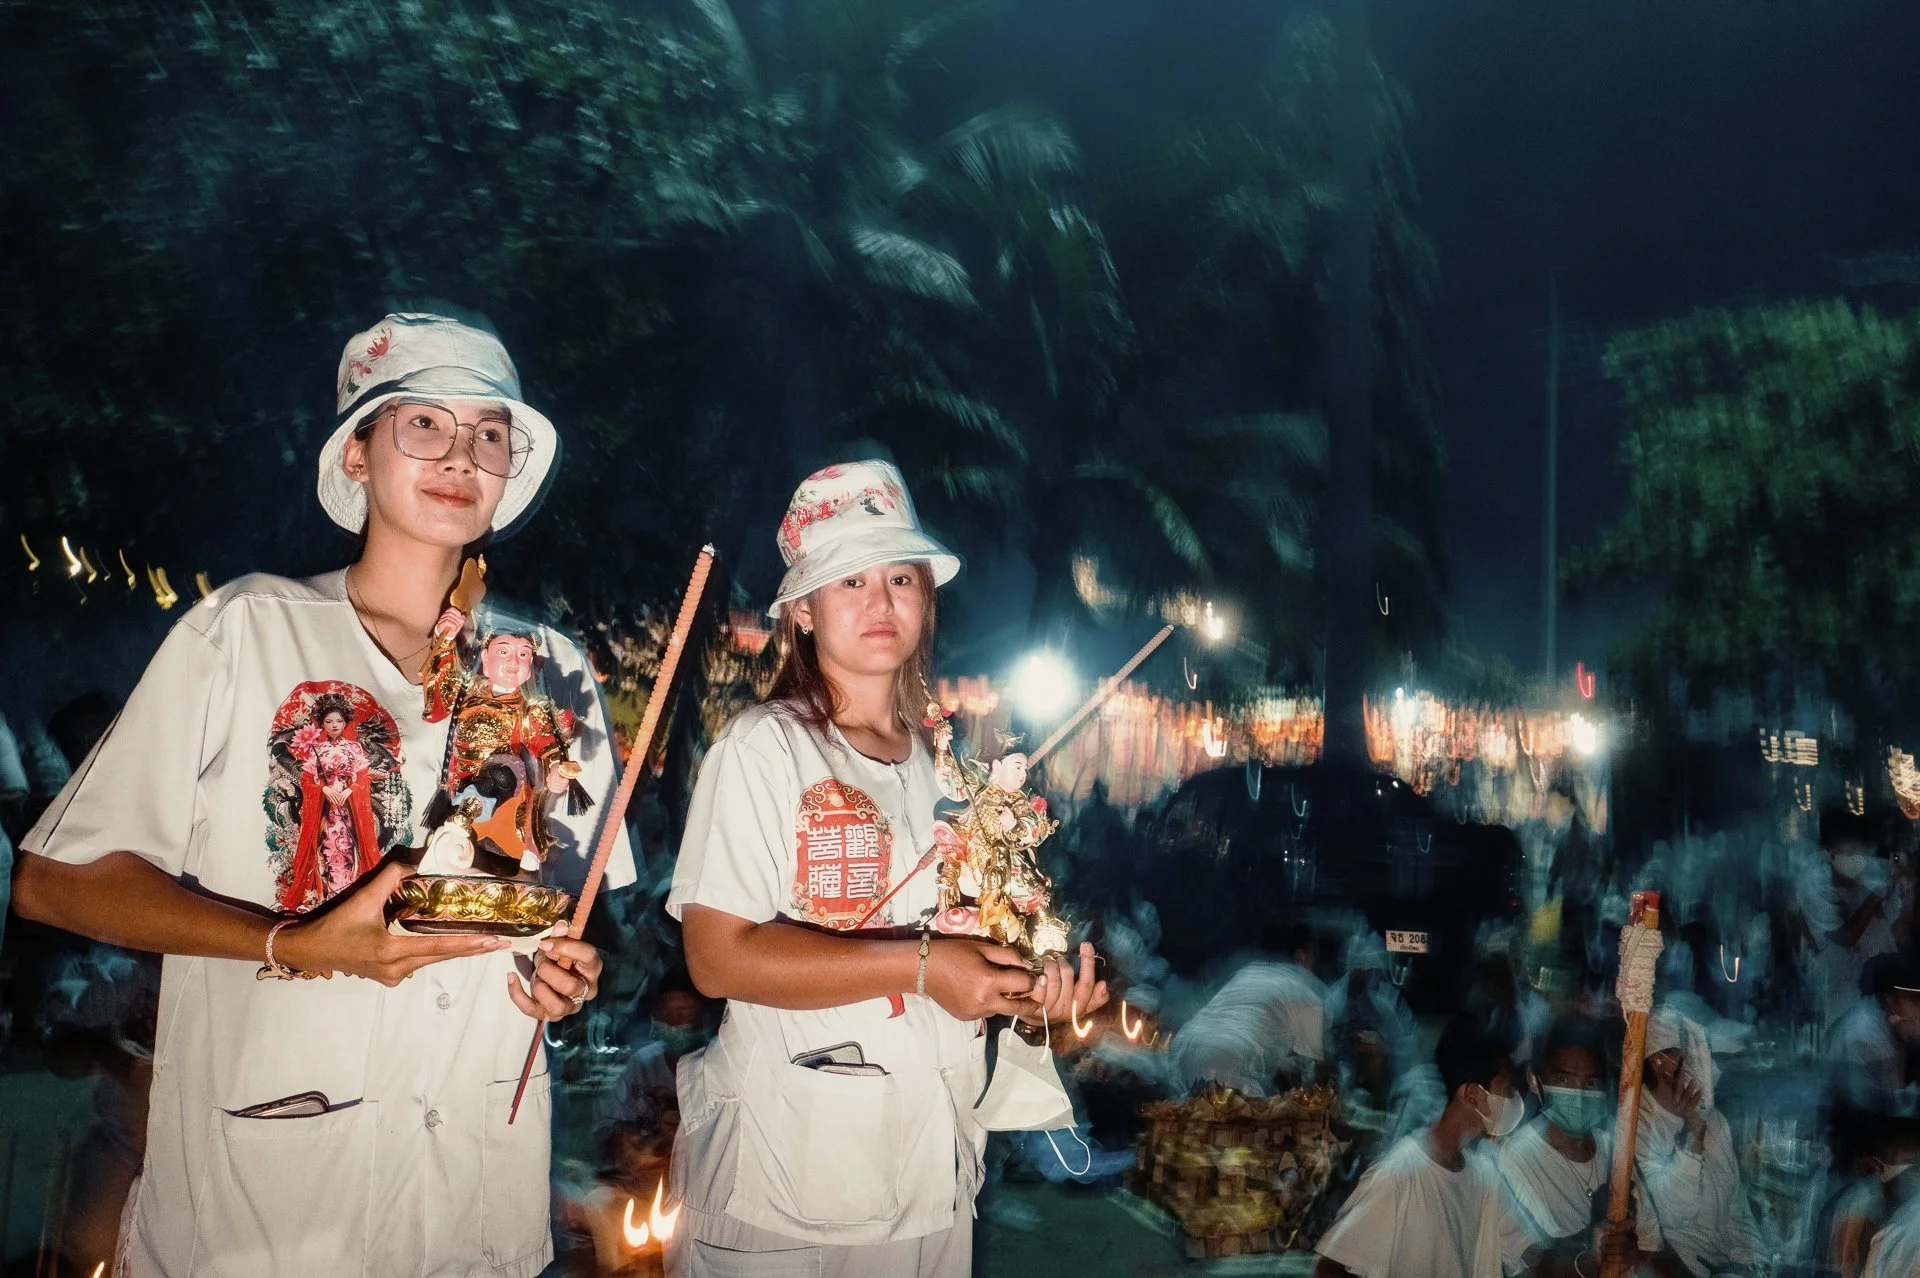
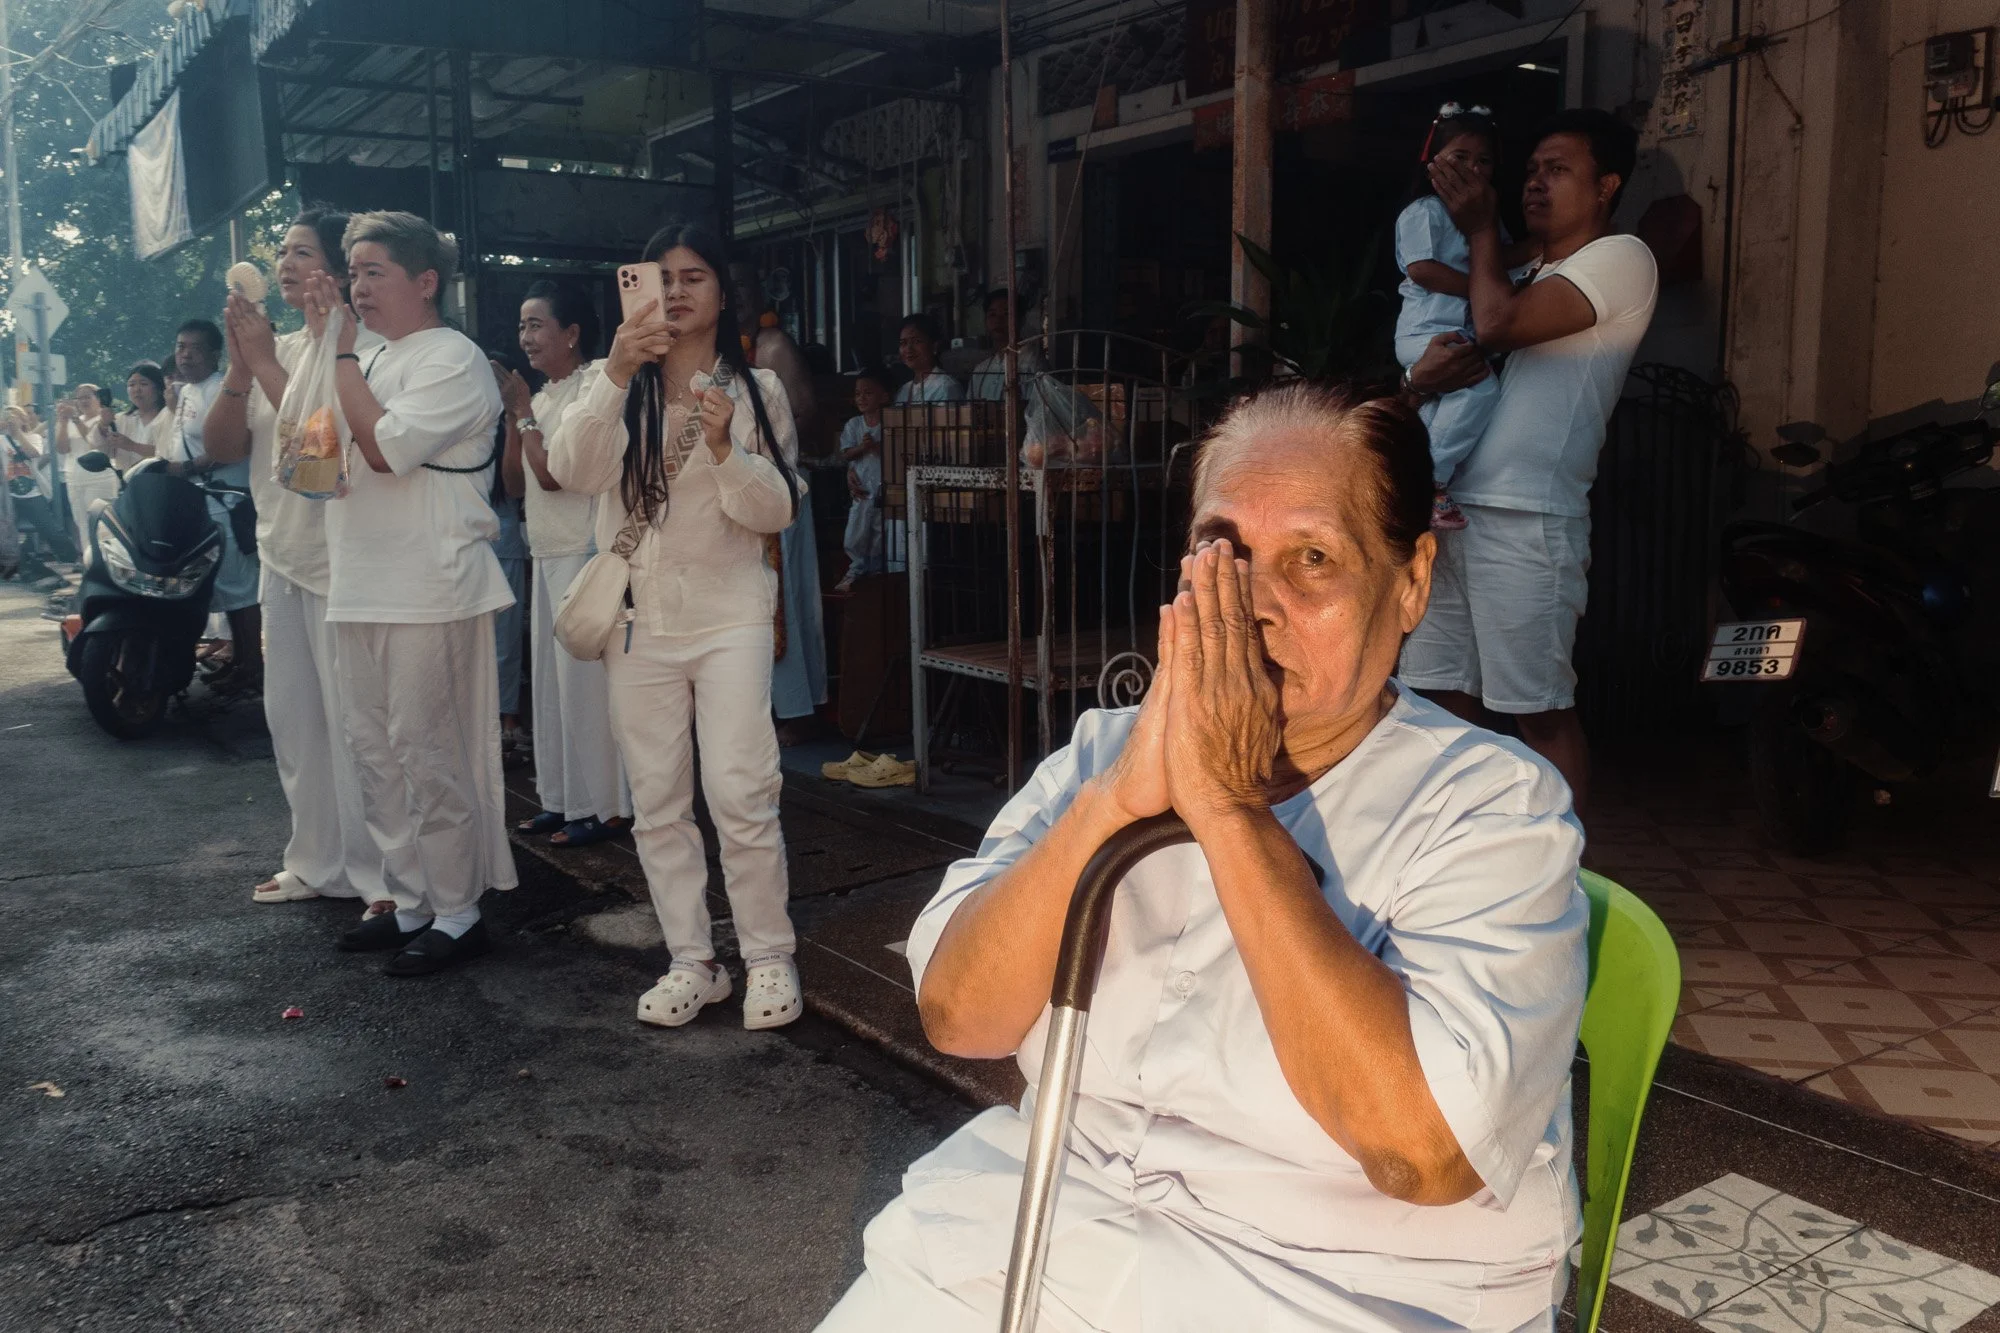
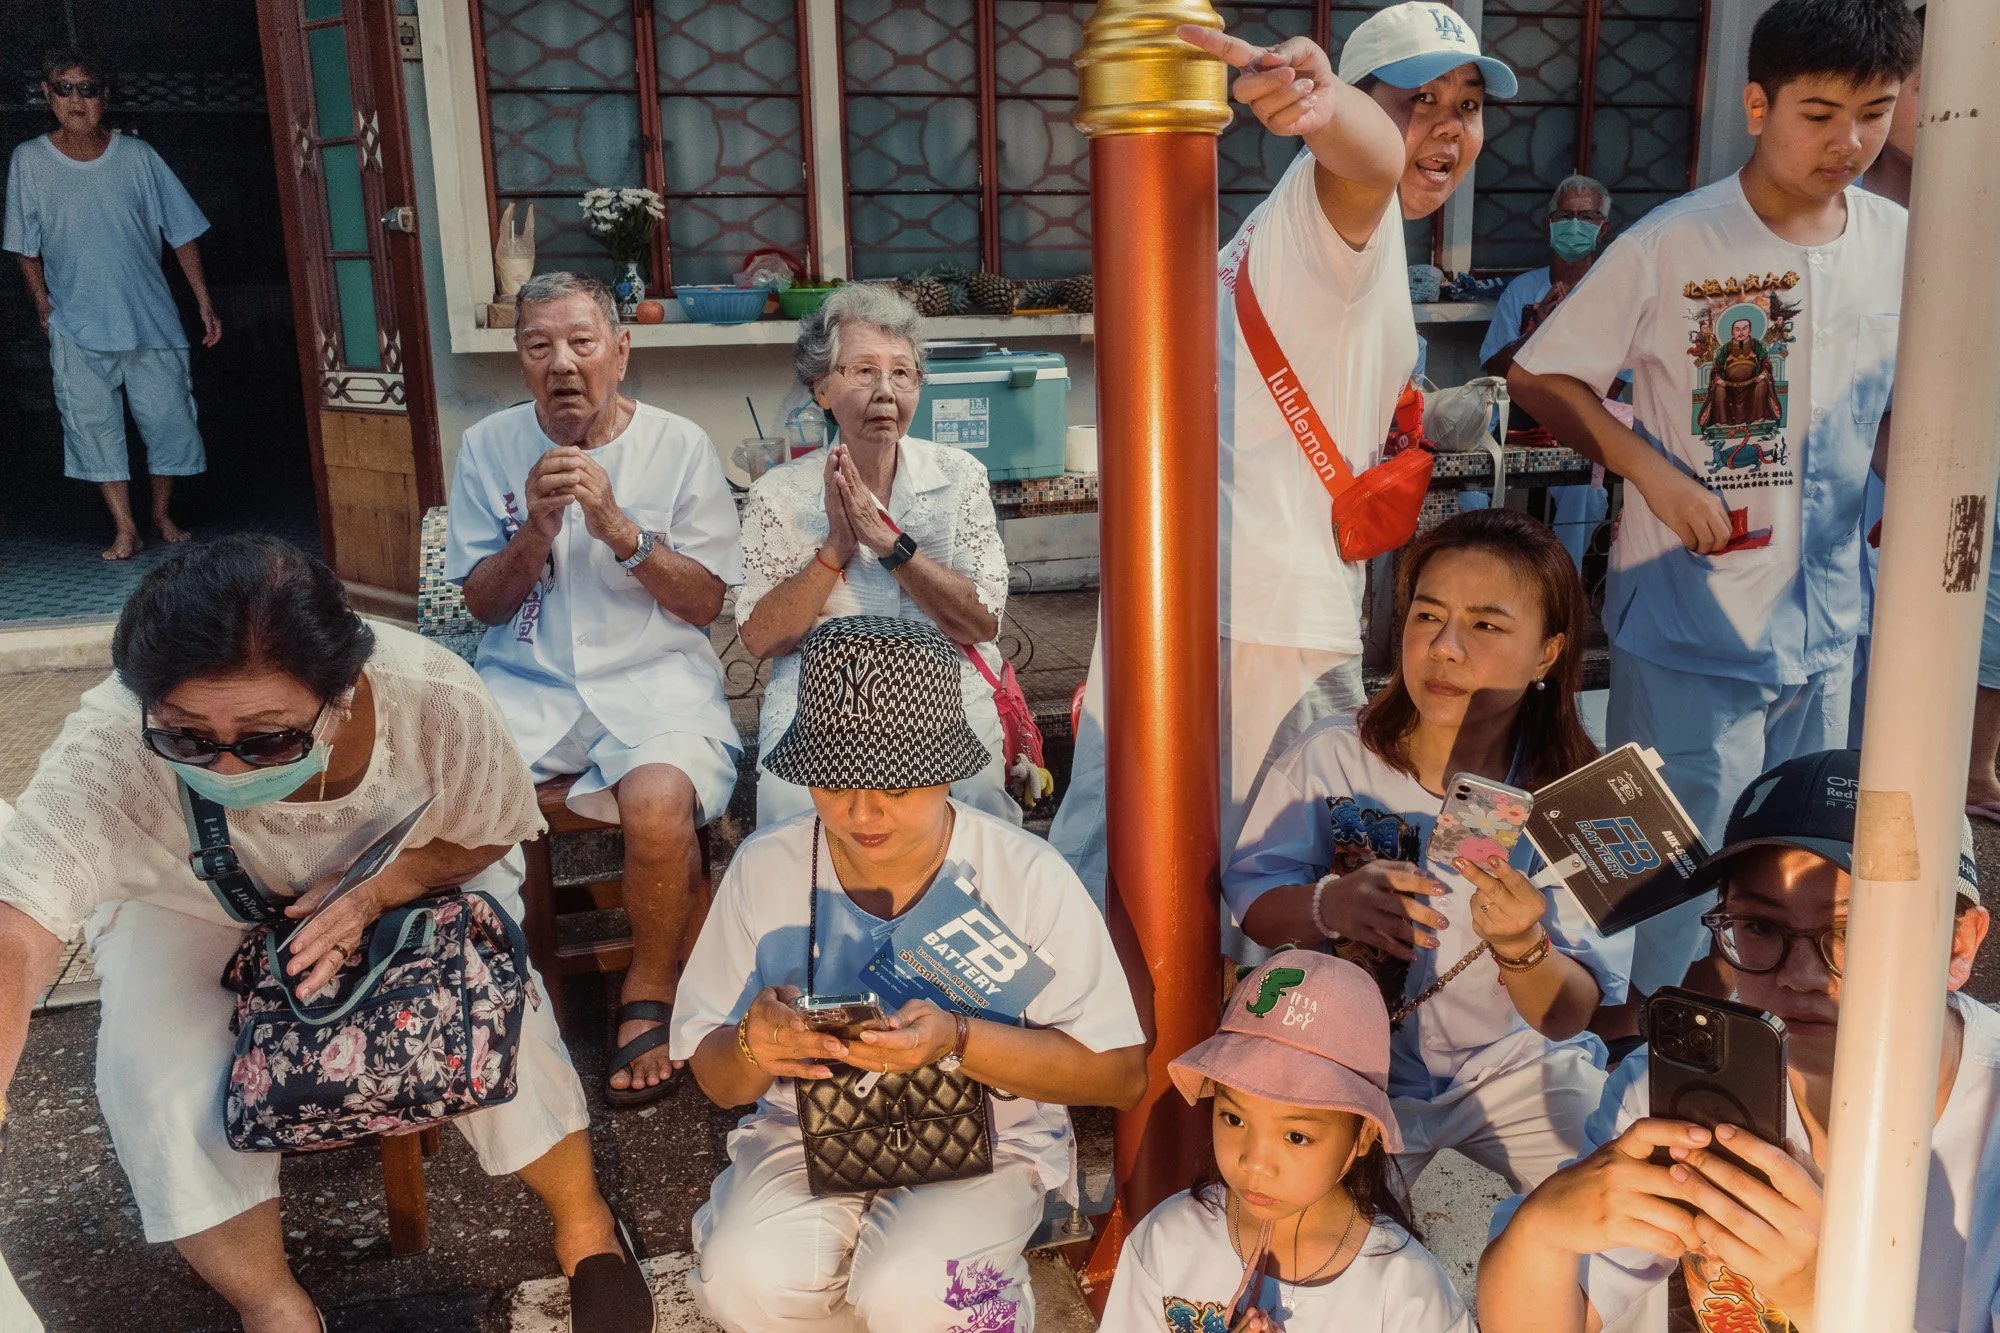
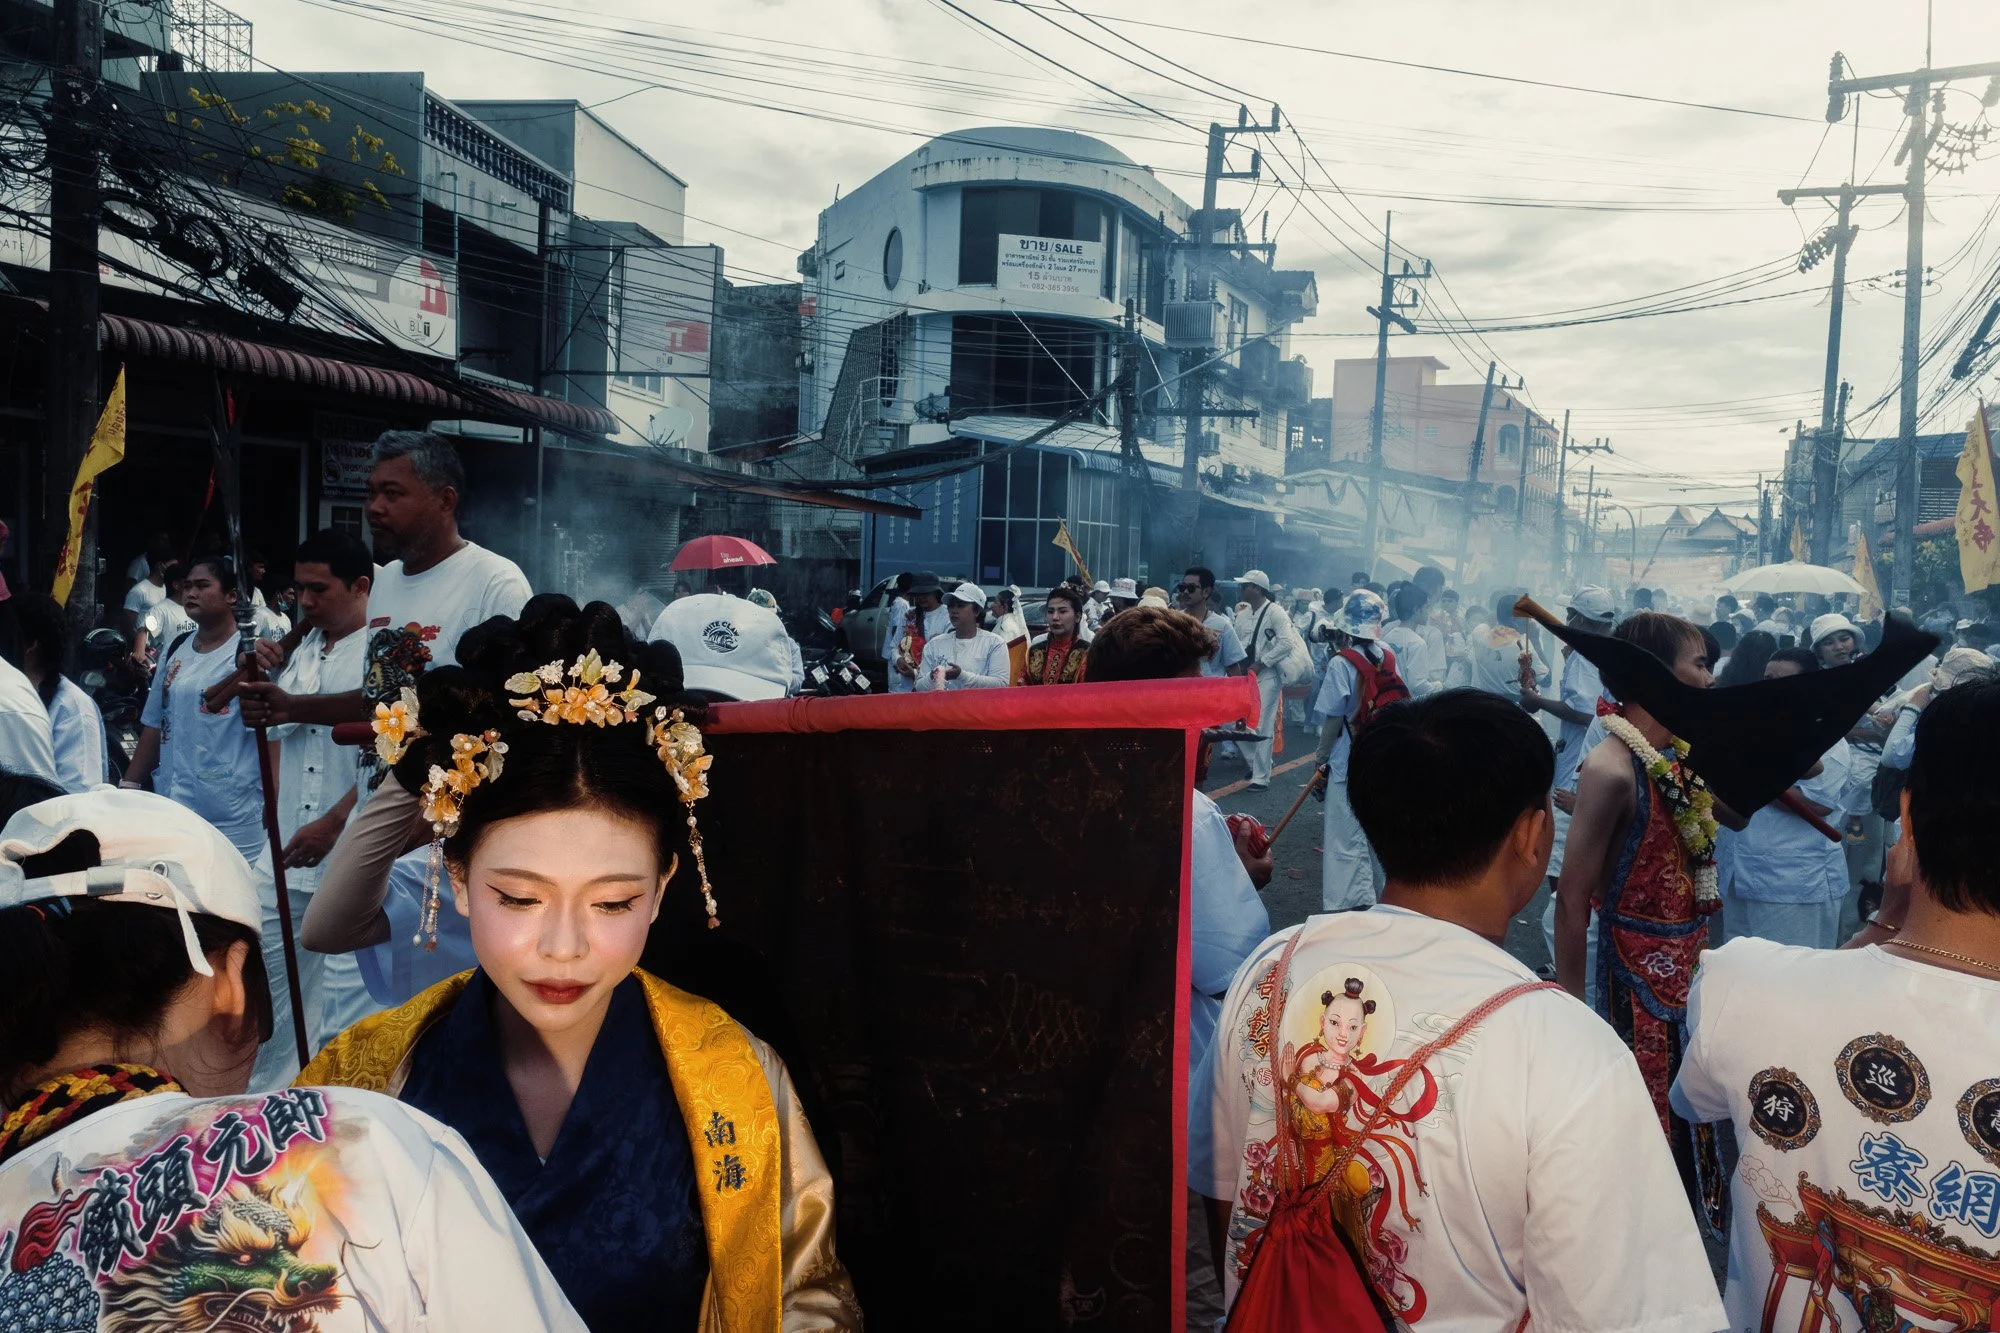
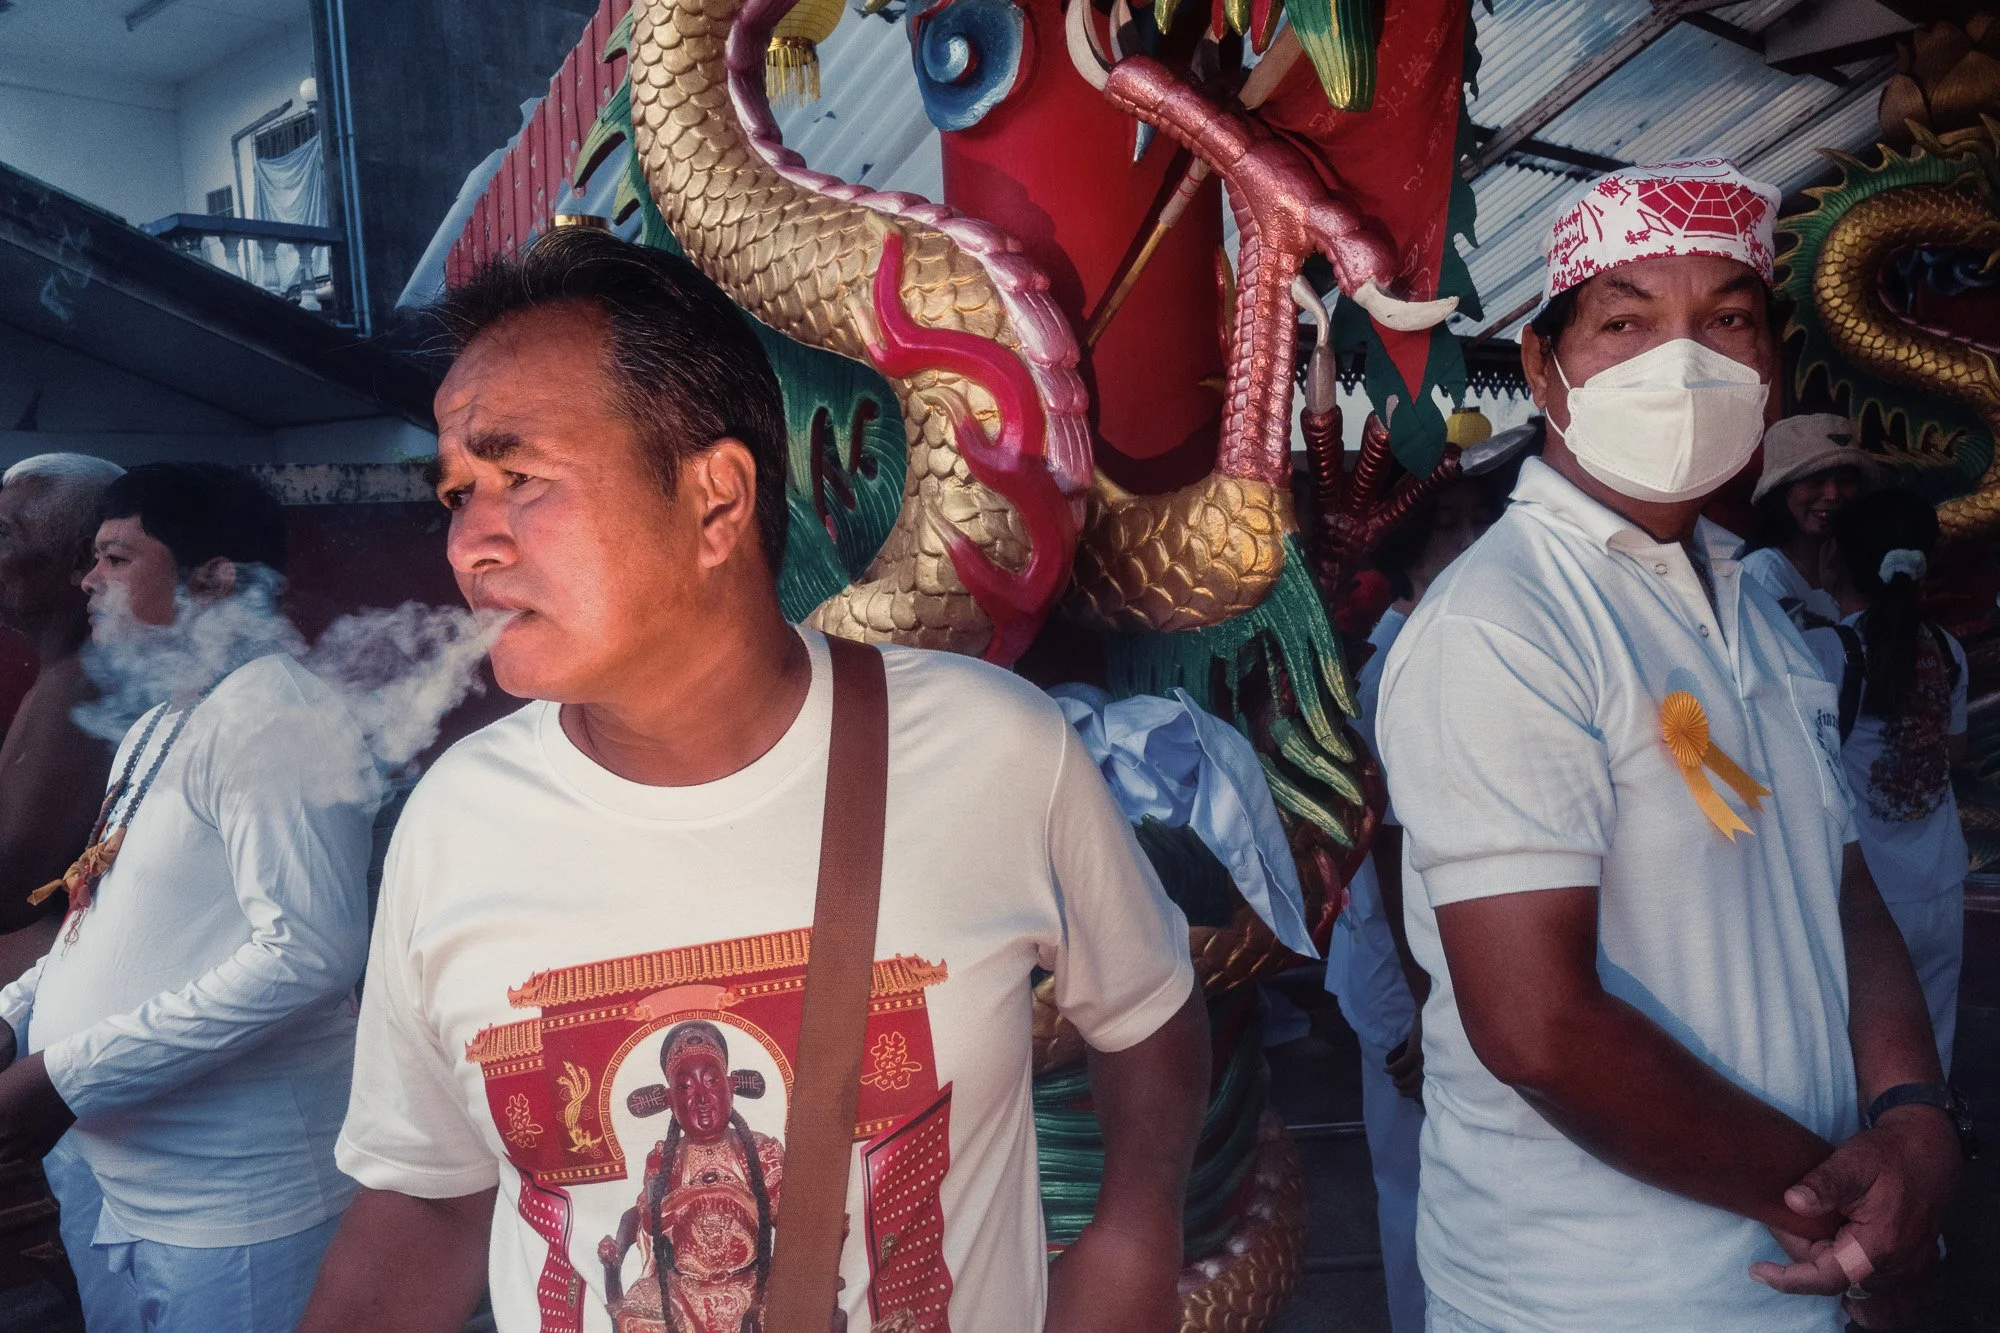
Thousands of people lined the streets to watch. Most were dressed in white, which is basically the dress code for the festival. It looks beautiful and creates a unified atmosphere.
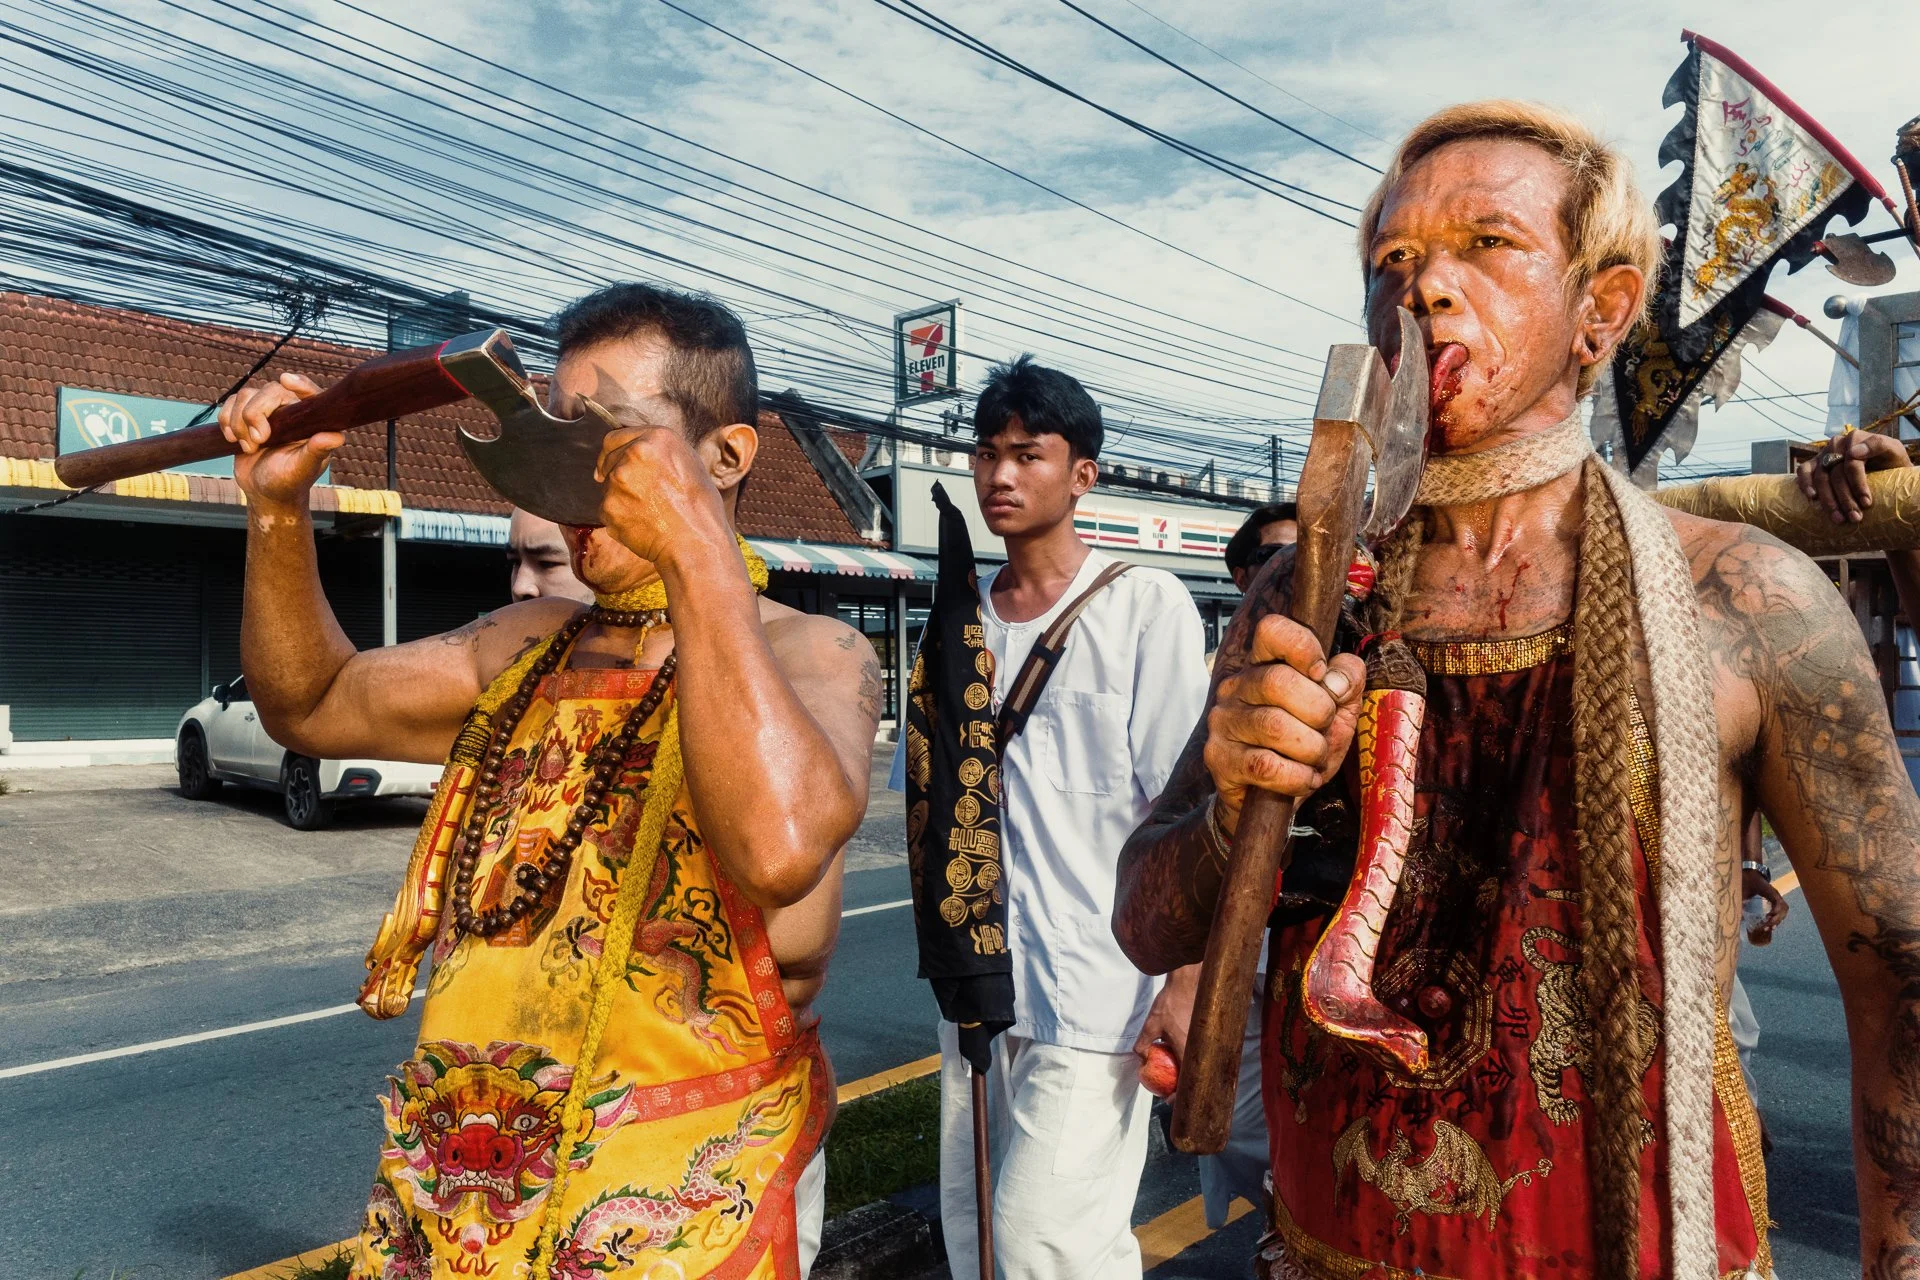
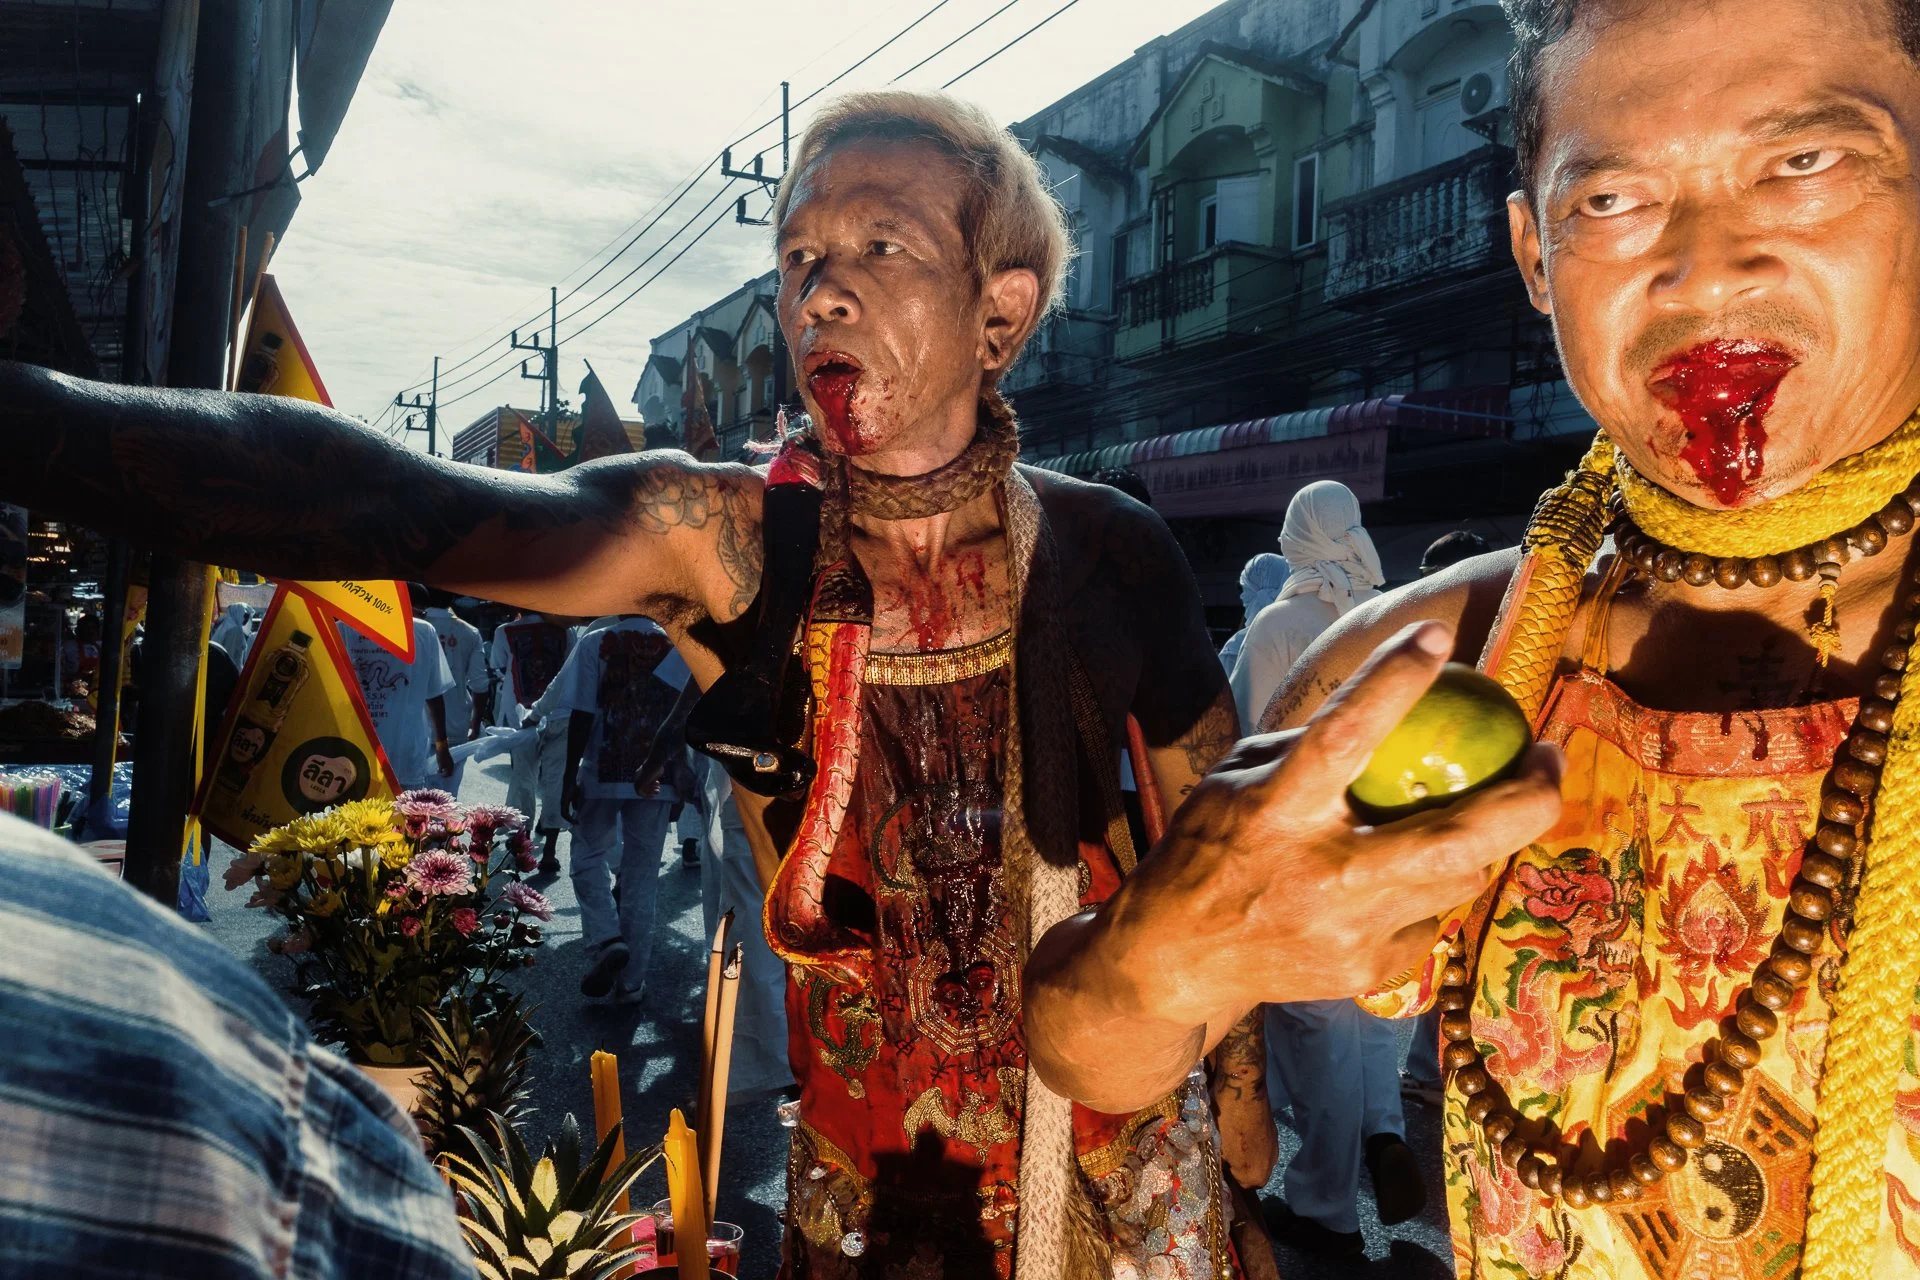
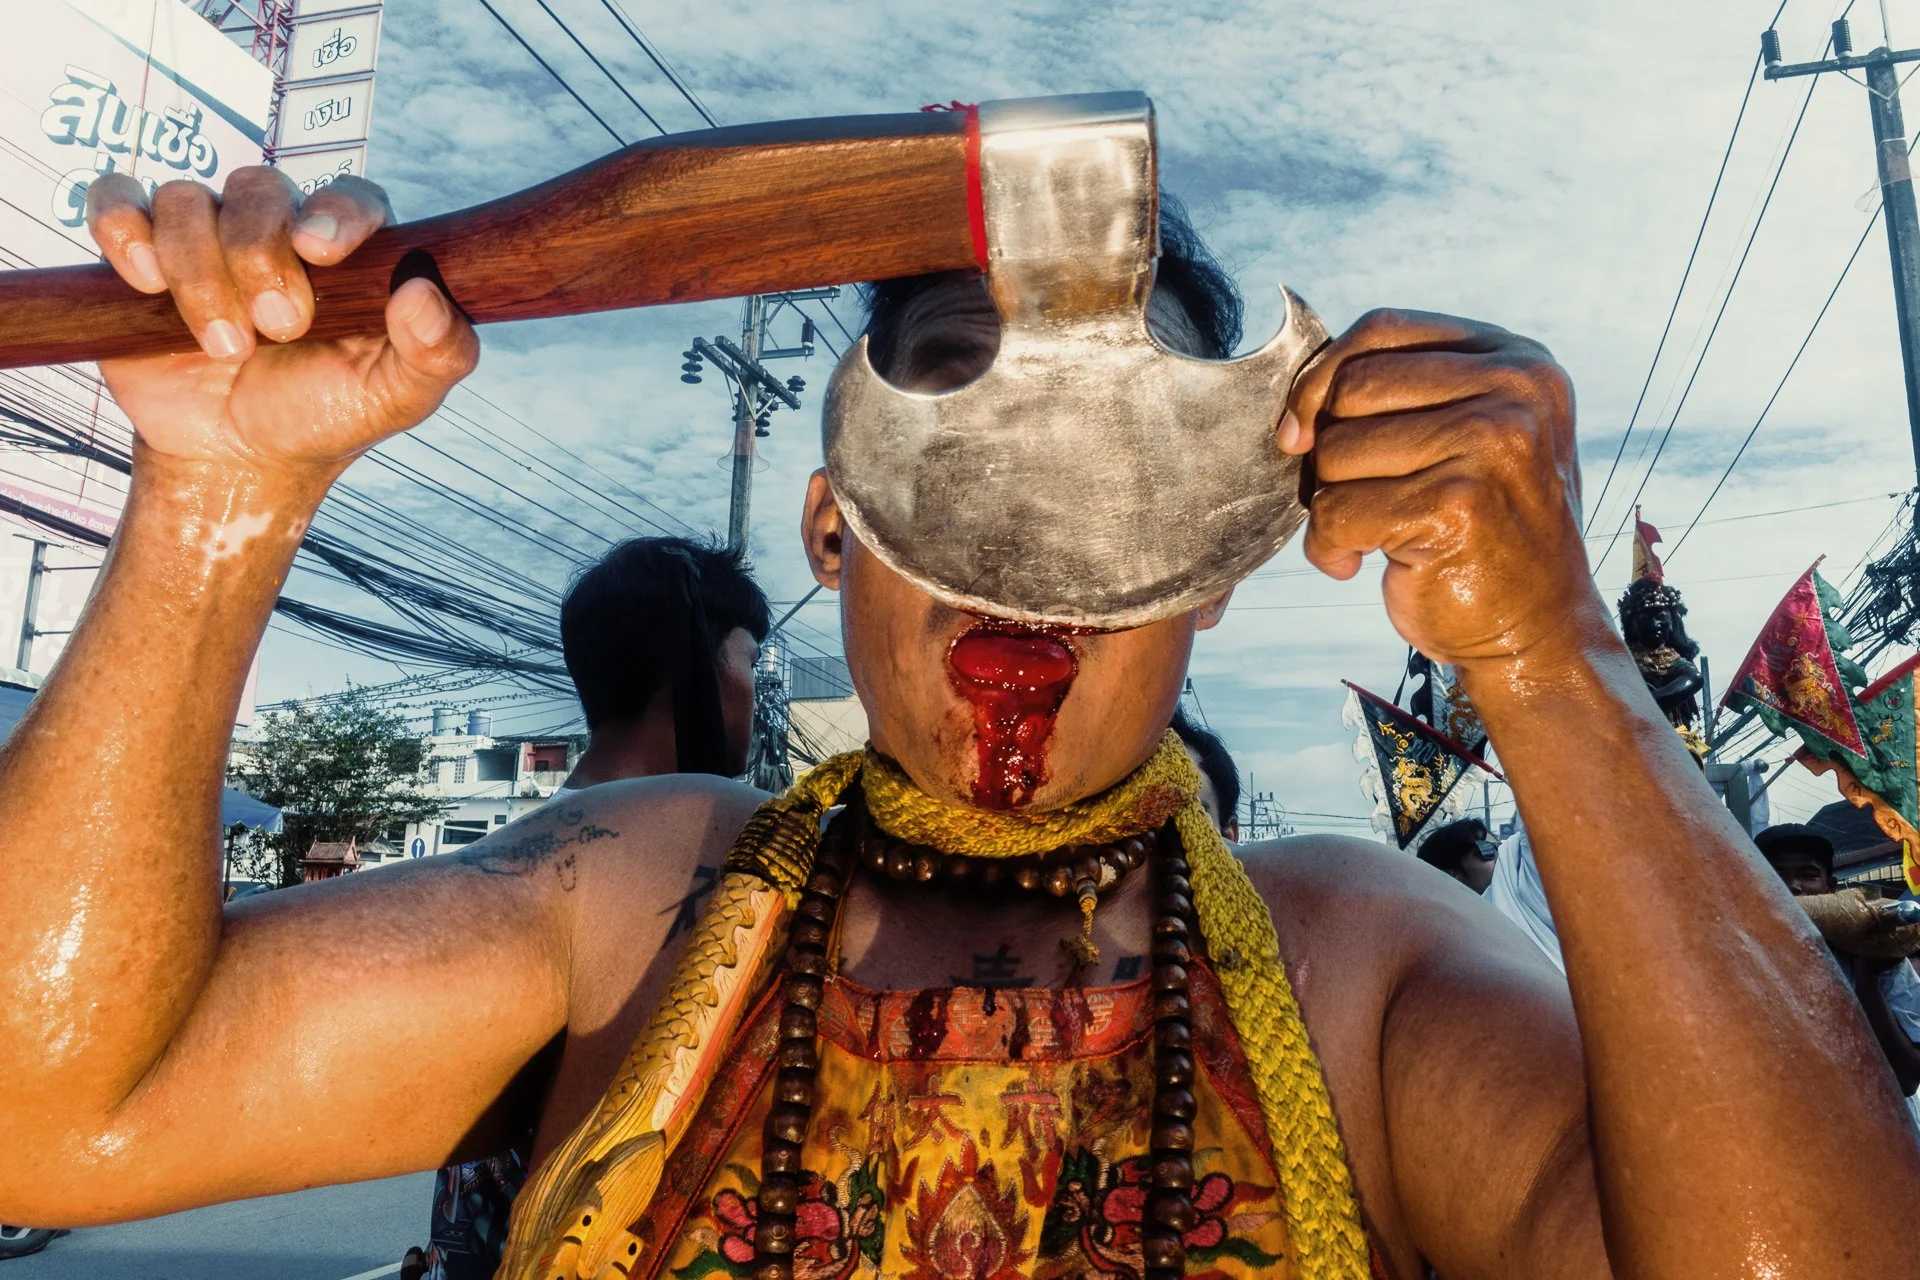
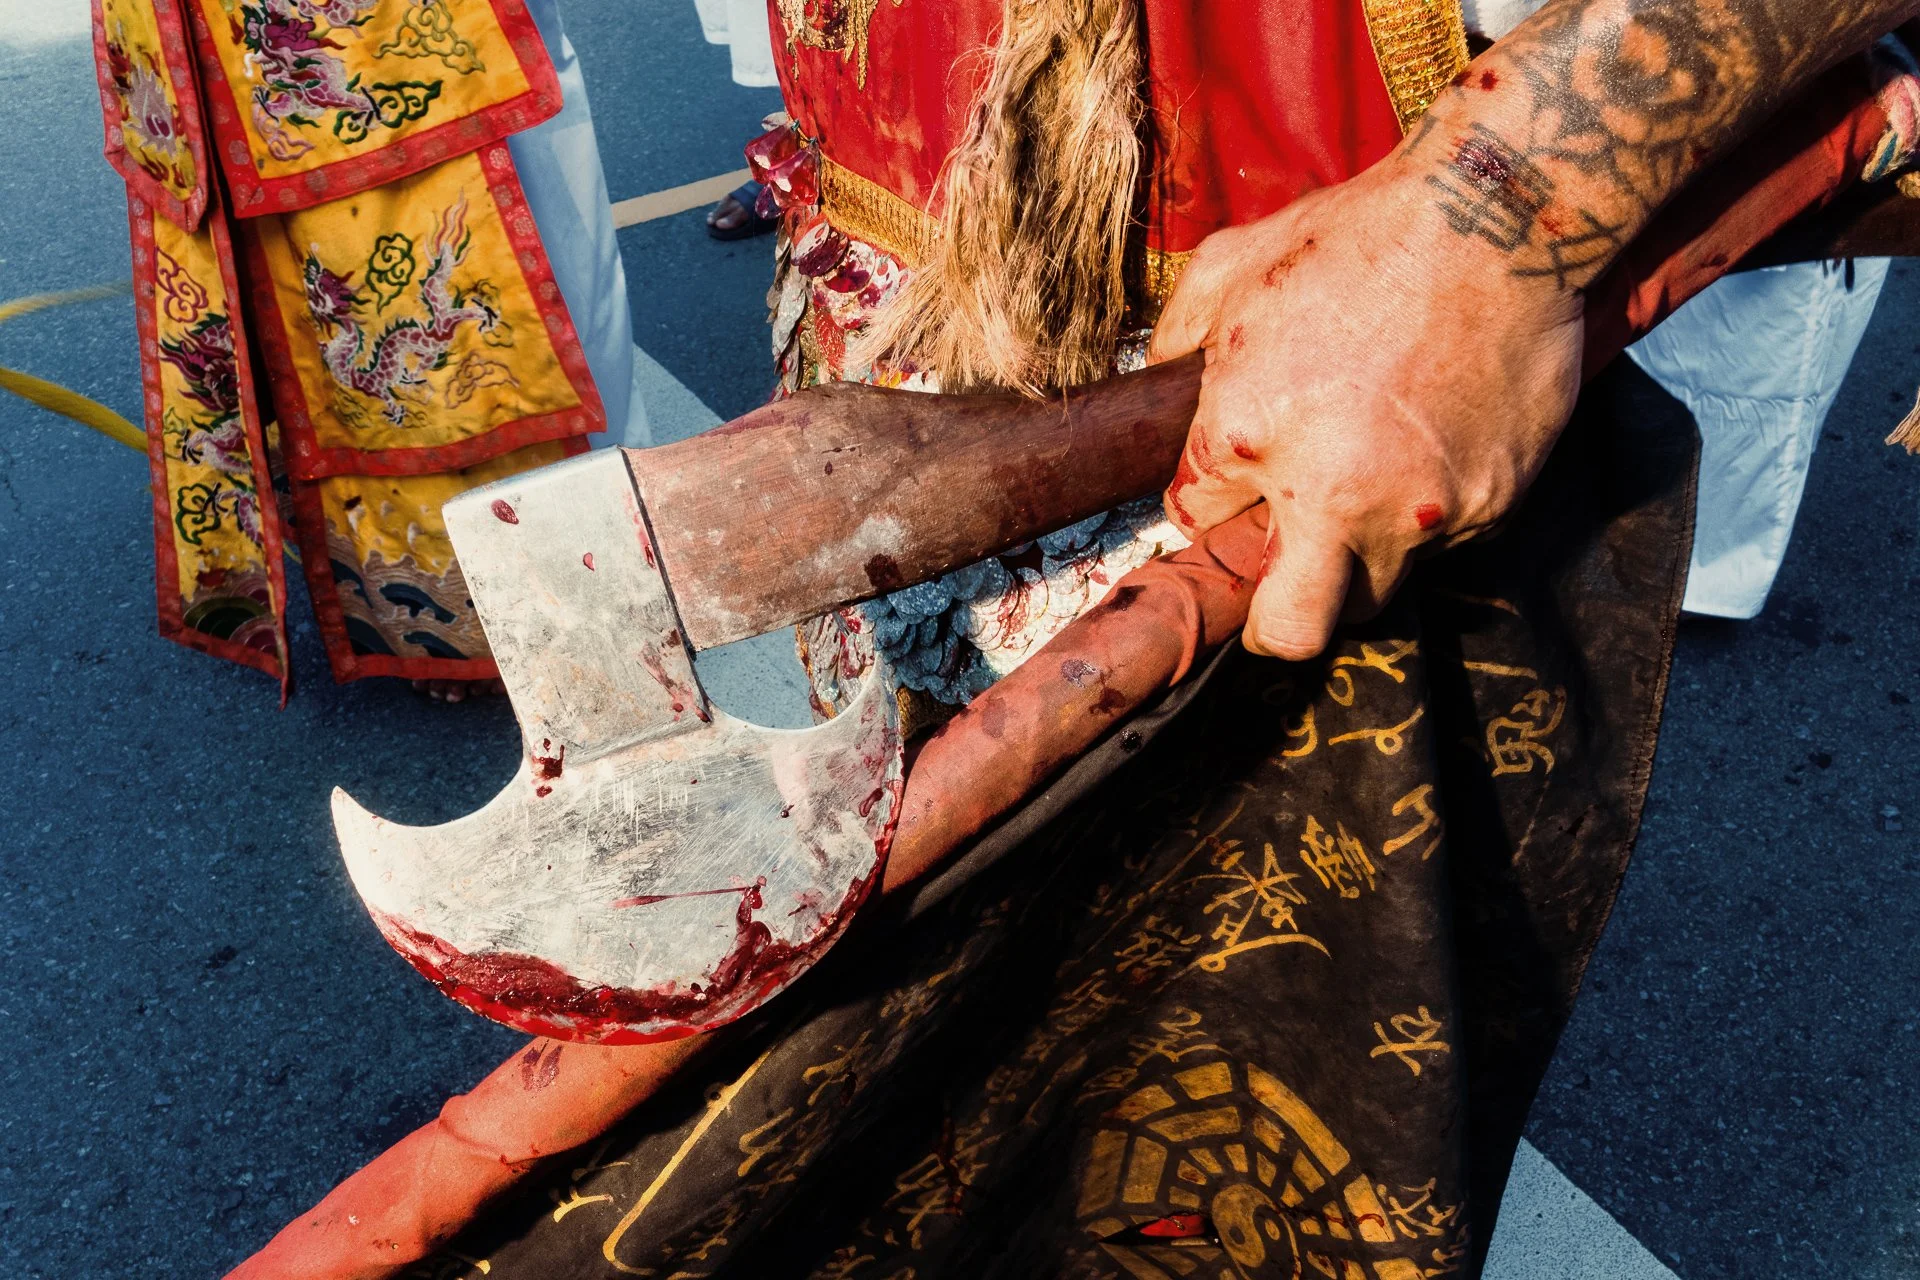
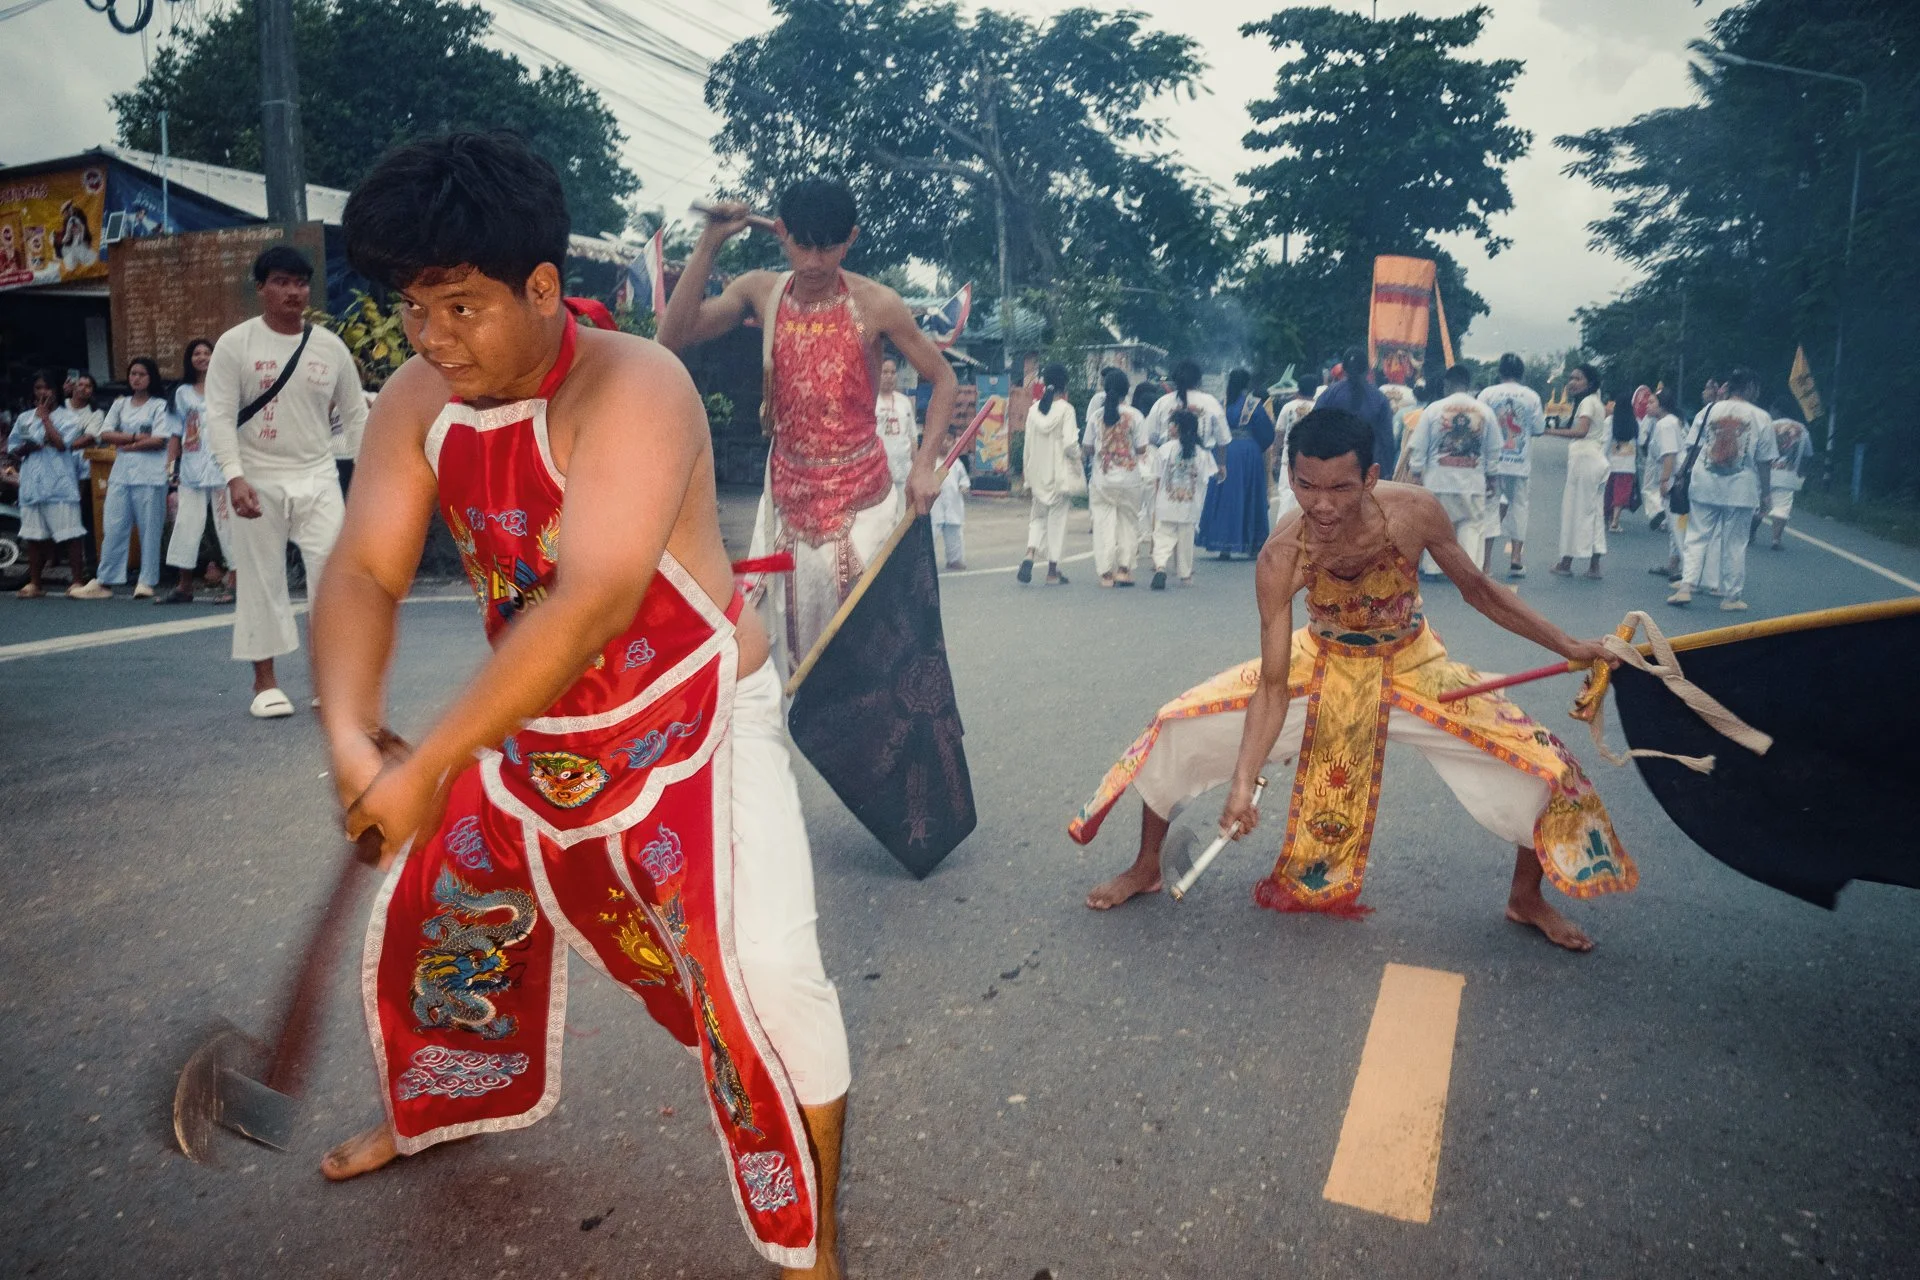
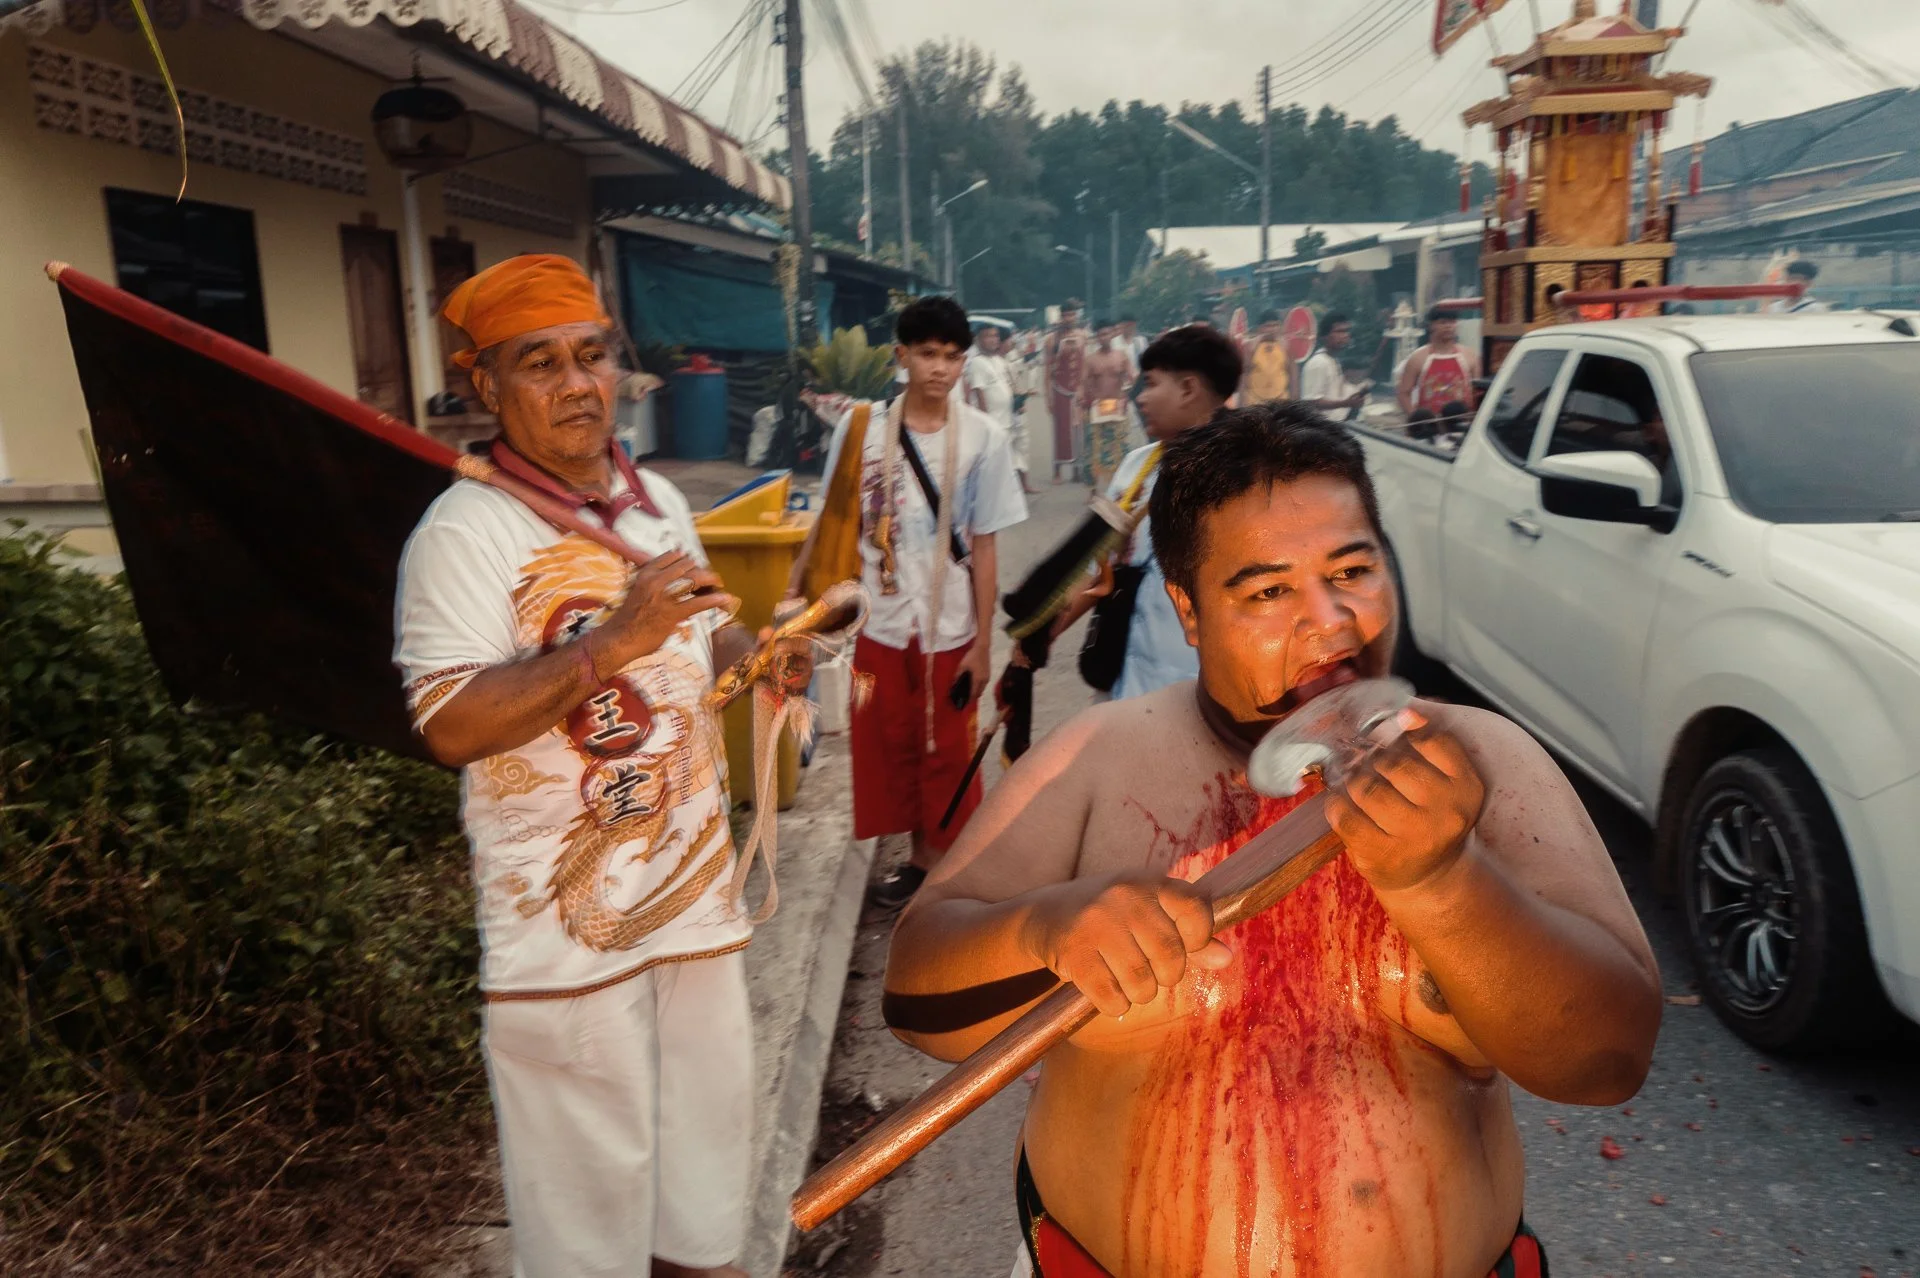
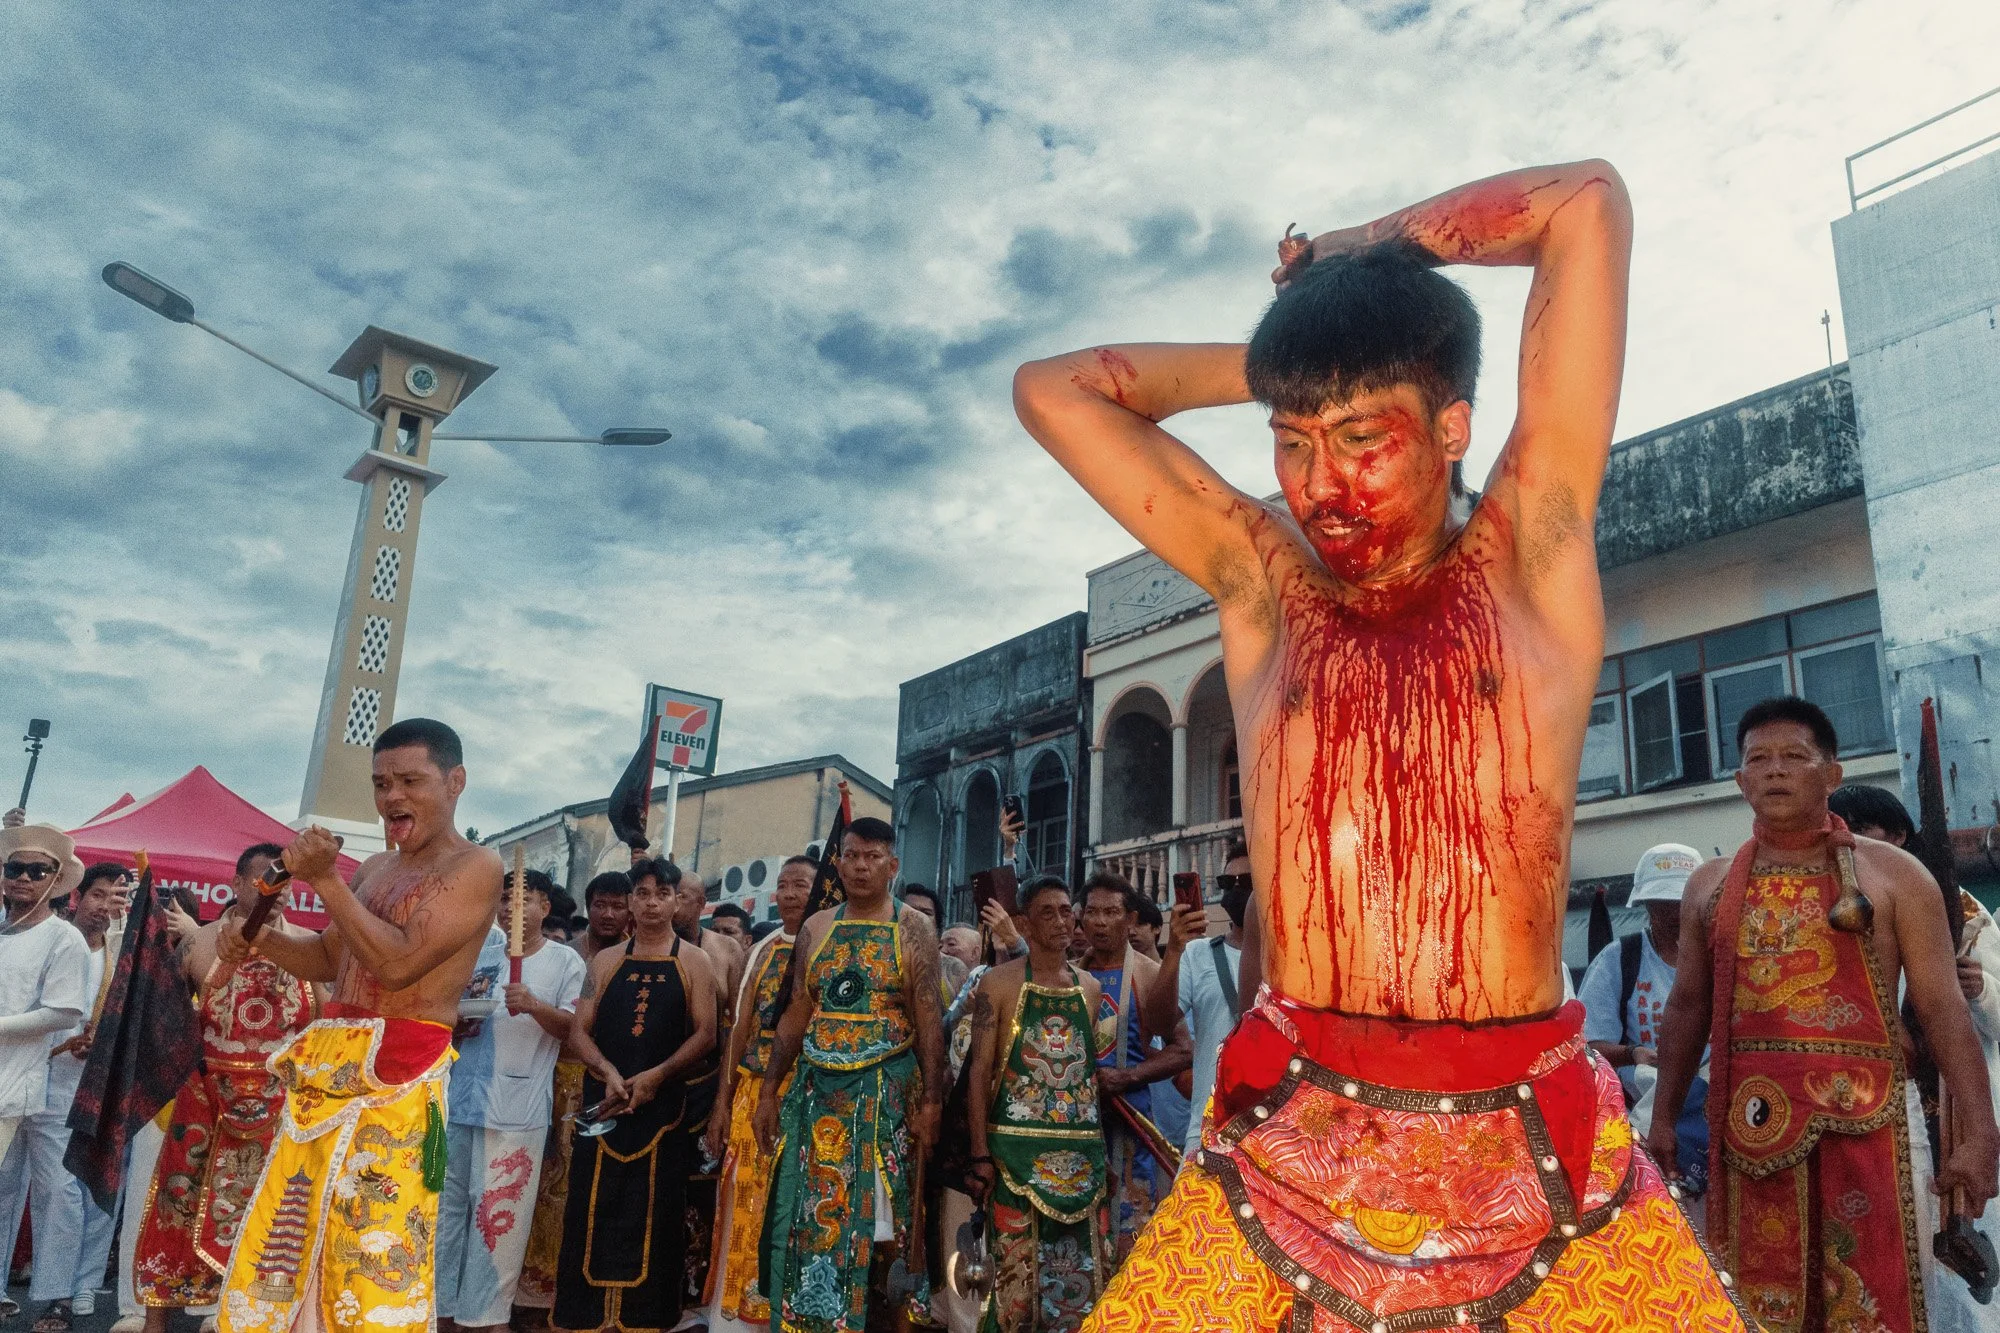
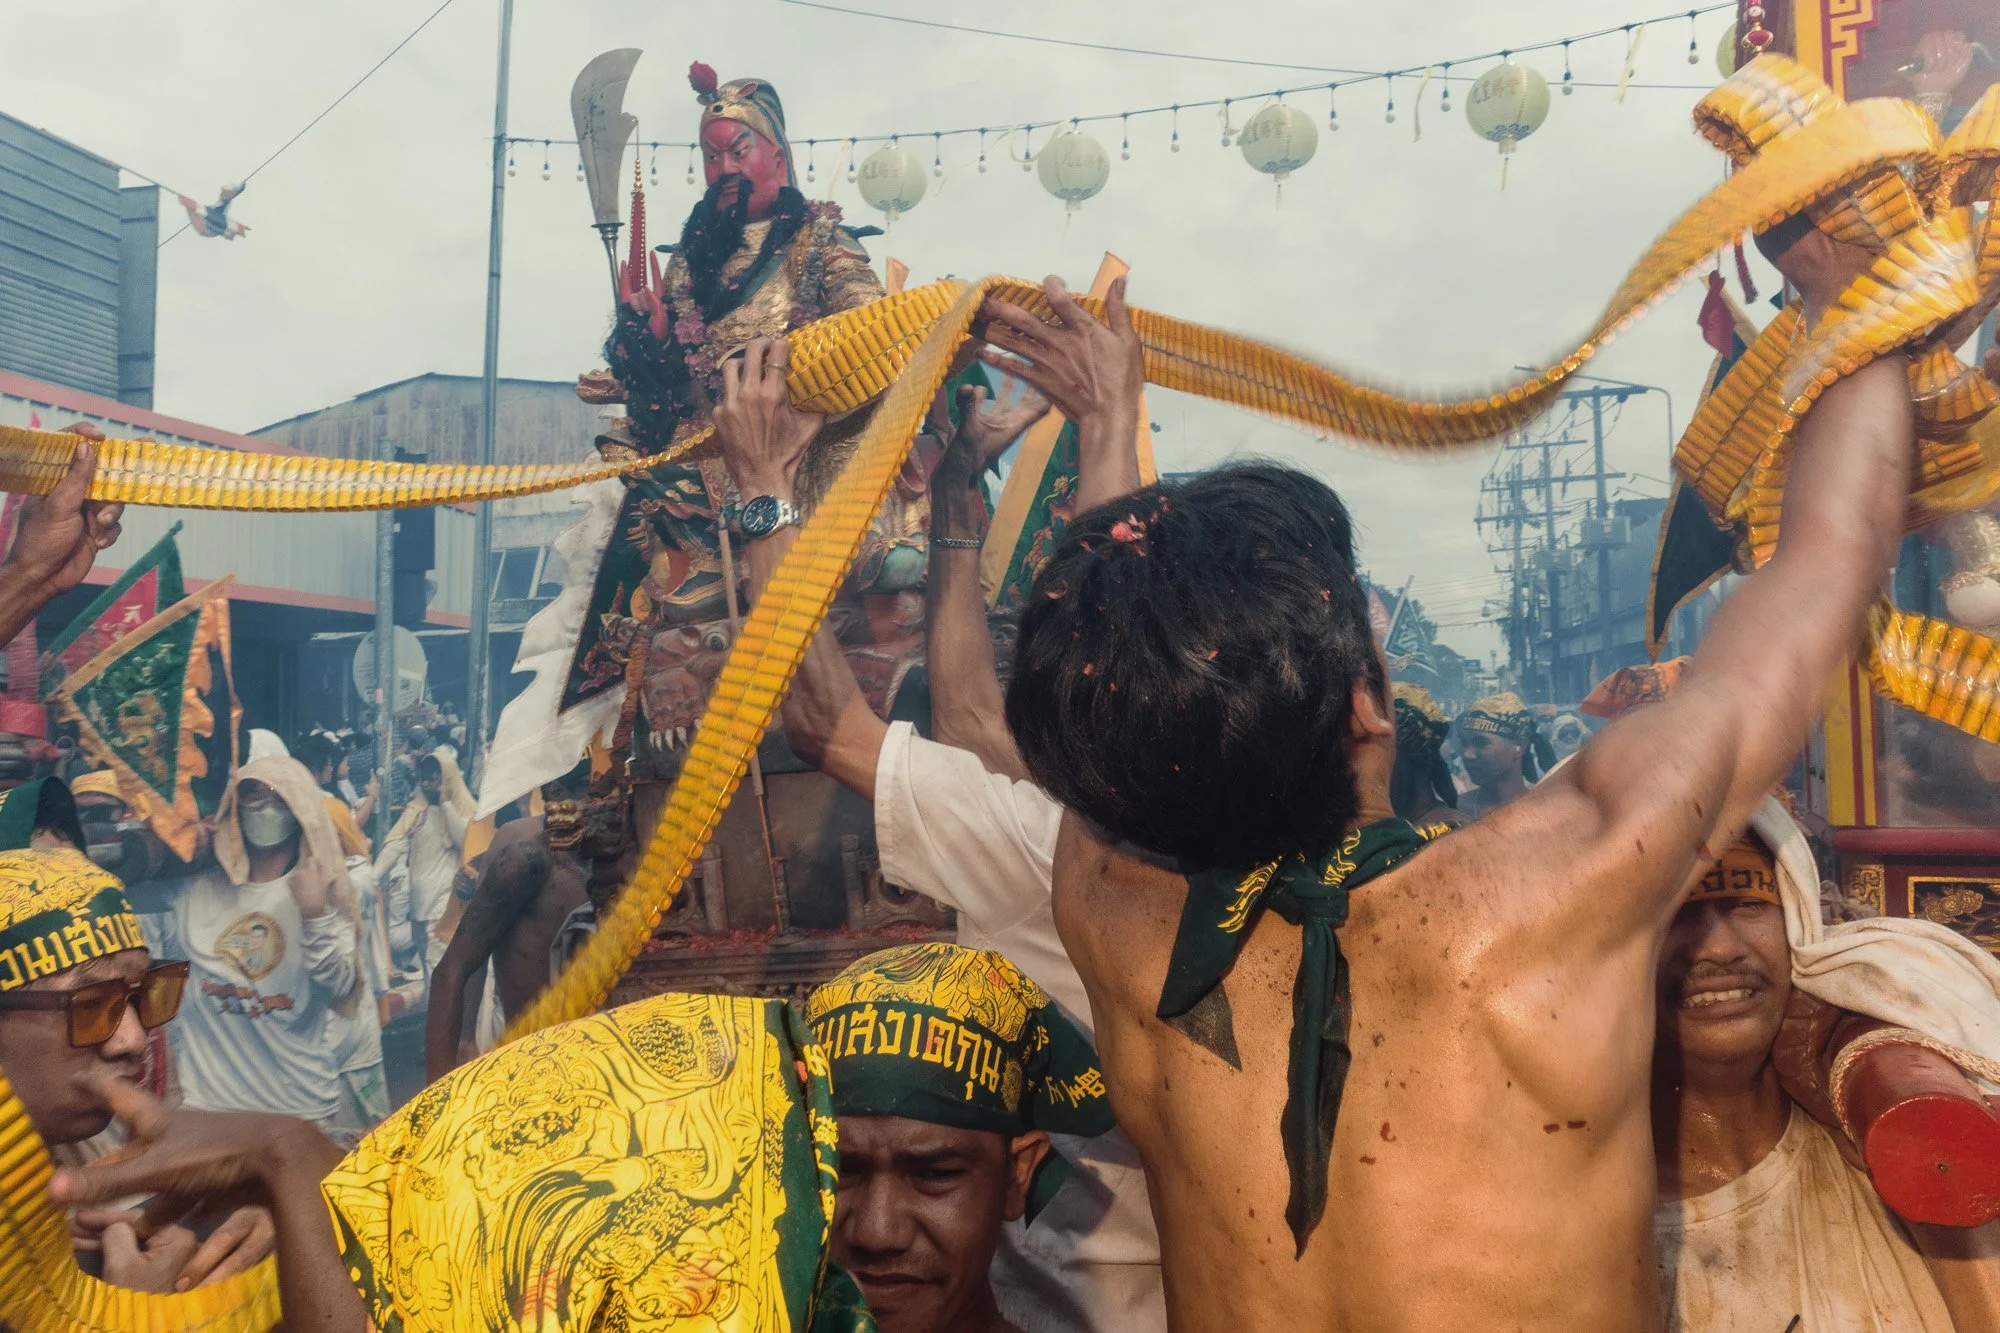
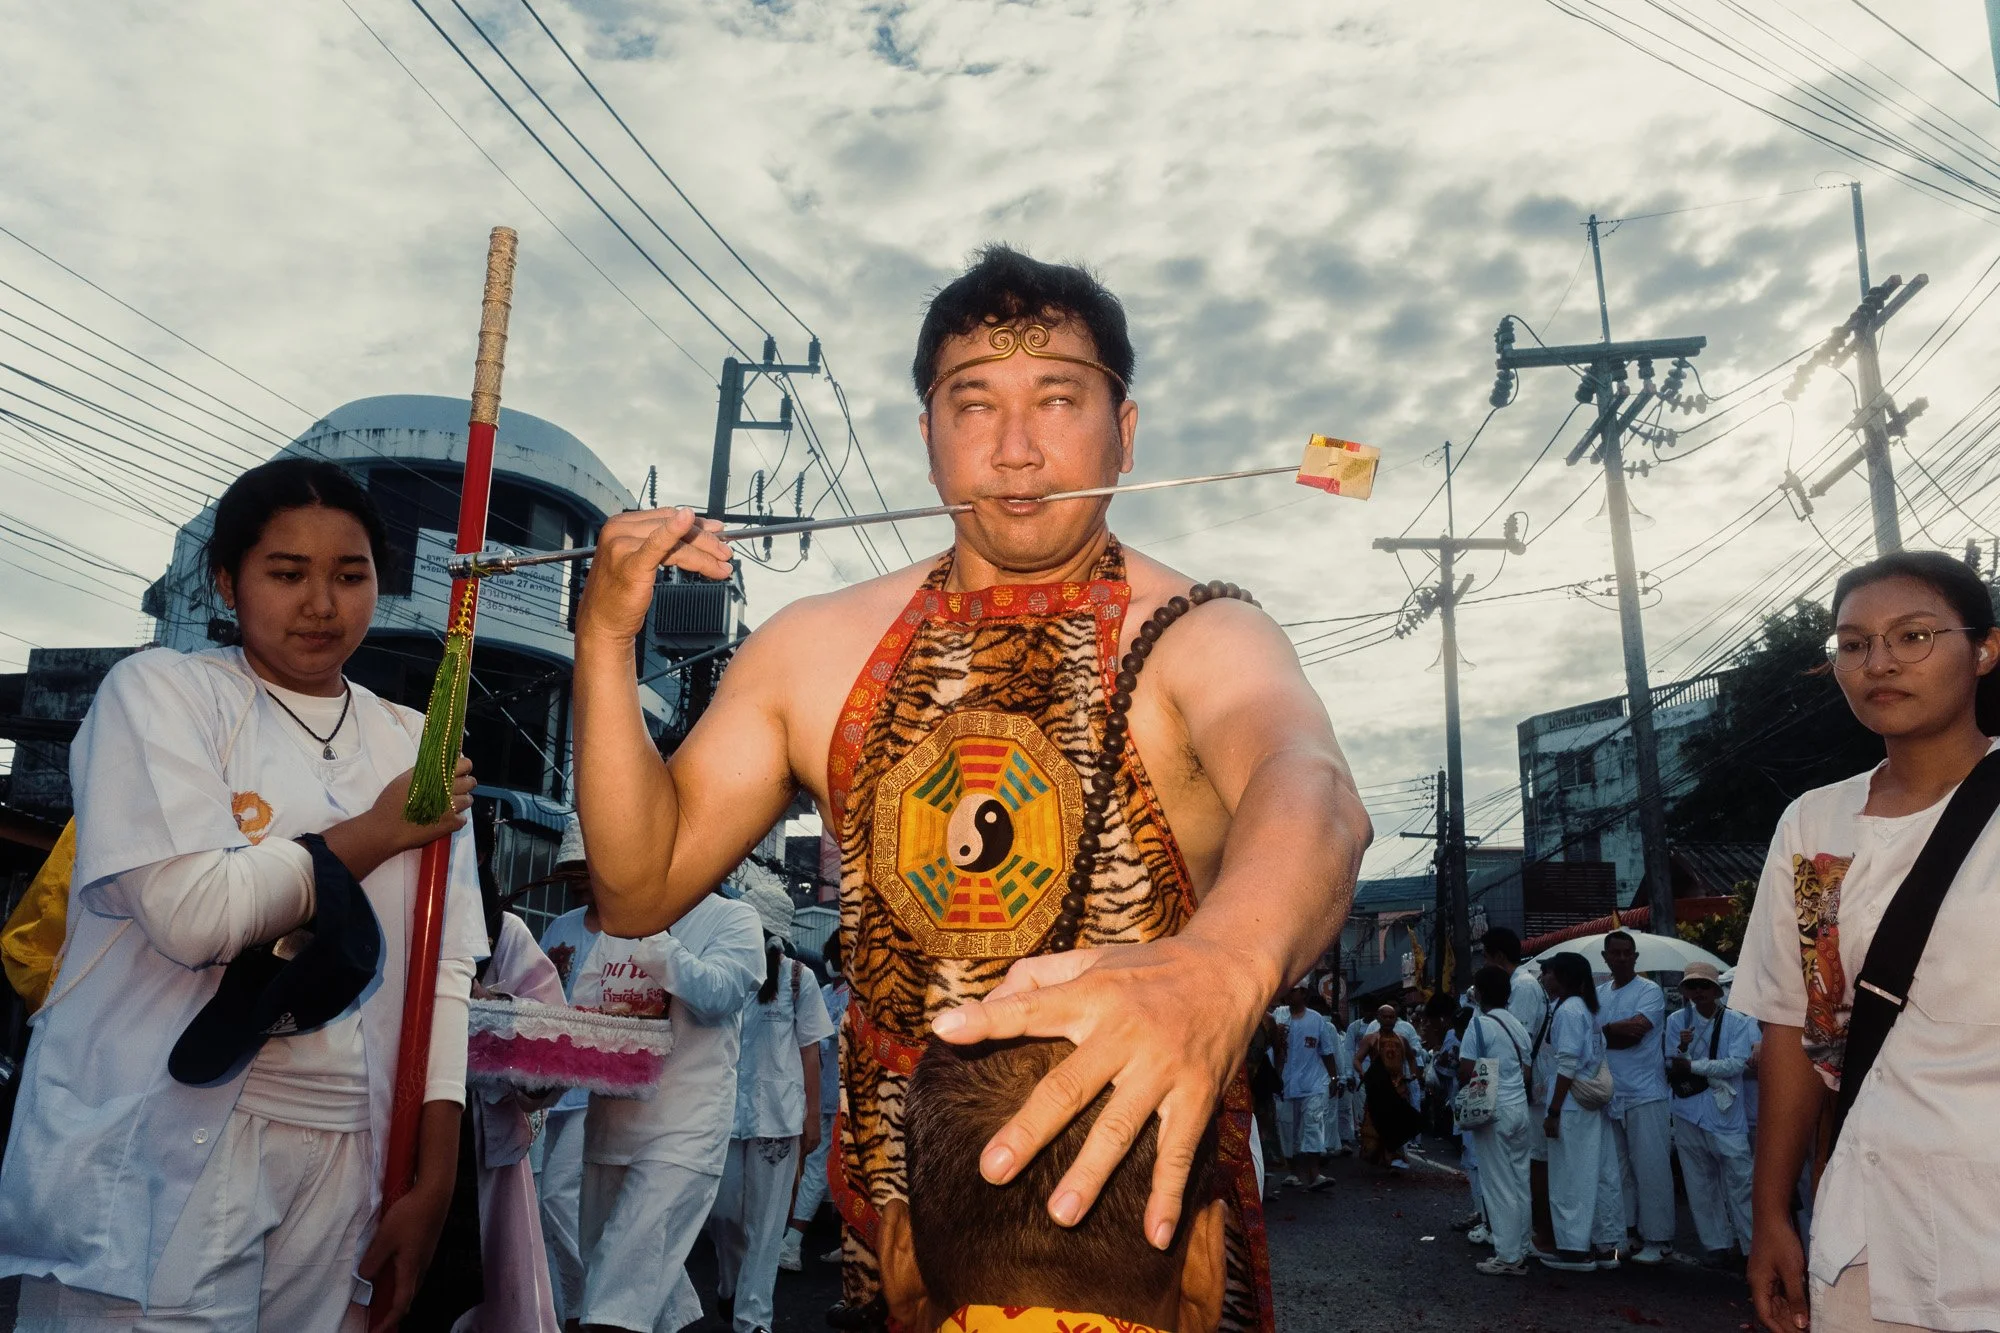
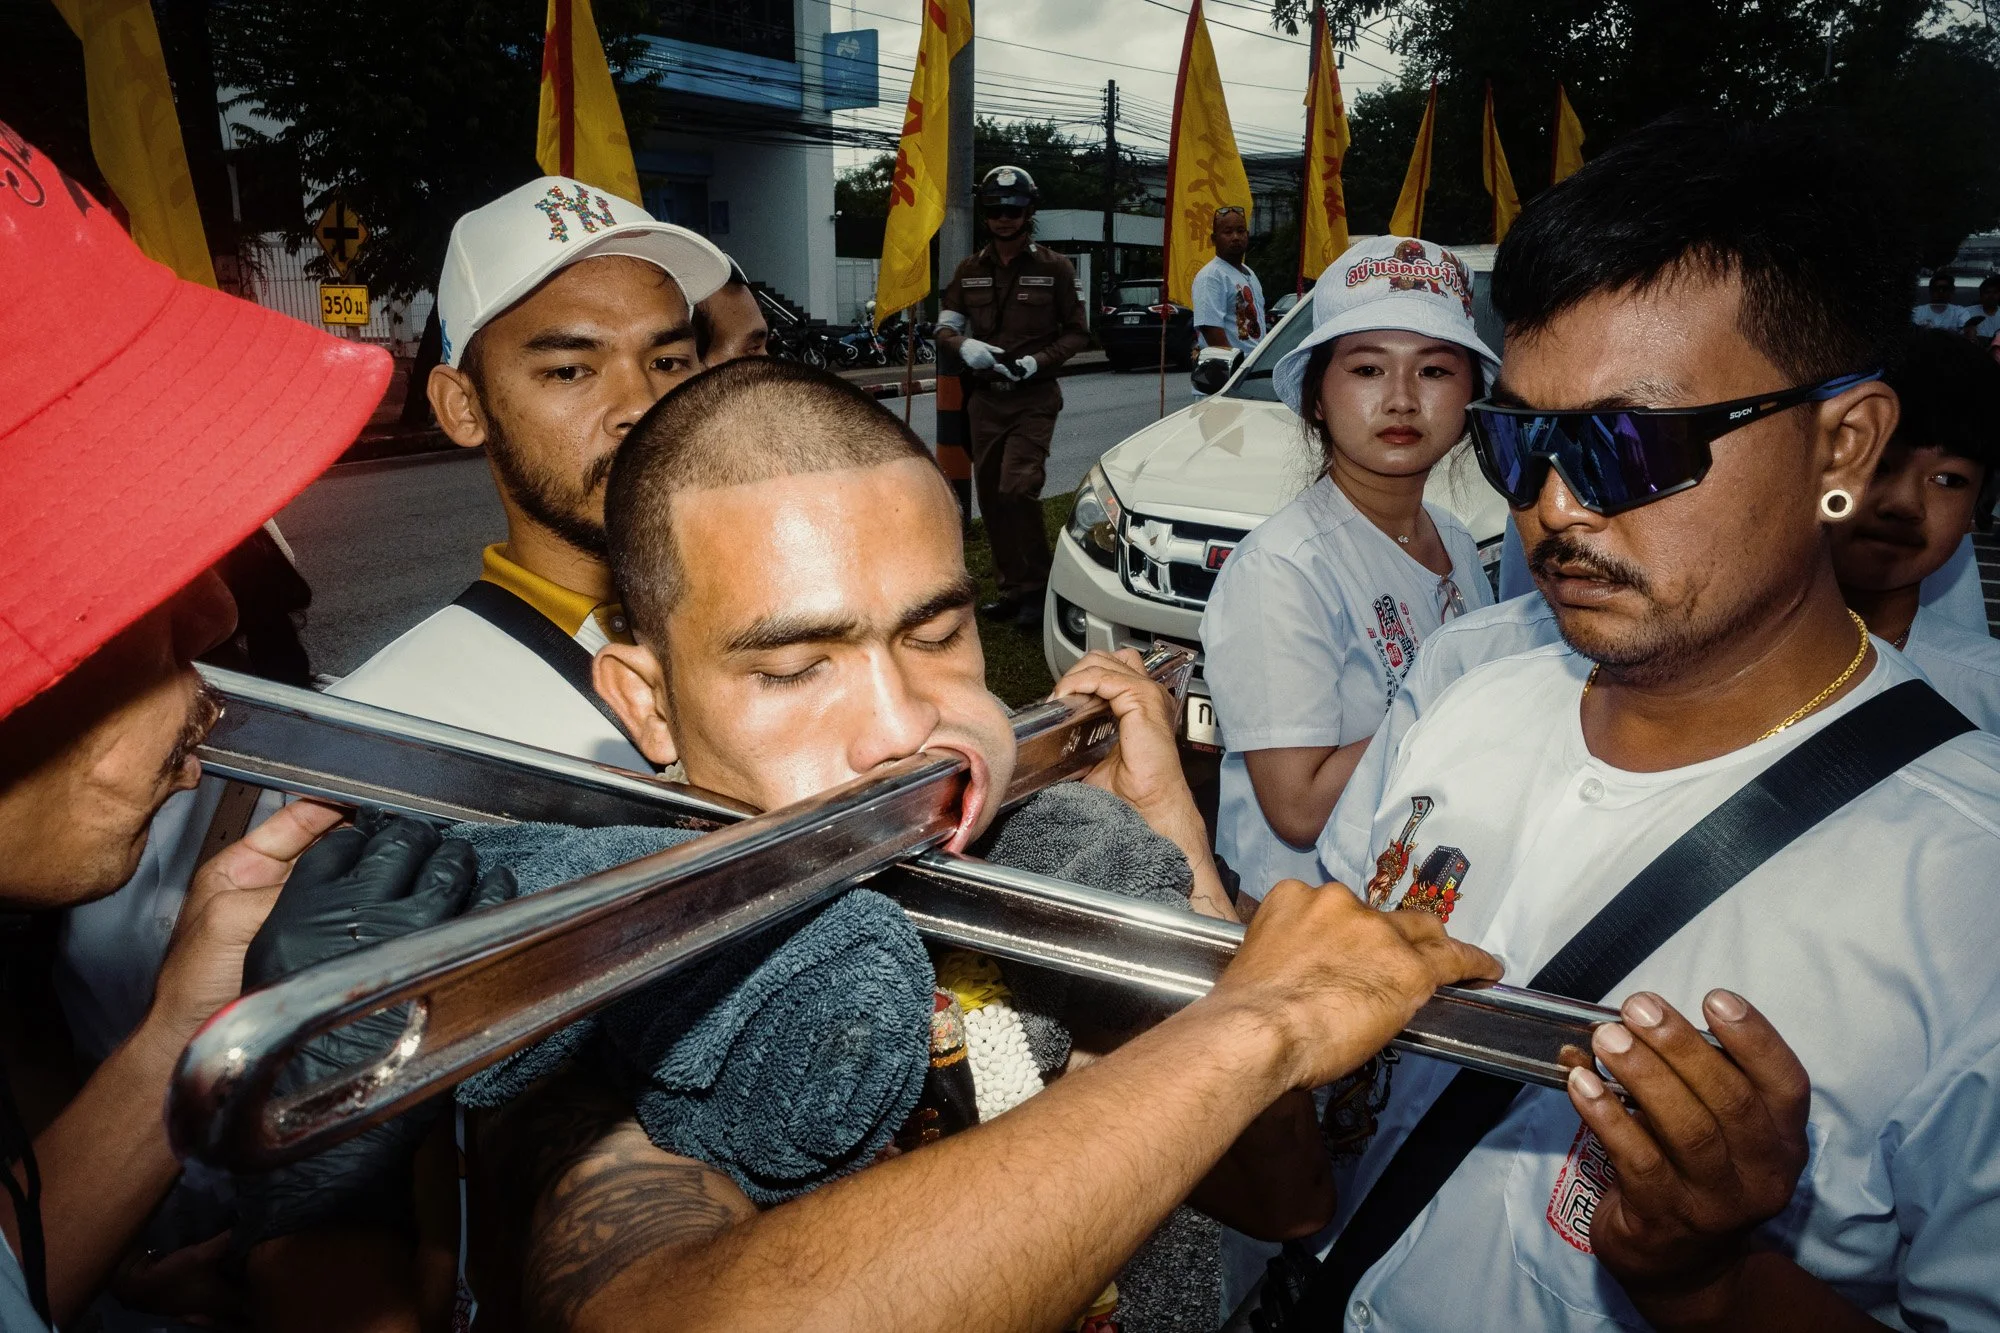
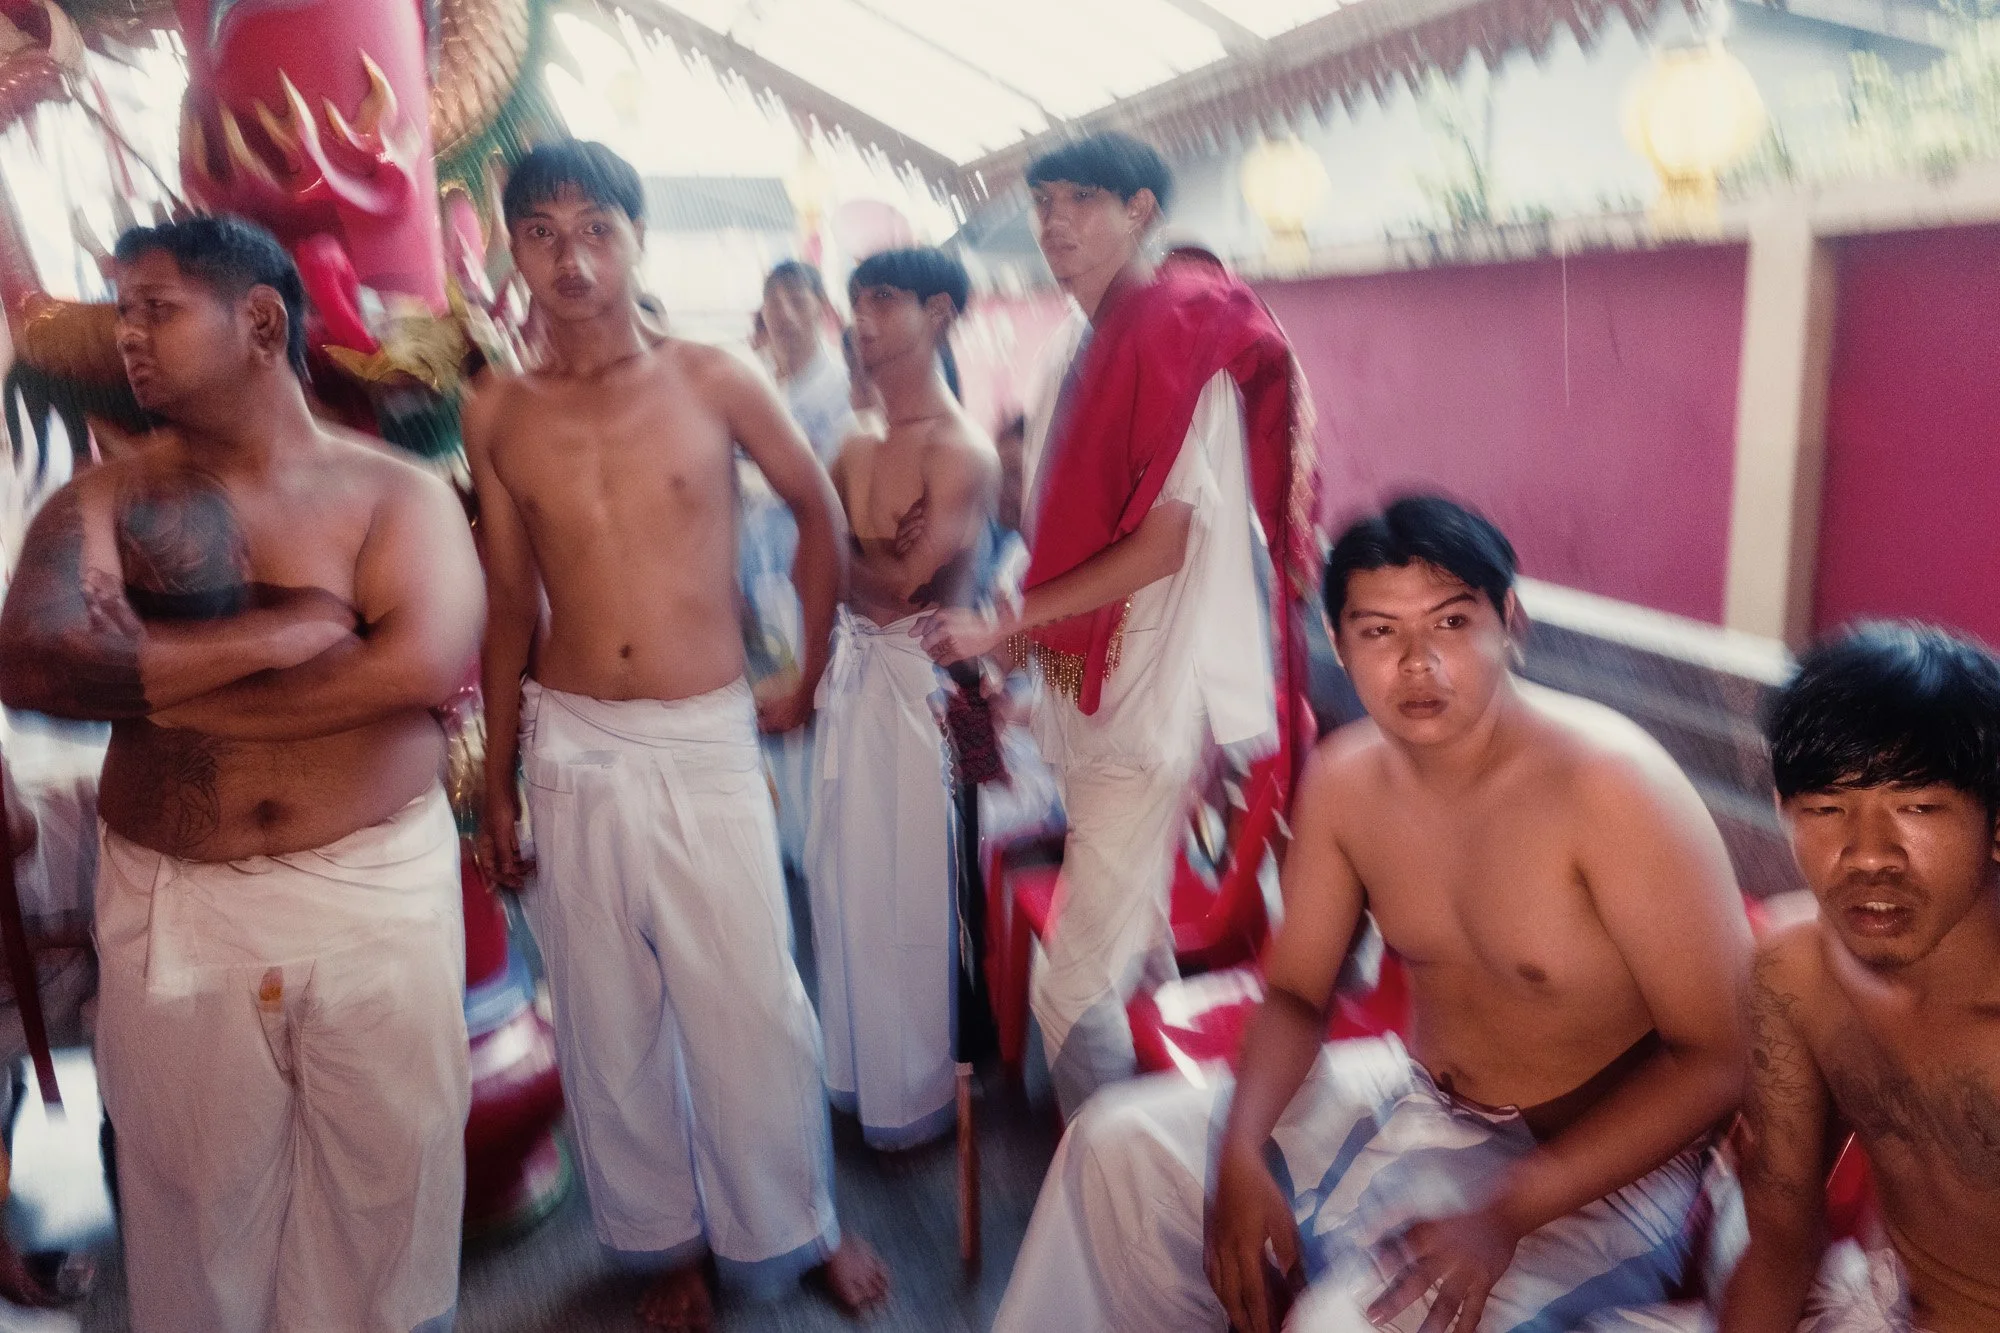
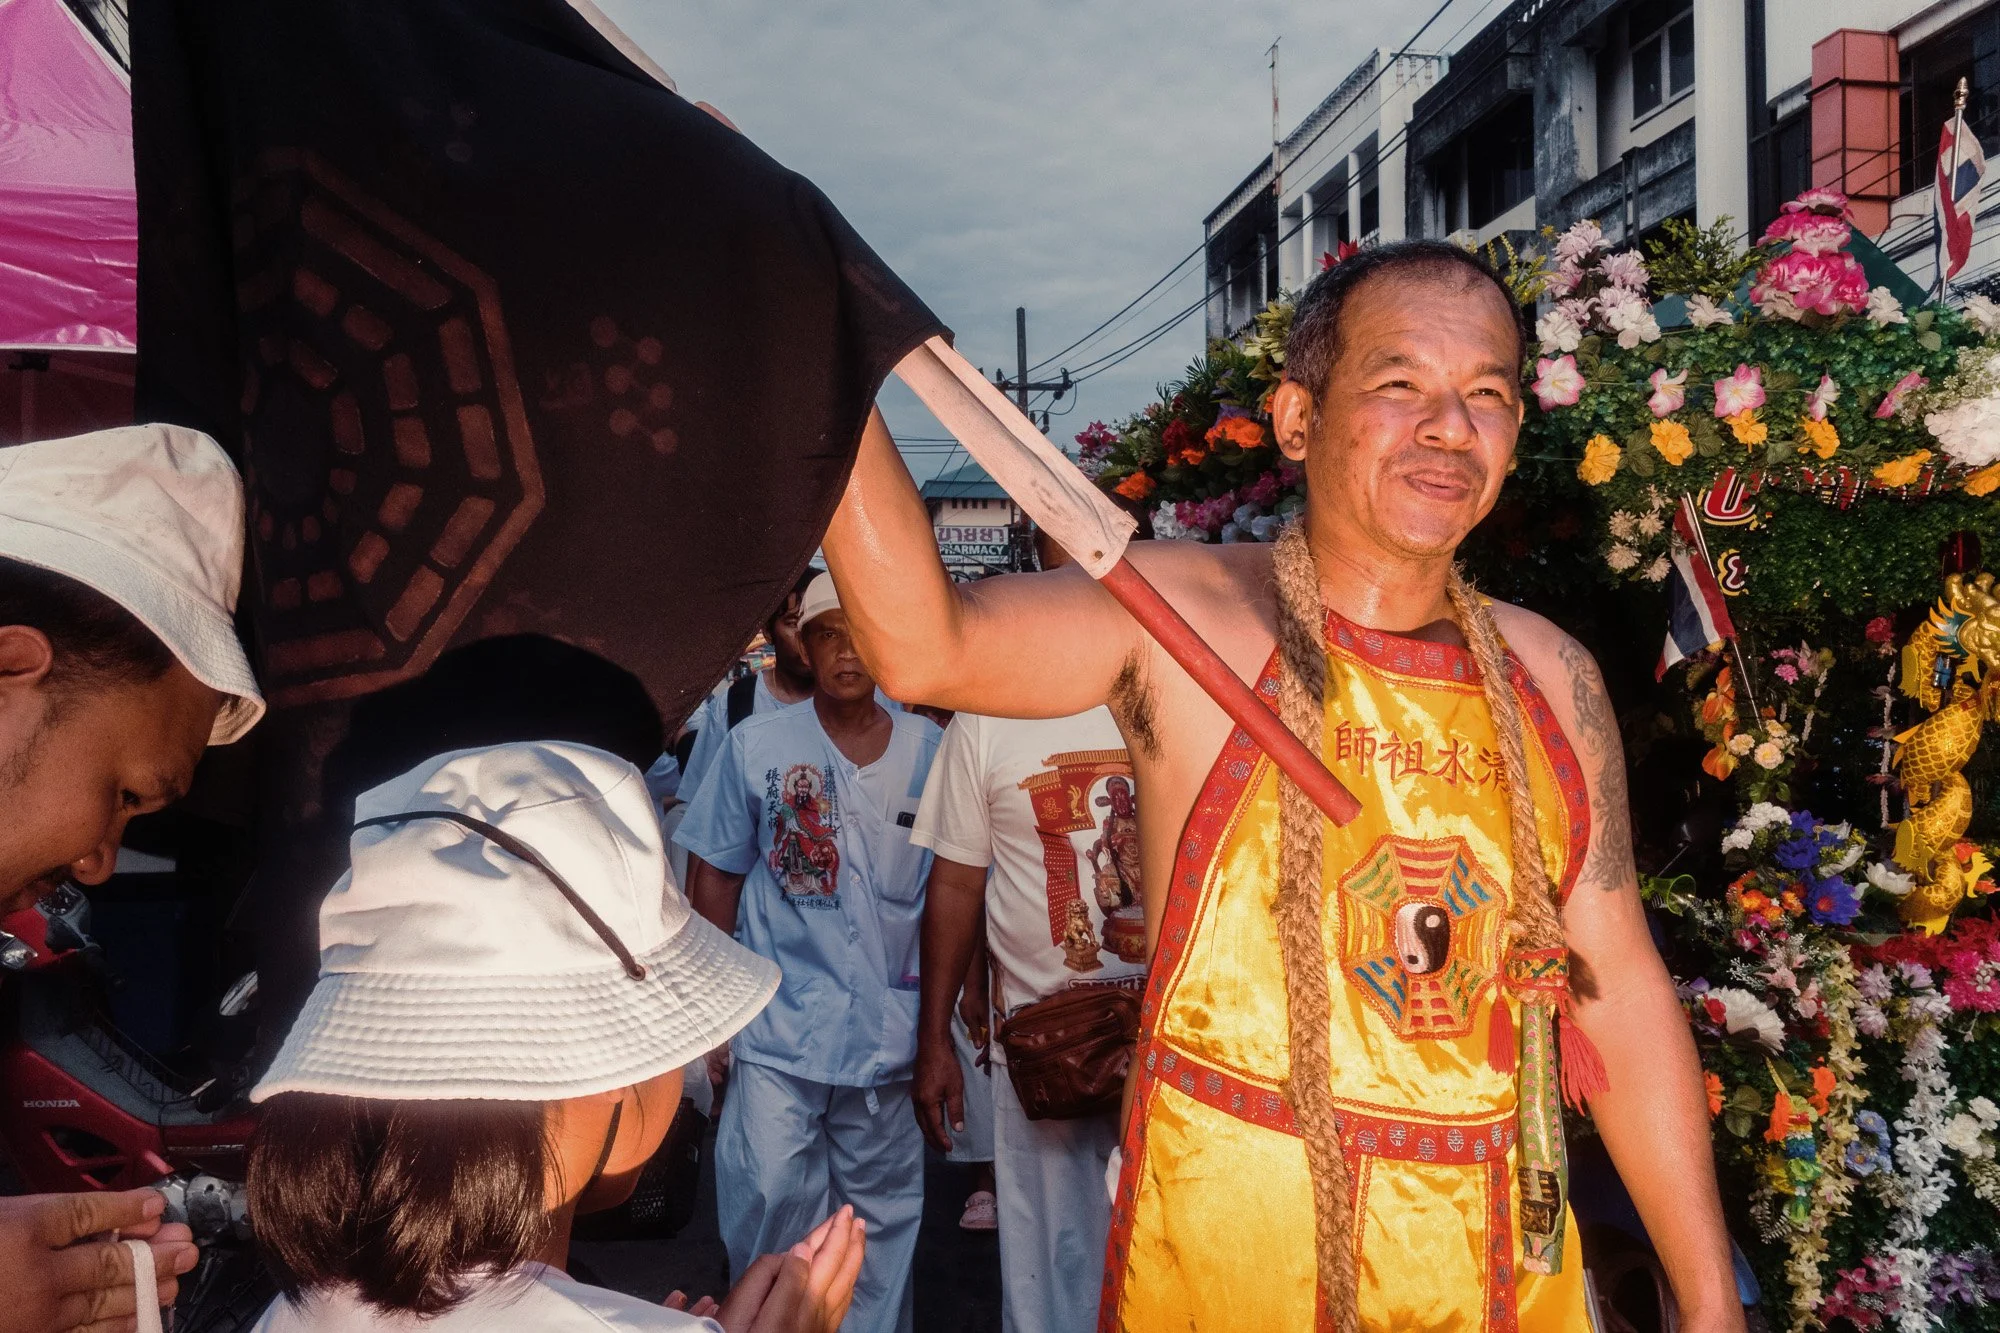
What made this parade special was that Masongs from all shrines across Phuket came together. There were no piercings in this event, but some Masongs were still performing rituals such as cutting themselves with swords or axes.
At one point I noticed roses being handed out. I was not sure what they represented, but moments later I spotted a Masong doing something wild and quickly ran over to capture the moment.

10. Ricoh GRIV - 1/8 - f/8.0 - ISO800

11. Ricoh GRIV - 1/4 - f/8.0 - ISO800

12. Ricoh GRIV - 1/4 - f/8.0 - ISO800
Some Masongs were cutting their tongues while walking. From what I have heard, the cuts are not very deep and they heal quickly. Still, it is intense to witness.
It is important to remember that these sacrifices are a meaningful part of the local culture. As outsiders, it is not our place to judge. The rituals carry deep significance for the community.

13. Ricoh GRIV - 0.6 sec - f/8.0 - ISO800

14. Ricoh GRIV - 1/80 - f/8.0 - ISO800
15. Ricoh GRIV - 1/4 - f/8.0 - ISO800
Ahead of the Crowd and the Calm Before the Chaos
Eventually I walked a bit faster to catch up with friends and to get ahead of the parade near Kathu Shrine. Suddenly everything became very calm again. I saw a woman napping in front of her house, and even a cool beetle sitting on the wall behind her. It was a peaceful moment before the madness returned.

16. Ricoh GRIV - 1/13 - f/8.0 - ISO800
As soon as the main part of the parade arrived, all hell broke loose. Firecrackers exploded everywhere. The smoke became so thick that seeing the Masongs was a challenge. Shooting in this chaos takes effort, patience and a little luck, but the results can be incredible.
17. Ricoh GRIV - 0.3 sec - f/8.0 - ISO800
18. Ricoh GRIV - 1/4 - f/8.0 - ISO800

19. Ricoh GRIV - 1/4 - f/8.0 - ISO800
20. Ricoh GRIV - 1/4 - f/8.0 - ISO800
Arriving at Kathu Shrine
Kathu Shrine was only a few steps away from where the main crowd had gathered. It was packed with people, and more kept arriving. Outside, a designated area had been set up where Masongs could perform their ritual to step out of trance.
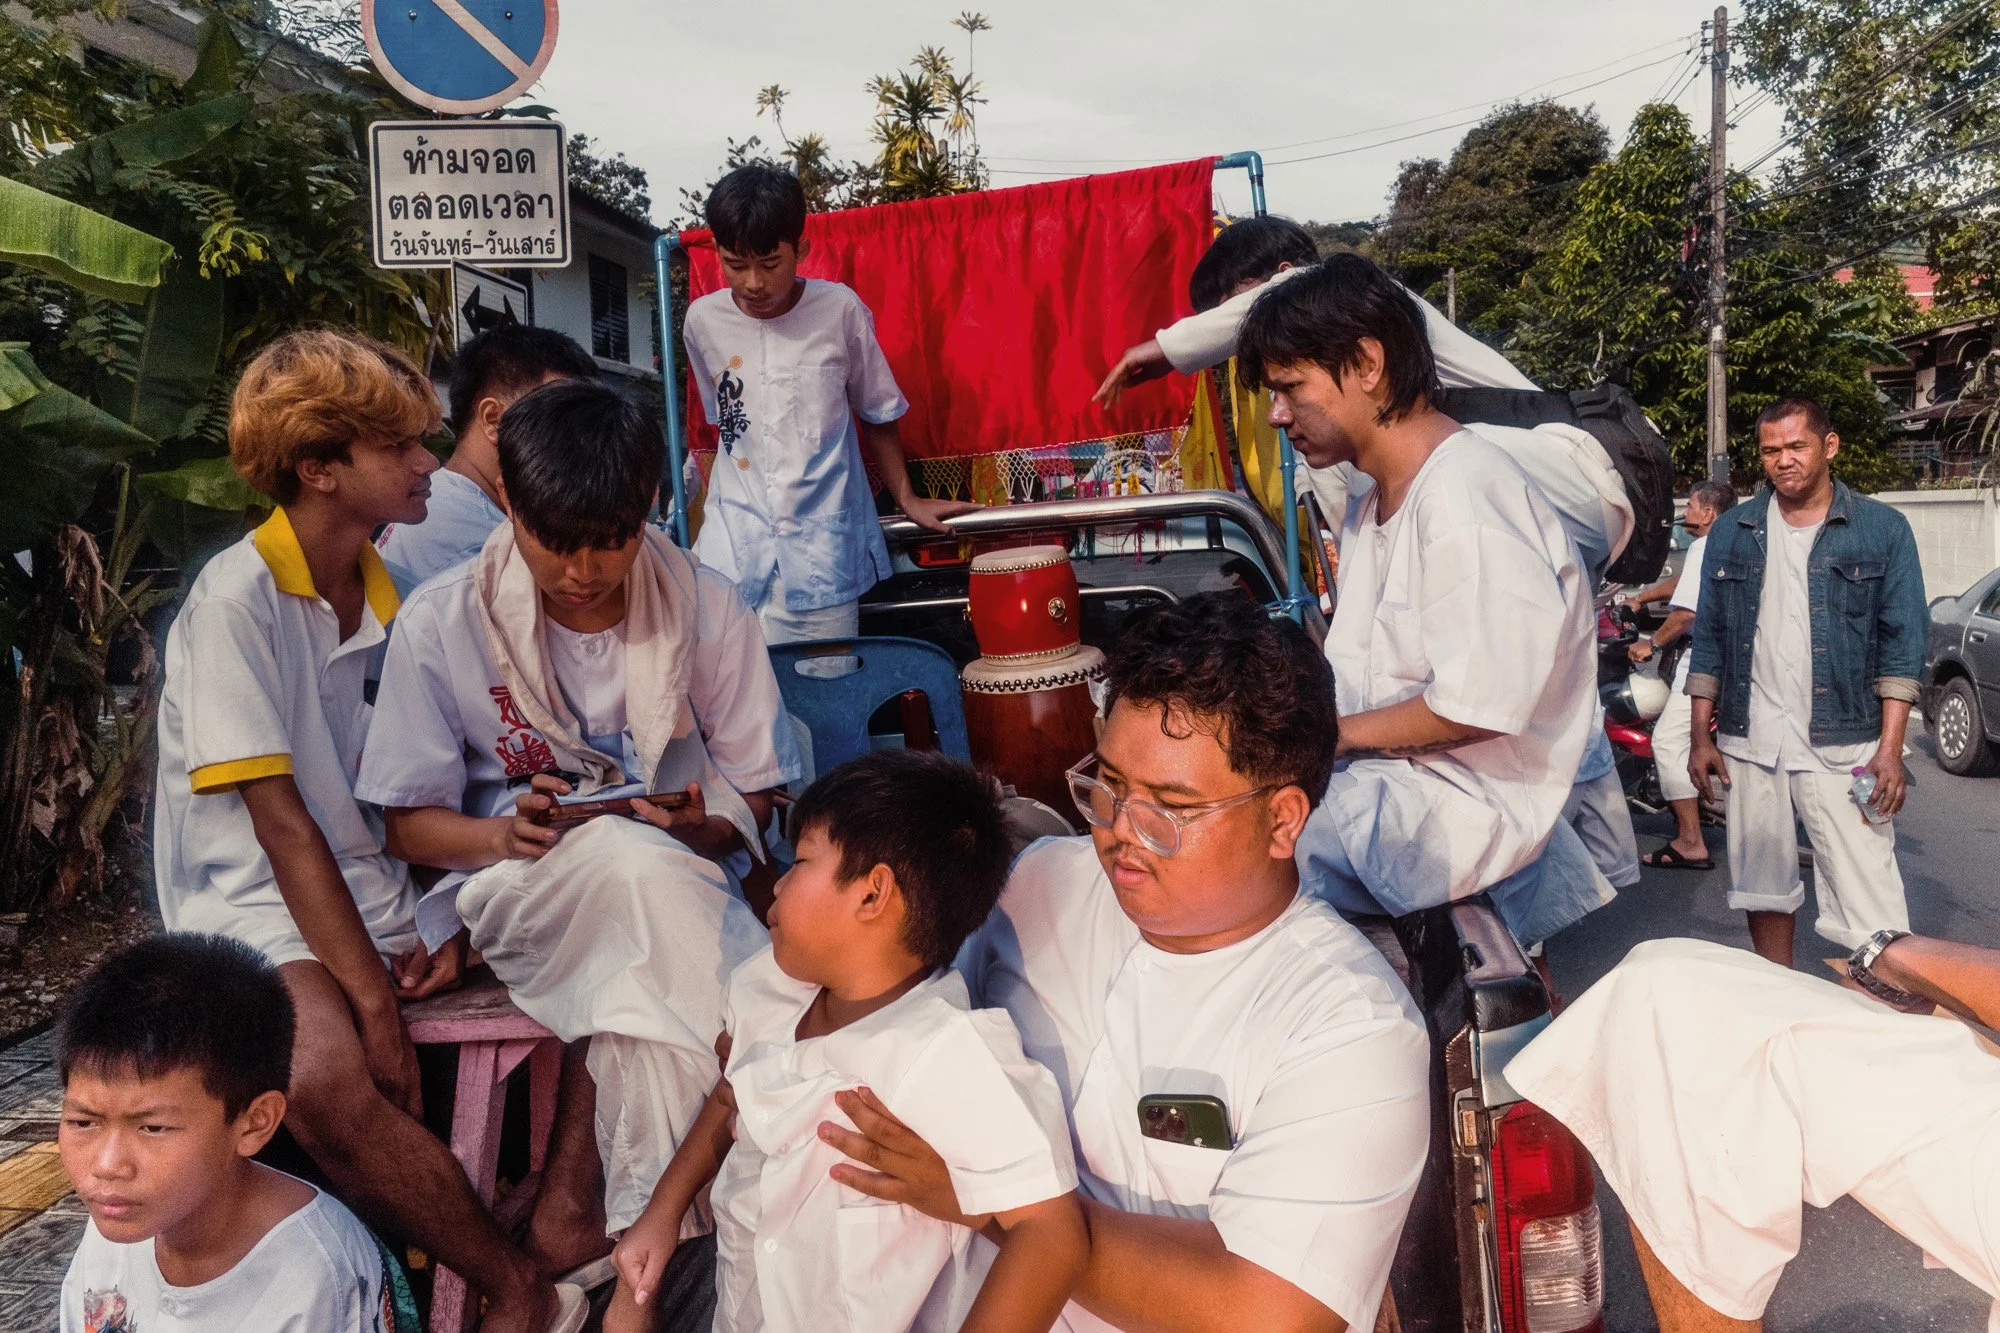
Because it was so busy and getting a clean shot was difficult, and because I wanted to try going to bed earlier than usual, I decided to call it a day. Early means before 1 a.m. by the way. I still needed to back up photos and recharge my batteries before waking up at 4:30 the next morning.

21. Ricoh GRIV - 1/6 - f/8.0 - ISO800
A New Shrine and a Flash Problem
The next morning we drove about 30 minutes to a different shrine. My friend had forgotten the remote for his flash and for some reason we could not get it to work on his camera. So I gave him my trigger and my flash. I mounted his Godox V350 onto my Ricoh GR IV and surprisingly it worked without any issues.
22. Ricoh GRIV - 1/6 - f/8.0 - ISO800
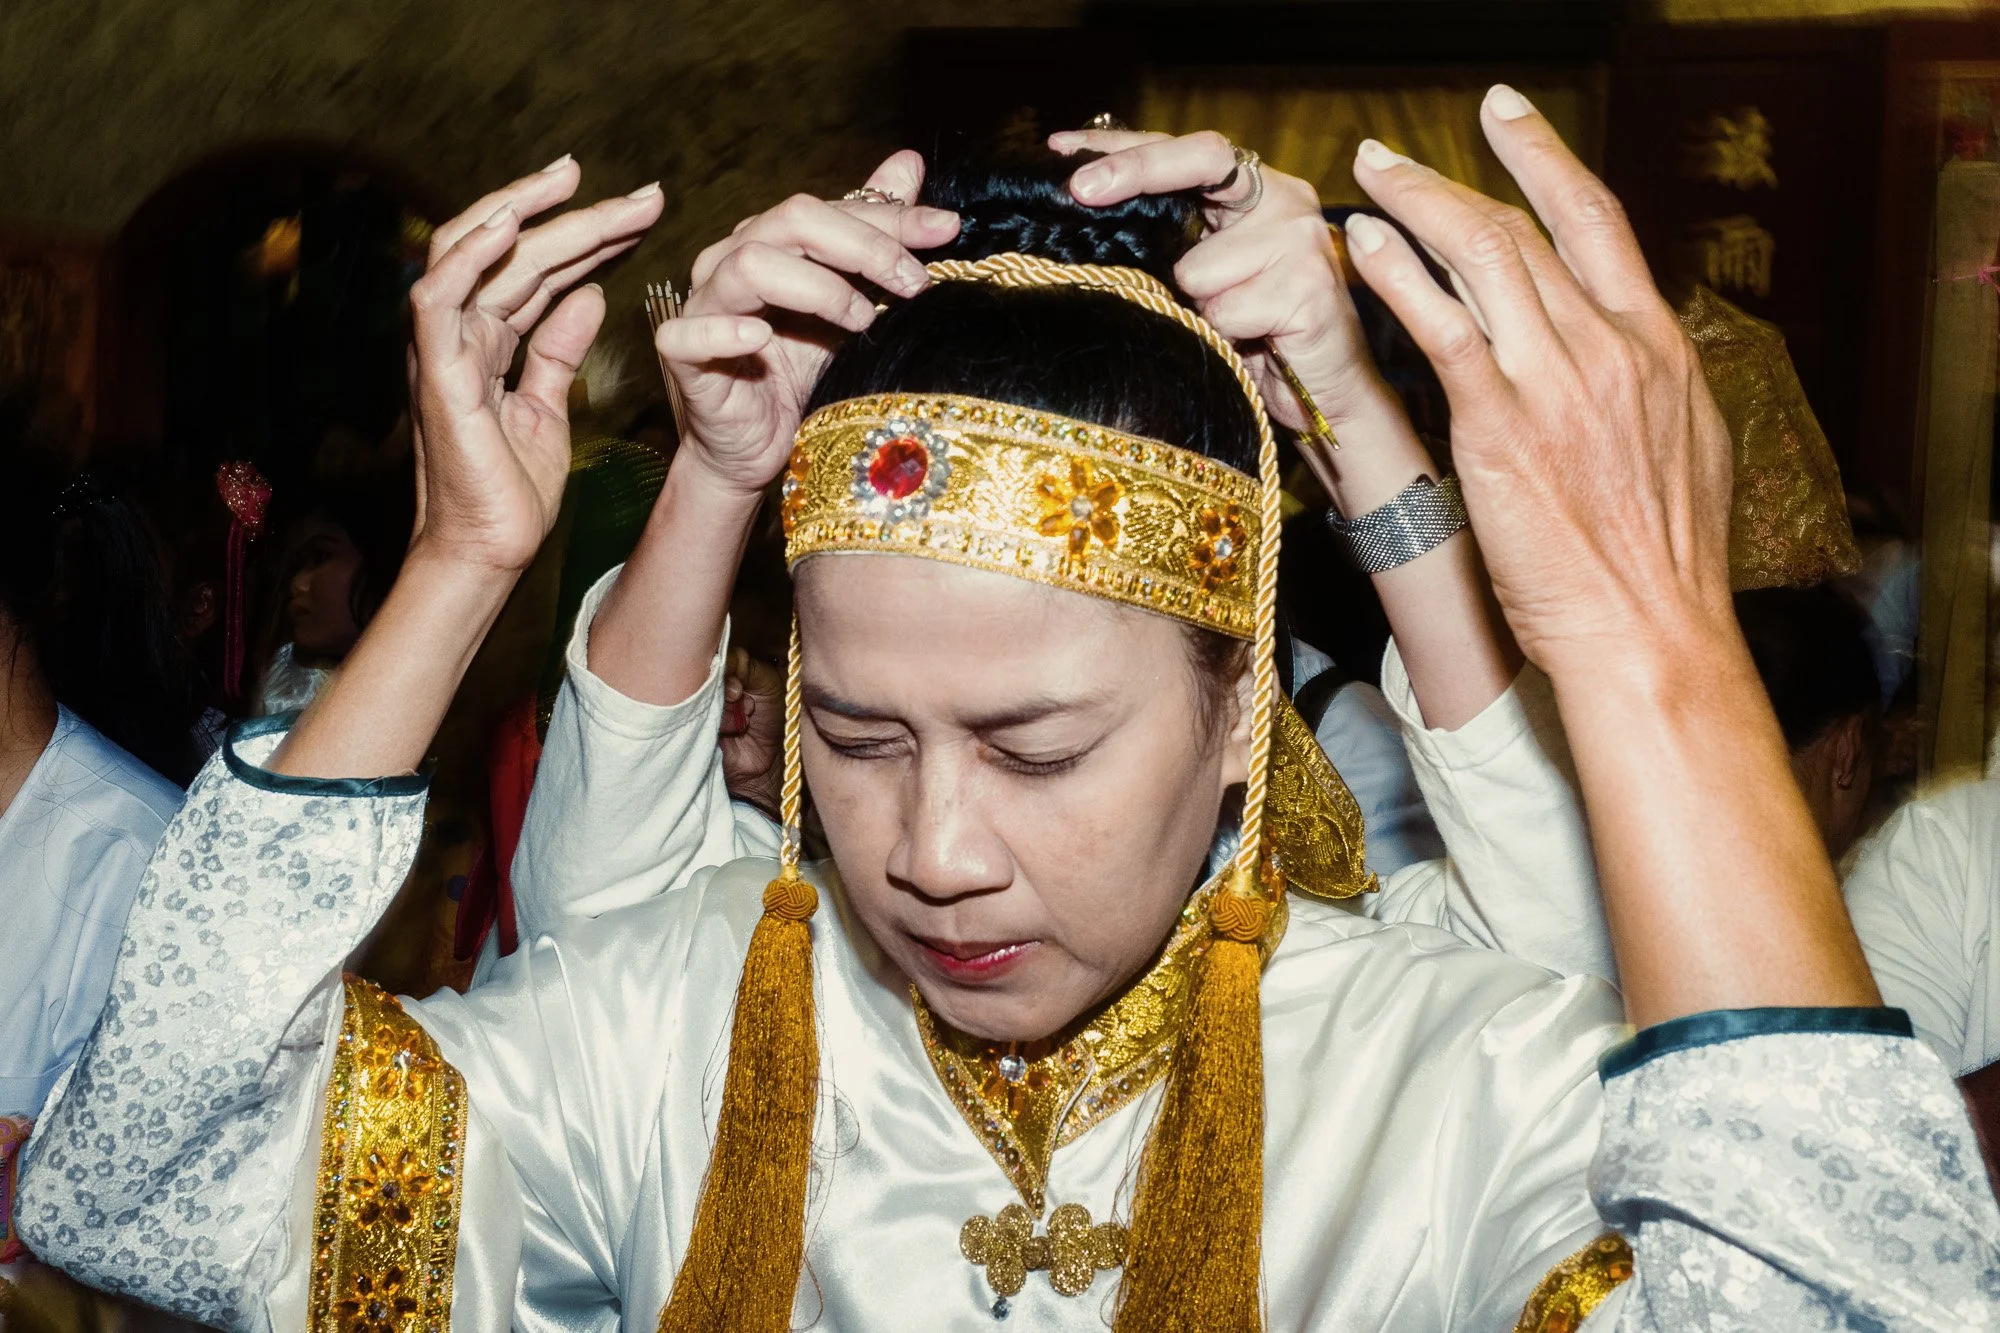
This shrine felt very different from the others. We did not have much time to shoot, so we tried to make the most of it. There was an area specifically for female Masongs and it was very active. When I saw multiple hands touching a Masong’s head, I knew there might be a shot worth capturing.
23. Ricoh GRIV - 1/6 - f/8.0 - ISO800

24. Ricoh GRIV - 1/10 - f/8.0 - ISO800
25. Ricoh GRIV - 1/13 - f/8.0 - ISO800
Soon after, we needed to head back outside and find a ride to Old Town for the next parade. We got lucky and hopped onto a pickup truck.
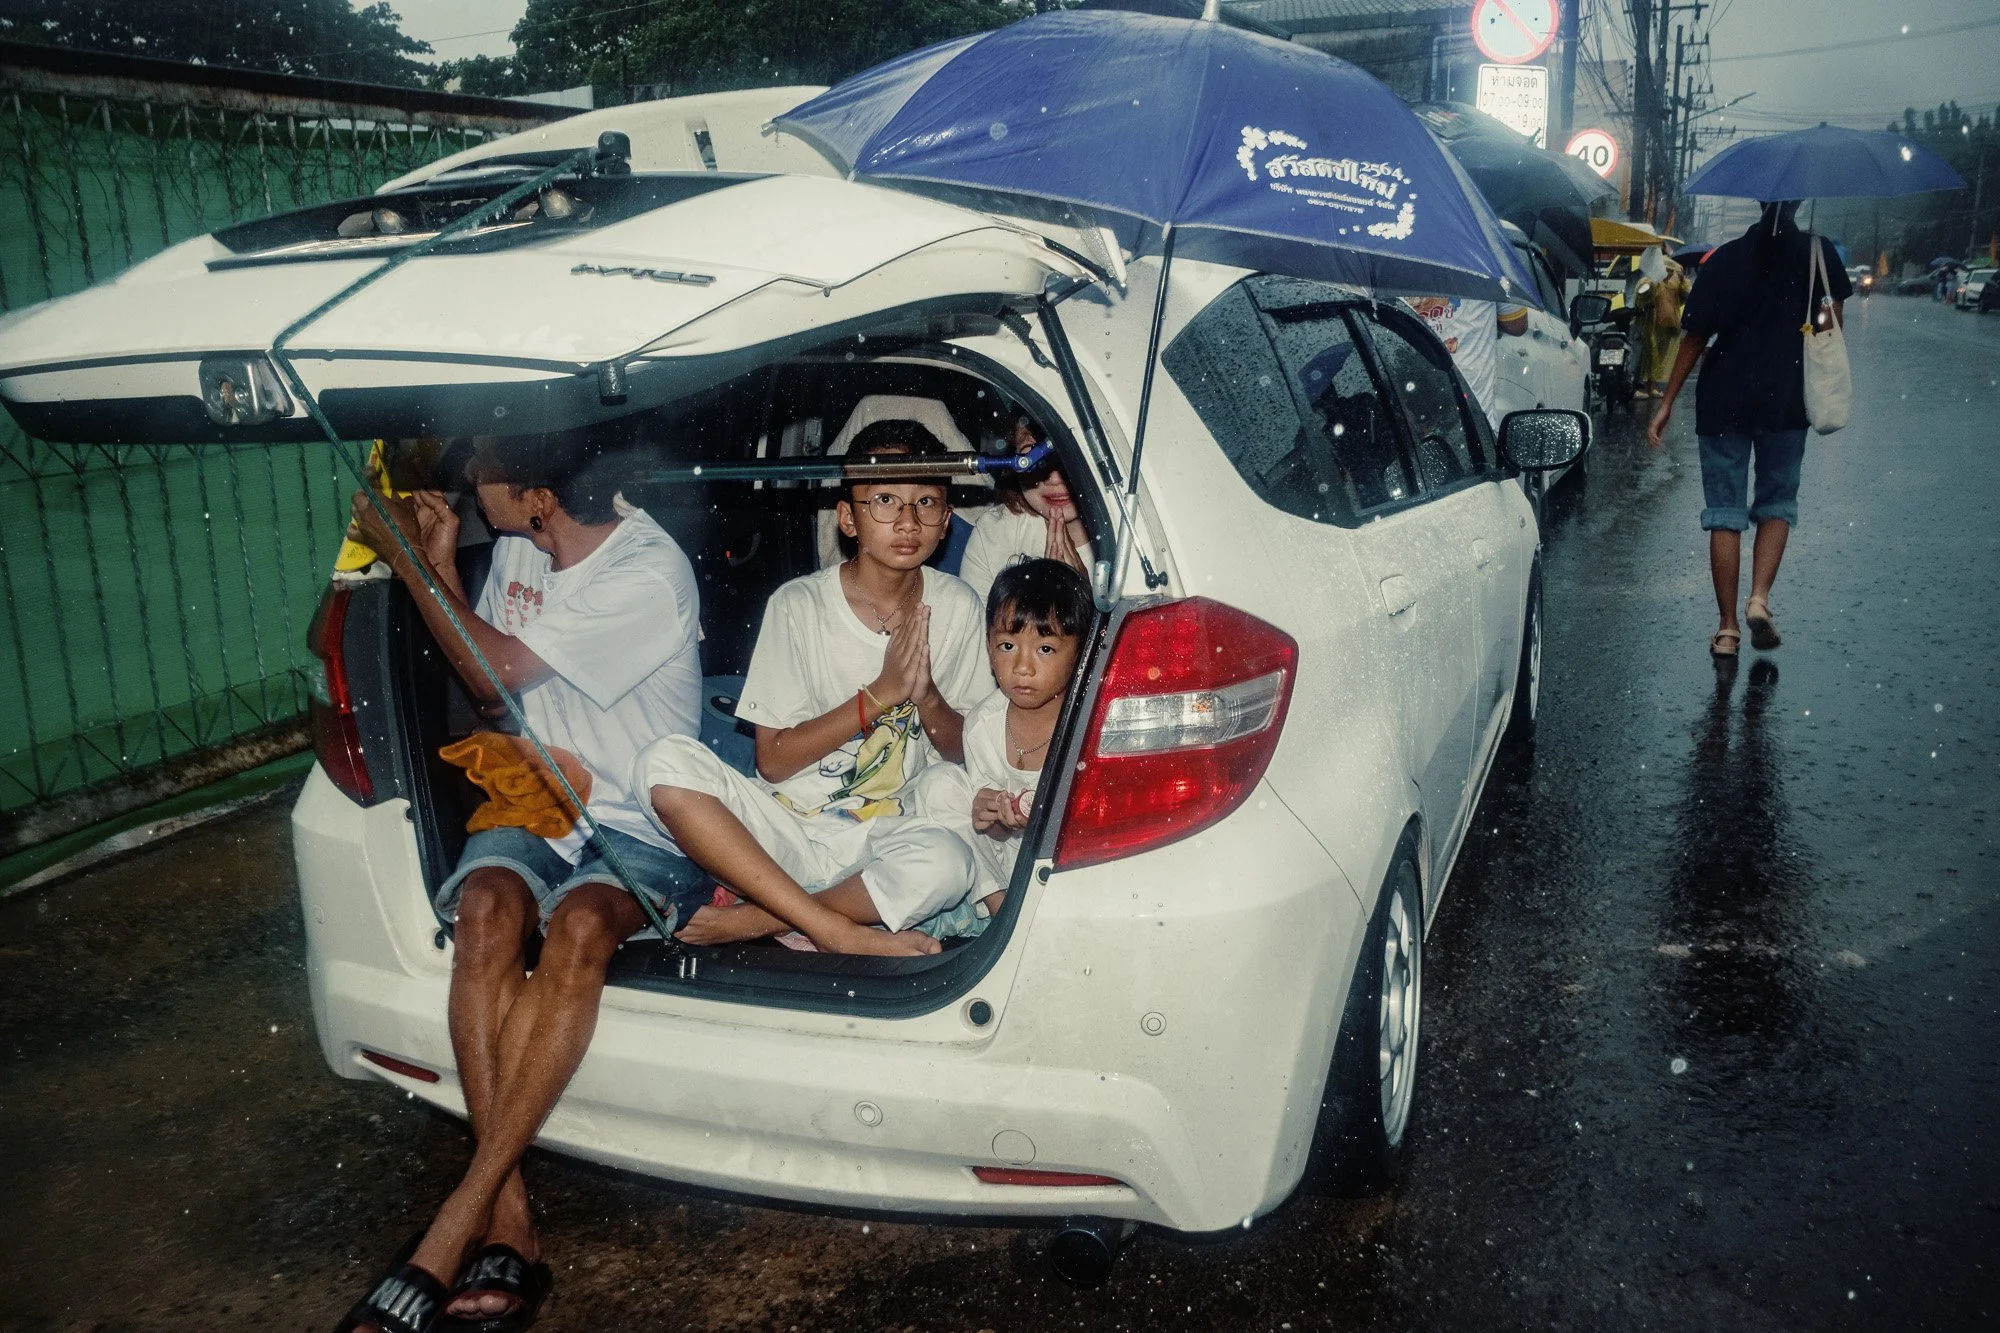
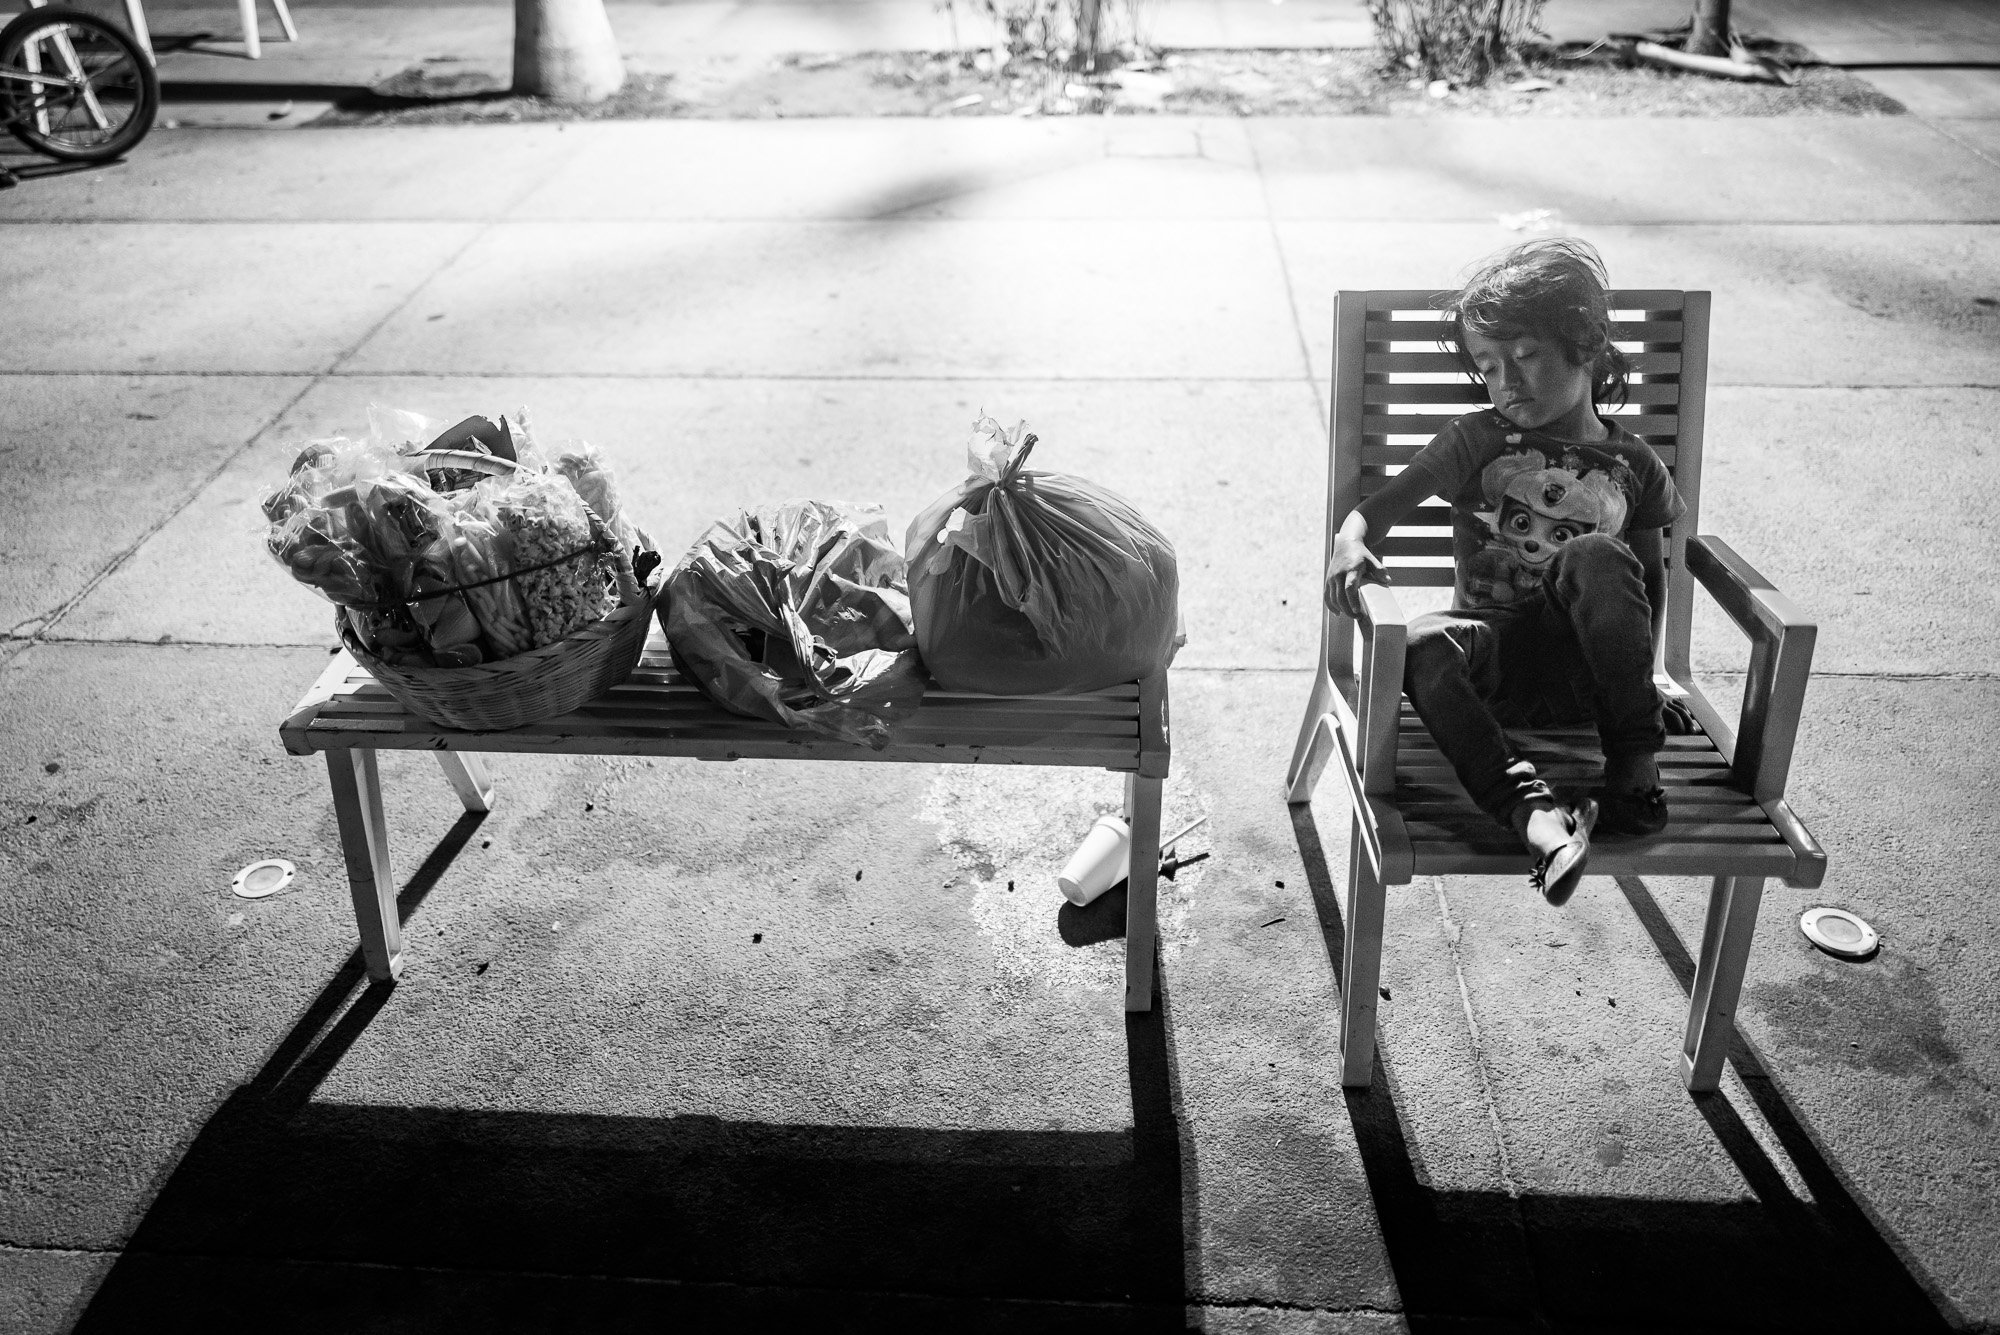
When we arrived and the parade began, I already had a bad feeling about the weather. The sky turned darker and darker. A boy sleeping in a car caught my attention, and he became the subject with the parade in the background.

26. Ricoh GRIV - 1/100 - f/11 - ISO800
27. Ricoh GRIV - 1/80 - f/11 - ISO800
28. Ricoh GRIV - 1/80 - f/11 - ISO800
Not long after that, the rain began. At first it was manageable, but it quickly became much worse. A Masong blessed people by throwing handfuls of rice at them. Another, a senior Masong, remained seated in the back of a pickup truck enduring the heavy rain.

29. Ricoh GRIV - 1/8 - f/11 - ISO800

30. Ricoh GRIV - 1/125 - f/11 - ISO800
31. Ricoh GRIV - 1/50 - f/11 - ISO800
Only one side of the road was blocked off for the parade, so the Masongs were walking on one side while motorbikes passed by on the other.
You cannot see it clearly in the images, but the rain kept intensifying until I had to pull out an umbrella.

32. Ricoh GRIV - 1/20 - f/11 - ISO800
33. Ricoh GRIV - 1/15 - f/11 - ISO800
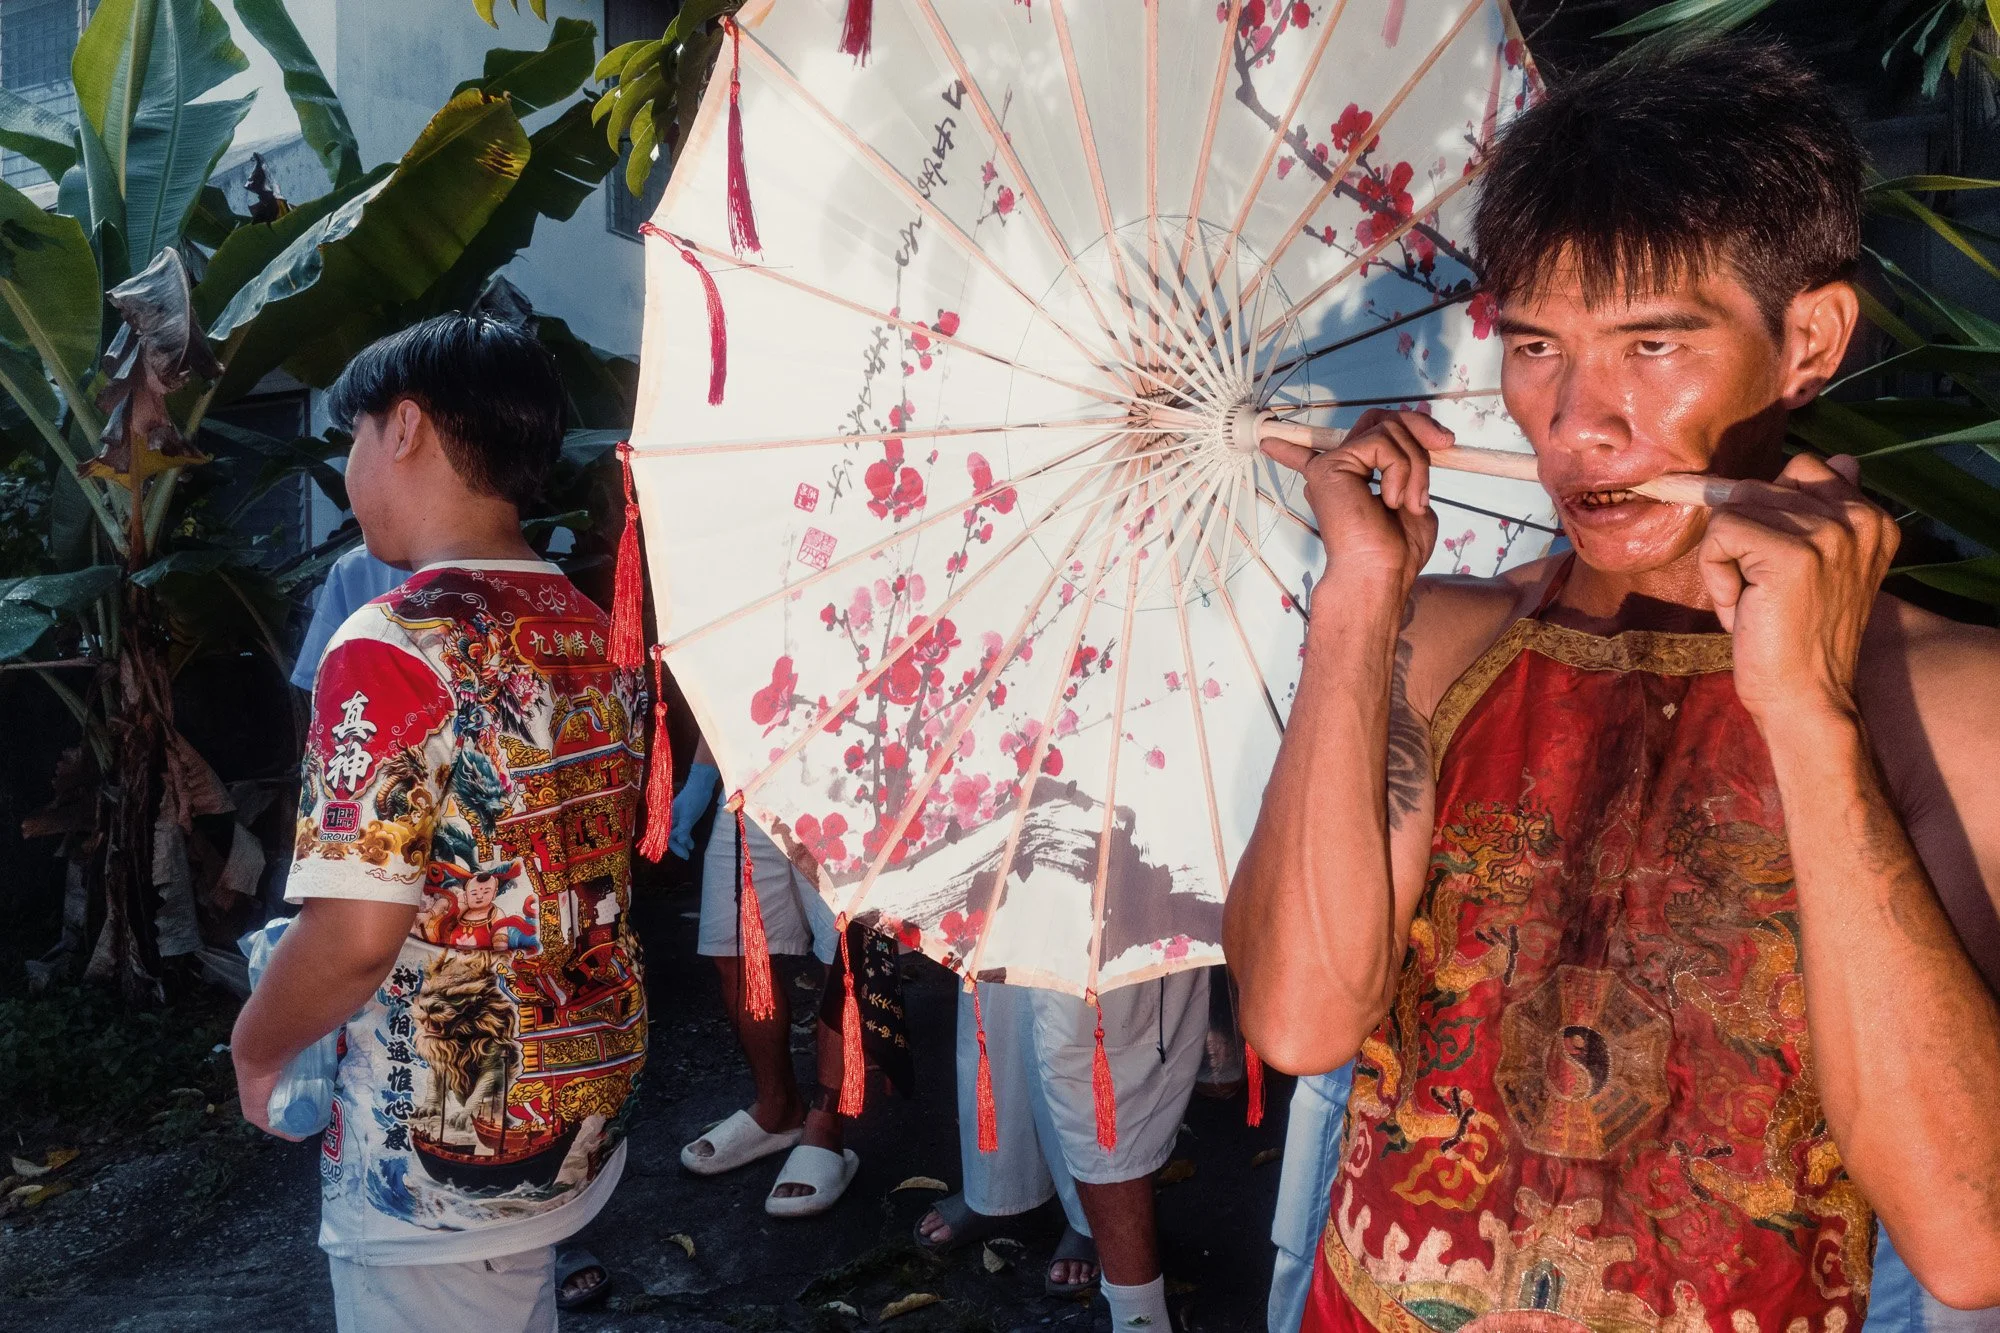
People along the road continued watching from under their own umbrellas. Some Masongs even had rain protection that matched their outfits perfectly.
34. Ricoh GRIV - 1/50 - f/11 - ISO800

35. Ricoh GRIV - 1/500 - f/11 - ISO800
Even though shooting in the rain was challenging, it added a whole new atmosphere to the images. A completely different vibe compared to the previous days.
After about ninety minutes of walking in the rain, I was drenched and decided to call it a day. The rain continued almost nonstop for the rest of the day.

36. Ricoh GRIV - 1/25 - f/11 - ISO800

37. Ricoh GRIV - 1/40 - f/11 - ISO800
38. Ricoh GRIV - 1/40 - f/11 - ISO800
If you want to learn how to use flash in Street Photography, check out my Ultimate Guide to Flash in Street Photography video course!!

39. Ricoh GRIV - 1/50 - f/11 - ISO800

Street Photography in Phuket: A Full Day Inside the Nine Emperor Gods Festival
A few weeks ago, I packed my bags and flew from Europe all the way to Thailand for several epic days of street photography. Not to Bangkok, where most people would expect, but to the island of Phuket, a place that usually is not associated with street photography at all.
But trust me, you will be surprised.
I went specifically to document the Nine Emperor Gods Festival, a nine day celebration full of devotion, chaos, beauty and raw energy. And armed with my Ricoh GR IV, I set out to capture a full day of what this festival feels like from the inside.
Little Stories and Layered Moments
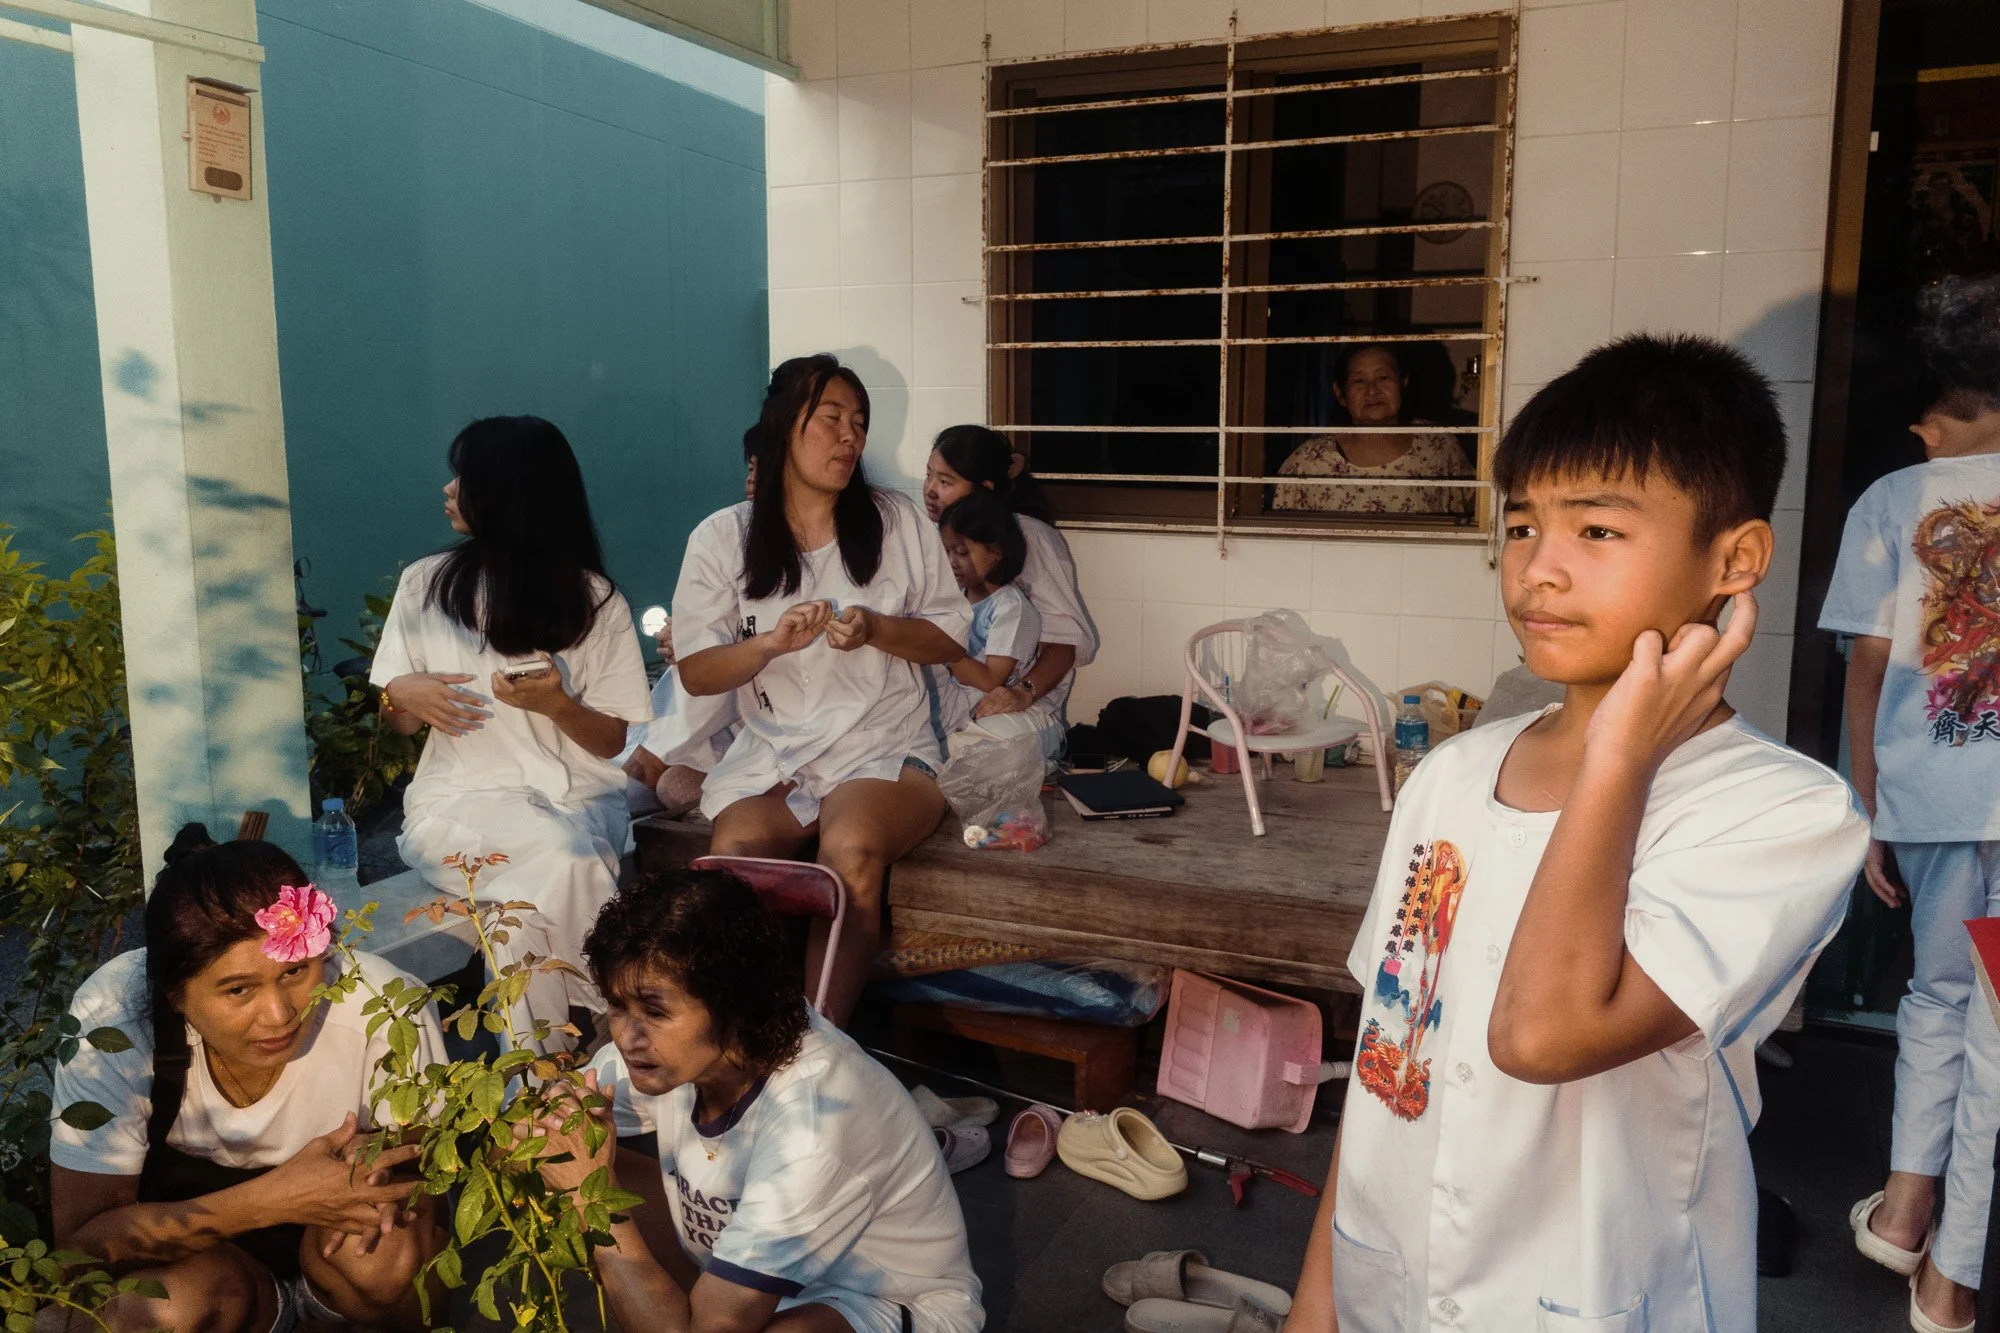
One of the first scenes I came across was a fleeting exchange between a mother and her son. These small interactions are what I love photographing most. Moments full of emotion, framed with multiple layers whenever possible.
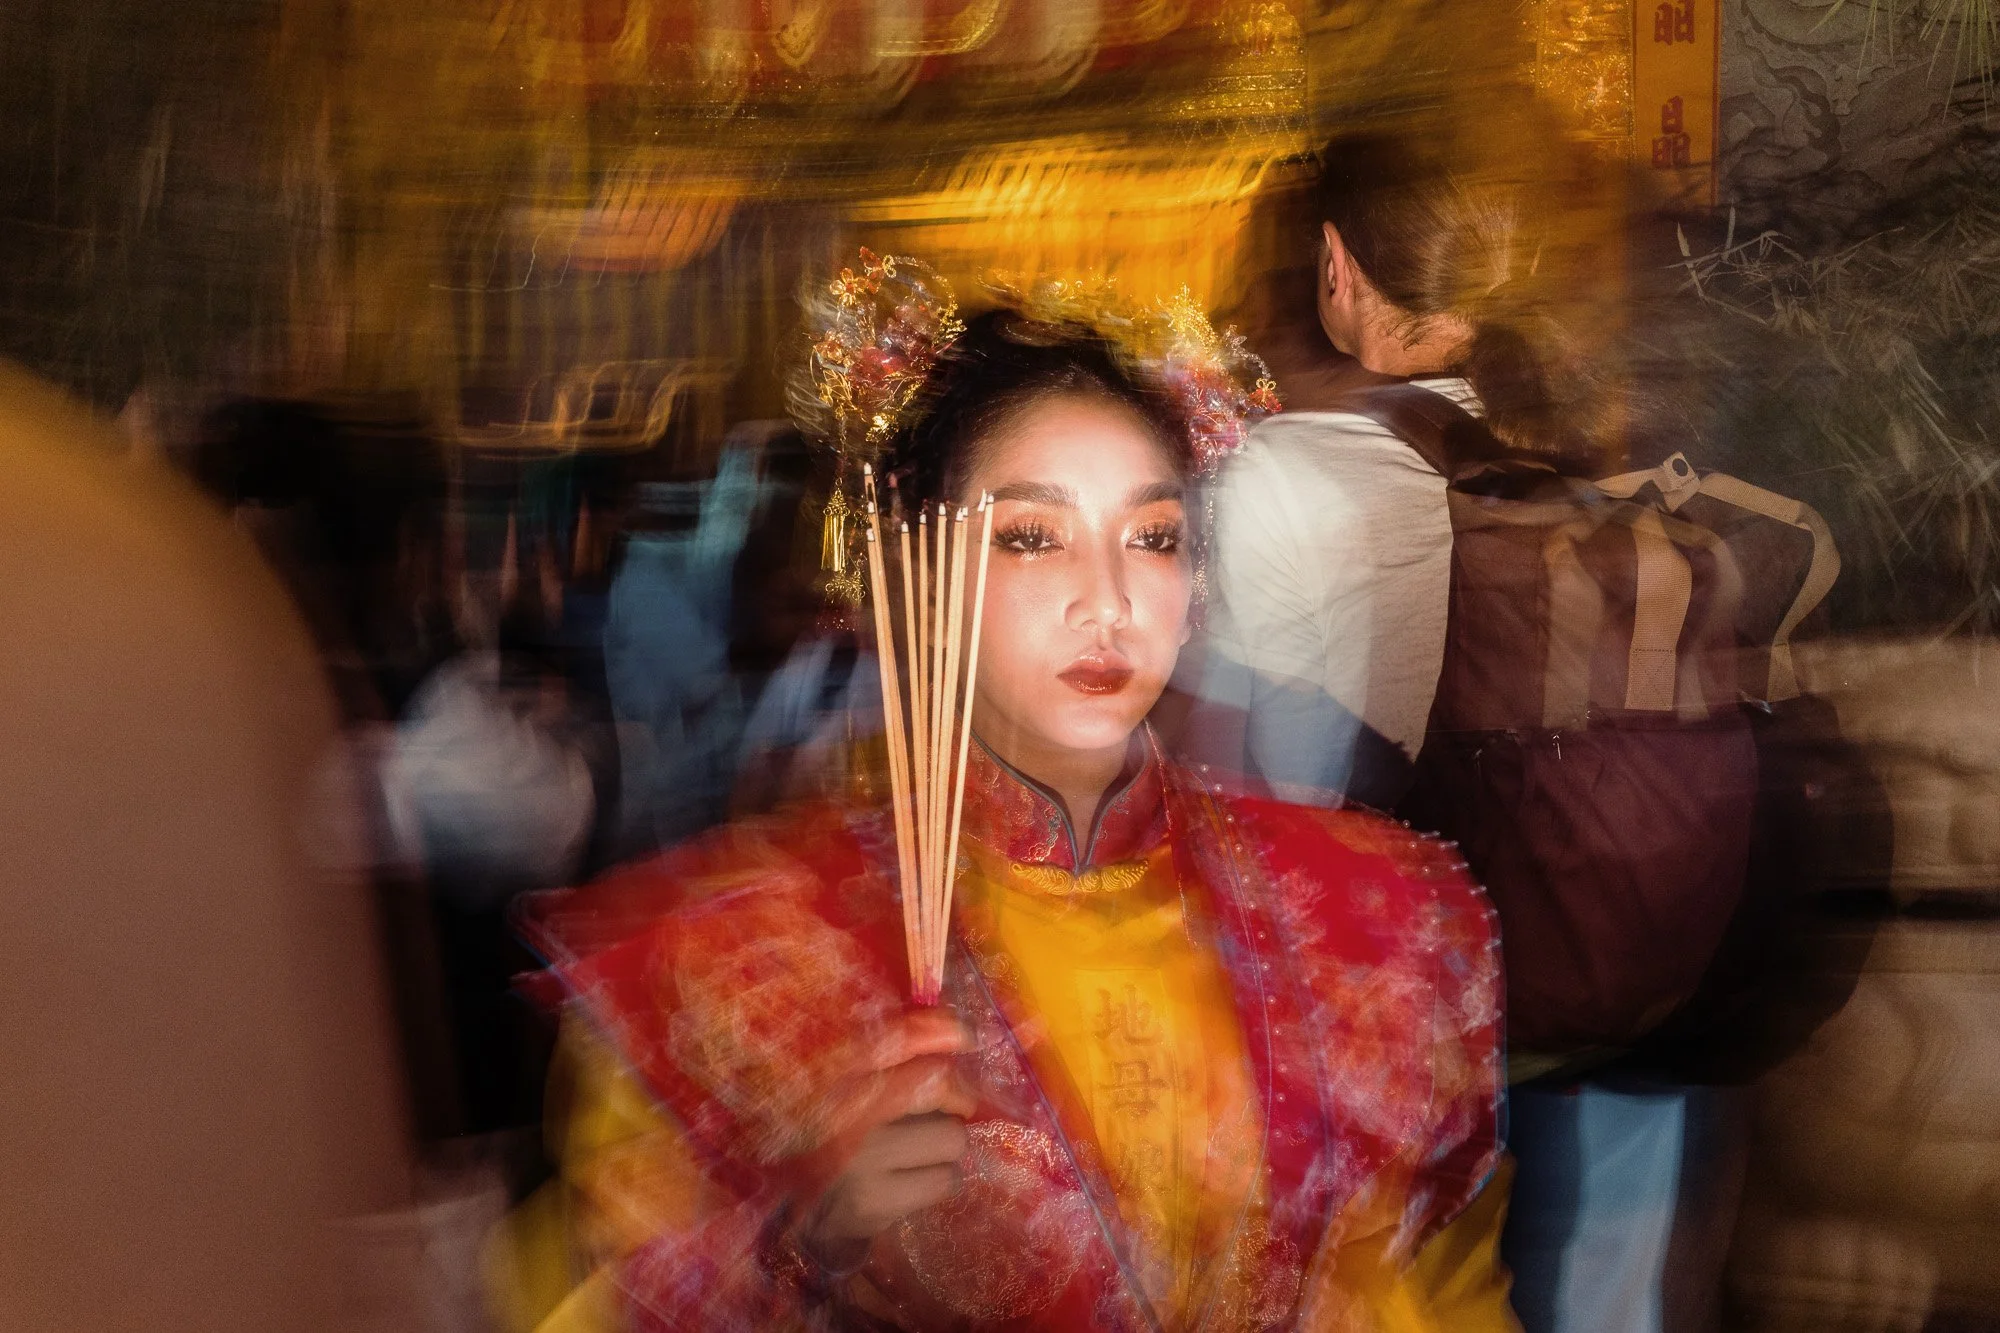
At the shrine, Masongs begin to gather. I spotted a female Masong having her makeup applied. Lipstick being carefully brushed on before she entered trance. I positioned myself to catch that exact moment, and the flash helped isolate the gesture in the middle of all the movement.
Ricoh GRIV - 1/15 - f/9.0 - ISO800
Ricoh GRIV - 1/13 - f/9.0 - ISO800

Ricoh GRIV - 1/8 - f/9.0 - ISO800
Early Mornings in Phuket Even for a Non Morning Person
I am not usually a morning person, but the festival leaves no choice. The first rituals begin around sunrise, roughly 6 AM, so if you want to photograph anything meaningful you have to be there early.
Most photographers focus on the extreme aspects. The piercings, the blood, the shock factor.
But I wanted to capture what is happening around the chaos. The quieter stories, the small connections, the human moments that unfold on the edges.
Ricoh GRIV - 1/100 - f/9.0 - ISO800
So… What Exactly Is a Masong?
Before we go any further, it is important to know who the central figures of this festival are.
A Masong is a devotee at the Phuket Vegetarian Festival who allows the spirit of a god to possess their body.
Under trance, they become a vehicle for the deity. The Thai word ma translates to horse and reflects the meaning of becoming a physical vessel.
In this state they may undergo ritual piercings, self mutilation and other extreme acts as a form of devotion.
They are the heart of the festival.
They lead the parades.
They bless local communities.
And they are the reason this celebration is so visually and emotionally powerful.
Now that you know that, the rest of the story will make much more sense.

Ricoh GRIV - 0.3 sec - f/9.0 - ISO800
Ricoh GRIV - 1/4 - f/9.0 - ISO800
Ricoh GRIV - 1/8 - f/9.0 - ISO800
The Trance Rituals Begin
Before entering the shrine to connect with the gods, Masongs put themselves into a deep trance.
It is intense.
It is spiritual.
And visually, it is incredible.
Ricoh GRIV - 1/6 - f/9.0 - ISO800
Ricoh GRIV - 0.5 sec - f/9.0 - ISO800

Ricoh GRIV - 1/60 - f/9.0 - ISO800

Ricoh GRIV - 1/400 - f/9.0 - ISO800
Riding in the Pickup Trucks
After receiving their piercings, the Masongs travel into Phuket Old Town for a long parade. Since this shrine was too far to walk from, everyone climbed into pickup trucks.
A friendly local gave us a lift, which was such a nice gesture.

Ricoh GRIV - 1/100 - f/9.0 - ISO800
Ricoh GRIV - 1/60 - f/11 - ISO400
Ricoh GRIV - 1/500 - f/11 - ISO400
Ricoh GRIV - 1/160 - f/11 - ISO400
The Parade Begins
The parade is where everything truly comes together.
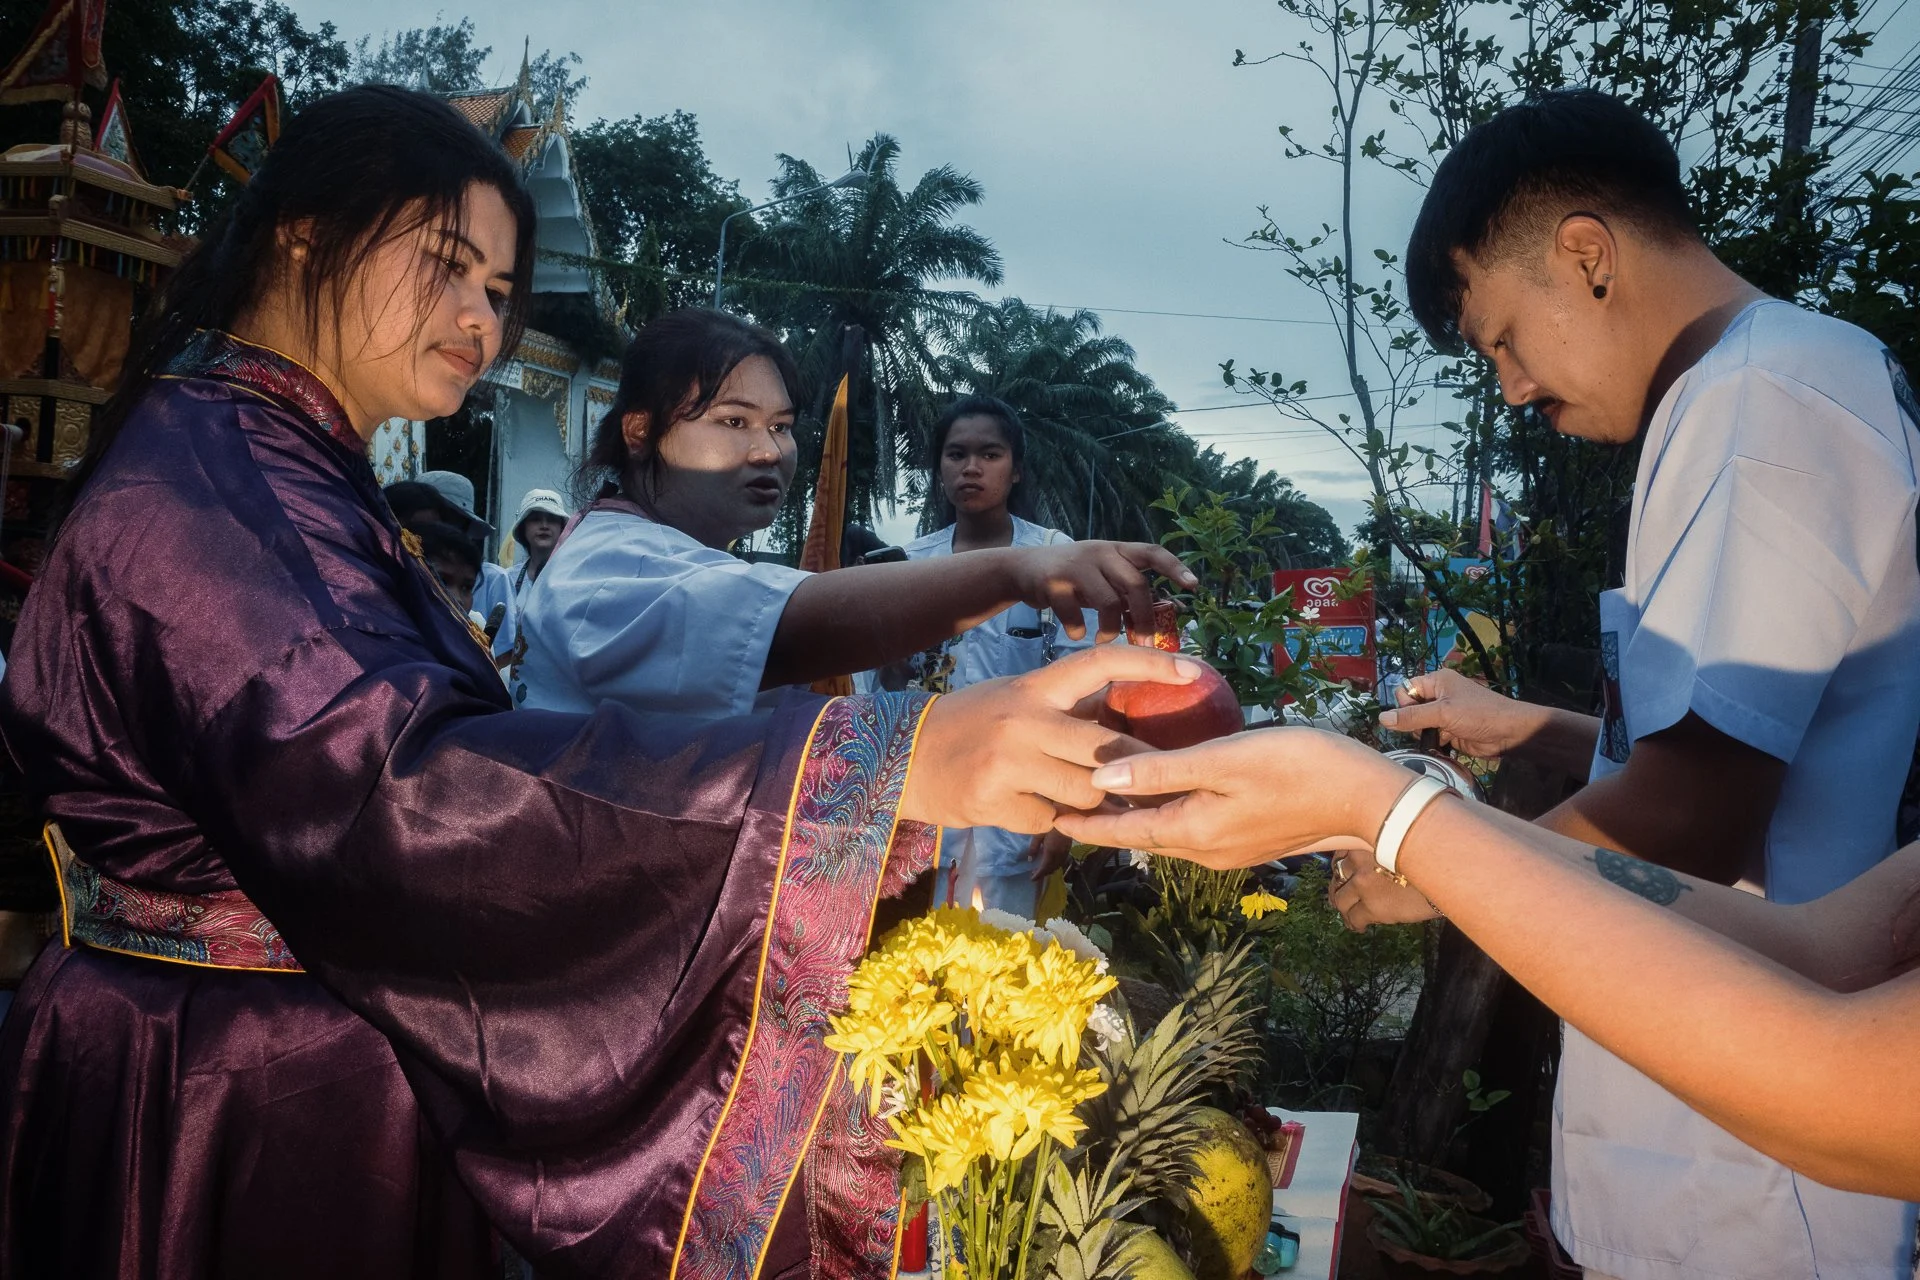
Families stand along the roadside, some with small shrines set up on tables. Masongs approach them, offer blessings, and help drive away evil spirits. The festival is deeply rooted in local culture, and even without photographing it is a beautiful thing to simply observe.
Shooting close brings you right into the action. Into the smoke, the drums, the shouting, the devotion.
Masongs usually have helpers with them, especially those with larger piercings who need support throughout the parade.
Ricoh GRIV - 1/500 - f/11 - ISO640
Ricoh GRIV - 1/250 - f/11 - ISO640
Ricoh GRIV - 1/320 - f/11 - ISO640
Ricoh GRIV - 1/250 - f/11 - ISO640
Ricoh GRIV - 1/400 - f/11 - ISO640
Ricoh GRIV - 1/1000 - f/11 - ISO640

Ricoh GRIV - 1/640 - f/11 - ISO800
Ricoh GRIV - 1/640 - f/11 - ISO800
The Firecrackers
One of the most intense elements of the parade is the firecrackers.
They are thrown at the Masongs and at the teenagers carrying the palanquins. The explosions are meant to chase away evil spirits, and the louder the better.
It gets unbelievably loud. Ear protection and protective goggles are strongly recommended if you ever attend the festival.
Ricoh GRIV - 1/200 - f/11 - ISO200

Ricoh GRIV - 1/200 - f/11 - ISO200
Then the Sky Opened Up
In the afternoon we headed to one of the main shrines for another ceremony.
Just as things were about to begin, it started pouring. Truly pouring.
Despite the downpour, the Masongs continued their parade.
We waited at the shrine for the weather to settle, and after about an hour they returned. Soaked, still in trance, heading straight inside to complete the ritual that brings them back out.
Because of the rain, almost everyone had left. The atmosphere was quiet, intimate and absolutely worth the wait.

Ricoh GRIV - 1/200 - f/11 - ISO200
Ricoh GRIV - 1/6 - f/8.0 - ISO800

Ricoh GRIV - 1/6 - f/8.0 - ISO800
Ricoh GRIV - 1/13 - f/8.0 - ISO800

Ricoh GRIV - 1/10 - f/8.0 - ISO800
Flooded Streets and Fogged Lenses
Later that evening, the drainage system was still struggling and parts of Phuket remained flooded. But the community kept going. Another parade, more devotion, more energy.
At one point, the humidity caused the filter on my GR IV to fog up, creating a soft, dreamy look in the images. A happy accident.
Ricoh GRIV - 1/30 - f/8.0 - ISO800
Ricoh GRIV - 1/8 - f/8.0 - ISO800
Ricoh GRIV - 1/15 - f/8.0 - ISO800
Ricoh GRIV - 1/20 - f/8.0 - ISO800

Ricoh GRIV - 0.5 sec - f/8.0 - ISO800
If you want to learn how to use flash in Street Photography, check out my Ultimate Guide to Flash in Street Photography video course!!
To Be Continued
This was only one day of the Nine Emperor Gods Festival. There is much more to come.
The following days brought even more intensity, more beauty and some of the most memorable photographic experiences I have ever had.
Stay tuned for Part Two.

Chasing Light and Stories: Street Photography in Galle, Sri Lanka
Leica Q3 - Galle / Sri Lanka
After an incredible experience capturing the streets of Colombo, it was time to take my Leica Q3 on a new adventure. My next destination? Galle—a historic city on Sri Lanka’s southern coast, just a two-hour train ride away. With its colonial architecture, bustling streets, and rich history, Galle promised to be a street photographer’s dream.

Leica Q3 - Galle / Sri Lanka
Early Morning Hopes and Unexpected Subjects
I started my day before sunrise, hoping to capture local fishermen at work. But as fate would have it, I arrived too early, and the beach was eerily quiet. The lighting was less than ideal, and the action I had anticipated simply wasn’t there. Disappointed but determined, I turned my lens toward other subjects—like a man unloading chickens from crates. The sight was unsettling, as the birds were in terrible condition. It was a painful yet honest depiction of life’s raw realities.

Leica Q3 - Galle / Sri Lanka
The Grit and Energy of Galle’s Bus Station
Making my way back to the city center, the streets gradually came to life. The bus station, with its chaotic energy and gritty aesthetic, became my next photographic playground. The station’s vibrant atmosphere made for some compelling images, and I knew I’d return for more the next day.

Leica Q3 - Galle / Sri Lanka

Leica Q3 - Galle / Sri Lanka

Leica Q3 - Galle / Sri Lanka
A Familiar Scam and a Legendary Photographer’s Footsteps
On my way to explore more of Galle, a local man approached me with a tragic story about losing his family in the 2004 tsunami. He then tried to lure me to a market—an all-too-familiar scam. While the tsunami was a real tragedy, this exact story has been used on tourists for over two decades. It made me wonder—maybe it’s time for them to come up with a new narrative?
Speaking of stories, I made an exciting discovery. Back in 1995, renowned photographer Steve McCurry visited Galle and captured one of his most iconic images of local fishermen. I was thrilled to find a faded print of that very photo mounted on a column. Seeing it in person transported me back in time, making me wish I had a few rolls of Kodachrome to capture the fishermen myself.

Leica Q3 - Galle / Sri Lanka
Finally, The Fishermen Arrive
That afternoon, I took a tuk-tuk back to the beach, where I finally found the fishermen pulling in their nets. The process took nearly an hour and a half, drawing in a crowd of spectators eager to buy fresh fish. I documented their hard work, capturing portraits of the fishermen hauling in their boats. The next day, I returned with printed photos to give back—a small but meaningful gesture.

Leica Q3 - Galle / Sri Lanka

Leica Q3 - Galle / Sri Lanka

Leica Q3 - Galle / Sri Lanka

Leica Q3 - Galle / Sri Lanka

Leica Q3 - Galle / Sri Lanka
Exploring Galle Fort and Beyond
The following morning greeted me with sunshine. After a quick revisit to the bus station, I made my way to Galle Fort—the city’s most famous landmark. Built in 1588 by the Portuguese, expanded by the Dutch in 1649, and later controlled by the British, this UNESCO World Heritage Site is a fascinating blend of history and modern charm. Inside the fort, I found locals relaxing under umbrellas, enjoying cricket matches, and even spotted a rather unexpected guest—a kangaroo statue, likely a nod to Sri Lanka’s cricket rivalry with Australia.
I stumbled upon a school celebration where a marching band played for a crowd of locals. Unlike the more tourist-heavy parts of Galle, this was a genuine moment of community and culture. Though invited to stay and watch the performances, I continued my photographic journey, eager to capture more of the city’s essence.

Leica Q3 - Galle / Sri Lanka

Leica Q3 - Galle / Sri Lanka

Leica Q3 - Galle / Sri Lanka
Leica Q3 - Galle / Sri Lanka

Leica Q3 - Galle / Sri Lanka

Leica Q3 - Galle / Sri Lanka
Dramatic Sunsets and Street Photography Magic
As the day ended, I headed to the western walls of the fort, where locals and visitors gathered to watch the sunset. The sky rewarded us with a dramatic display, providing the perfect backdrop for my final shots. The silhouettes, the golden light, and the timeless feel of Galle made it a perfect conclusion to my time in the city.
Leica Q3 - Galle / Sri Lanka

Leica Q3 - Galle / Sri Lanka
Galle turned out to be more than just another destination—it was a place where history, culture, and raw everyday life merged into a visual feast. Whether chasing the legacy of Steve McCurry, dodging tourist scams, or capturing the grit and beauty of street life, this adventure was one for the books.
My Leica Q3 was the perfect camera for the job. Especially since I was using flash, it was very helpful that I didn’t need to worry about the flash sync speed, unlike cameras with a focal plane shutter. If you want to learn how to use flash in street photography, check out my video course, 'Ultimate Guide to Flash Street Photography.'
Next stop? Who knows. But the Leica Q3 and I are ready for whatever comes next.

Exploring the World Through Street Photography: Tips for Shooting in New Locations
If you’re new to the wonderful craft of street photography or feeling uninspired by shooting in the same city, it might be time to explore new locations—even different countries or continents. Traveling with your camera can be an exciting way to discover fresh perspectives and enrich your photography skills.
In this blog post, I’ll share some essential tips and tricks I’ve gathered over the past decade while traveling and shooting street photography. Whether these are lessons I’ve learned firsthand or things I’m actively putting into practice, I hope they’ll help you on your own photographic journey.
Leica Q3 - Colombo / Sri Lanka
1. Research and Planning
Cultural Sensitivity
Before heading to a new destination, research local customs and laws regarding photography. Some countries have strict regulations about photographing people, government buildings, or anything related to law enforcement. For example, street photographer F.D. Walker was once arrested in Morocco for taking photos in public, even though local police were mistaken about the law. To avoid trouble, always be aware of local restrictions.
Iconic and Offbeat Locations
Use tools like Google Maps, Instagram, or photography blogs to discover popular spots as well as hidden gems. Some of the best street photography locations are often places you’d overlook at first glance. Keep an open mind and look for the stories hidden in the everyday hustle of the city.
Local Events
Festivals, markets, and street performances can provide vibrant street scenes full of life and character. Check event calendars to find out what’s happening during your visit.
Optimal Times
Plan your shoots around the best lighting conditions, such as the golden hour, or the busiest times for street life. Also, consider the time of year—weather and seasonal events can significantly impact your experience.

Leica Q3 - Galle / Sri Lanka
2. Blend in with the Environment
Dress Appropriately
Wearing clothing that blends with the local crowd can help you stay unnoticed, allowing you to capture more candid moments.
Gear Minimalism
Opt for a lightweight setup, such as a mirrorless camera with a prime lens or a fixed lens camera like a Fuji X100, Leica Q, Ricoh GR. Carrying minimal equipment helps you stay agile and discreet.

Leica Q3 - Kuala Lumpur
3. Engage with the Local Community
Hire a Guide
If you’re in an unfamiliar city, a local guide can help you find authentic spots while also offering insights into cultural nuances.
Connect with Local Photographers
Social media is a great way to find local photographers who may be open to meeting up and sharing their knowledge of the area.

Leica M6 - Colombo / Sri Lanka
4. Explore on Foot
Walk the Streets
Wandering aimlessly through neighborhoods allows you to discover spontaneous moments and unique compositions.
Observe First
Before lifting your camera, take time to observe people and their activities. This helps in capturing genuine, unposed moments.
Follow the Light
Pay attention to natural light and shadows—they can add drama and depth to your shots.

Leica Q3 - Barsana / India

Leica Q3 - Vrindavan / India
5. Stay Flexible
Capture Spontaneity
Some of the best street photos happen unexpectedly. Be ready to shoot when the moment presents itself.
Experiment with Composition
Try using reflections, silhouettes, or unusual angles to add creativity to your shots.
Avoid Over-Planning
While research is valuable, leave room for exploration and serendipity. Some of the best photos come from unplanned encounters.

Leica Q3 - Galle / Sri Lanka
6. Navigating the Streets
Pre-Visualize Walks
Use Google Street View and maps to familiarize yourself with key locations before heading out.
Know When Places Are Busy
Check Google Maps to see peak hours at specific locations so you can plan your visits accordingly.
Use Public Transport
Buses, trains, and ferries are great places to capture everyday life in motion.

Leica Q3 - Kuala Lumpur

Leica Q3 - Galle / Sri Lanka
7. Mind Safety
Stay Aware
Always be mindful of your surroundings to protect yourself and your gear.
Backup Essentials
Bring extra memory cards and batteries. Losing a memory card with all your images can be devastating, so back up your work regularly—consider using an external hard drive or cloud storage.
Trust Your Instincts
Ask local photographers about safe areas, but also trust your gut. If something feels off, move on.
Exude Confidence
People who walk with confidence and purpose are less likely to be targeted for theft or trouble.
Wear Comfortable Shoes
Since you’ll be walking a lot, don’t forget a good pair of walking shoes—they’ll make your photography adventures much more enjoyable!

Leica Q3 - Barsana / India

Leica Q3 - Kuala Lumpur
Traveling as a street photographer is a rewarding experience that expands your perspective and enhances your skills. With the right preparation and mindset, you’ll be able to capture incredible images that tell unique stories.
Now, grab your camera, hit the streets, and start exploring!

Which Flash To Use For Street Photography
For years, when people asked me which flash I used and recommended, my answer was always the same: the Lightpixlabs FlashQ Q20II. This tiny, innovative flash became a trusted companion, for my Leica Q3 and every Leica Q camera I’ve owned since 2015. I loved it so much that I bought several units myself and enthusiastically told others to get one too. But as the saying goes, all good things must come to an end.
Recently, I’ve stopped recommending the FlashQ Q20II and no longer use it myself. Today, I’ll share the reasons behind my decision, the challenges I’ve faced, and introduce you to an alternative that has not only met but exceeded my expectations.

Leica Q - Bangkok

Leica Q - Seoul
Why the FlashQ Q20II Was My Go-To Flash
Let’s rewind to 2019. When I first picked up the FlashQ Q20II, it was love at first sight. Its compact size made it perfect for street photography. It was packed with clever features like:
Built-in wireless receiver and a tiny transmitter.
Rechargeable batteries, with the ability to charge them directly in the unit.
Easy off-camera setup, making it versatile.
A set of color gels for creative lighting effects.
For a street photographer, this was the dream package. The flash quickly became an essential part of my gear. However, over time, I started noticing flaws that made me rethink its place in my toolkit.

Leica Q2 Monochrom - Bangkok

Leica Q3 - Pattaya
The Problems I Encountered
While the Q20II offered an excellent starting experience, three recurring issues led to my decision to move on:
1. Overheating
The first problem surfaced after an extended trip through Asia. After heavy usage, I noticed the reflector in the flash head was burned, as was one of my color gels. I contacted the company, and to their credit, they replaced the unit. However, they warned that the flash wasn’t designed for frequent high-power use. Despite being careful with subsequent units, the same overheating issue cropped up again—even with minimal use of full or half power.
2. Slow Recycle Time
In fast-paced environments, like crowded streets or events, every second counts. Unfortunately, the Q20II’s slow recycle time became a liability. At even moderate power levels like 1/8th, the flash would take over a second to recharge, causing me to miss potentially great shots. For a professional or passionate photographer, that’s a frustrating limitation.
3. Misfires and Interference
The Q20II’s tendency to misfire grew more frequent over time. Worse, because it randomly assigned wireless channels, I often found myself battling interference in crowded settings where others were using the same flash. Imagine someone else’s trigger firing your flash—or vice versa. That’s a dealbreaker for me. That happened a few times for me when I was shooting with friends who were using the same flash or the Lightpixlabs flash triggers. Especially, when teaching workshops it got rather annoying.

Leica Q3 - Kuala Lumpur

Leica Q3 - Bangkok
What’s a better alternative?
After enduring these issues, I knew it was time for a change. My criteria were clear: I needed a compact flash system with better reliability, faster recycle times, and no overheating problems. That’s when I discovered the Godox X3 flash trigger and TT350/V350 flash. The V350 is basically the same flash that is using a rechargeable battery instead if double AAs and it that lasts up to 500 shots at full power. On top of that, the recycle time is even a little bit faster over the TT350.
Why Godox?
The Godox system checked all the boxes:
Increased Power: The TT350 offers nearly double the power of the Q20II, making it more versatile for different lighting conditions.
Faster Recycle Times: No more waiting around—the TT350 recycles much faster, even at higher power settings.
Overheating Protection: Built-in safeguards ensure the flash can handle demanding usage without damage.
Compatibility: Godox has now released a Leica-specific version of the X3 trigger, but I’ve decided to stick with the Panasonic version that I picked up earlier. It works seamlessly with my Lumix cameras, Leica Q3, and even my Leica M6 in manual mode. However, it’s crucial to set the trigger to “legacy hot shoe” mode in the menu to ensure everything functions properly.
The system also offers the flexibility of using AA batteries, which are readily available—a lifesaver for travel photographers.
An even better alternative would be the Godox V350. It’s essentially the same flash but uses a rechargeable battery instead of AA batteries, lasting up to 500 shots at full power. Additionally, the recycle time is slightly faster compared to the TT350.
I have both the TT350 and the V350, but I tend to grab the V350 more frequently out of convenience. Its rechargeable battery and faster performance make it my go-to choice for most situations.

Leica Q3 - Godox V350 - TT350 - X3

Leica Q3 - Phuket
Leica Q3 - Phuket
Master Street Photography with flash
If you want to master using flash in street photography, check out my video course! It’s designed to help you understand how flash works and how to use it to your advantage, enabling you to create incredible images out on the streets.
Farewell, FlashQ Q20II
Despite its flaws, the Q20II deserves credit for being the flash that introduced me to using flash in street photography. Many of my favorite shots wouldn’t have been possible without it. However, for photographers who rely on dependable gear, reliability is non-negotiable.
If you’re an occasional flash user or working in less demanding scenarios, the Q20II might still be a viable option. But for those like me who need a flash that keeps up with fast-paced environments, the Godox TT350 or V350 paired with the X3 trigger are far better alternatives.

Leica Q3 - Berlin

Leica Q3 - Bangkok

Leica Q3 - Penang

Leica Q - Bangkok
What About You?
Have you experienced similar issues with the FlashQ Q20II? Or have you found a flash system you swear by? Let me know in the comments!
The Leica Q3 Look
When Leica introduced the Leica Q3 in mid of 2023, they also introduced some sort of film presets, somewhat similar to what Fuji is doing with their film simulations. As you might know, I am not a jpg shooter because I love the ability that raw files give me. However, I wanted to give these Leica Looks a try and see what it is all about.
I was particularly interested in the two color looks, Leica Classic and Leica Contemporary. The other three available looks are black and white and didn’t spark my interest. So, after trying them out, I really liked the look they gave me but in very contrasty situations, they are not very useful since the jpgs don’t have much headroom for post production. That bothered me and I wished the looks would also be available for raw files.
So, the first few months, I was shooting RAW+JPG with switching between the looks. That helped me to emulate the look and to create a Lightroom presets that comes fairly close to the original Leica Looks. However, now I can use them even when shooting while having all the benefits of the dngs.
Just to give you an idea, here are a few examples:
Leica Classic

JPG out of camera

RAW + Lightroom preset

RAW export out of Lightroom untouched

JPG out of camera

RAW + Lightroom preset

RAW export out of Lightroom untouched
Leica Contemporary

JPG out of camera

RAW + Lightroom preset

RAW export out of Lightroom untouched

JPG out of camera

RAW + Lightroom preset

RAW export out of Lightroom untouched
I think, the results speak for themselves. Finally, I can use the Leica Looks and shoot raw only. And the cool part is, that these presets also work with other Leica cameras that don’t come with these Leica looks and also cameras from other brands as well.
If you want to use those Lightroom presents too, you can and it is absolutely free! Simple, subscribe to my brand new newsletter and I am going to send you the download link.

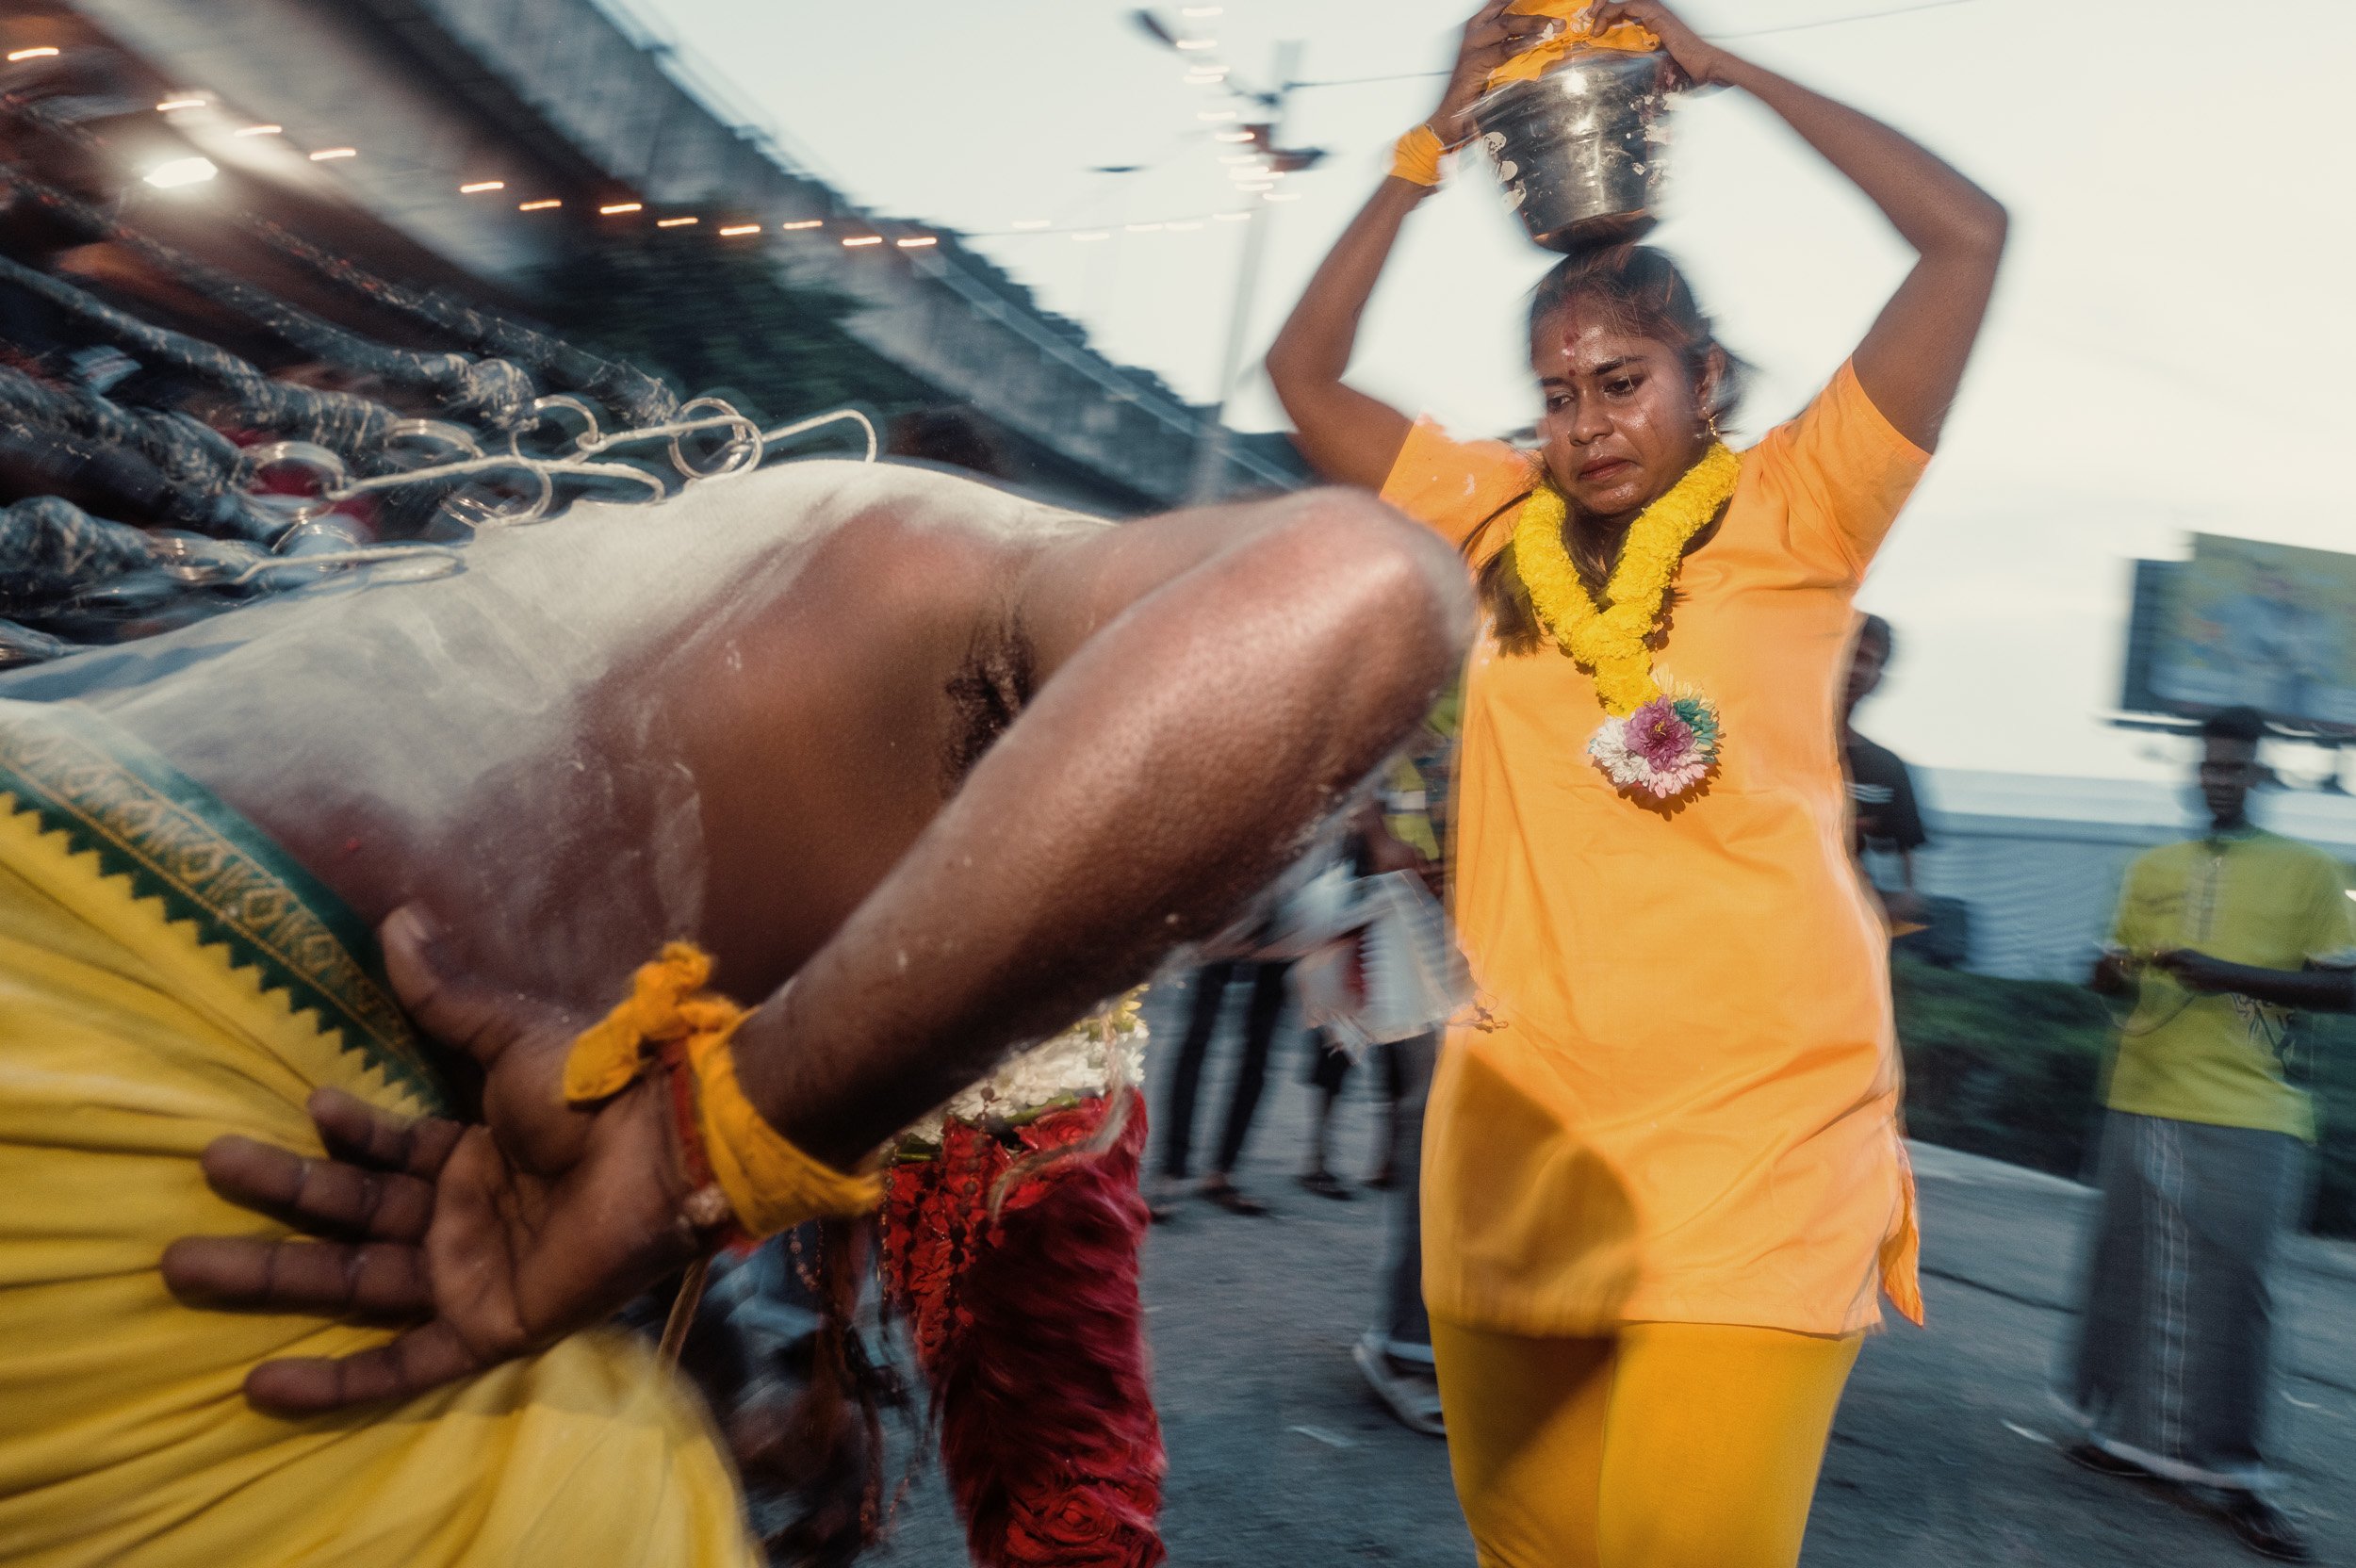
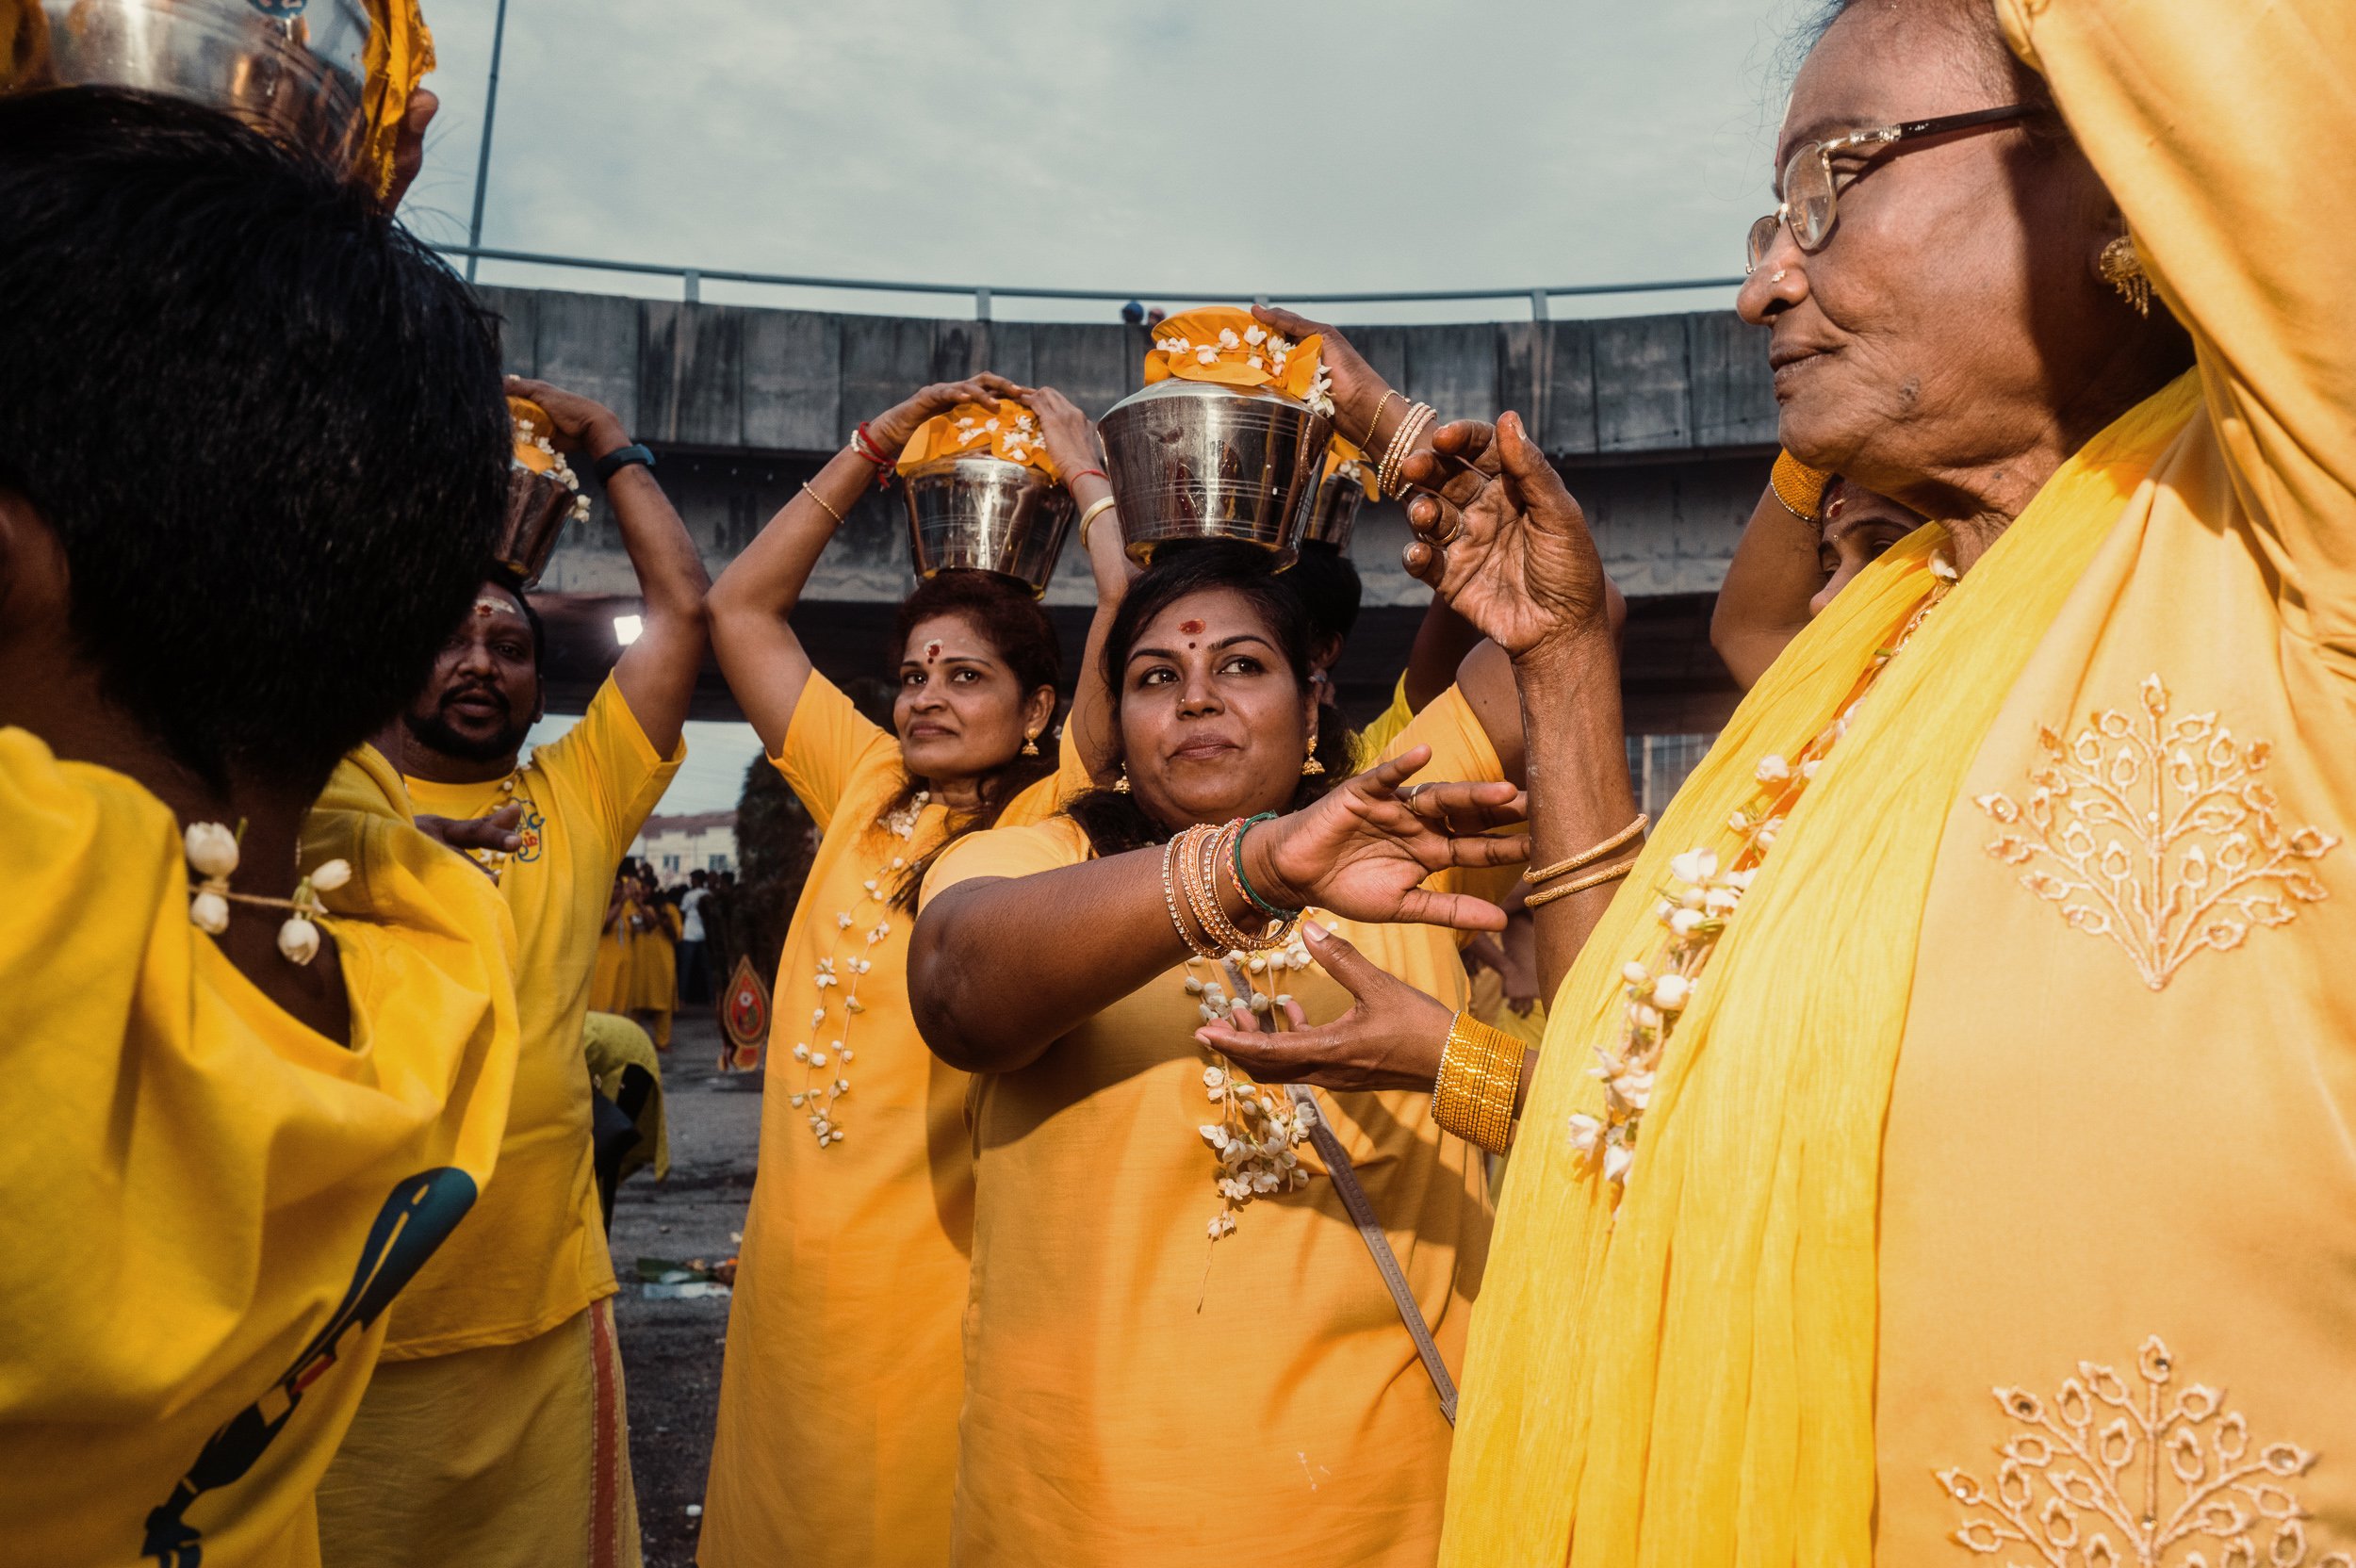
Shooting Thaipusam
Last month, while I was in Kuala Lumpur, I finally had the chance to photograph the infamous Thaipusam festival. Upfront, I wasn’t really sure what to expect but it was much nicer than I could ever hoped for. I was joined by Edmond (edmondstreetz) and he recommended that we should at night in order to avoid the masses of photographers who would inevitably get in the way of each other. So, we arrived there at around midnight and shot until the morning and it was insane. If you haven’t watched it, check out the video to learn more about the festival and to see us shooting and trying to stay awake during the night.
Below the video you’ll find photos that are included in the video and some additional ones.


Thaipusam in Kuala Lumpur - a Street Photograpgher’s Paradise
Last week, after returning from Penang to Kuala Lumpur, I had the pleasure to attend the famous Thaipusam festival. Today’s blogpost is however more focused on the days prior to the actual event. Why going to the festival? Well, my friend and fellow street photographer Edmond (edmondstreetz) told me about it around a year ago and I knew at some point I had to come and see it for myself. I don’t want to spoil it but it was totally worth it.

1. Leica Q3, 1/5 - f/11 - ISO800

2. Leica Q3, 1/15 - f/11 - ISO800
The photos you can see in this post had been taken a few days before the actual festival and it was already a lot going on and it gave me an idea about what to expect during the two days of the event a few days later.

3. Leica Q3, 1/50 - f/8 - ISO800
The Thaipusam festival, celebrated with unparalleled fervor and devotion, holds a special place in the hearts of Hindus around the world. One of the most iconic and grandiose celebrations occurs at Batu Caves in Kuala Lumpur, Malaysia. The Thaipusam festival at Batu Caves is a unique blend of religious customs, cultural expressions, and spiritual fervor, making it a captivating spectacle that attracts pilgrims, tourists, and locals alike.

4. Leica Q3, 1/60 - f/8 - ISO800
Thaipusam is a Hindu festival dedicated to Lord Murugan, the God of War, and is observed during the Tamil month of Thai (January-February). This festival commemorates the occasion when Parvati, the mother of Murugan, presented him with a divine spear to vanquish the evil demon Soorapadman. Devotees believe that by participating in the Thaipusam rituals, they can seek the blessings of Lord Murugan for strength, protection, and the fulfillment of their wishes.

5. Leica Q3, 1/30 - f/8 - ISO800

6. Leica Q3, 1/30 - f/8 - ISO800
Batu Caves, located just north of Kuala Lumpur, is an iconic site for Thaipusam celebrations due to the monumental golden statue of Lord Murugan and the towering limestone caves that house several Hindu shrines. The site's natural beauty adds to the religious ambiance, making it a focal point for both worshippers and spectators during the festival.
7. Leica Q3, 1/400 - f/8 - ISO800
The most extreme form of penance is the act of carrying a "paal kudam" or milk pot, which involves piercing the devotee's cheeks, tongue, or other body parts with sharp objects. Despite the physical pain, devotees display an unwavering faith and determination, considering their sacrifices as acts of devotion and penance.

8. Leica Q3, 1/500 - f/8 - ISO800

9. Leica Q3, 1/500 - f/8 - ISO800

10. Leica Q3, 1/400 - f/8 - ISO800

11. Leica Q3, 1/640 - f/8 - ISO800
Beyond the spiritual and religious aspects, the Thaipusam festival at Batu Caves is a cultural extravaganza. The vibrant procession to the caves is accompanied by rhythmic music, traditional dances, and the chanting of hymns, creating an atmosphere of joy and celebration. The entire event is a testament to the rich cultural heritage of the Hindu community in Malaysia, and it provides an opportunity for people of different backgrounds to witness and appreciate this unique manifestation of faith.

12. Leica Q3, 1/500 - f/8.0 - ISO800

13. Leica Q3, 1/1000 - f/8.0 - ISO800

14. Leica Q3, 1/500 - f/8.0 - ISO800

15. Leica Q3, 1/800 - f/8.0 - ISO800
The Thaipusam festival at Batu Caves has gained international recognition and has become a significant tourist attraction. The annual event draws visitors from various parts of the world who come to witness the spectacle, experience the cultural richness, and capture the spiritual essence of the festival. The global awareness generated by Thaipusam at Batu Caves contributes to the promotion of religious tolerance, cultural understanding, and the appreciation of diverse traditions.

16. Leica Q3, 1/800 - f/8.0 - ISO800

17. Leica Q3, 1/500 - f/8.0 - ISO800

18. Leica Q3, 1/320- f/16 - ISO1600
The Leica Q3 was the perfect tool to capture these scenes, especially because I was using flash. I shot mostly at aperture priority and let the camera pick the shutter speeds. The ISO was set to 800 in the beginning and a little later on I raised it to 1600. You might asked yourself why, but the answer is fairly simple. The flash power is only effected by ISO and aperture and the shutter speed was used to control the ambient light.
The Leica Q3 has a leaf shutter and can sync flash at any speed of its mechanical shutter and that makes everything so much easier. So, it can go up to 1/2000 and that allows me to raise the ISO as high as I need to get the flash power that I want to achieve. Since, I use zone focusing and I want most things to be in focus, I usually shoot at f/8 or even f/16 but that would normally also mean that I had to use my flash at max power. However, I try to avoid that because it kills the batteries much faster and also after each shot I would have to wait a few seconds for the flash to be ready again. By shooting at higher ISOs, I can comfortably set my flash to 1/8 power and avoid all those issues. And to be honest, the Q3 can handle ISO1600 very well and even when pushing the files later on in Lightroom, there is hardly any noise.

19. Leica Q3, 1/320 - f/16 - ISO1600

20. Leica Q3, 1/200 - f/16 - ISO1600

21. Leica Q3, 1/160 - f/16 - ISO1600

22. Leica Q3, 1/800 - f/13 - ISO1600

23. Leica Q3, 1/500- f/16 - ISO1600

24. Leica Q3, 1/125 - f/16 - ISO1600

25. Leica Q3, 1/320 - f/16 - ISO1600

26. Leica Q3, 1/200 - f/16 - ISO1600

27. Leica Q3, 1/400 - f/16 - ISO1600

28. Leica Q3, 1/50- f/16 - ISO1600

29. Leica Q3, 1/1000 - f/16 - ISO1600
Stay tuned, more to come!

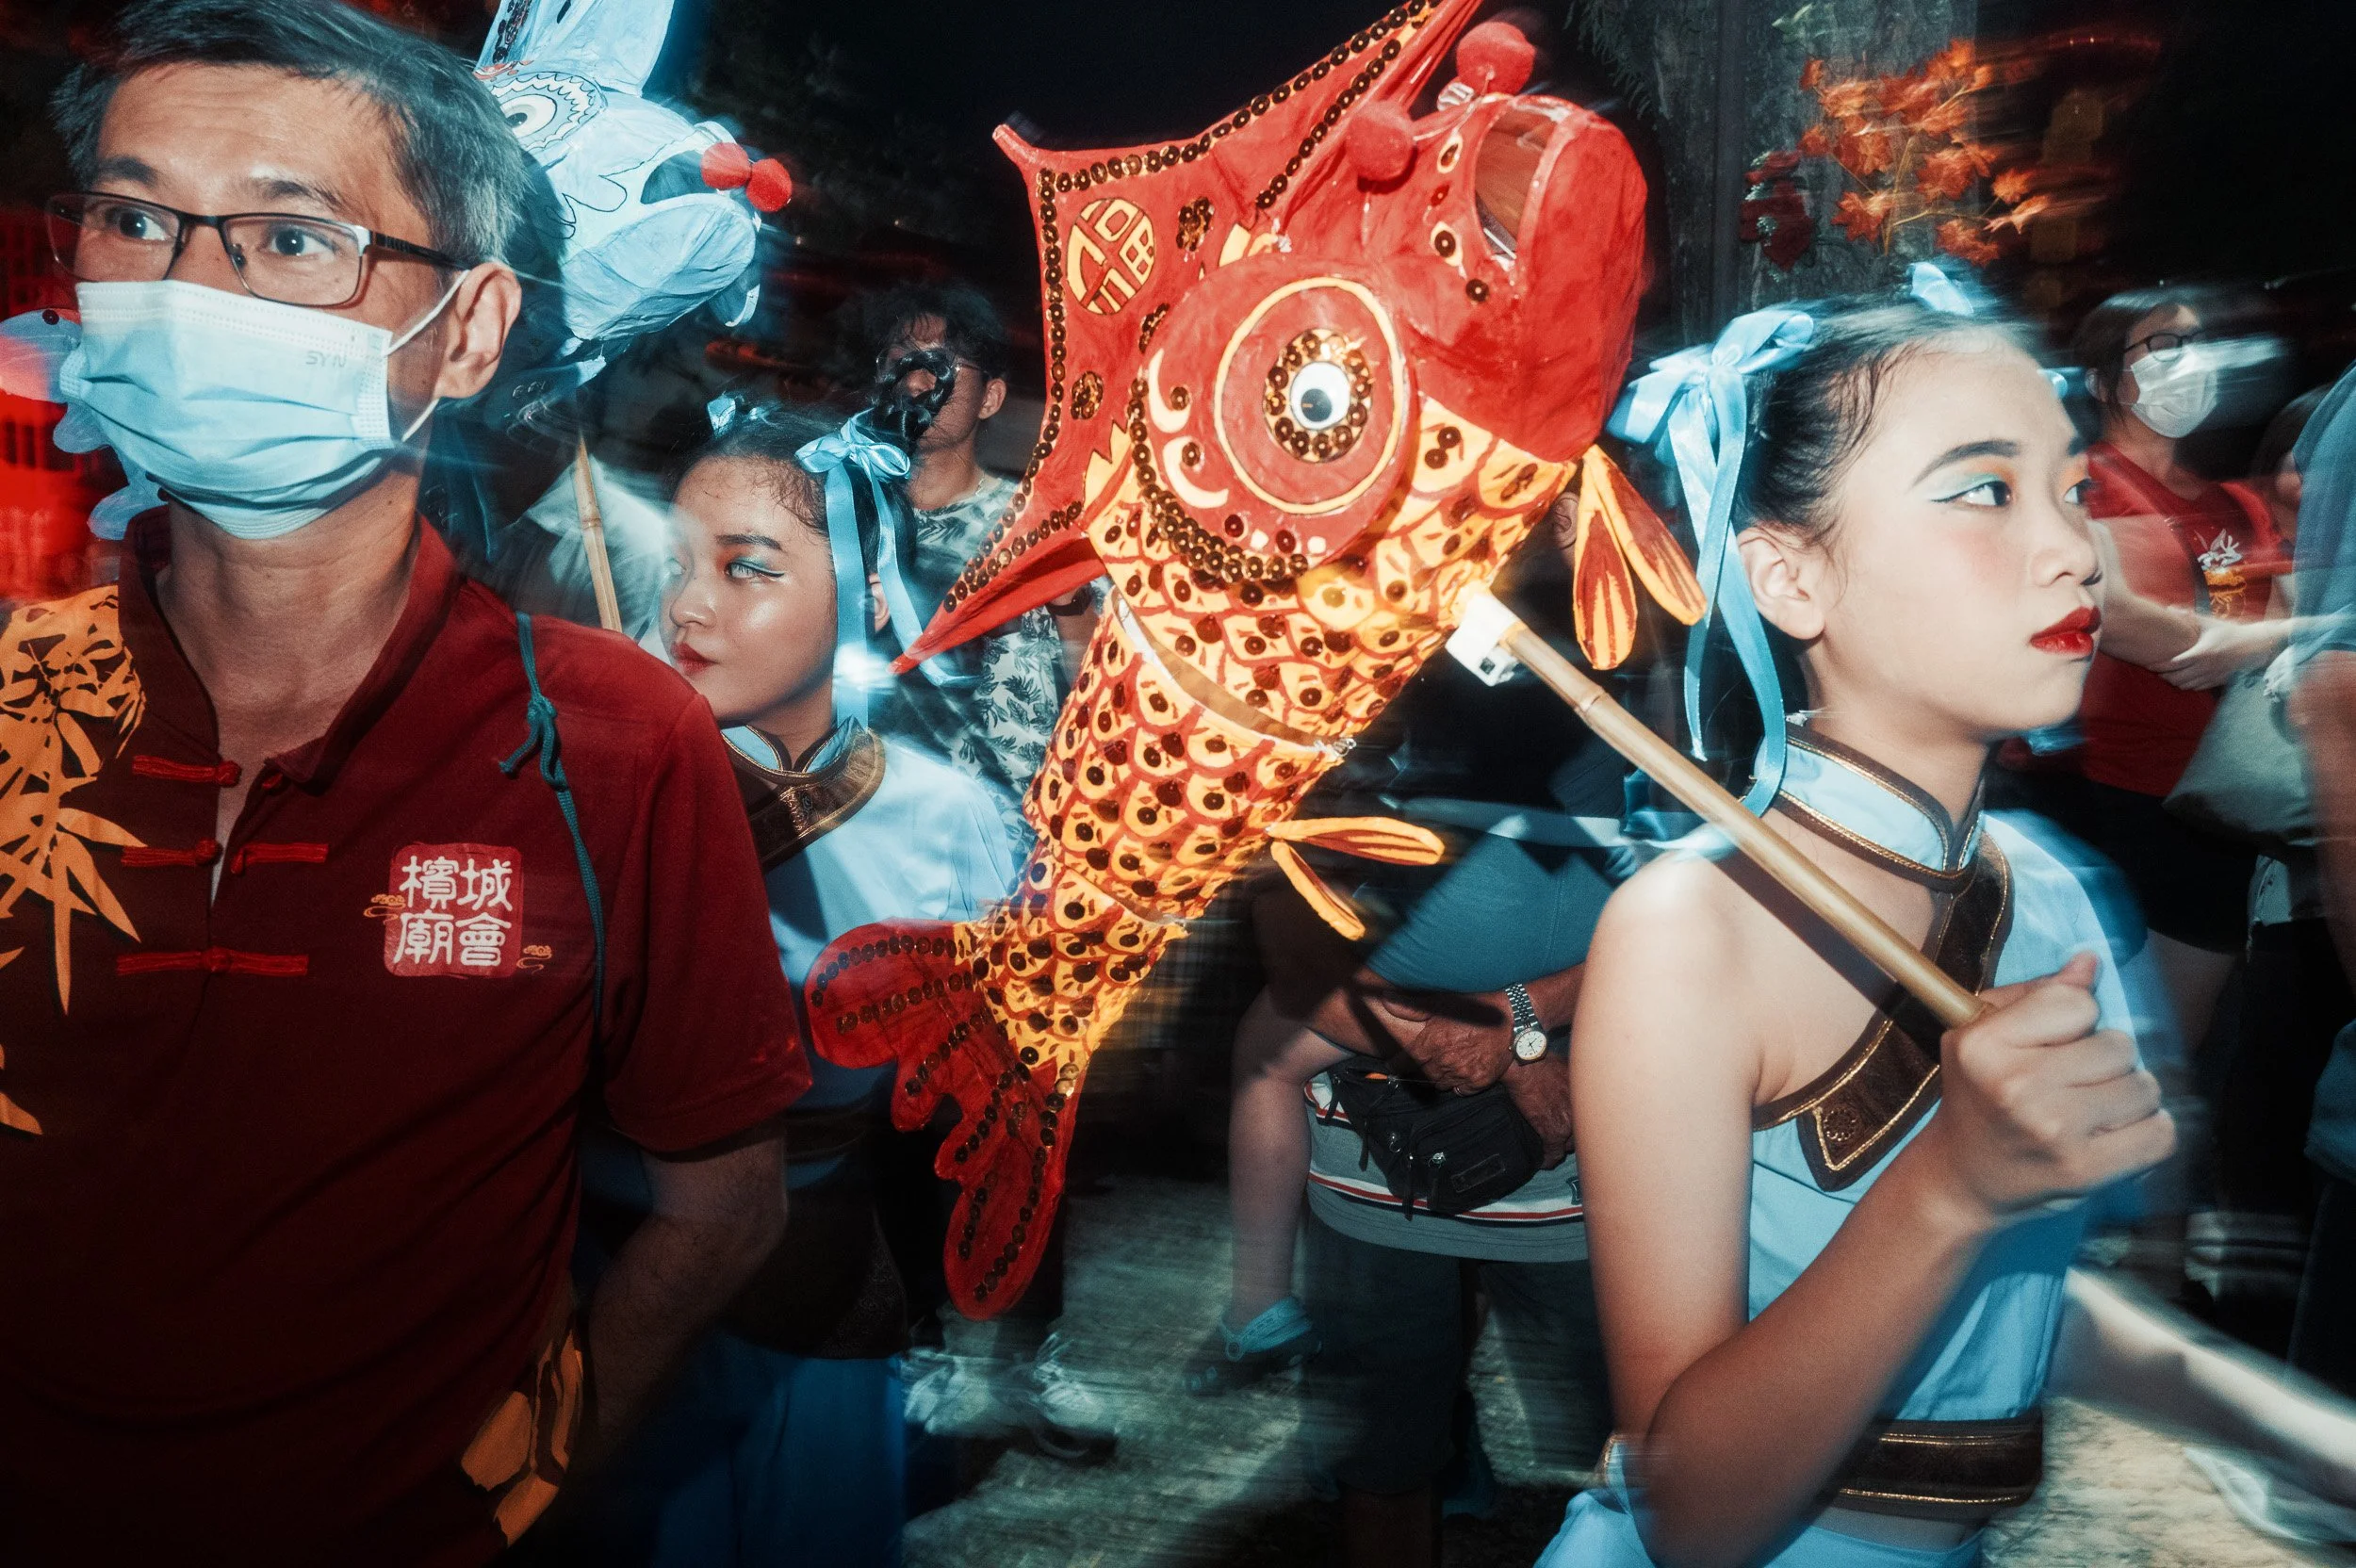
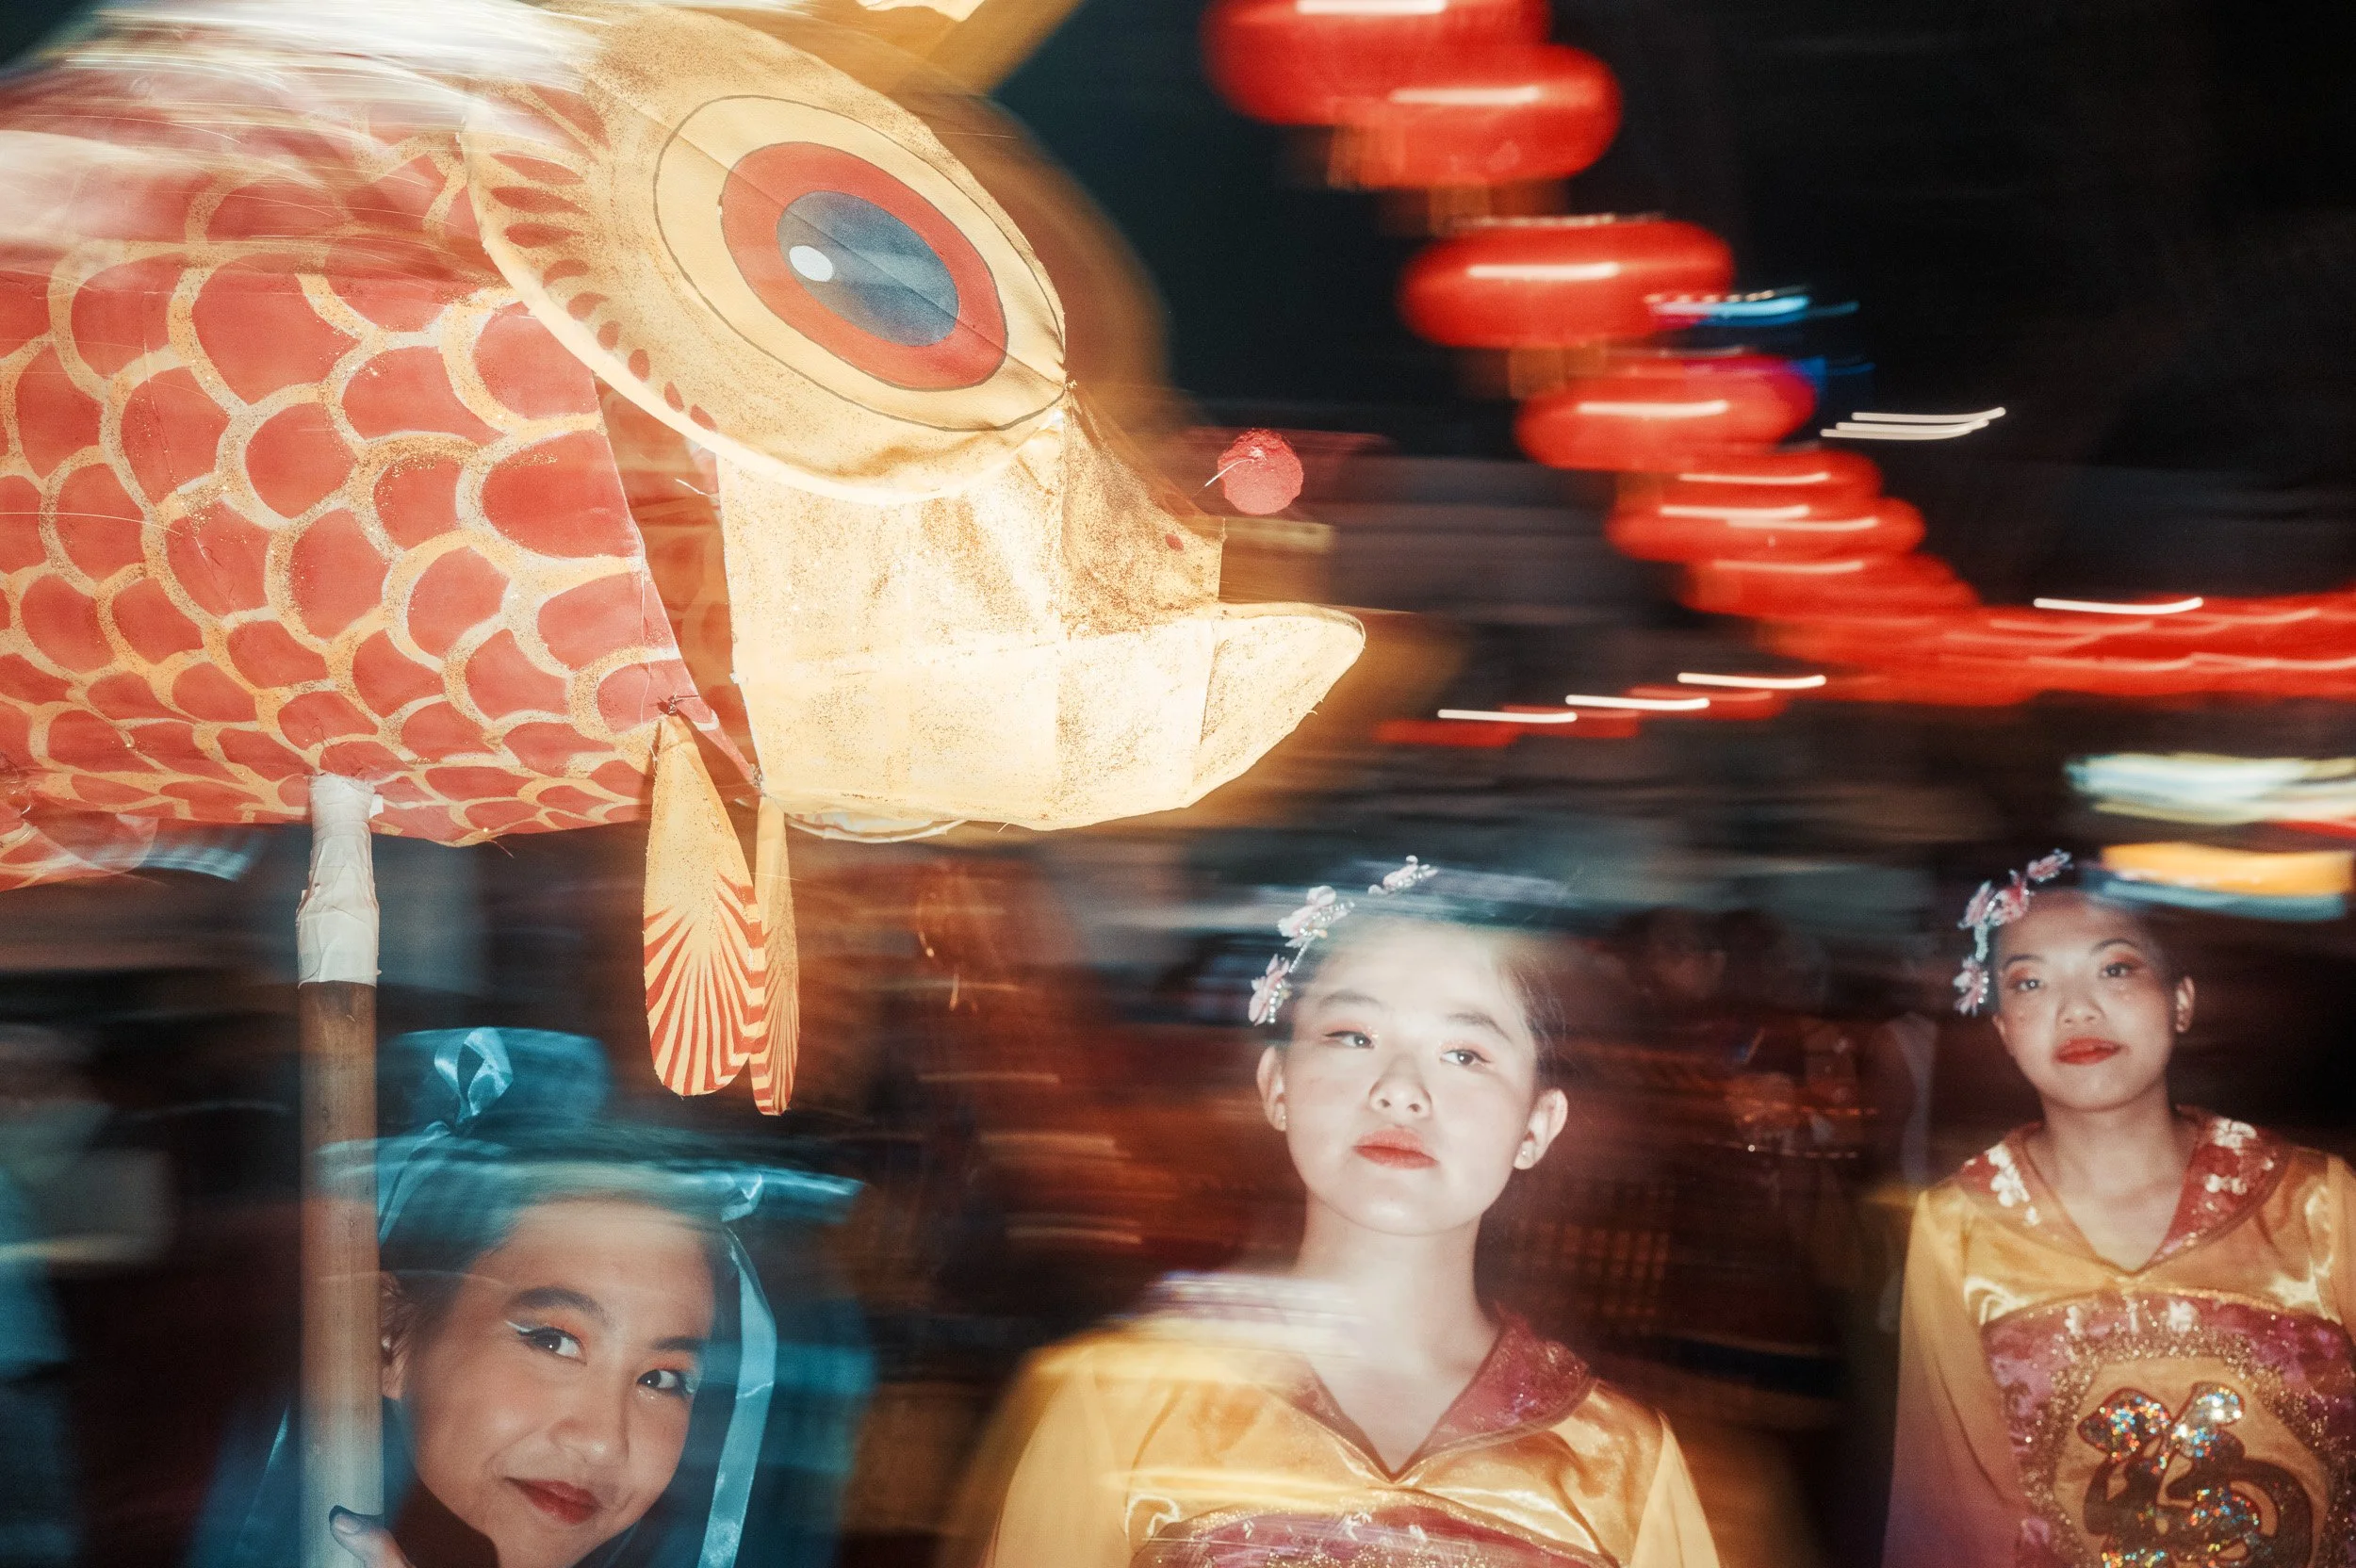
A day of shooting in Georgetown/Penang
Nestled on the northwest coast of Malaysia, the captivating city of Georgetown, the capital of Penang, is a melting pot of diverse influences, blending colonial architecture, vibrant street art, and a delectable fusion of cuisines. While I was in Kuala Lumpur, I wanted a break from city life and went to Georgetown for a few days. But of course, me being me, I had to hit the streets to see what I could come up with.

1. Leica Q3, 1/100 - f/11 - ISO800

2. Leica Q3, 1/320 - f/11 - ISO800
Georgetown's history is woven with threads from various epochs, creating a rich and diverse cultural landscape. Founded in 1786 by Captain Francis Light of the British East India Company, Georgetown played a pivotal role in British colonial expansion in Southeast Asia. The city's historical significance is evident in its well-preserved colonial architecture.

3. Leica Q3, 1/200 - f/11 - ISO800
One of Georgetown's most captivating aspects is its cultural diversity, a harmonious blend of Malay, Chinese, Indian, and European influences. The city's UNESCO World Heritage status, awarded in 2008, recognizes its unique architectural and cultural heritage.
Georgetown has gained international acclaim for its vibrant street art scene, transforming the city into an open-air gallery. The streets are full of murals and installations that narrate tales of the city's history and culture. The famous "Children on a Bicycle" and "Little Children on a Bicycle" murals by Lithuanian artist Ernest Zacharevic have become iconic symbols of Georgetown's artistic charm. But we all know that I didn’t come here to do the touristy bits.

4. Leica Q3, 1/10 - f/16 - ISO100
I was shown around by two local photographers. In the morning I went on a stroll with Thinnesh (https://www.instagram.com/thinnesh.jpg/) and we did explore some of the markets and streets in the historical part of Georgetown. It wasn’t all that busy but nonetheless it was great seeing some of the cool sights.
In the afternoon I was joined by Sean (https://www.instagram.com/thisseanchai/) which was great fun and we got really lucky with an event, that was taking place in one the parks. It was an opening ceremony for the upcoming Chinese new year festivities. A lot of people gathered there and a leading politician of Penang came to help pulling up a huge lantern. Besides that, a local dancing school showed a performance which was nice to capture. Besides us, there were many other photographers and of course the local press was covering the event as well.
But before the event we went to a few jetties which were very interesting to photograph. Two hours before sunset, you’ll find a good amount of people going there to have their photos taken or just to hang out until the sun has set. For candid photography this was great and if you come into town, it is a place I would recommend giving a try.
5. Leica Q3, 1/500 - f/16 - ISO800

6. Leica Q3, 1/500 - f/16 - ISO800

7. Leica Q3, 1/8 - f/16 - ISO100

8. Leica Q3, 1/50 - f/16 - ISO100

9. Leica Q3, 1/50 - f/11 - ISO800
Of course, I used the Leica Q3 for all of the shots and except for a few photos all were shot using flash. During the event in the evening I ran out of batteries but luckily a nearby convenient store got me covered and I was able to pick up some AA.
10. Leica Q3, 1/15 - f/8.0 - ISO1600

11. Leica Q3, 1/15 - f/8.0 - ISO1600

12. Leica Q3, 1/15 - f/8.0 - ISO1600

13. Leica Q3, 1/15 - f/8.0 - ISO1600

14. Leica Q3, 1/15 - f/8.0 - ISO1600

15. Leica Q3, 1/15 - f/8.0 - ISO1600

16. Leica Q3, 1/15 - f/8.0 - ISO1600

17. Leica Q3, 1/15 - f/8.0 - ISO1600
18. Leica Q3, 1/15 - f/8.0 - ISO1600

19. Leica Q3, 1/15 - f/8.0 - ISO1600

20. Leica Q3, 1/15 - f/8.0 - ISO1600

21. Leica Q3, 1/8 - f/8.0 - ISO1600
Would I recommend Georgetown for street photography? If you want to relax for a few days and also want to shoot on the side, then I think Penang can be a good place to shoot street. People are very friendly and with a little bit of luck, you should be able to come up with some great shots.

Leica Q3 and Low Light
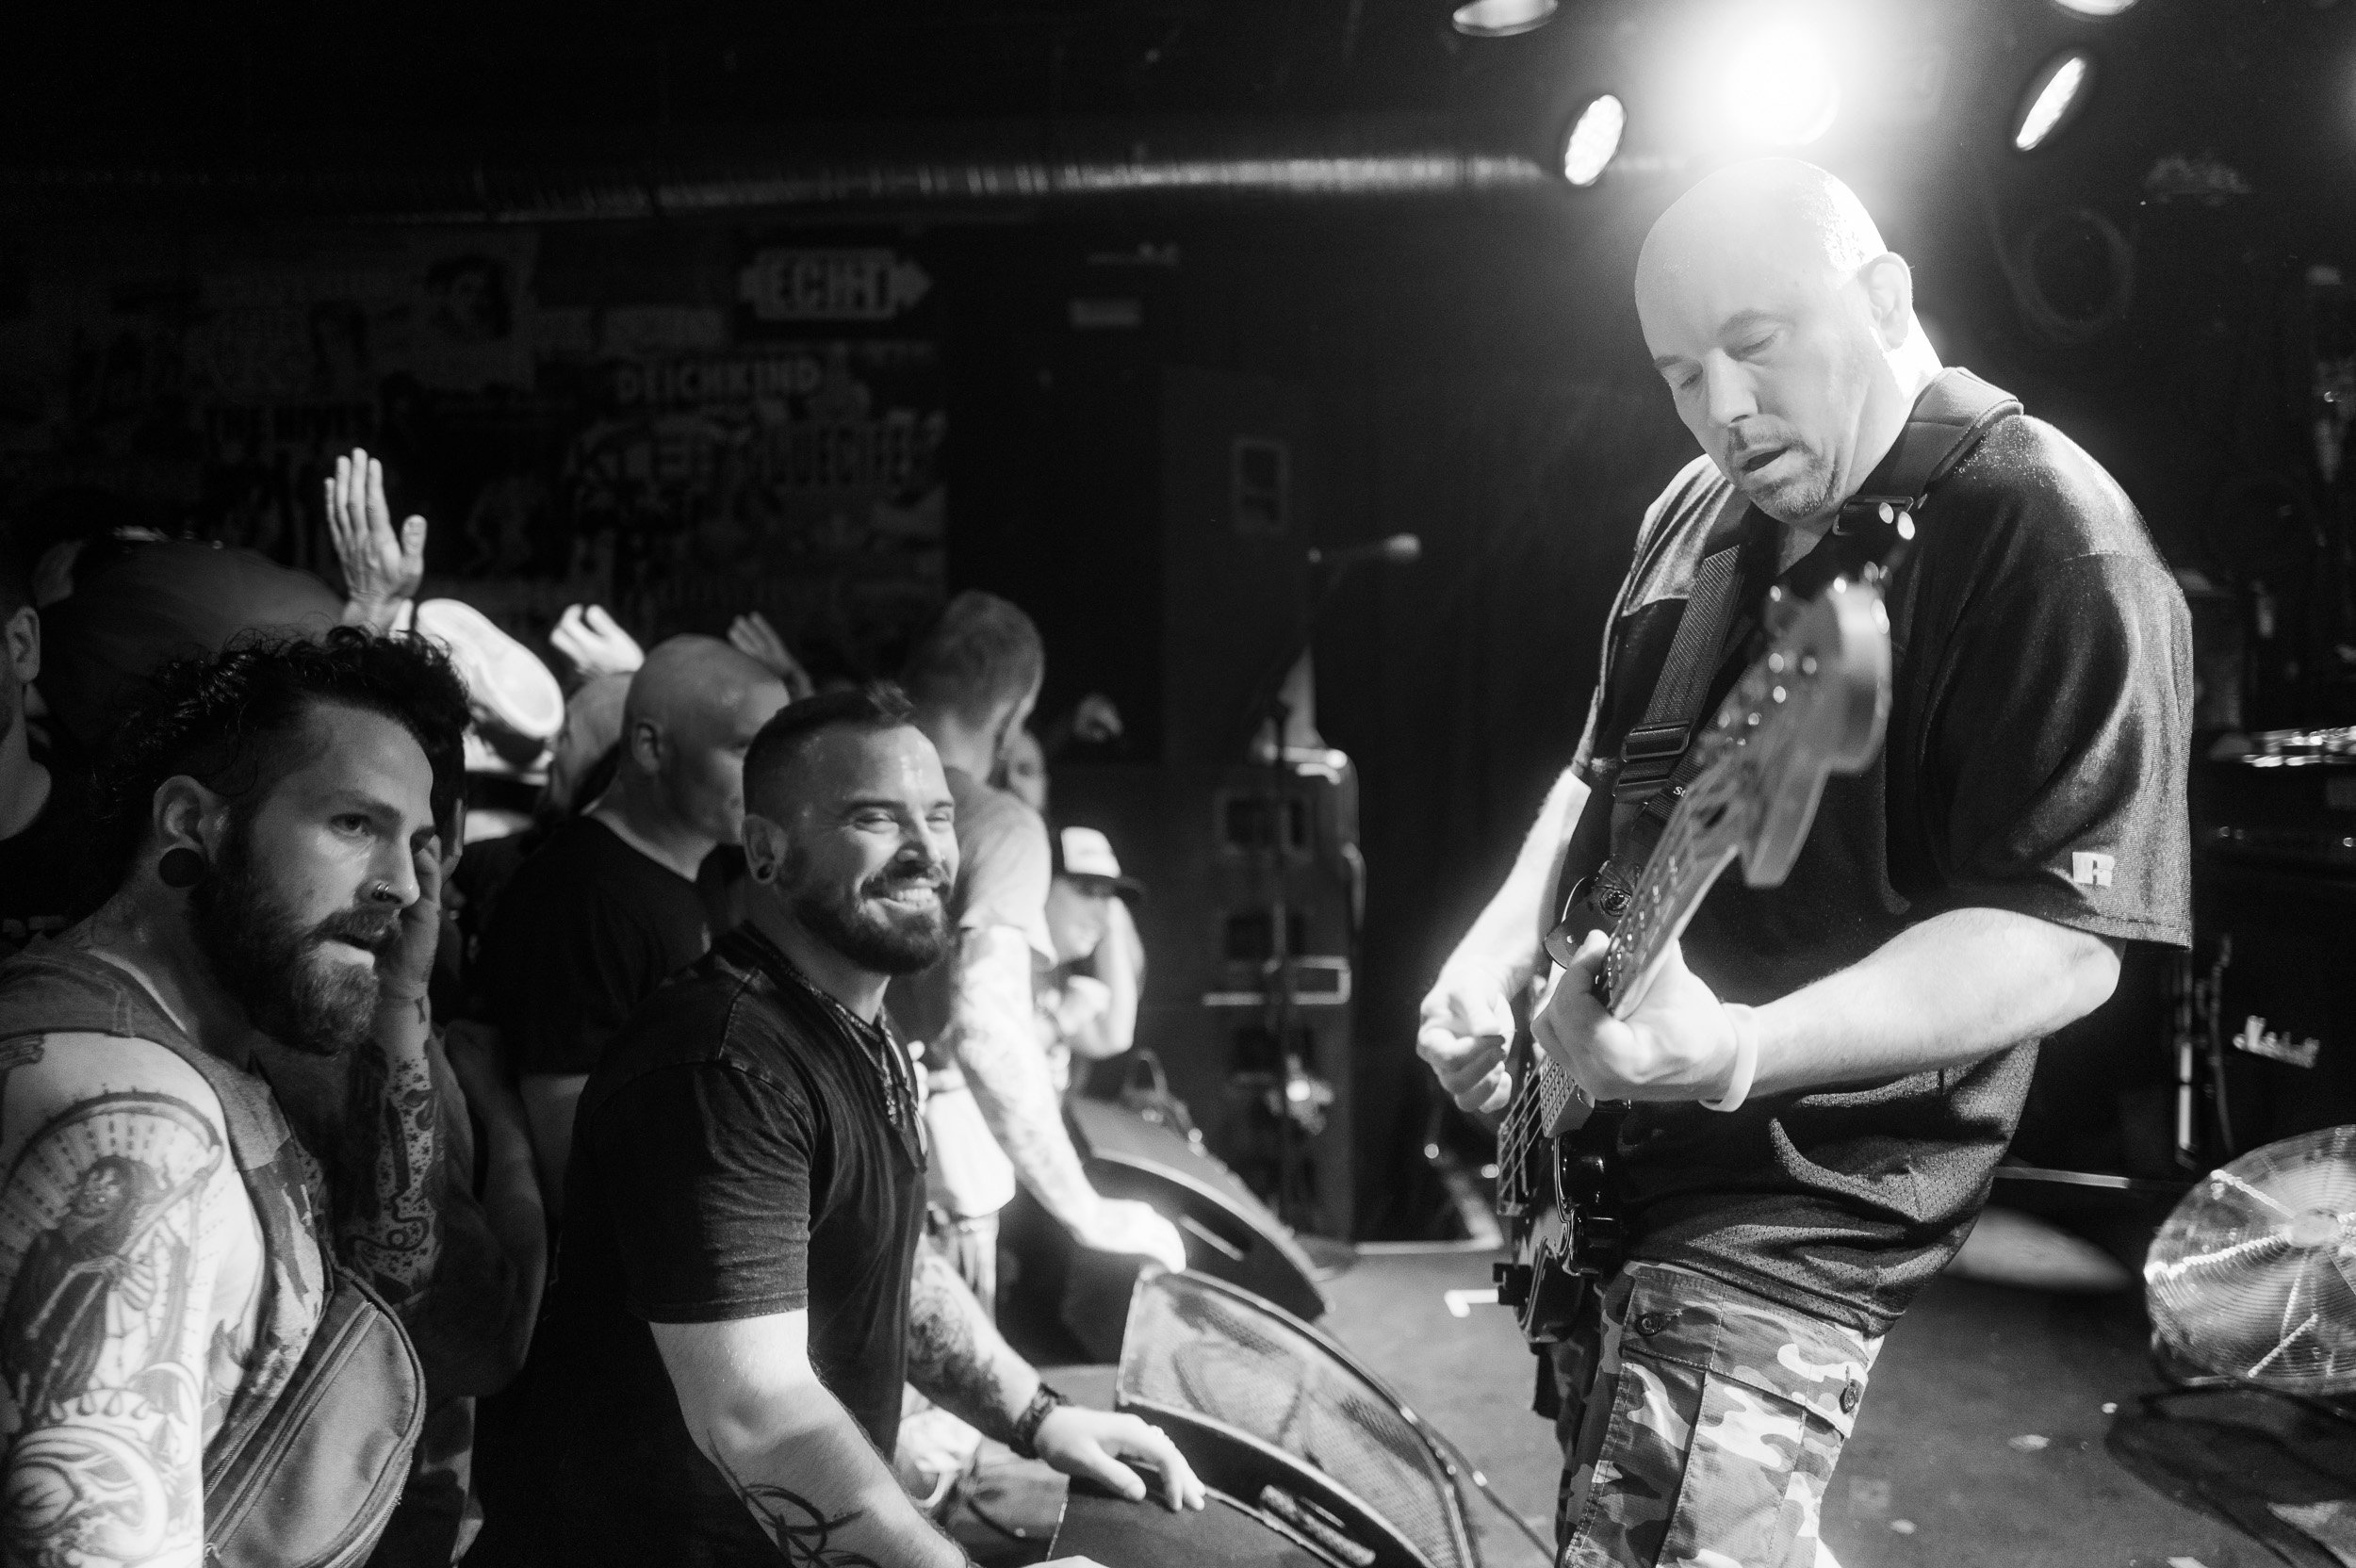
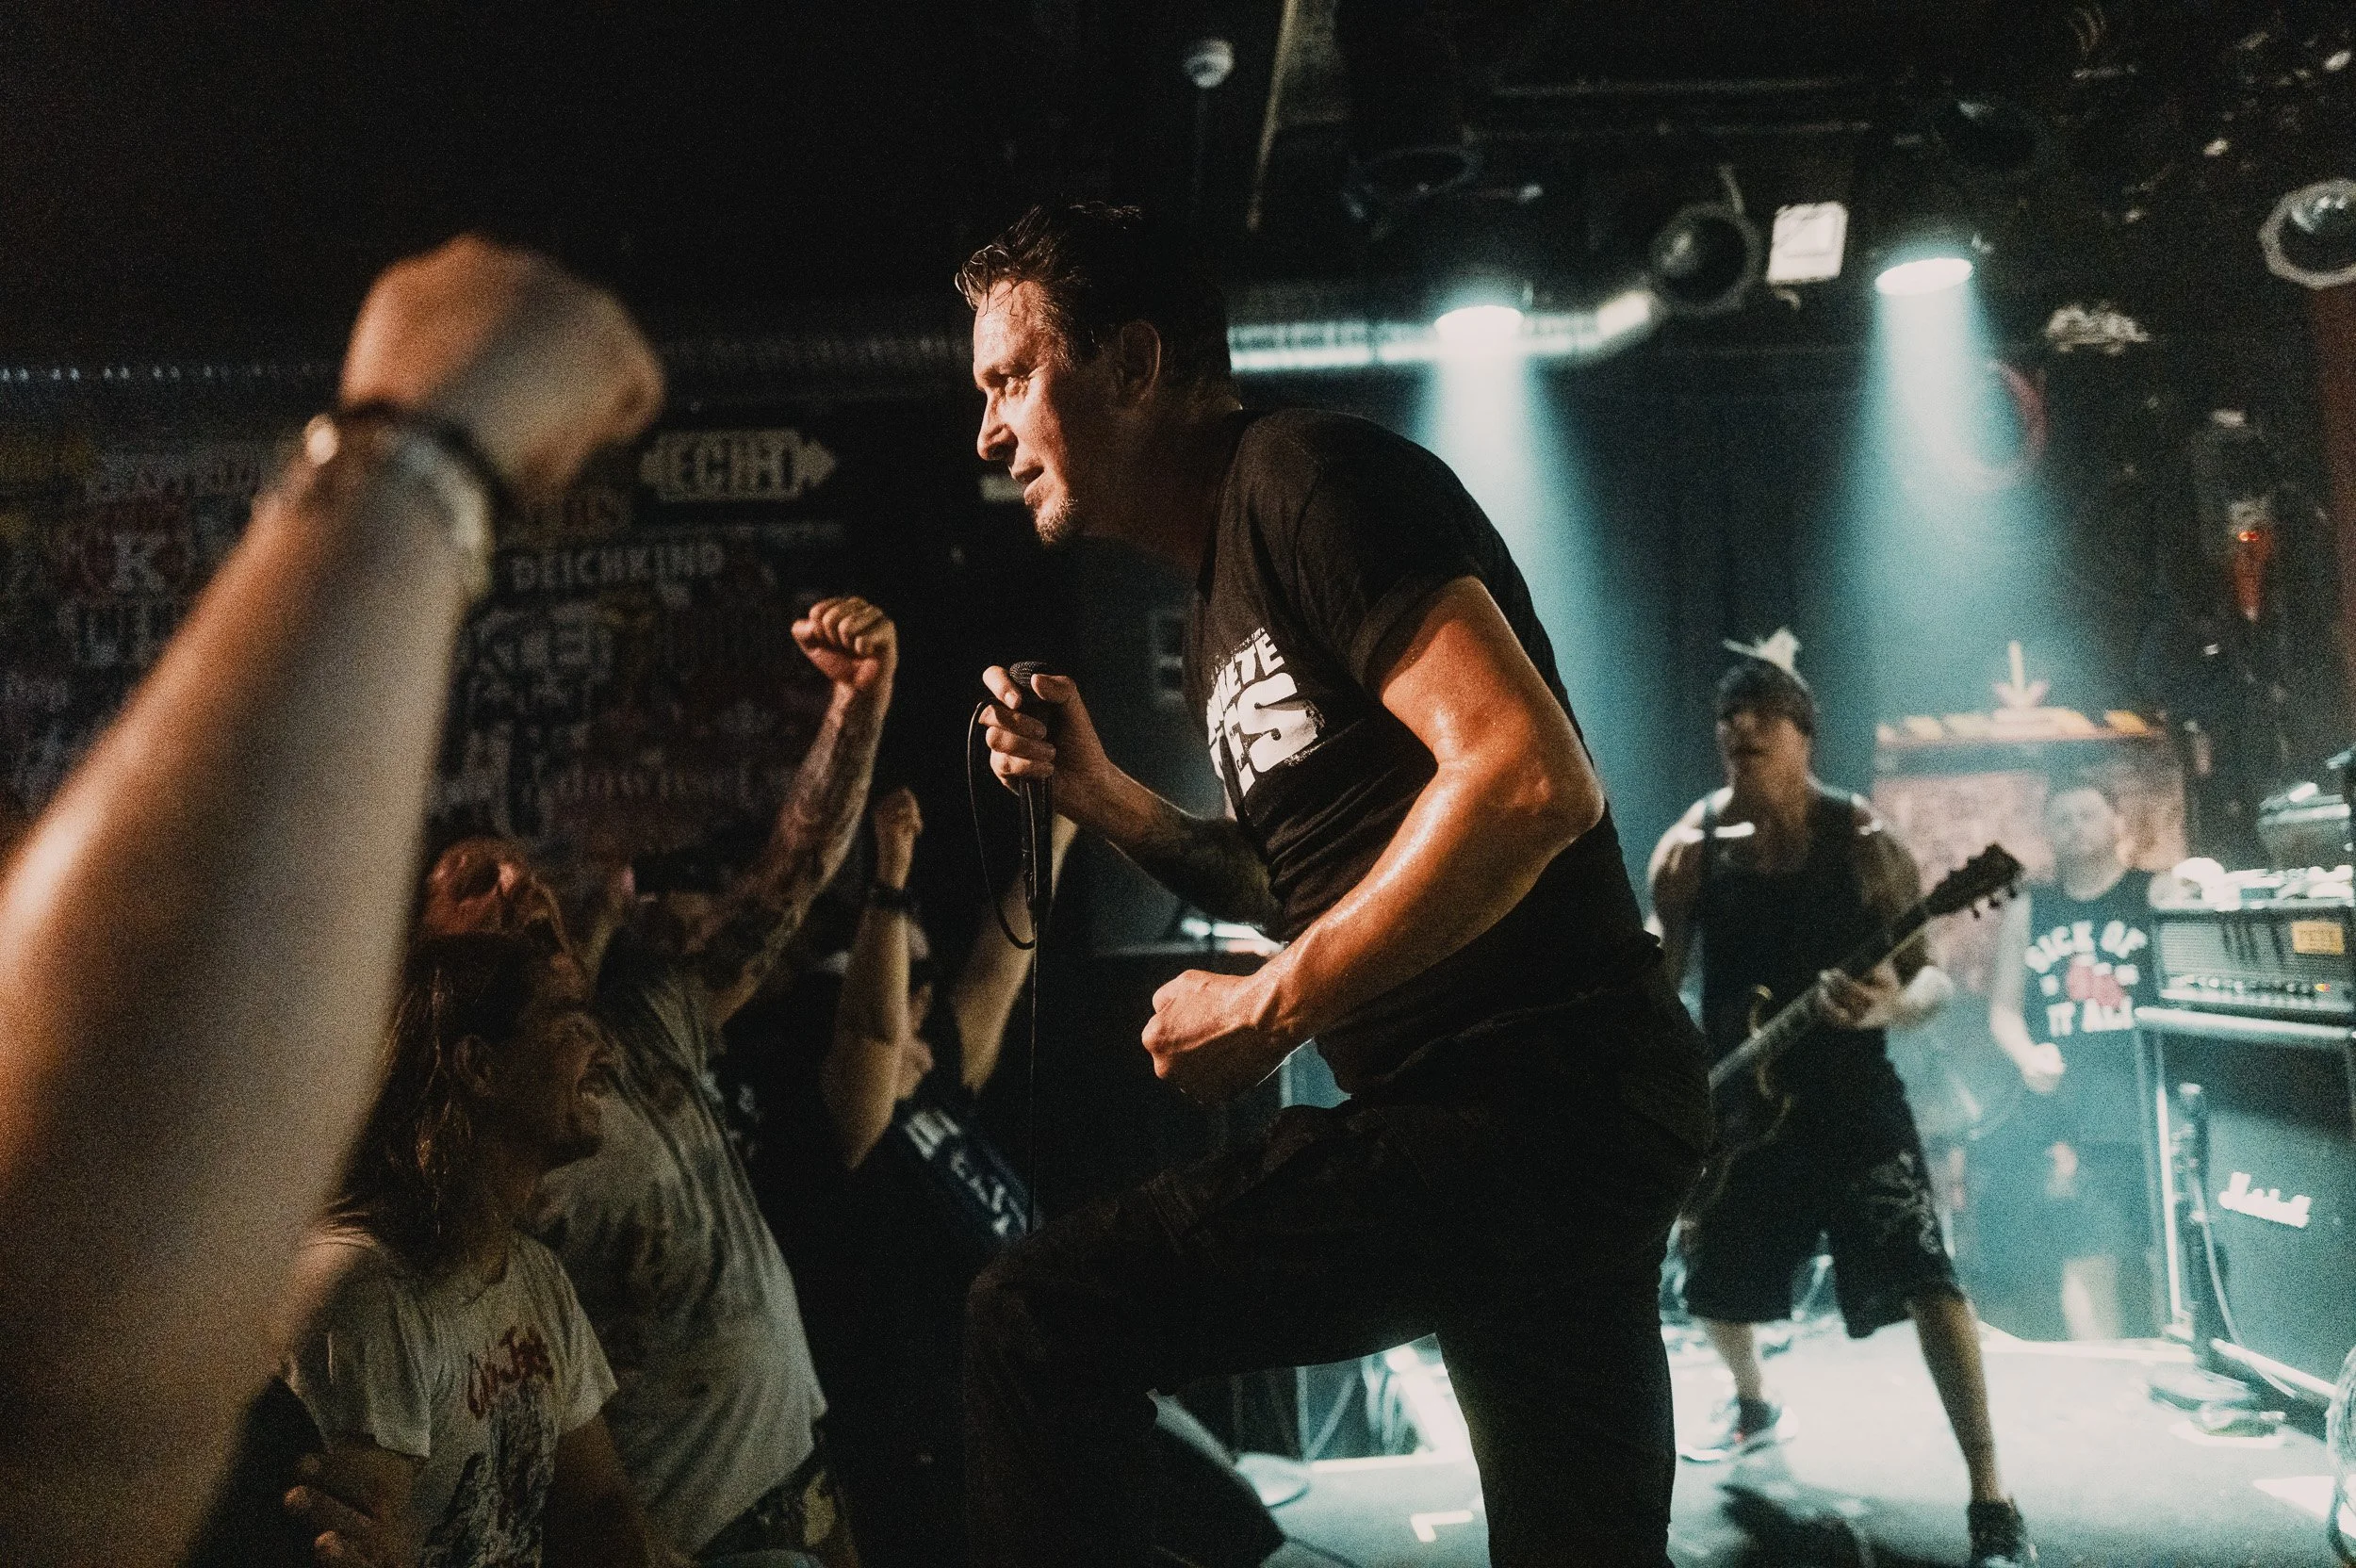
Yesterday, I finally had the chance to give the new Leica Q3 a proper test. Since I got mine, I used it a little bit but so far I haven’t done any street photography. However, yesterday I had the chance to bring it to a concert which is a very tough environment for any camera.
The band that played is called Sick Of It All from NY and it’s one of the biggest names in the Punk and Hardcore scene. Normally, they play big festivals and larger clubs but Cafe Central in Weinheim is fairly small and it was packed to the rafters. For me as a photographer, it’s surely one of my favorite venues for concert photography because there isn’t any barrier in front of the stage and the band get’s in very close contact with their fans.
Yes, for some it might seem crazy to bring an expensive camera to such an event but I have insurance in case something goes wrong which did not happen.
To my surprise, I was the only one taking photos which used to be different in the past. For me, that was a good thing and I got a very good spot very close to all the action.
Photographing concerts like this isn’t that easy because the lighting situation can be challenging. The light sources changing up constantly and especially the red light is a pain in the but because it’s almost impossible to get a proper white balance. For those cases it’s better to convert the images to black and white because in color they would look really bad.
Now you might think that a Leica Q2 Monochrom would probably be a better option for this kind of environment and yes in terms of high ISO it would be better. However, because you are dealing with very bright light sources, you would need to underexpose a lot to make sure the highlights are not totally blown out which happens easily with a monochrome sensor.
So now, how did the Leica Q3 handle the situation? Well, in terms of high ISO I think it did pretty well. Some of the images were shot at ISO1600 and higher and in Lightroom I even bumped the exposure by up to 2 or in some cases 3 stops and the results look still very good. The last image for example was shot at ISO 16000 and was pushed in LR by 1.5 stops and it is still very usable.
In general, because of all the action I had to shoot at 1/250 of a second. In the beginning I tried to shoot at 1/125 but that wasn’t fast enough.
I was also curious about how the autofocus would keep up. I shot mostly in af-c single field and that worked alright. I also tried using af-s single field but that wasn’t ideal because of all the fast-paced action. Yes, I could have used face detection but I am pretty sure that that would have not worked that well.
In front of the lens I used a Black Pro Mist 1/4 filter and all the RAW files were processed in LR.
Enough talking, here are the images.

1. 1/125 - f/1.7 - ISO1600

2. 1/125 - f/1.7 - ISO1250

3. 1/250 - f/1.7 - ISO4000

4. 1/250 - f/1.7 - ISO800

5. 1/250 - f/1.7 - ISO2000

6. 1/250 - f/1.7 - ISO640

7. 1/250 - f/1.7 - ISO800

8. 1/250 - f/1.7 - ISO2000
9. 1/250 - f/1.7 - ISO5000

10. 1/250 - f/1.7 - ISO2000

11. 1/250 - f/1.7 - ISO4000
12. 1/250 - f/1.7 - ISO1600

13. 1/250 - f/1.7 - ISO2000

14. 1/250 - f/1.7 - ISO1000
15. 1/250 - f/1.7 - ISO16000

Shooting The Notting Hill Carnival With The Q2M
Shooting street photography at the Notting Hill Carnival with the Leica Q2 Monochrom
Sometimes good things happen very unexpected and that is one thing that makes life as exciting as it is.
So, while I was in London for my street photography workshop someone told me that there was a big event going down and it happened to be the world famous Notting Hill Carnival. I’ve heard about it before but I had no idea how big that event gets and that it attracts more than a million people each year. Of course, it was at the same time as the workshop but it was also a great opportunity to shoot and luckily my students thought the same way.
On Sunday early afternoon we went and were greeted by an overwhelmingly big crowd. It took a litte to get into the groove but then it was a lot of fun to shoot. We focused mainly on the parade which went on for a long time and after 4 or 5 hours we left the place because the noise and the massive crowd were tiring and we were starting to get very hungry and also the toilets were a little gross to say the least.
I only had the Leica Q2 Monochrom with me and my little flash that came very handy that afternoon. Well, some might think that it isn’t a good idea to shoot such a colorful event in black and white but I’d disagree. To me, the colors were a little too much and distracting and especially with the flash the photos came out great in monochrome.
Normally, I use a color filter on my Q2M but this time I was shooting without any filters and if you are wondering why I was shooting at ISO800…. simply because I wanted to give the flash an easier time. I was shooting at 1/8 power and the batteries lasted all day long for a couple hundred photos.
The good thing about the Q2(M) is the leaf shutter that makes it very easy to control the ambient light because the camera can sync the flash at any given speed up to 1/2000.
My aperture was set to f/16 to get as much in focus as possible because there was so much going on and I wanted to get very close. And of course I was using manual focus which was set to 1m for most of the shots.

1. 1/500 - f/16 - ISO400

2. 1/1000 - f/16 - ISO800

3. 1/500 - f/16 - ISO400

4. 1/500 - f/16 - ISO400

5. 1/1000 - f/16 - ISO800

6. 1/1000 - f/16 - ISO800

7. 1/500 - f/16 - ISO800

8. 1/500 - f/16 - ISO800

9. 1/1000 - f/16 - ISO800

10. 1/1000 - f/16 - ISO800

11. 1/1000 - f/16 - ISO800

12. 1/500 - f/16 - ISO400
13. 1/500 - f/16 - ISO800

14. 1/1000 - f/16 - ISO800

15. 1/500 - f/16 - ISO400

16. 1/1000 - f/16 - ISO800

17. 1/1000 - f/16 - ISO800

18. 1/1000 - f/16 - ISO800

19. 1/1000 - f/16 - ISO800

20. 1/1000 - f/16 - ISO800

21. 1/1000 - f/16 - ISO800

22. 1/1000 - f/16 - ISO800

23. 1/1000 - f/16 - ISO800

24. 1/1000 - f/16 - ISO800

25. 1/1000 - f/16 - ISO800

26. 1/1000 - f/16 - ISO800

27. 1/1000 - f/16 - ISO800

28. 1/1000 - f/16 - ISO800

29. 1/1000 - f/16 - ISO800
30. 1/1000 - f/16 - ISO800

31. 1/1000 - f/16 - ISO800

Was It Worth It To Get Up This Early?
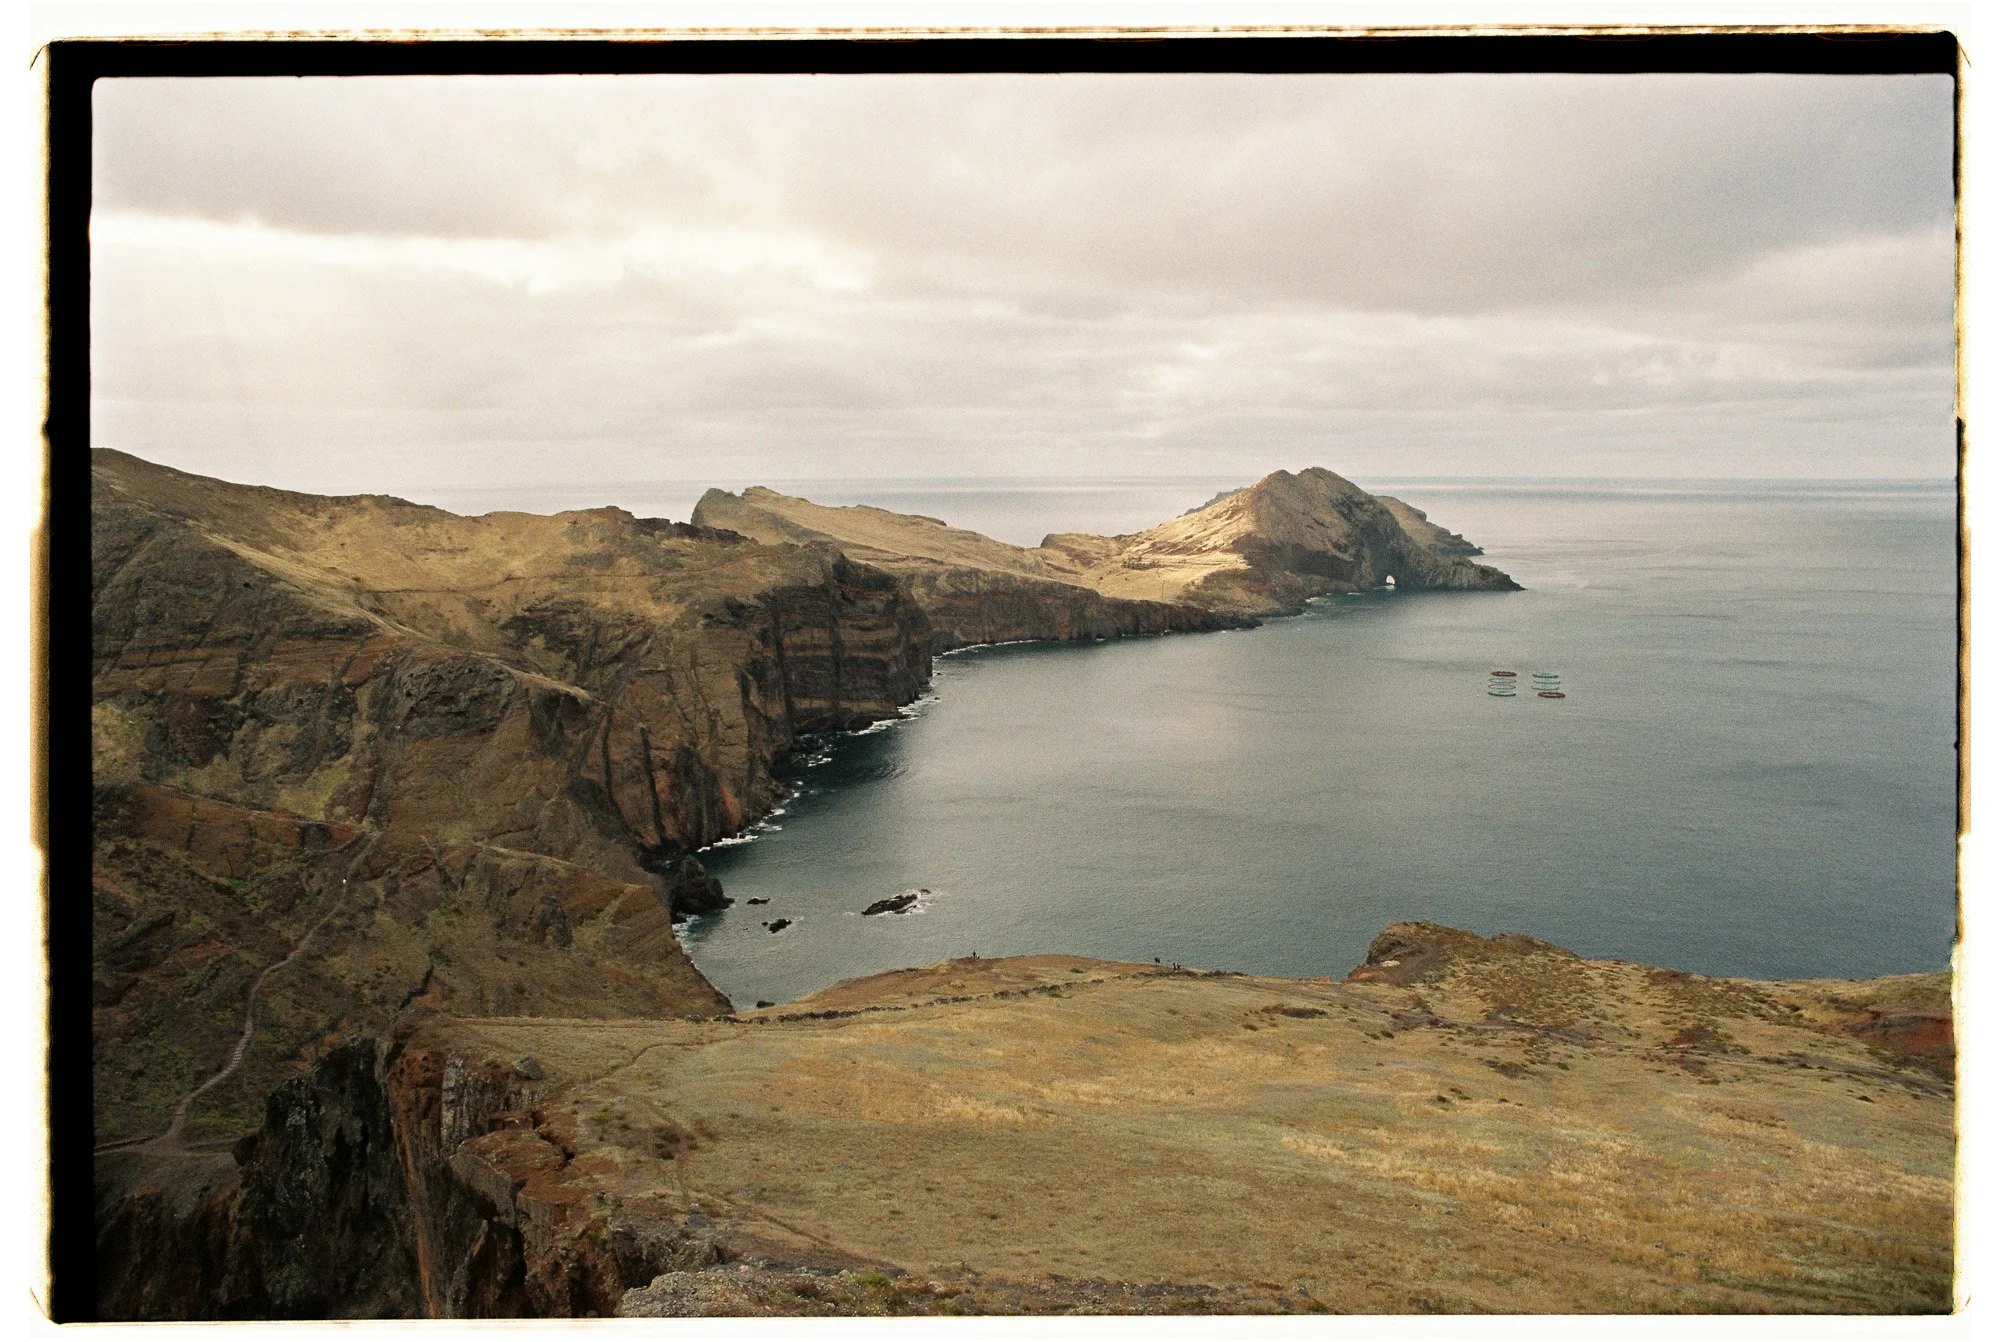
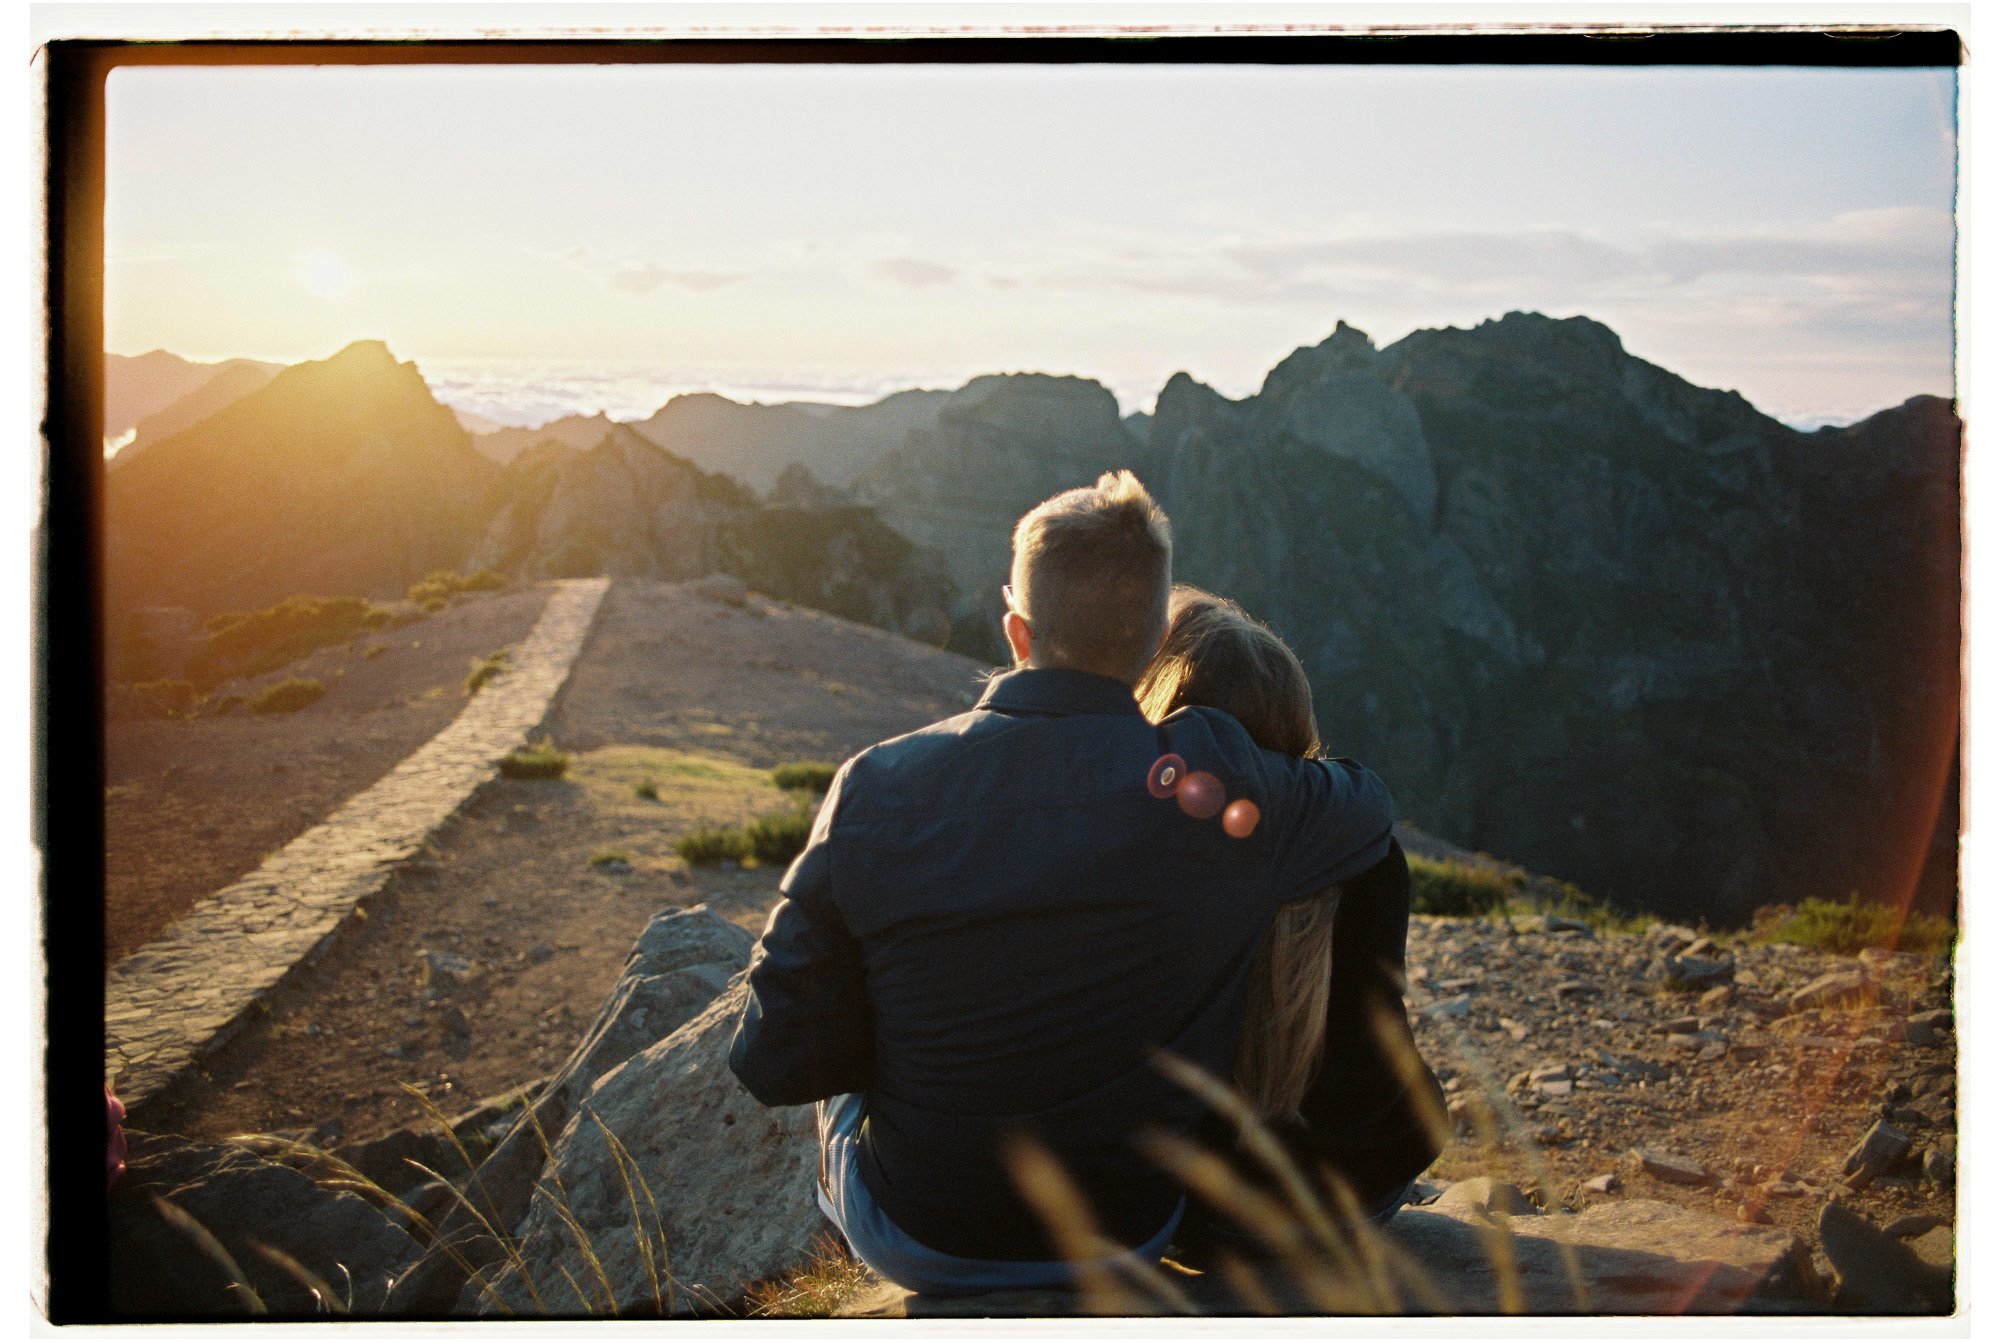
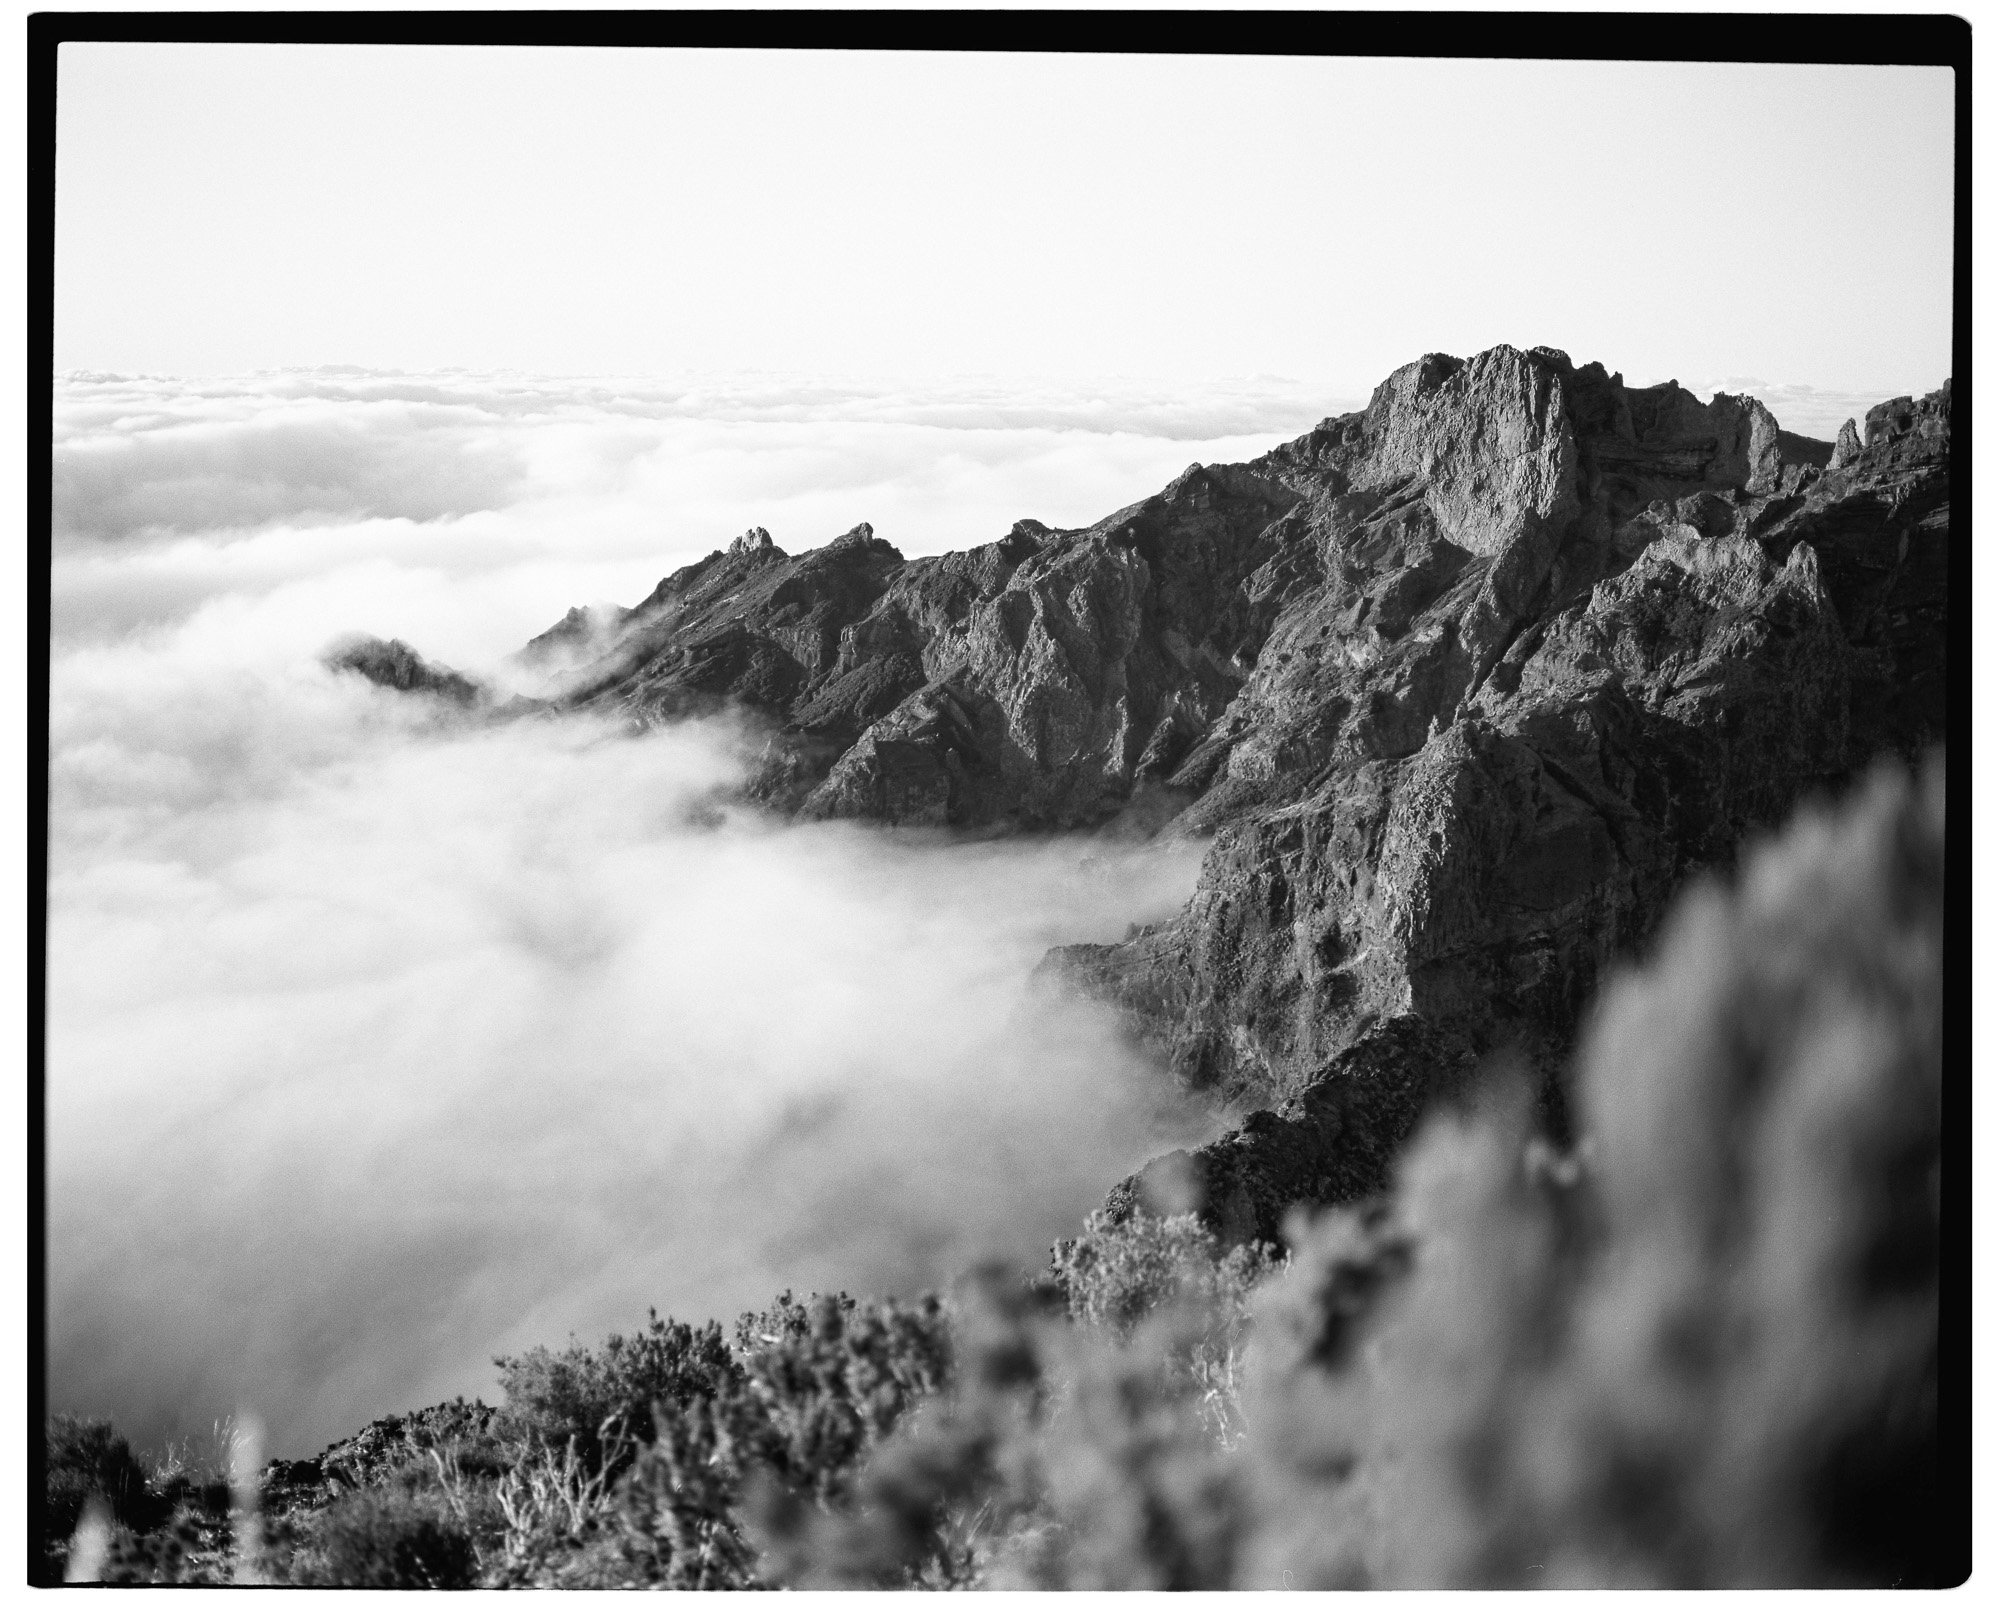
Early on during my trip to Madeira we went to place in the east of the island to watch the sunrise and it was absolutely beautiful. But back then I had no time to shoot a video or take photos on film. However, I wanted to go back there after finishing my assignment and I did. But that meant to get up super early because it was a 30 minute drive and the sunrise was very early in the morning. After arriving I wasn’t very hopeful that the sunrise would be any good and even though my app told me differently it was overcast the whole time. Nevertheless, the scenery looked stunning and the sky was somewhat dramatic. Despite the lack of sun, the photos turned out great again. On this day I only shot Fujifilm stocks. My GF670 was loaded up with Pro400H and later with Acros 100 and in my Olympus OM2n was a roll of Venus 800. Developing and scanning was again done by Carmencita!

1. Fuji GF670 - Fujifilm Pro400H

2. Olympus OM2n - 28mm f/2 - Fujifilm Venus 800
3. Fuji GF670 - Fujifilm Pro400H

4. Olympus OM2n - 28mm f/2 - Fujifilm Venus 800

5. Fuji GF670 - Fujifilm Pro400H

6. Fuji GF670 - Fujifilm Pro400H

7. Fuji GF670 - Fujifilm Pro400H

8. Fuji GF670 - Fujifilm Pro400H

9. Fuji GF670 - Fujifilm Pro400H

10. Olympus OM2n - 28mm f/2 - Fujifilm Venus 800

11. Fuji GF670 - Fujifilm Pro400H

12. Fuji GF670 - Fujifilm Acros 100

13. Fuji GF670 - Fujifilm Acros 100

14. Fuji GF670 - Fujifilm Acros 100

15. Olympus OM2n - 28mm f/2 - Fujifilm Venus 800

16. Olympus OM2n - 28mm f/2 - Fujifilm Venus 800

17. Olympus OM2n - 28mm f/2 - Fujifilm Venus 800

18. Fuji GF670 - Fujifilm Acros 100

19. Olympus OM2n - 28mm f/2 - Fujifilm Venus 800

20. Olympus OM2n - 28mm f/2 - Fujifilm Venus 800

21. Fuji GF670 - Fujifilm Acros 100

22. Olympus OM2n - 28mm f/2 - Fujifilm Venus 800

23. Olympus OM2n - 28mm f/2 - Fujifilm Venus 800
24. Olympus OM2n - 28mm f/2 - Fujifilm Venus 800

25. Fuji GF670 - Fujifilm Acros 100

26. Fuji GF670 - Fujifilm Acros 100

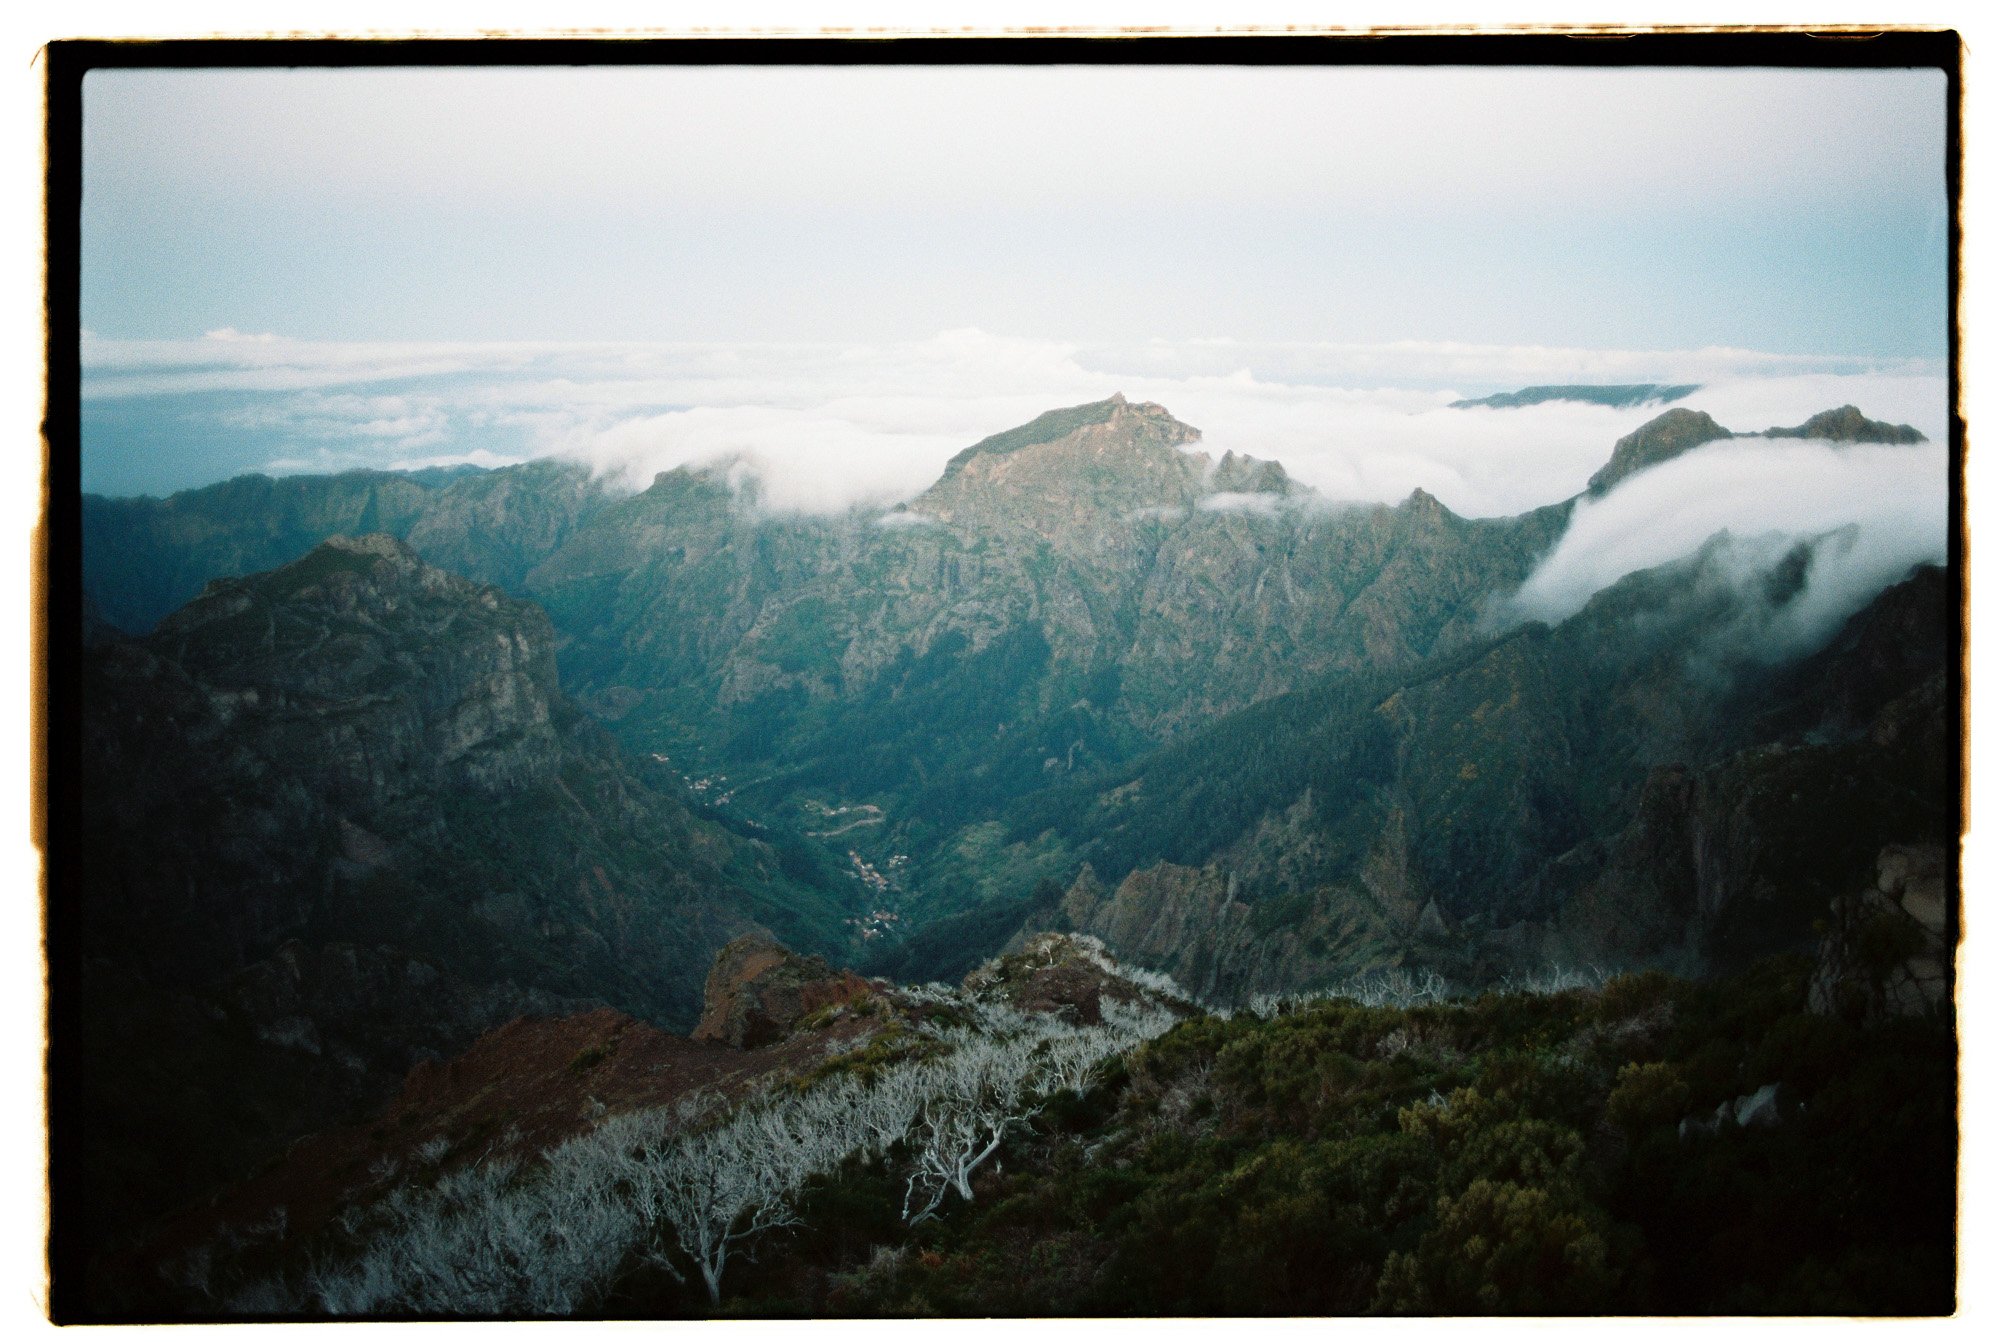
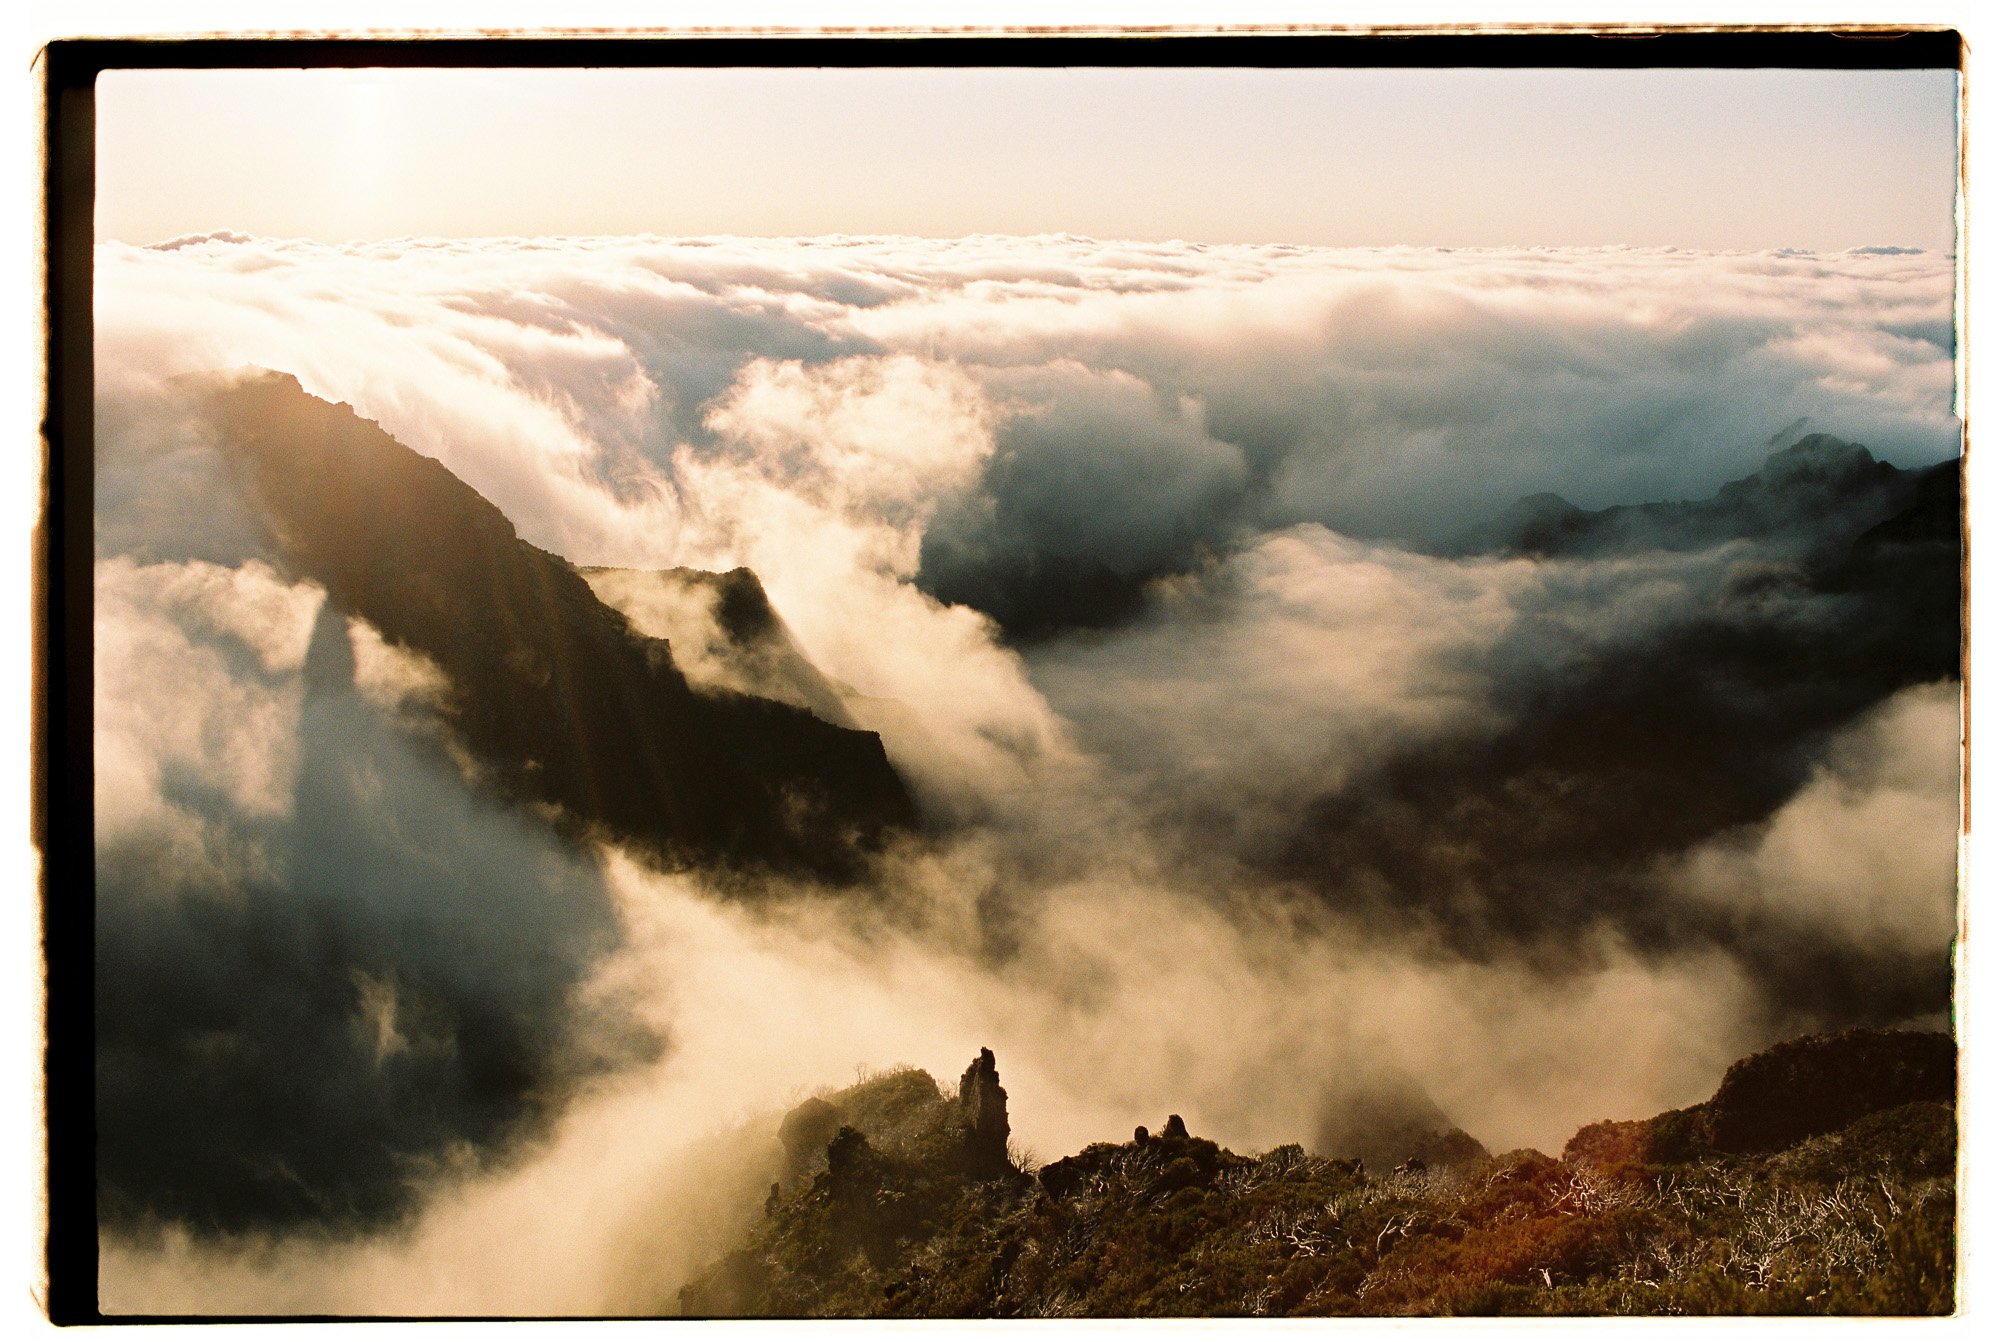
On The Road Shooting Film
After the the challenge shooting the sunrise over the clouds it was time to hit the road to find other beautiful spots on Madeira. Unfortunately though, the weather or more specifically the lighting wasn’t on my side and it was mostly overcast. However, the scenery was still lovely and after several attempts to see and capture a beautiful sunset it finally happened on top of a mountain again. This time it was the second highest peak which is almost as tall as Pico Ruivo. My Olympus OM2n was still loaded up with Kodak Portra 400 and in my Fujifilm GF670 I shot a roll of Kodak Ektar 100 and later some Portra 800.
Again, thanks to Carmencita the scans came out nicely!

1. Olympus OM2n - 28mm f/2 - Kodak Portra 400

2. Fuji GF670 - Kodak Hektar 100

3. Olympus OM2n - 28mm f/2 - Kodak Portra 400

4. Fuji GF670 - Kodak Hektar 100

5. Fuji GF670 - Kodak Portra 800

6. Olympus OM2n - 28mm f/2 - Kodak Portra 400

7. Olympus OM2n - 28mm f/2 - Kodak Portra 400

8. Fuji GF670 - Kodak Portra 800
9. Olympus OM2n - 28mm f/2 - Kodak Portra 400

10. Fuji GF670 - Kodak Portra 800

11. Fuji GF670 - Kodak Portra 800

12. Fuji GF670 - Kodak Portra 800

13. Fuji GF670 - Kodak Portra 800

14. Fuji GF670 - Kodak Portra 800

15. Olympus OM2n - 28mm f/2 - Kodak Portra 400

16. Fuji GF670 - Kodak Portra 800

17. Olympus OM2n - 28mm f/2 - Kodak Portra 400

Trying Myself As A Landscape Photographer On Madeira
Back in May this year, I had the opportunity to go to the Island of Madeira for a photography job. It’s not a place I usually go since there isn’t much going on in terms of street photography but since the landscape is so beautiful, I had the idea that I could try myself as a landscape photographer. I had two film camera with me and a bunch of film ready to be shot. In this case I loaded up some expired Kodak Portra 100T into my Fuji GF670 medium format camera and some Portra 400 into my Olympus OM2n. The expired film was overexposed by a couple of shots and it turned better than expected. Also the roll of Fujifilm Across 100 looks amazing. One reason is probably also the fact that Carmencita did such an amazing job developing and scanning my rolls.

1. Fuji GF670 - Kodak Portra 100T
2. Olympus OM2n - 28mm f/2 - Kodak Portra 400

3. Fuji GF670 - Kodak Portra 100T

4. Fuji GF670 - Kodak Portra 100T

5. Olympus OM2n - 28mm f/2 - Kodak Portra 400

6. Fuji GF670 - Fujifilm Acros 100

7. Olympus OM2n - 28mm f/2 - Kodak Portra 400

8. Olympus OM2n - 28mm f/2 - Kodak Portra 400
9. Olympus OM2n - 28mm f/2 - Kodak Portra 400

10. Fuji GF670 - Kodak Portra 100T

11. Olympus OM2n - 28mm f/2 - Kodak Portra 400

12. Fuji GF670 - Fujifilm Acros 100

13. Olympus OM2n - 28mm f/2 - Kodak Portra 400

14. Olympus OM2n - 28mm f/2 - Kodak Portra 400

15. Olympus OM2n - 28mm f/2 - Kodak Portra 400

16. Olympus OM2n - 28mm f/2 - Kodak Portra 400

17. Olympus OM2n - 28mm f/2 - Kodak Portra 400

18. Fuji GF670 - Fujifilm Acros 100

19. Fuji GF670 - Fujifilm Acros 100
20. Fuji GF670 - Fujifilm Acros 100

21. Fuji GF670 - Fujifilm Acros 100

Shooting The “Digital” X-Pan In Istanbul
A digital version of the Hasselblad X-Pan is probably a camera that a lot of people are dreaming of. Well, let's find out how it would feel to shoot that camera. My Lumix S5 has a 65x24 crop mode which is the same aspect ratio the X-Pan shoots in. When opening the RAWs in Lightroom the crop will still be there but of course you could change that afterwards, which I didn't do in this case. It would be amazing if some camera brand would stick two 35mm sensors together and release that as a digital X-Pan. Or even two APS-C size sensors which would already be really nice but I don't think that this will ever happen.

1. 1/250 - f/4- ISO250

2. 1/250 - f/4- ISO400

3. 1/250 - f/4- ISO250
4. 1/250 - f/9- ISO640

5. 1/250 - f/9- ISO500

6. 1/250 - f/4- ISO160

7. 1/320 - f/4- ISO100

8. 1/250 - f/4- ISO200

9. 1/250 - f/4- ISO320

10. 1/250 - f/4- ISO500

11. 1/250 - f/4- ISO320

12. 1/250 - f/4- ISO500

13. 1/250 - f/4- ISO100

14. 1/250 - f/4- ISO320
15. 1/250 - f/4- ISO100

16. 1/320 - f/4- ISO100

17. 1/400 - f/4- ISO100

18. 1/250 - f/4- ISO125

19. 1/250 - f/4- ISO200

20. 1/250 - f/4- ISO100

21. 1/1600 - f/4- ISO400

22. 1/250 - f/4- ISO1000

23. 1/800 - f/4- ISO250

24. 1/250 - f/4- ISO160

25. 1/2500 - f/4- ISO100

26. 1/400 - f/4- ISO100

27. 1/320 - f/4- ISO100

28. 1/500 - f/4- ISO100

29. 1/1250 - f/4- ISO100

Shooting Street Photography At Night In Acapulco. Stupid Idea?
After a week in Mexico City I headed back to Acapulco and I wanted to shoot an episode at night. I’ve mentioned it in an older blog-post that the city is considered to be one of the unsafest in Mexico or even in the whole world. Nevertheless, I wanted to give it a try and to be honest, it went very well without any issues.
Again I was shooting the Leica Q2 Monochrom with a Black Pro Mist 1/4 filter. If you look at the ISOs under the photos, they look crazy high but in reality I wasn’t pushing the ISO that much. As you might know, in order to preserve the highlights, you have to underexpose in high contrast situations and bring up the shadows later in post. For instance when I shoot an image at ISO3,200 and it is underexposed by 2 stops and then I add these two stops later in Lighroom, the photo will look almost the same as shooting it at ISO12,800 without underexposing the image. Though, the big advantage is that you can safe the highlights from being blown out which is especially important when shooting a monochrome sensor.
The reason I am mentioning this is because the ISO values you see under the photos represent the settings I was shooting the image plus the adjustments later in Lightroom in case I did any. This way it makes way more sense than just giving you the ISOs without the information about the post processing.
Even after using this camera for almost 1,5 years it still blows me away how far you can push these files and how clean absurd high ISO can look.

1. 1/250- f/1.7- ISO40,000

2. 1/250- f/1.7- ISO12,500

3. 1/250- f/1.7- ISO50,000

4. 1/250- f/1.7- ISO80,000

5. 1/250- f/1.7- ISO50,000

6. 1/250- f/1.7- ISO6,400

7. 1/60- f/1.7- ISO20,000

8. 1/15- f/1.7- ISO6,400
9. 1/60- f/1.7- ISO12,500

10. 1/60- f/1.7- ISO12,500

11. 1/125- f/1.7- ISO10,000

12. 1/60- f/1.7- ISO20,000

13. 1/125- f/1.7- ISO12,500

14. 1/125- f/1.7- ISO50,000

15. 1/60- f/1.7- ISO12,500

16. 1/8- f/1.7- ISO1,600

17. 1/125- f/1.7- ISO12,500

18. 1/250- f/1.7- ISO10,000

19. 1/250- f/1.7- ISO12,500

20. 1/250- f/1.7- ISO20,000

21. 1/60- f/1.7- ISO10,000

22. 1/125- f/1.7- ISO20,000

23. 1/125- f/1.7- ISO12,500

24. 1/125- f/1.7- ISO12,500
25. 1/30- f/1.7- ISO10,000

My New Film Camera Is Awesome!
When I was in Mexico City I was checking out some local camera shops with my friend Alejandro. That day I couldn’t find anything that I was interested in or the prices where too wild. However, a few days later I spotted a camera that I hadn’t seen in that shop before. The guy told me that it just came back from service and the camera comes with a 50mm f/1.8 and also a 28mm f/2.8. After trying out the camera I couldn’t resist and I pulled the trigger.
The camera I am talking about is a Olympus OM2n in pristine condition. After buying the camera I put in some Portra 160 that the guy in the shop gifted me and I shot an episode. The video wasn’t planned but sometimes that’s the way it goes.
As always, processing and scanning was done by my favorite lab Carmencita and they did a terrific job.

1. Olympus OM2n - 28mm

2. Olympus OM2n - 50mm

3. Olympus OM2n - 28mm

4. Olympus OM2n - 28mm

5. Olympus OM2n - 28mm

6. Olympus OM2n - 28mm

7. Olympus OM2n - 28mm

8. Olympus OM2n - 28mm

9. Olympus OM2n - 28mm

10. Olympus OM2n - 28mm

11. Olympus OM2n - 28mm

12. Olympus OM2n - 28mm

13. Olympus OM2n - 28mm

14. Olympus OM2n - 28mm

15. Olympus OM2n - 28mm

16. Olympus OM2n - 28mm

17. Olympus OM2n - 28mm

18. Olympus OM2n - 28mm

19. Olympus OM2n - 28mm

20. Olympus OM2n - 28mm

21. Olympus OM2n - 28mm

22. Olympus OM2n - 28mm

23. Olympus OM2n - 28mm

24. Olympus OM2n - 28mm

25. Olympus OM2n - 50mm

26. Olympus OM2n - 50mm

27. Olympus OM2n - 50mm
Shooting Street Photography in Mexico City’s most notorious neighborhood.
It’s Sunday afternoon and what would your normally do in Mexico City? Of course, you go to Tepito and do a little bit of street photography. 😁 I’ve heard many stories about that place and in general people will tell you that is not an area you should go to, especially when carrying an expensive camera around your neck. Nevertheless, when my buddy Alejandro told me about this flea market we could check out which is located right next to Tepito I said sure, let’s go. Already on the way there, Alejandro told me that we have to be careful and keep an eye open because of potential thieves. Which makes sense, since the place was packed with people and there is always the chance that somebody might take advantage of the situation.
After walking around for a while we then ended up in Tepito and there were no tourists around at all and we got some funny looks. It didn’t feel dangerous in any way but we felt that it probably wouldn’t be a wise idea to stick around for too long. Besides that it was so busy that it wasn’t too much fun shooting there either.
In the end, we had a fun afternoon shooting in Mexico City and I would say that the mission was a success.

1. 1/1000 - f/1.7- ISO250

2. 1/1250 - f/1.7- ISO200

3. 1/1000 - f/1.7- ISO1250

4. 1/1000 - f/1.7- ISO250

5. 1/1000 - f/1.7- ISO200

6. 1/1250 - f/1.7- ISO200

7. 1/2500 - f/1.7- ISO200

8. 1/1000 - f/1.7- ISO400

9. 1/1000 - f/1.7- ISO500

10. 1/1000 - f/1.7- ISO320

11. 1/1000 - f/1.7- ISO250

12. 1/1000 - f/1.7- ISO320

13. 1/1000 - f/1.7- ISO200

14. 1/1000 - f/1.7- ISO200
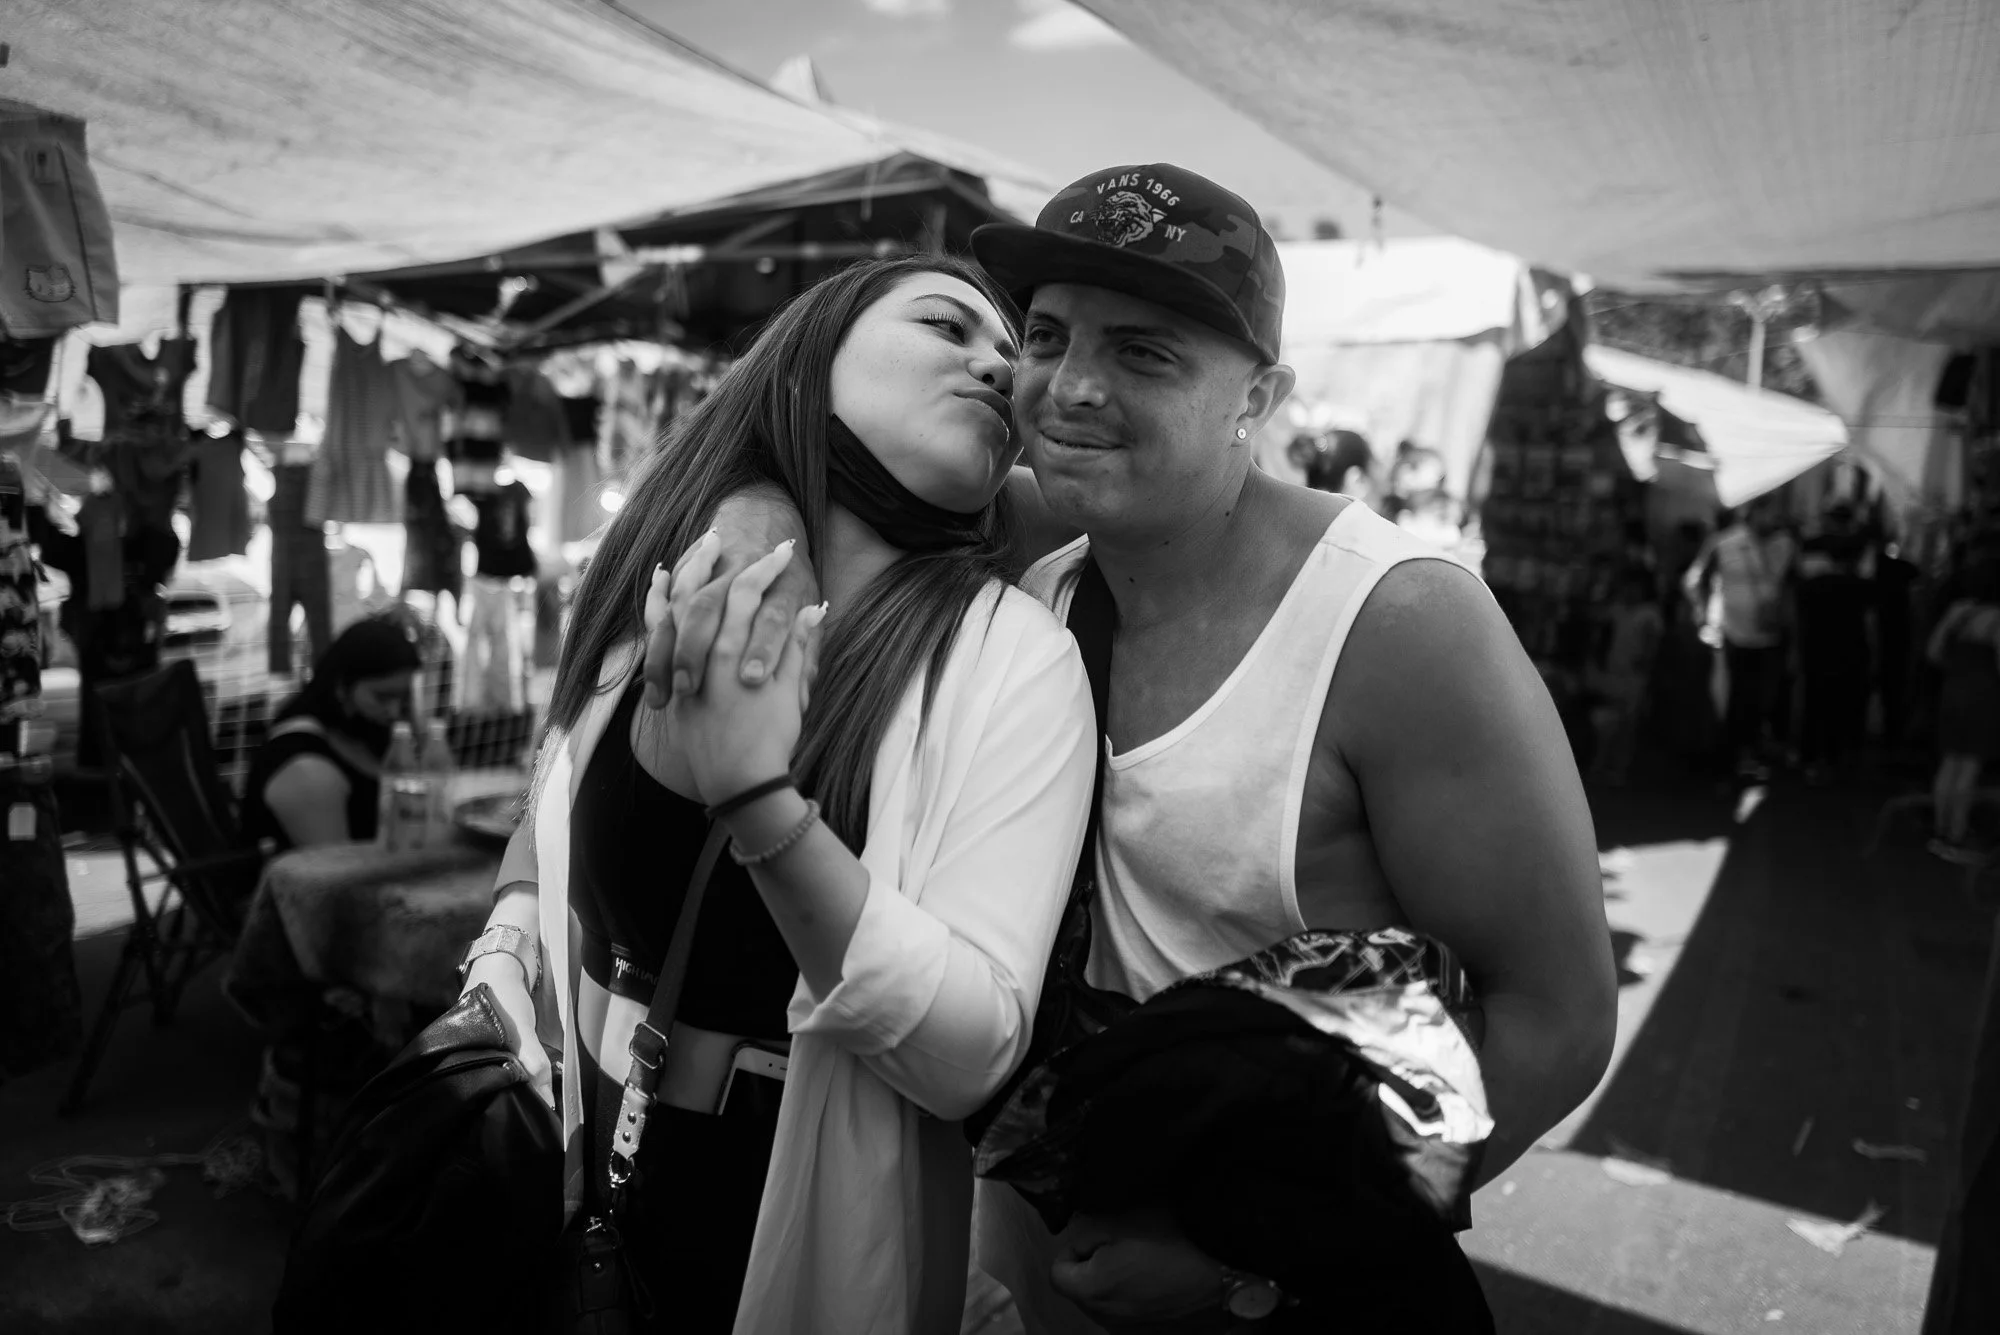
15. 1/1000 - f/1.7- ISO320

16. 1/1600 - f/1.7- ISO200

17. 1/1000 - f/1.7- ISO250
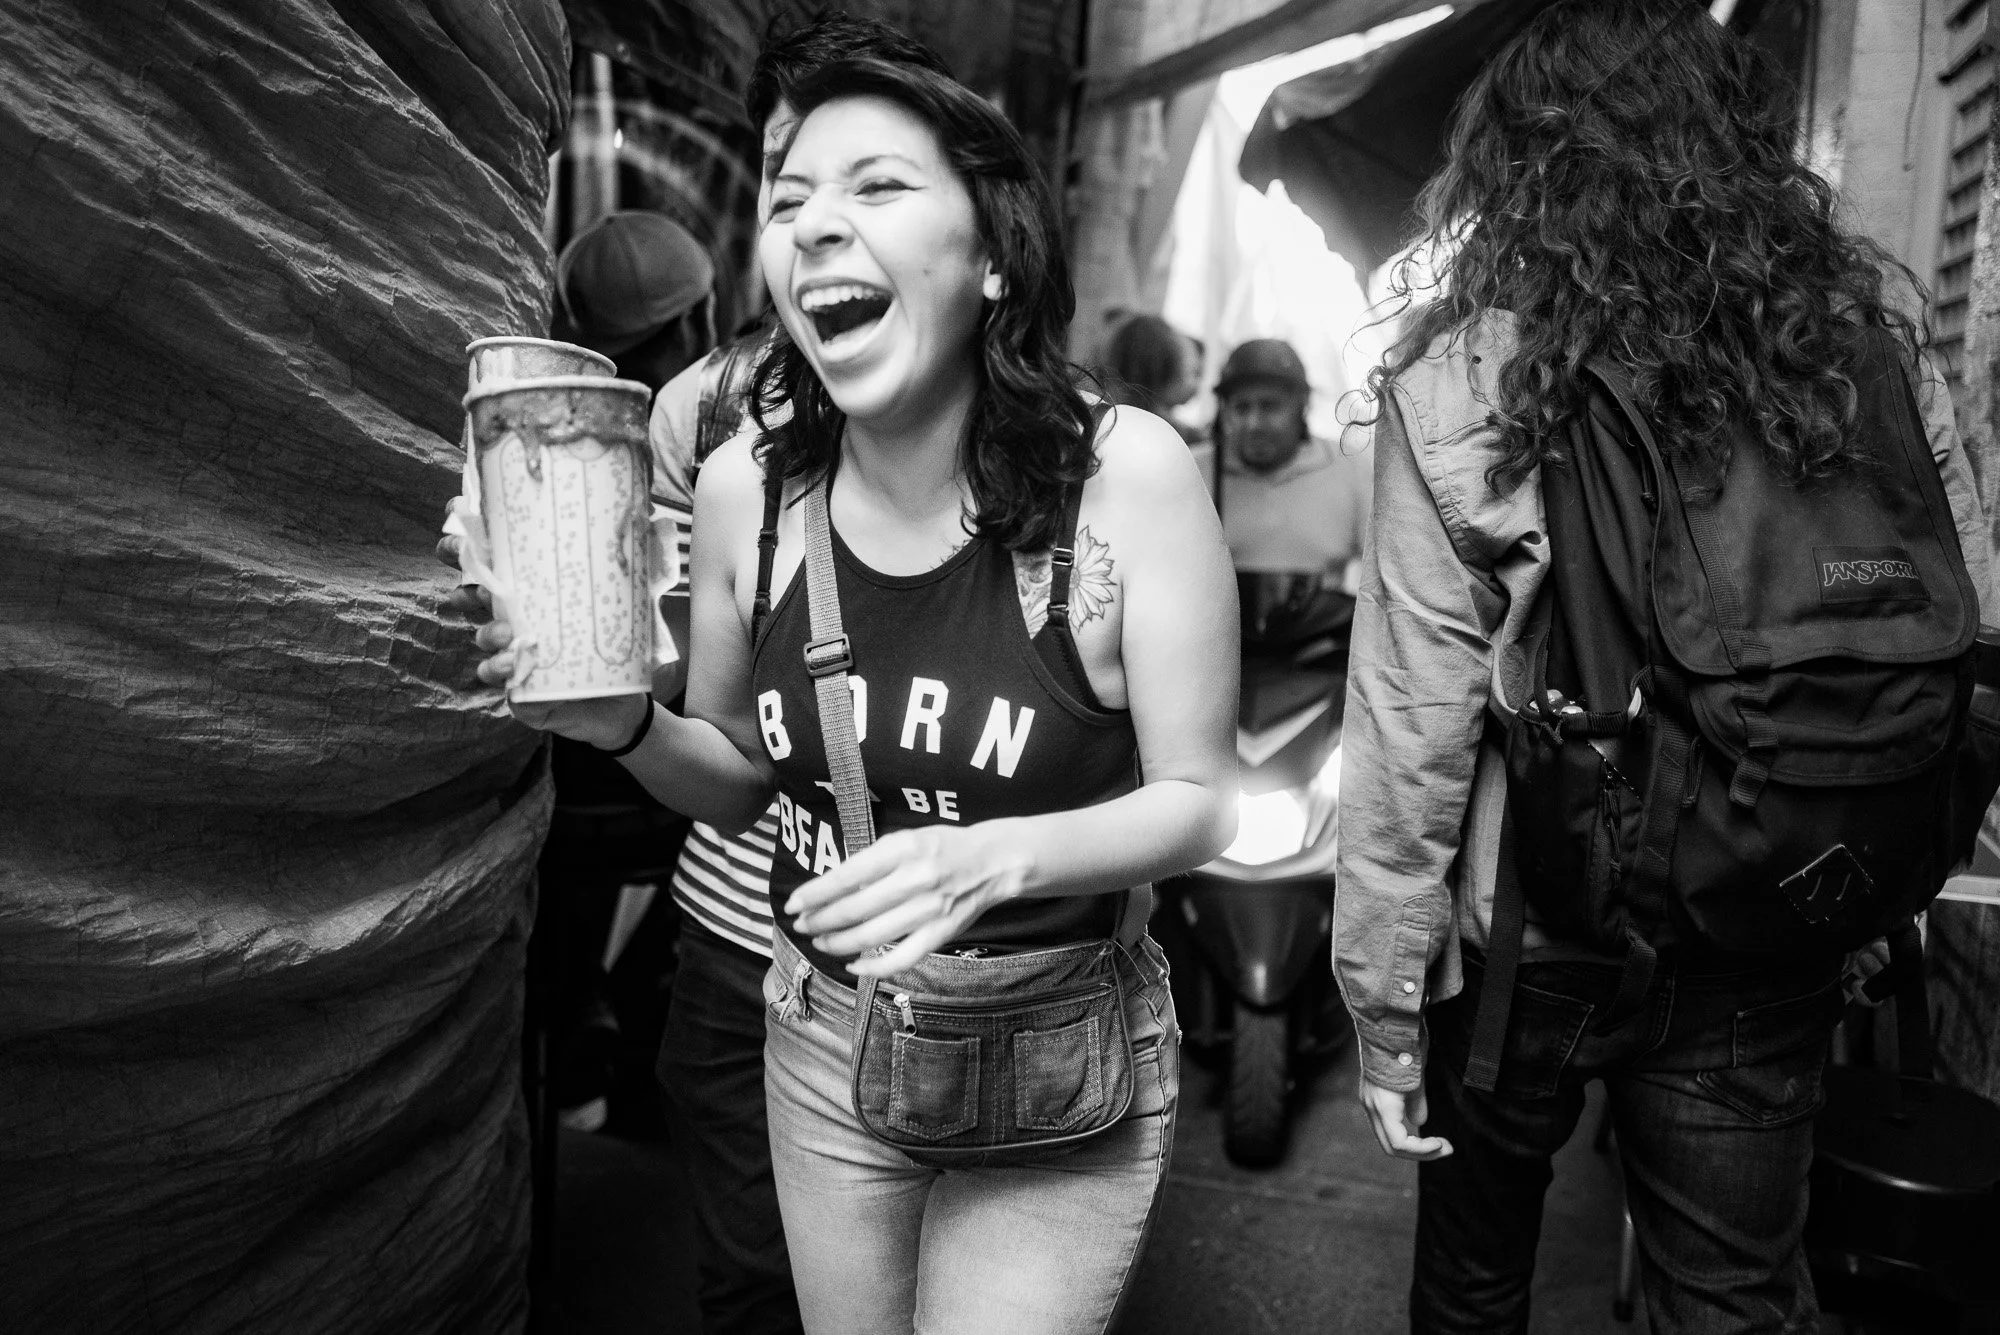
18. 1/1000 - f/1.7- ISO3200

19. 1/1000 - f/1.7- ISO800

20. 1/1000 - f/1.7- ISO640

21. 1/1000 - f/1.7- ISO1000

22. 1/1000 - f/1.7- ISO1600

23. 1/1000 - f/1.7- ISO1000

24. 1/1000 - f/1.7- ISO400

25. 1/1250 - f/1.7- ISO200

26. 1/1000 - f/1.7- ISO200